自动化预配是一个快速部署和配置运行 Azure 数据资源管理器群集所需的资源的过程。 这是 DevOps 或 DataOps 工作流的关键部分。 预配过程不需要手动配置群集,不需要人工干预,并且易于设置。
可使用自动预配来部署包含数据的预配置群集,作为持续集成和持续交付 (CI/CD) 管道的一部分。 这样做的一些主要优势包括:
- 定义和维护多个环境。
- 在源代码管理中跟踪部署。
- 更轻松地回滚到早期版本。
- 通过预配专用测试环境简化自动测试。
本文概述了用于自动预配 Azure 数据资源管理器环境的各种机制,包括 基础结构、架构实体和数据引入。 它还提供了用于自动执行预配过程的各种工具和技术的参考。

部署基础结构
基础结构部署涉及群集、数据库和数据连接等 Azure 资源的部署。 基础结构部署有多种不同的类型,包括:
ARM 模板和 Terraform 脚本是部署 Azure 数据资源管理器基础结构的两种主要的声明性方式。
ARM 模板部署
ARM 模板是 JSON 或 Bicep 文件,用于定义部署的基础结构和配置。 你可使用这些模板来部署群集、数据库、数据连接和许多其他基础结构组件。 有关详细信息,请参阅使用 Azure 资源管理器模板创建 Azure 数据资源管理器群集和数据库。
你还可使用 ARM 模板部署命令脚本,这些脚本可帮助你创建数据库架构和定义策略。 有关详细信息,请参阅使用 Kusto 查询语言脚本配置数据库。
可以在 Azure 快速启动模板网站上找到更多示例模板。
Terraform 部署
Terraform 是一种开源基础结构即代码软件工具。 它提供一致的 CLI 工作流来管理云服务。 Terraform 可将云 API 编码成声明性的配置文件。
Terraform 提供与 ARM 模板相同的功能。 可使用 Terraform 部署群集、数据库、数据连接和其他基础结构组件。
你还可使用 Terraform 部署命令脚本,这些脚本可帮助你创建数据库架构和定义策略。
命令式部署
也可使用任何支持的平台以命令性方法部署基础结构:
部署架构实体
架构实体预配涉及表、函数、策略和权限的部署。 可运行包含管理命令的脚本来创建或更新实体。
可使用以下方法自动部署架构实体:
- ARM 模板
- Terraform 脚本
- Kusto CLI
- SDK
- 工具
- 同步 Kusto。 使用此交互式开发人员工具来提取数据库架构或管理命令脚本。 然后,可将提取的内容命令脚本用于自动部署。
- Delta Kusto:在 CI/CD 管道中调用此工具。 它可比较两个源,例如数据库架构或管理命令脚本,并计算增量管理命令脚本。 然后,可将提取的内容命令脚本用于自动部署。
引入数据
有时需要将数据引入群集。 例如,你可能想要引入数据来运行测试或重新创建环境。 可使用以下方法来引入数据:
- SDK
- LightIngest CLI 工具
- 触发 Azure 数据工厂管道
使用 CI/CD 管道的部署示例
在以下示例中,你将使用运行工具的 Azure DevOps CI/CD 管道来自动部署基础结构、架构实体和数据。 这是使用一组特定工具的管道的一个示例,但你可使用其他工具和步骤。 例如,在生产环境中,你可能想要创建一个不引入数据的管道。 还可向管道添加更多步骤,例如在创建的群集上运行自动测试。
在这里,你将使用以下工具:
| 部署类型 | 工具 | 任务 |
|---|---|---|
| 基础结构 | ARM 模板 | 创建群集和数据库 |
| 架构实体 | Kusto CLI | 在数据库中创建表 |
| 数据 | LightIngest | 将数据引入表中 |

使用以下步骤来创建管道。
步骤 1:创建服务连接
定义 Azure 资源管理器类型的服务连接。 将连接指向要将群集部署到的订阅和资源组。 创建 Azure 服务主体后,你将使用它来部署 ARM 模板。 可使用该主体部署架构实体和引入数据。 必须将凭据显式传递到 Kusto CLI 和 LightIngest 工具。
步骤 2:创建管道
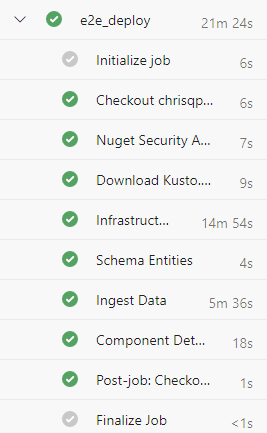
定义将用于部署群集、创建架构实体和引入数据的管道 (deploy-environ)。
必须先创建以下机密变量,然后才能使用管道:
| 变量名称 | 说明 |
|---|---|
clusterName |
Azure 数据资源管理器群集的名称。 |
serviceConnection |
用于部署 ARM 模板的 Azure DevOps 连接的名称。 |
appId |
用于与群集进行交互的服务主体的客户端 ID。 |
appSecret |
服务主体的机密。 |
appTenantId |
服务主体的租户 ID。 |
location |
要在其中部署群集的 Azure 区域。 例如,chinaeast2。 |
resources:
- repo: self

stages:
- stage: deploy_cluster
  displayName: Deploy cluster
  variables: []
    clusterName: specifyClusterName
    serviceConnection: specifyServiceConnection
    appId: specifyAppId
    appSecret: specifyAppSecret
    appTenantId: specifyAppTenantId
    location: specifyLocation
  jobs:
  - job: e2e_deploy
    pool:
      vmImage: windows-latest
    variables: []
    steps:
    - bash: |
        nuget install Microsoft.Azure.Kusto.Tools -Version 5.3.1
        # Rename the folder (including the most recent version)
        mv Microsoft.Azure.Kusto.Tools.* kusto.tools
      displayName: Download required Kusto.Tools Nuget package
    - task: AzureResourceManagerTemplateDeployment@3
      displayName: Deploy Infrastructure
      inputs:
        deploymentScope: 'Resource Group'
        # subscriptionId and resourceGroupName are specified in the serviceConnection
        azureResourceManagerConnection: $(serviceConnection)
        action: 'Create Or Update Resource Group'
        location: $(location)
        templateLocation: 'Linked artifact'
        csmFile: deploy-infra.json
        overrideParameters: "-clusterName $(clusterName)"
        deploymentMode: 'Incremental'
    - bash: |
        # Define connection string to cluster's database, including service principal's credentials
        connectionString="https://$(clusterName).$(location).kusto.chinacloudapi.cn/myDatabase;Fed=true;AppClientId=$(appId);AppKey=$(appSecret);TenantId=$(appTenantId)"
        # Execute a KQL script against the database
        kusto.tools/tools/Kusto.Cli $connectionString -script:MyDatabase.kql
      displayName: Create Schema Entities
    - bash: |
        connectionString="https://ingest-$(CLUSTERNAME).$(location).kusto.chinacloudapi.cn/;Fed=true;AppClientId=$(appId);AppKey=$(appSecret);TenantId=$(appTenantId)"
        kusto.tools/tools/LightIngest $connectionString -table:Customer -sourcePath:customers.csv -db:myDatabase -format:csv -ignoreFirst:true
      displayName: Ingest Data
步骤 3:创建用于部署群集的 ARM 模板
定义用于将群集部署到订阅和资源组的 ARM 模板 (deploy-infra.json)。
{
    "$schema": "https://schema.management.azure.com/schemas/2019-04-01/deploymentTemplate.json#",
    "contentVersion": "1.0.0.0",
    "parameters": {
        "clusterName": {
            "type": "string",
            "minLength": 5
        }
    },
    "variables": {
    },
    "resources": [
        {
            "name": "[parameters('clusterName')]",
            "type": "Microsoft.Kusto/clusters",
            "apiVersion": "2021-01-01",
            "location": "[resourceGroup().location]",
            "sku": {
                "name": "Dev(No SLA)_Standard_E2a_v4",
                "tier": "Basic",
                "capacity": 1
            },
            "resources": [
                {
                    "name": "myDatabase",
                    "type": "databases",
                    "apiVersion": "2021-01-01",
                    "location": "[resourceGroup().location]",
                    "dependsOn": [
                        "[resourceId('Microsoft.Kusto/clusters', parameters('clusterName'))]"
                    ],
                    "kind": "ReadWrite",
                    "properties": {
                        "softDeletePeriodInDays": 365,
                        "hotCachePeriodInDays": 31
                    }
                }
            ]
        }
    ]
}
步骤 4:创建 KQL 脚本,以创建架构实体
定义将用于在数据库中创建表的 KQL 脚本 (MyDatabase.kql)。
.create table Customer(CustomerName:string, CustomerAddress:string)

//  Set the ingestion batching policy to trigger ingestion quickly
//  This is to speedup reaction time for the sample
//  Do not do this in production
.alter table Customer policy ingestionbatching @'{"MaximumBatchingTimeSpan":"00:00:10", "MaximumNumberOfItems": 500, "MaximumRawDataSizeMB": 1024}'

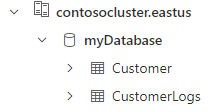
.create table CustomerLogs(CustomerName:string, Log:string)
步骤 5:创建 KQL 脚本以引入数据
创建要引入的 CSV 数据文件 (customer.csv)。
customerName,customerAddress
Contoso Ltd,Paris
Datum Corporation,Seattle
Fabrikam,NYC

通过使用在管道中指定的服务主体凭据创建群集。 要向用户授予权限,请按照管理 Azure 数据资源管理器数据库权限中的步骤进行操作。

可通过对 Customer 表运行查询来验证部署。 你应该会看到从 CSV 文件导入的三条记录。
相关内容
- 使用 Azure 资源管理器模板创建群集和数据库。
- 使用 KQL 脚本配置数据库