这是本教程系列中的第二个教程,演示如何将适用于 iOS 和 macOS 的 Microsoft 身份验证库(MSAL)添加到 iOS Swift 应用。
员工租户配置适用于员工、内部应用和其他组织资源。
在本教程中,你将:
- 将 MSAL 框架添加到 iOS (Swift) 应用。
- 创建 SDK 实例。
- 配置 Xcode 项目设置。
先决条件
- 在Microsoft Entra 管理中心注册新的客户端 Web 应用,并配置为允许任何组织目录中的帐户使用。 有关更多详细信息 ,请参阅注册应用程序 。 在应用程序 概述 页中记录以下值供以后使用:
- 应用程序(客户端)ID
- 目录(租户)ID
- Xcode。
- iOS (Swift) 项目。
添加平台重定向 URL
若要将应用类型指定到应用注册,请执行以下步骤:
- 在“管理”下,选择“身份验证”“添加平台”“iOS/macOS” 。
- 输入项目的捆绑 ID。 如果下载了代码示例,则捆绑 ID 为
com.microsoft.identitysample.MSALiOS。 若要创建自己的项目,请在 Xcode 中选择项目,然后打开“常规”选项卡。此时捆绑标识符会显示在“标识”部分。 - 选择配置并保存出现在MSAL 配置页面的MSAL 配置,以便稍后在配置应用时进行输入。
- 选择“完成”。
将 MSAL 框架添加到 iOS (Swift) 应用
选择以下方式之一在应用中安装 MSAL 库:
CocoaPods
如果使用 CocoaPods,请安装
MSAL,方法是先在项目的 .xcodeproj 文件所在的文件夹中创建名为 podfile 的空文件。 将以下内容添加到podfile:use_frameworks! target '<your-target-here>' do pod 'MSAL' end将
<your-target-here>替换为项目的名称。在终端窗口中导航到包含所创建的 podfile 的文件夹,然后运行 以安装 MSAL 库。
关闭 Xcode,然后打开
<your project name>.xcworkspace,以便在 Xcode 中重新加载项目。
迦太基
如果使用 Carthage,请安装 MSAL,只需将其添加到 Cartfile 即可:
github "AzureAD/microsoft-authentication-library-for-objc" "master"
在终端窗口中,在与更新的 Cartfile 相同的目录中,运行以下命令,让 Carthage 更新项目中的依赖项。
iOS:
carthage update --platform iOS
macOS:
carthage update --platform macOS
手动
还可使用 Git 子模块或查看最新版本,以便在应用程序中将其用作框架。
添加应用注册
接下来,我们将你的应用注册添加到代码中。
首先,将以下导入语句添加到 ViewController.swift 文件和 AppDelegate.swift 或 SceneDelegate.swift 的顶部:
import MSAL
接下来,请在 之前将以下代码添加到 viewDidLoad() 文件中:
// Update the below to your client ID. The below is for running the demo only
let kClientID = "Your_Application_Id_Here"
let kGraphEndpoint = "https://microsoftgraph.chinacloudapi.cn/" // the Microsoft Graph endpoint
let kAuthority = "https://login.partner.microsoftonline.cn/common" // this authority allows a work or school account in any organization's Azure AD tenant to sign in

let kScopes: [String] = ["https://microsoftgraph.chinacloudapi.cn/user.read"] // request permission to read the profile of the signed-in user

var accessToken = String()
var applicationContext : MSALPublicClientApplication?
var webViewParameters : MSALWebviewParameters?
var currentAccount: MSALAccount?
你修改的唯一值是被分配给 kClientID 作为你的 应用程序 ID 的值。 此值是你在本教程开头用于注册应用程序的步骤中保存的 MSAL 配置数据的一部分。
创建 SDK 实例
若要在项目中创建 MSAL 实例,请执行以下步骤:
将 ViewController 方法添加到 initMSAL 类:
    func initMSAL() throws {

        guard let authorityURL = URL(string: kAuthority) else {
            self.updateLogging(text: "Unable to create authority URL")
            return
        }

        let authority = try MSALAADAuthority(url: authorityURL)

        let msalConfiguration = MSALPublicClientApplicationConfig(clientId: kClientID, redirectUri: nil, authority: authority)
        self.applicationContext = try MSALPublicClientApplication(configuration: msalConfiguration)
        self.initWebViewParams()
    }
仍在 ViewController 类中,在 initMSAL 方法后面,添加 initWebViewParams 方法:
iOS 代码:
func initWebViewParams() {
        self.webViewParameters = MSALWebviewParameters(authPresentationViewController: self)
    }
macOS 代码:
func initWebViewParams() {
        self.webViewParameters = MSALWebviewParameters()
    }
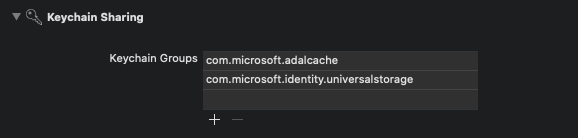
配置 Xcode 项目设置
向项目 签名和功能添加新的密钥链组。 密钥链组在 iOS 上应为 com.microsoft.adalcache,在 macOS 上应为 com.microsoft.identity.universalstorage。
仅对于 iOS,配置 URL 方案
在此步骤中需注册 CFBundleURLSchemes,以便用户在登录后可重定向回应用。 另外,LSApplicationQueriesSchemes 也允许应用使用 Microsoft Authenticator。
在 Xcode 中将 Info.plist 作为源代码文件打开,在 部分中添加以下命令。 将 [BUNDLE_ID] 替换为你之前使用的值。 如果已下载代码,则捆绑包标识符为 com.microsoft.identitysample.MSALiOS。 若要创建自己的项目,请在 Xcode 中选择项目,然后打开“常规”选项卡。此时捆绑标识符会显示在“标识”部分。
<key>CFBundleURLTypes</key>
<array>
    <dict>
        <key>CFBundleURLSchemes</key>
        <array>
            <string>msauth.[BUNDLE_ID]</string>
        </array>
    </dict>
</array>
<key>LSApplicationQueriesSchemes</key>
<array>
    <string>msauthv2</string>
    <string>msauthv3</string>
</array>
仅对于 macOS,配置应用沙盒
- 转到 Xcode 项目设置 >“功能”选项卡>“应用沙盒”
- 选中“传出连接(客户端)”复选框。