可能需要更新连接到 IoT 中心的设备上的固件。 例如,可能需要向固件添加新功能,或者需要应用安全修补程序。 在许多 IoT 方案中,以物理方式访问设备并以手动方式对设备应用固件更新是不现实的。 本教程介绍如何通过连接到中心的后端应用程序以远程方式启动并监视固件更新过程。
为了创建并监视固件更新过程,本教程中的后端应用程序在 IoT 中心创建了一个配置。 IoT 中心自动设备管理使用此配置在所有冷却器设备上更新一组设备孪生所需属性。 所需属性指定所需固件更新的详细信息。 冷却器设备在运行固件更新过程时,会使用设备孪生报告属性将其状态报告给后端应用程序。 后端应用程序可以使用此配置监视从设备发送的报告属性,并跟踪固件更新过程至完成:

在本教程中,请完成以下任务:
- 创建 IoT 中心并将测试设备添加到设备标识注册表。
- 创建用于定义固件更新的配置。
- 模拟设备上的固件更新过程。
- 在固件更新进行过程中从设备接收状态更新。
如果没有 Azure 订阅,请在开始前创建一个试用帐户。
先决条件
可以使用本地 Azure CLI。
如果需要,请安装 Azure CLI 来运行 CLI 参考命令。
本地 Azure CLI,请了解如何安装 Azure CLI。 如果在 Windows 或 macOS 上运行,请考虑在 Docker 容器中运行 Azure CLI。 有关详细信息,请参阅如何在 Docker 容器中运行 Azure CLI。
通过使用 az login 命令登录到 Azure CLI。 若要完成身份验证过程,请遵循终端中显示的步骤。 有关其他登录选项,请参阅使用 Azure CLI 登录。
出现提示时,请在首次使用时安装 Azure CLI 扩展。 有关扩展详细信息,请参阅使用 Azure CLI 的扩展。
运行 az version 以查找安装的版本和依赖库。 若要升级到最新版本,请运行 az upgrade。
本快速入门中运行的两个示例应用程序是使用 Node.js 编写的。 开发计算机上需要有 Node.js v10.x.x 或更高版本。
可从 nodejs.org 下载适用于多个平台的 Node.js。
可以使用以下命令验证开发计算机上 Node.js 当前的版本:
node --version
从 https://github.com/Azure-Samples/azure-iot-samples-node/archive/master.zip 下载示例 Node.js 项目并提取 ZIP 存档。
确保已在防火墙中打开端口 8883。 本教程中的设备示例使用 MQTT 协议,该协议通过端口 8883 进行通信。 在某些公司和教育网络环境中,此端口可能被阻止。 有关解决此问题的更多信息和方法,请参阅连接到 IoT 中心(MQTT)。
设置 Azure 资源
若要完成本教程,你的 Azure 订阅必须有一个 IoT 中心,其中的某个设备已添加到设备标识注册表。 在本教程中运行的模拟设备可以通过设备标识注册表中的条目连接到中心。
如果尚未在订阅中设置 IoT 中心,可使用以下 CLI 脚本设置一个。 此脚本使用 tutorial-iot-hub 作为 IoT 中心的名称。运行此脚本时,应将此名称替换为自己的唯一名称。 此脚本在“中国东部”区域创建资源组和中心。可以将其更改为更靠近自己的区域。 此脚本将检索 IoT 中心服务连接字符串。在后端示例应用程序中,请使用该连接字符串连接到 IoT 中心:
hubname=tutorial-iot-hub
location=chinaeast

# Install the IoT extension if it's not already installed
az extension add --name azure-iot

# Create a resource group
az group create --name tutorial-iot-hub-rg --location $location

# Create a free-tier IoT Hub. You can have only one free IoT Hub per subscription. Free tier hubs can have only 2 partitions.
az iot hub create --name $hubname --location $location --resource-group tutorial-iot-hub-rg --partition-count 2 --sku F1

# Make a note of the service connection string, you need it later
az iot hub connection-string show --name $hubname --policy-name service -o table
本教程使用名为 MyFirmwareUpdateDevice 的模拟设备。 以下脚本将此设备添加到设备标识注册表、设置标记值,并检索其连接字符串:
# Set the name of your IoT hub
hubname=tutorial-iot-hub

# Create the device in the identity registry
az iot hub device-identity create --device-id MyFirmwareUpdateDevice --hub-name $hubname --resource-group tutorial-iot-hub-rg

# Add a device type tag
az iot hub device-twin update --device-id MyFirmwareUpdateDevice --hub-name $hubname --set tags='{"devicetype":"chiller"}'

# Retrieve the device connection string, you need this later
az iot hub device-identity connection-string show --device-id MyFirmwareUpdateDevice --hub-name $hubname --resource-group tutorial-iot-hub-rg -o table
提示
如果在 Windows 命令提示符或 Powershell 提示符处运行这些命令,请查看 azure-iot-cli-extension 提示页,了解如何引用 JSON 字符串。
启动固件更新
在后端应用程序中创建自动设备管理配置即可在其 devicetype 标记为冷却器的所有设备上开始固件更新过程。 本部分介绍以下操作:
- 在后端应用程序中创建配置。
- 监视作业,直至其完成。
使用所需属性启动从后端应用程序进行的固件升级
若要查看用于创建配置的后端应用程序代码,请导航到已下载的示例 Node.js 项目中的 iot-hub/Tutorials/FirmwareUpdate 文件夹。 然后在文本编辑器中打开 ServiceClient.js 文件。
后端应用程序创建以下配置:
var firmwareConfig = {
  id: sampleConfigId,
  content: {
    deviceContent: {
      'properties.desired.firmware': {
        fwVersion: fwVersion,
        fwPackageURI: fwPackageURI,
        fwPackageCheckValue: fwPackageCheckValue
      }
    }
  },

  // Maximum of 5 metrics per configuration
  metrics: {
    queries: {
      current: 'SELECT deviceId FROM devices WHERE configurations.[[firmware285]].status=\'Applied\' AND properties.reported.firmware.fwUpdateStatus=\'current\'',
      applying: 'SELECT deviceId FROM devices WHERE configurations.[[firmware285]].status=\'Applied\' AND ( properties.reported.firmware.fwUpdateStatus=\'downloading\' OR properties.reported.firmware.fwUpdateStatus=\'verifying\' OR properties.reported.firmware.fwUpdateStatus=\'applying\')',
      rebooting: 'SELECT deviceId FROM devices WHERE configurations.[[firmware285]].status=\'Applied\' AND properties.reported.firmware.fwUpdateStatus=\'rebooting\'',
      error: 'SELECT deviceId FROM devices WHERE configurations.[[firmware285]].status=\'Applied\' AND properties.reported.firmware.fwUpdateStatus=\'error\'',
      rolledback: 'SELECT deviceId FROM devices WHERE configurations.[[firmware285]].status=\'Applied\' AND properties.reported.firmware.fwUpdateStatus=\'rolledback\''
    }
  },

  // Specify the devices the firmware update applies to
  targetCondition: 'tags.devicetype = \'chiller\'',
  priority: 20
};
该配置包括以下节:
content指定发送到选定设备的固件所需属性。metrics指定要运行的用于报告固件更新状态的查询。targetCondition选择用于接收固件更新的设备。priorty设置此配置相对于其他配置的优先级。
后端应用程序使用以下代码创建配置,以便设置所需的属性:
var createConfiguration = function(done) {
  console.log();
  console.log('Add new configuration with id ' + firmwareConfig.id + ' and priority ' + firmwareConfig.priority);

  registry.addConfiguration(firmwareConfig, function(err) {
    if (err) {
      console.log('Add configuration failed: ' + err);
      done();
    } else {
      console.log('Add configuration succeeded');
      done();
    }
  });
};
创建配置后,应用程序会监视固件更新:
var monitorConfiguration = function(done) {
  console.log('Monitor metrics for configuration: ' + sampleConfigId);
  setInterval(function(){
    registry.getConfiguration(sampleConfigId, function(err, config) {
      if (err) {
        console.log('getConfiguration failed: ' + err);
      } else {
        console.log('System metrics:');
        console.log(JSON.stringify(config.systemMetrics.results, null, '  '));
        console.log('Custom metrics:');
        console.log(JSON.stringify(config.metrics.results, null, '  '));
      }
    });
  }, 20000);
  done();
};
配置报告两类指标:
- 一是系统指标,用于报告针对的设备数目以及应用了更新的设备数目。
- 二是自定义指标,由添加到配置的查询生成。 在本教程中,查询会报告在更新过程的每个阶段有多少设备。
响应设备上的固件升级请求
若要查看模拟设备代码(用于处理从后端应用程序发送的固件所需属性),请导航到已下载的示例 Node.js 项目中的 iot-hub/Tutorials/FirmwareUpdate 文件夹。 然后在文本编辑器中打开 SimulatedDevice.js 文件。
模拟设备应用程序为设备孪生中 properties.desired.firmware 所需属性的更新创建一个处理程序。 在处理程序中,它会在启动更新过程之前对所需属性执行一些基本的检查:
// Handle firmware desired property updates - this triggers the firmware update flow
twin.on('properties.desired.firmware', function(fwUpdateDesiredProperties) {
  console.log(chalk.green('\nCurrent firmware version: ' + twin.properties.reported.firmware.currentFwVersion));
  console.log(chalk.green('Starting firmware update flow using this data:'));
  console.log(JSON.stringify(fwUpdateDesiredProperties, null, 2));
  desiredFirmwareProperties = twin.properties.desired.firmware;

  if (fwUpdateDesiredProperties.fwVersion == twin.properties.reported.firmware.currentFwVersion) {
    sendStatusUpdate('current', 'Firmware already up to date', function (err) {
      if (err) {
        console.error(chalk.red('Error occured sending status update : ' + err.message));
      }
      return;
    });
  }
  if (fwUpdateInProgress) {
    sendStatusUpdate('current', 'Firmware update already running', function (err) {
      if (err) {
        console.error(chalk.red('Error occured sending status update : ' + err.message));
      }
      return;
    });
  }
  if (!fwUpdateDesiredProperties.fwPackageURI.startsWith('https')) {
    sendStatusUpdate('error', 'Insecure package URI', function (err) {
      if (err) {
        console.error(chalk.red('Error occured sending status update : ' + err.message));
      }
      return;
    });
  }

  fwUpdateInProgress = true;

  sendStartingUpdate(fwUpdateDesiredProperties.fwVersion, function (err) {
    if (err) {
      console.error(chalk.red('Error occured sending starting update : ' + err.message));
    }
    return;
  });
  initiateFirmwareUpdateFlow(function(err, result) {
    fwUpdateInProgress = false;
    if (!err) {
      console.log(chalk.green('Completed firmwareUpdate flow. New version: ' + result));
      sendFinishedUpdate(result, function (err) {
        if (err) {
          console.error(chalk.red('Error occured sending finished update : ' + err.message));
        }
        return;
      });
    }
  }, twin.properties.reported.firmware.currentFwVersion);
});
更新固件
initiateFirmwareUpdateFlow 函数运行更新。 此函数使用 waterfall 函数按顺序运行更新过程的各个阶段。 在此示例中,固件更新有四个阶段。 第一个阶段下载映像,第二个阶段使用校验和验证映像,第三个阶段应用映像,最后一个阶段重启设备:
// Implementation of firmwareUpdate flow
function initiateFirmwareUpdateFlow(callback, currentVersion) {

  async.waterfall([
    downloadImage,
    verifyImage,
    applyImage,
    reboot
  ], function(err, result) {
    if (err) {
      console.error(chalk.red('Error occured firmwareUpdate flow : ' + err.message));
      sendStatusUpdate('error', err.message, function (err) {
        if (err) {
          console.error(chalk.red('Error occured sending status update : ' + err.message));
        }
      });
      setTimeout(function() {
        console.log('Simulate rolling back update due to error');
        sendStatusUpdate('rolledback', 'Rolled back to: ' + currentVersion, function (err) {
          if (err) {
            console.error(chalk.red('Error occured sending status update : ' + err.message));
          }
        });
        callback(err, result);
      }, 5000);
    } else {
      callback(null, result);
    }
  });
}
在更新过程中,模拟设备使用报告属性报告进度:
// Firmware update patch
//  currentFwVersion: The firmware version currently running on the device.
//  pendingFwVersion: The next version to update to, should match what's
//                    specified in the desired properties. Blank if there
//                    is no pending update (fwUpdateStatus is 'current').
//  fwUpdateStatus:   Defines the progress of the update so that it can be
//                    categorized from a summary view. One of:
//     - current:     There is no pending firmware update. currentFwVersion should
//                    match fwVersion from desired properties.
//     - downloading: Firmware update image is downloading.
//     - verifying:   Verifying image file checksum and any other validations.
//     - applying:    Update to the new image file is in progress.
//     - rebooting:   Device is rebooting as part of update process.
//     - error:       An error occurred during the update process. Additional details
//                    should be specified in fwUpdateSubstatus.
//     - rolledback:  Update rolled back to the previous version due to an error.
//  fwUpdateSubstatus: Any additional detail for the fwUpdateStatus . May include
//                     reasons for error or rollback states, or download %.
//
// var twinPatchFirmwareUpdate = {
//   firmware: {
//     currentFwVersion: '1.0.0',
//     pendingFwVersion: '',
//     fwUpdateStatus: 'current',
//     fwUpdateSubstatus: '',
//     lastFwUpdateStartTime: '',
//     lastFwUpdateEndTime: ''
//   }
// };
以下代码片段演示下载阶段的实施。 在下载阶段,模拟设备使用报告属性将状态信息发送给后端应用程序:
// Simulate downloading an image
function downloadImage(callback) {
  console.log('Simulating image download from: ' + desiredFirmwareProperties.fwPackageURI);

  async.waterfall([
    function(callback) {
      sendStatusUpdate('downloading', 'Start downloading', function (err) {
        if (err) {
          console.error(chalk.red('Error occured sending status update : ' + err.message));
        }
      });
      callback(null);
    },
    function(callback) {
      // Simulate a delay downloading the image.
      setTimeout(function() {
        // Simulate some firmware image data
        var imageData = '[Fake firmware image data]';
        callback(null, imageData);
      }, 30000);
    },
    function(imageData, callback) {
      console.log('Downloaded image data: ' + imageData);
      sendStatusUpdate('downloading', 'Finished downloading', function (err) {
        if (err) {
          console.error(chalk.red('Error occured sending status update : ' + err.message));
        }
      });
      callback(null, imageData);
    }
  ], function (err, result) {
    callback(err, result);
  });
}
运行示例
在此部分,请运行两个示例应用程序,以便在后端应用程序创建配置来管理模拟设备上的固件更新过程时对其进行观察。
若要运行模拟设备和后端应用程序,需要使用设备和服务连接字符串。 在本教程的开头部分创建资源时,我们已记下这些连接字符串。
若要运行模拟设备应用程序,请打开 shell 或命令提示符窗口,并导航到下载的 Node.js 项目中的 iot-hub/Tutorials/FirmwareUpdate 文件夹。 然后运行以下命令:
npm install
node SimulatedDevice.js "{your device connection string}"
若要运行后端应用程序,请打开另一个 shell 或命令提示符窗口。 导航到下载的 Node.js 项目中的 iot-hub/Tutorials/FirmwareUpdate 文件夹。 然后运行以下命令:
npm install
node ServiceClient.js "{your service connection string}"
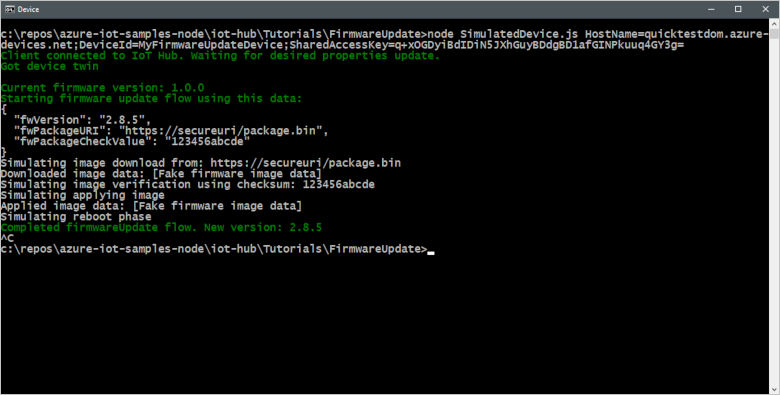
以下屏幕截图显示模拟设备应用程序的输出,并显示它如何响应后端应用程序提供的固件所需属性更新:
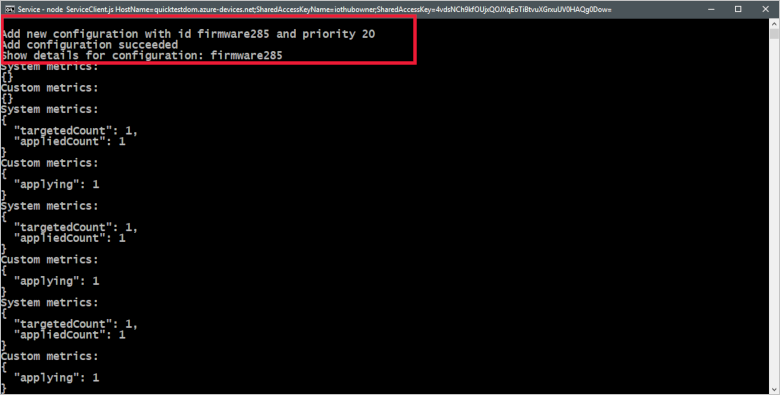
以下屏幕截图显示后端应用程序的输出,并突出显示它如何创建配置来更新固件所需属性:
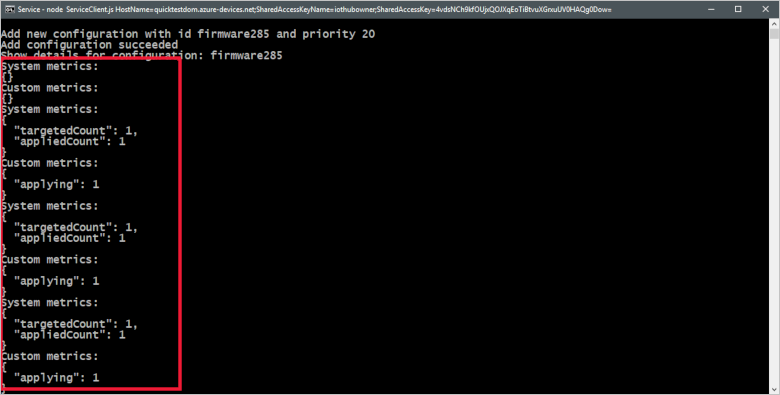
以下屏幕截图显示后端应用程序的输出,并突出显示它如何监视模拟设备提供的固件更新指标:
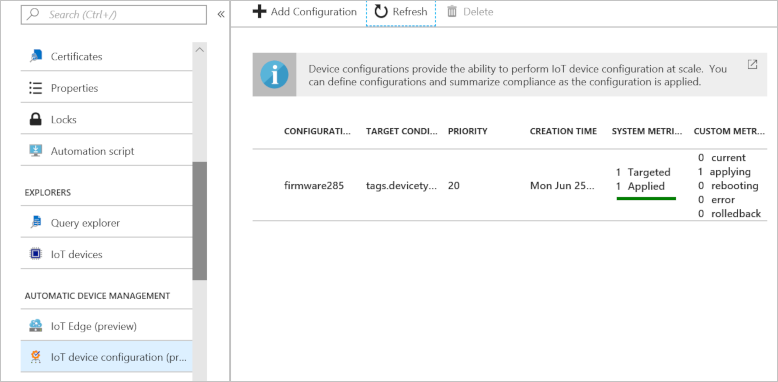
由于自动设备配置在创建时运行,然后每五分钟运行一次,因此你可能看不到发送到后端应用程序的每个状态更新。 也可以在 IoT 中心的“自动设备管理”->“IoT 设备配置”部分的门户中查看这些指标:
清理资源
如果你打算完成下一篇教程,请保留资源组和 IoT 中心,以便到时重复使用。
如果不再需要 IoT 中心,请在门户中删除该中心与资源组。 为此,请选择包含 IoT 中心的 tutorial-iot-hub-rg 资源组,然后单击“删除”。
或者使用 CLI:
# Delete your resource group and its contents
az group delete --name tutorial-iot-hub-rg
后续步骤
本教程介绍了如何针对连接的设备实施固件更新过程。 转到下一教程,了解如何使用 Azure IoT 中心门户工具和 Azure CLI 命令来测试设备连接性。