消息路由 允许将遥测数据从 IoT 设备发送到与事件中心兼容的内置终结点或自定义终结点,例如 Blob 存储、服务总线队列、服务总线主题和事件中心。 若要配置自定义消息路由,请创建 路由查询 以自定义与特定条件匹配的路由。 设置后,传入数据会自动由 IoT 中心路由到终结点。 如果消息与任何定义的路由查询不匹配,则会将其路由到默认终结点。
本 2 部分教程介绍如何在 IoT 中心设置和使用这些自定义路由查询。 将消息从 IoT 设备路由到多个终结点之一,包括 Blob 存储和服务总线队列。 发送到服务总线队列的消息由逻辑应用选取,并通过电子邮件发送。 未定义自定义消息路由的消息将发送到默认终结点,然后由 Azure 流分析选取并在 Power BI 可视化效果中查看。
若要完成本教程的第 1 部分和第 2 部分,请执行以下任务:
第一部分:创建资源,设置消息路由
- 创建资源 - IoT 中心、存储帐户、服务总线队列和模拟设备。 可以使用 Azure 门户、Azure 资源管理器模板、Azure CLI 或 Azure PowerShell 来完成此作。
- 在 IoT 中心为存储帐户和服务总线队列配置终结点和消息路由。
第 II 部分:将消息发送到中心,查看路由结果
- 创建在将消息添加到服务总线队列时触发并发送电子邮件的逻辑应用。
- 下载并运行模拟 IoT 设备向中心发送消息的应用,以获取不同的路由选项。
- 为发送到默认终结点的数据创建 Power BI 可视化效果。
- 查看结果...
- ...在服务总线队列和电子邮件中。
- ...在存储帐户中。
- ...在 Power BI 可视化效果中。
先决条件
本教程的第 1 部分:
- 必须拥有 Azure 订阅。 如果没有 Azure 订阅,请在开始前创建一个试用版订阅。
对于本教程的第 2 部分:
必须已完成本教程的第 1 部分,并且仍有可用资源。
安装 Visual Studio。
有权访问 Power BI 帐户以分析默认终结点的流分析。 (免费试用 Power BI。
拥有用于发送通知电子邮件的工作或学校帐户。
确保已在防火墙中打开端口 8883。 本教程中的示例使用 MQTT 协议,该协议通过端口 8883 进行通信。 某些企业和教育网络环境中可能会阻止此端口。 有关解决此问题的详细信息和方法,请参阅“连接到 IoT 中心”(MQTT)。
创建基本资源
在配置消息路由之前,需要创建 IoT 中心、存储帐户和服务总线队列。 可以使用本教程第 1 部分的四篇文章之一创建这些资源:Azure 门户、Azure 资源管理器模板、Azure CLI 或 Azure PowerShell。
为所有资源使用相同的资源组和位置。 最后,您可以通过删除资源组来一键清除所有资源。
下面是以下部分中要执行的步骤的摘要:
创建资源组。
在 S1 层中创建 IoT 中心。 将使用者组添加到 IoT 中心。 检索数据时,Azure 流分析将使用使用者组。
注释
必须使用付费层中的 Iot 中心来完成本教程。 免费层仅允许设置一个终结点,本教程需要多个终结点。
创建具有Standard_LRS复制的标准 V1 存储帐户。
创建服务总线命名空间和队列。
为向中心发送消息的模拟设备创建设备标识。 保存测试阶段的密钥。 (如果创建资源管理器模板,则部署模板后完成此作。
下载脚本(可选)
在本教程的第二部分,下载并运行 Visual Studio 应用程序以将消息发送到 IoT 中心。 下载中有一个文件夹,其中包含 Azure 资源管理器模板和参数文件,以及 Azure CLI 和 PowerShell 脚本。
如果要查看已完成的脚本,请下载 Azure IoT C# 示例。 解压缩 main.zip 文件。 Azure CLI 脚本位于 /iot-hub/Tutorials/Routing/SimulatedDevice/resources/as iothub_routing_cli.azcli 中。
使用 Azure CLI 创建资源
将下面的脚本复制并粘贴到本地 Shell 中,然后按 Enter。 它逐行运行脚本。 此脚本的第一部分将为本教程创建基本资源,包括存储帐户、IoT 中心、服务总线命名空间和服务总线队列。 完成本教程的其余部分时,复制每个脚本块并将其粘贴到本地 Shell 中以运行它。
小窍门
有关调试的提示:此脚本使用延续符号(反斜杠 \)使脚本更具可读性。 如果运行脚本时遇到问题,请确保您的本地 Shell 会话正在正确运行bash,并且任何反斜杠后面都没有空格。
有多个资源名称必须全局唯一,例如 IoT 中心名称和存储帐户名称。 为方便起见,这些资源名称将追加一个名为 randomValue 的随机字母数字值。 在脚本顶部,randomValue 生成一次,并根据需要将其附加到资源名称中,以便在整个脚本中使用。 如果不希望它是随机的,则可以将其设置为空字符串或特定值。
重要
初始脚本中设置的变量也由路由脚本使用,因此在同一本地 Shell 会话中运行所有脚本。 如果打开一个新会话来运行用于设置路由的脚本,则其中几个变量将缺少值。
# This command retrieves the subscription id of the current Azure account.
# This field is used when setting up the routing queries.
subscriptionID=$(az account show --query id -o tsv)

# Concatenate this number onto the resources that have to be globally unique.
# You can set this to "" or to a specific value if you don't want it to be random.
# This retrieves a random value.
randomValue=$RANDOM

# This command installs the IOT Extension for Azure CLI.
# You only need to install this the first time.
# You need it to create the device identity.
az extension add --name azure-iot

# Set the values for the resource names that
# don't have to be globally unique.
location=chinanorth
resourceGroup=ContosoResources
iotHubConsumerGroup=ContosoConsumers
containerName=contosoresults
iotDeviceName=Contoso-Test-Device

# Create the resource group to be used
# for all the resources for this tutorial.
az group create --name $resourceGroup \
    --location $location

# The IoT hub name must be globally unique,
# so add a random value to the end.
iotHubName=ContosoTestHub$randomValue
echo "IoT hub name = " $iotHubName

# Create the IoT hub.
az iot hub create --name $iotHubName \
    --resource-group $resourceGroup \
    --sku S1 --location $location

# Add a consumer group to the IoT hub for the 'events' endpoint.
az iot hub consumer-group create --hub-name $iotHubName \
    --name $iotHubConsumerGroup

# The storage account name must be globally unique,
# so add a random value to the end.
storageAccountName=contosostorage$randomValue
echo "Storage account name = " $storageAccountName

# Create the storage account to be used as a routing destination.
az storage account create --name $storageAccountName \
    --resource-group $resourceGroup \
    --location $location \
    --sku Standard_LRS

# Get the primary storage account key.
# You need this to create the container.
storageAccountKey=$(az storage account keys list \
    --resource-group $resourceGroup \
    --account-name $storageAccountName \
    --query "[0].value" | tr -d '"')

# See the value of the storage account key.
echo "storage account key = " $storageAccountKey

# Create the container in the storage account.
az storage container create --name $containerName \
    --account-name $storageAccountName \
    --account-key $storageAccountKey \
    --public-access off

# The Service Bus namespace must be globally unique,
# so add a random value to the end.
sbNamespace=ContosoSBNamespace$randomValue
echo "Service Bus namespace = " $sbNamespace

# Create the Service Bus namespace.
az servicebus namespace create --resource-group $resourceGroup \
    --name $sbNamespace \
    --location $location

# The Service Bus queue name must be globally unique,
# so add a random value to the end.
sbQueueName=ContosoSBQueue$randomValue
echo "Service Bus queue name = " $sbQueueName

# Create the Service Bus queue to be used as a routing destination.
az servicebus queue create --name $sbQueueName \
    --namespace-name $sbNamespace \
    --resource-group $resourceGroup

# Create the IoT device identity to be used for testing.
az iot hub device-identity create --device-id $iotDeviceName \
    --hub-name $iotHubName

# Retrieve the information about the device identity, then copy the primary key to
# Notepad. You need this to run the device simulation during the testing phase.
az iot hub device-identity show --device-id $iotDeviceName \
    --hub-name $iotHubName
设置基本资源后,可以配置消息路由。
设置消息路由
根据模拟设备附加到消息的属性,将消息路由到不同的资源。 未自定义路由的消息将发送到默认终结点(消息/事件)。 在下一教程中,将消息发送到 IoT 中心,并看到消息路由到不同的目标。
| 价值 | 结果 |
|---|---|
| level=“storage” | 写入 Azure 存储。 |
| level=“critical” | 写入服务总线队列。 逻辑应用从队列中检索消息,并使用 Office 365 发送电子邮件。 |
| 默认 | 使用 Power BI 显示此数据。 |
第一步是设置将数据路由到的终结点。 第二步是设置使用该终结点的消息路由。 设置路由后,可以在门户中查看终结点和消息路由。
若要创建路由终结点,请使用 az iot hub routing-endpoint create。 若要为终结点创建消息路由,请使用 az iot hub route create。
路由到存储帐户
注释
可将数据以 Apache Avro 格式(默认)或 JSON 格式写入 Blob 存储。
编码格式只能在配置 Blob 存储终结点时设置。 无法更改以前配置的终结点的格式。 使用 JSON 编码时,必须在消息系统属性中将 contentType 设置为 JSON,将 contentEncoding 设置为 UTF-8。
有关使用 Blob 存储终结点的更多详细信息,请参阅 Azure 存储作为路由终结点。
首先,为存储帐户设置终结点,然后设置路由。
以下是必须设置的脚本使用的变量:
storageConnectionString:此值是从上一脚本中设置的存储帐户中检索的。 消息路由使用它来访问存储帐户。
resourceGroup:资源组出现了两次 -- 将它们设置为你的资源组。
endpoint subscriptionID:此字段设置为终结点的 Azure subscriptionID。
endpointType:此字段是终结点的类型。 此值必须设置为azurestoragecontainer、eventhub或 servicebusqueueservicebustopic。 出于此目的,请将其设置为 azurestoragecontainer。
iotHubName:此字段是将执行路由的中心的名称。
containerName:此字段是将向其写入数据的存储帐户中的容器的名称。
编码:此字段要么为 avro,要么为 json。 这表示存储数据的格式。
routeName:此字段是要设置的路由的名称。
endpointName:此字段是标识终结点的名称。
enabled:此字段默认为 true,指示创建后应启用消息路由。
条件:此字段是用于筛选发送到此终结点的消息的查询。 将消息路由到存储的查询条件为 level="storage"。
复制此脚本并将其粘贴到本地 Shell 窗口中,然后运行它。
##### ROUTING FOR STORAGE #####

endpointName="ContosoStorageEndpoint"
endpointType="azurestoragecontainer"
routeName="ContosoStorageRoute"
condition='level="storage"'

# Get the connection string for the storage account.
# Adding the "-o tsv" makes it be returned without the default double quotes around it.
storageConnectionString=$(az storage account show-connection-string \
  --name $storageAccountName --query connectionString -o tsv)
下一步是为存储帐户创建路由终结点。 还可以指定要在其中存储结果的容器。 容器之前是在创建存储帐户时创建的。
# Create the routing endpoint for storage.
az iot hub routing-endpoint create \
  --connection-string $storageConnectionString \
  --endpoint-name $endpointName \
  --endpoint-resource-group $resourceGroup \
  --endpoint-subscription-id $subscriptionID \
  --endpoint-type $endpointType \
  --hub-name $iotHubName \
  --container $containerName \
  --resource-group $resourceGroup \
  --encoding avro
接下来,为存储终结点创建路由。 消息路由指定发送满足查询规范的消息的位置。
# Create the route for the storage endpoint.
az iot hub route create \
  --name $routeName \
  --hub-name $iotHubName \
  --source devicemessages \
  --resource-group $resourceGroup \
  --endpoint-name $endpointName \
  --enabled \
  --condition $condition
路由到服务总线队列
现在,为服务总线队列设置路由。 若要检索服务总线队列的连接字符串,必须创建定义正确的权限的授权规则。 以下脚本为名为sbauthrule的服务总线队列创建一个授权规则,并将权限设置为Listen Manage Send。 定义此授权规则后,可以使用它检索队列的连接字符串。
# Create the authorization rule for the Service Bus queue.
az servicebus queue authorization-rule create \
  --name "sbauthrule" \
  --namespace-name $sbNamespace \
  --queue-name $sbQueueName \
  --resource-group $resourceGroup \
  --rights Listen Manage Send \
  --subscription $subscriptionID
现在,使用授权规则检索服务总线队列的连接字符串。
# Get the Service Bus queue connection string.
# The "-o tsv" ensures it is returned without the default double-quotes.
sbqConnectionString=$(az servicebus queue authorization-rule keys list \
  --name "sbauthrule" \
  --namespace-name $sbNamespace \
  --queue-name $sbQueueName \
  --resource-group $resourceGroup \
  --subscription $subscriptionID \
  --query primaryConnectionString -o tsv)

# Show the Service Bus queue connection string.
echo "service bus queue connection string = " $sbqConnectionString
现在,设置服务总线队列的路由终结点和消息路由。 这些是必须在本地 Shell 会话中设置并由脚本使用的变量:
endpointName:此字段是标识终结点的名称。
endpointType:此字段是终结点的类型。 此值必须设置为azurestoragecontainer、eventhub或 servicebusqueueservicebustopic。 出于此目的,请将其设置为 servicebusqueue。
routeName:此字段是要设置的路由的名称。
条件:此字段是用于筛选发送到此终结点的消息的查询。 用于将消息路由到服务总线队列的查询条件为 level="critical"。
下面是路由终结点的 Azure CLI,以及服务总线队列的消息路由。
endpointName="ContosoSBQueueEndpoint"
endpointType="ServiceBusQueue"
routeName="ContosoSBQueueRoute"
condition='level="critical"'

# Set up the routing endpoint for the Service Bus queue.
# This uses the Service Bus queue connection string.
az iot hub routing-endpoint create \
  --connection-string $sbqConnectionString \
  --endpoint-name $endpointName \
  --endpoint-resource-group $resourceGroup \
  --endpoint-subscription-id $subscriptionID \
  --endpoint-type $endpointType \
  --hub-name $iotHubName \
  --resource-group $resourceGroup

# Set up the message route for the Service Bus queue endpoint.
az iot hub route create --name $routeName \
  --hub-name $iotHubName \
  --source-type devicemessages \
  --resource-group $resourceGroup \
  --endpoint-name $endpointName \
  --enabled \
  --condition $condition
在门户中查看消息路由
设置终结点和消息路由后,可以在门户中查看其配置。 登录到 Azure 门户 并转到 资源组。 接下来,选择资源组,然后选择中心(在本教程中,中心名称以 ContosoTestHub 开头)。 可以看到“IoT 中心”窗格。
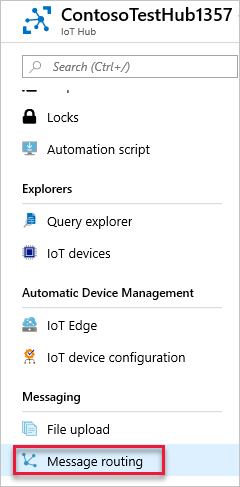
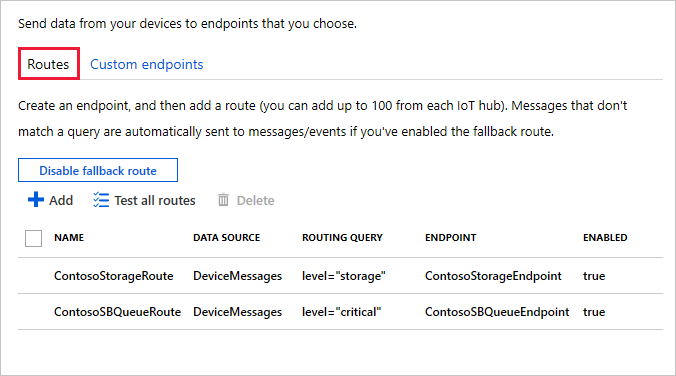
在 IoT 中心的选项中,选择 消息路由。 将显示已成功设置的路由。
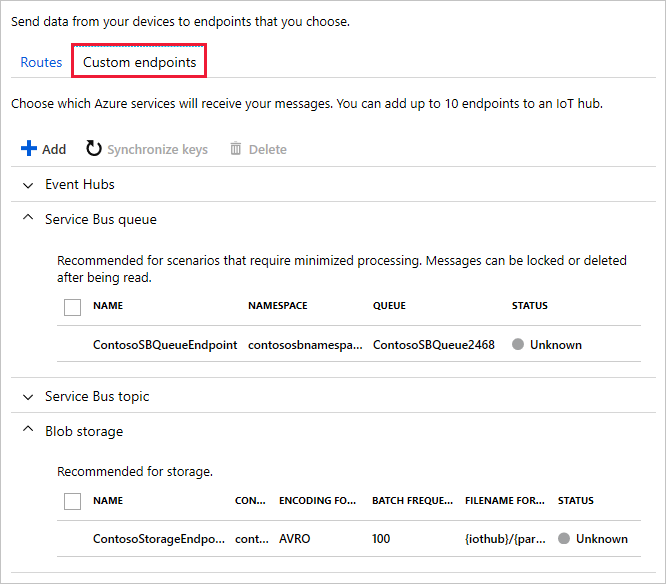
在 “消息路由 ”屏幕上,选择 “自定义终结点 ”以查看为路由定义的终结点。
后续步骤
设置资源并配置消息路由后,请继续学习下一教程,了解如何将消息发送到 IoT 中心,并查看消息路由到不同的目标。