Get started creating an internal load balancer (classic) using PowerShell
Azure Internal Load Balancer (ILB) provides network load balancing between virtual machines that reside inside a cloud service or a virtual network with a regional scope.
For information about the use and configuration of virtual networks with a regional scope, see Regional virtual networks. Existing virtual networks that have been configured for an affinity group cannot use ILB.
Important
Azure has two different deployment models for creating and working with resources: Resource Manager and classic. This article covers using the classic deployment model. Microsoft recommends that most new deployments use the Resource Manager model. Learn how to perform these steps using the Resource Manager model.
Configuration scenario
In this scenario, we're creating an internal load balancer in a virtual network as shown in the following figure:
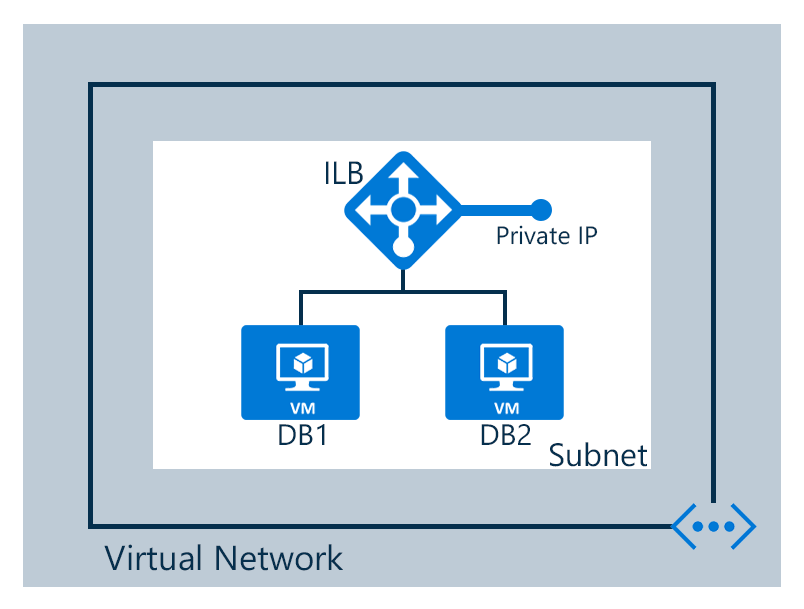
The configuration for our scenario is as follows:
- Two virtual machines named DB1 and DB2
- Endpoints for the internal load balancer
- An internal load balancer
Prerequisite: Install the Azure PowerShell module
To perform the steps in this article, you need to install and configure the Azure PowerShell module. Be sure to complete all of the instructions. After the installation is finished, sign in to Azure and select your subscription.
Note
You need an Azure account to complete these steps. If you don't have an Azure account, you can sign up for a free trial.
Create an internal load balancer set for virtual machines
To create an internal load balancer set and the servers that will send their traffic to it, you have to do the following:
- Create an instance of Internal Load Balancing that will be the endpoint of incoming traffic to be load balanced across the servers of a load-balanced set.
- Add endpoints corresponding to the virtual machines that will be receiving the incoming traffic.
- Configure the servers that will be sending the traffic to be load balanced to send their traffic to the virtual IP (VIP) address of the Internal Load Balancing instance.
Step 1: Create an Internal Load Balancing instance
For an existing cloud service or a cloud service deployed under a regional virtual network, you can create an Internal Load Balancing instance with the following Windows PowerShell commands:
$svc="<Cloud Service Name>"
$ilb="<Name of your ILB instance>"
$subnet="<Name of the subnet within your virtual network>"
$IP="<The IPv4 address to use on the subnet-optional>"

Add-AzureInternalLoadBalancer -ServiceName $svc -InternalLoadBalancerName $ilb –SubnetName $subnet –StaticVNetIPAddress $IP
Note that this use of the Add-AzureEndpoint Windows PowerShell cmdlet uses the DefaultProbe parameter set. For more information on additional parameter sets, see Add-AzureEndpoint.
Step 2: Add endpoints to the Internal Load Balancing instance
Here is an example:
$svc="mytestcloud"
$vmname="DB1"
$epname="TCP-1433-1433"
$lbsetname="lbset"
$prot="tcp"
$locport=1433
$pubport=1433
$ilb="ilbset"
Get-AzureVM –ServiceName $svc –Name $vmname | Add-AzureEndpoint -Name $epname -Lbset $lbsetname -Protocol $prot -LocalPort $locport -PublicPort $pubport –DefaultProbe -InternalLoadBalancerName $ilb | Update-AzureVM
Step 3: Configure your servers to send their traffic to the new Internal Load Balancing endpoint
You have to configure the servers whose traffic is going to be load balanced to use the new IP address (the VIP) of the Internal Load Balancing instance. This is the address on which the Internal Load Balancing instance is listening. In most cases, you need to just add or modify a DNS record for the VIP of the Internal Load Balancing instance.
If you specified the IP address during the creation of the Internal Load Balancing instance, you already have the VIP. Otherwise, you can see the VIP from the following commands:
$svc="<Cloud Service Name>"
Get-AzureService -ServiceName $svc | Get-AzureInternalLoadBalancer
To use these commands, fill in the values and remove the < and >. Here is an example:
$svc="mytestcloud"
Get-AzureService -ServiceName $svc | Get-AzureInternalLoadBalancer
From the display of the Get-AzureInternalLoadBalancer command, note the IP address and make the necessary changes to your servers or DNS records to ensure that traffic gets sent to the VIP.
Note
The Microsoft Azure platform uses a static, publicly routable IPv4 address for a variety of administrative scenarios. The IP address is 168.63.129.16. This IP address should not be blocked by any firewalls, because it can cause unexpected behavior. With respect to Azure Internal Load Balancing, this IP address is used by monitoring probes from the load balancer to determine the health state for virtual machines in a load balanced set. If a Network Security Group is used to restrict traffic to Azure virtual machines in an internally load-balanced set or is applied to a Virtual Network Subnet, ensure that a Network Security Rule is added to allow traffic from 168.63.129.16.
Example of internal load balancing
To step you through the end-to end process of creating a load-balanced set for two example configurations, see the following sections.
An Internet facing, multi-tier application
You want to provide a load balanced database service for a set of Internet-facing web servers. Both sets of servers are hosted in a single Azure cloud service. Web server traffic to TCP port 1433 must be distributed among two virtual machines in the database tier. Figure 1 shows the configuration.

The configuration consists of the following:
- The existing cloud service hosting the virtual machines is named mytestcloud.
- The two existing database servers are named DB1, DB2.
- Web servers in the web tier connect to the database servers in the database tier by using the private IP address. Another option is to use your own DNS for the virtual network and manually register an A record for the internal load balancer set.
The following commands configure a new Internal Load Balancing instance named ILBset and add endpoints to the virtual machines corresponding to the two database servers:
$svc="mytestcloud"
$ilb="ilbset"
Add-AzureInternalLoadBalancer -ServiceName $svc -InternalLoadBalancerName $ilb
$prot="tcp"
$locport=1433
$pubport=1433
$epname="TCP-1433-1433"
$lbsetname="lbset"
$vmname="DB1"
Get-AzureVM –ServiceName $svc –Name $vmname | Add-AzureEndpoint -Name $epname -LbSetName $lbsetname -Protocol $prot -LocalPort $locport -PublicPort $pubport –DefaultProbe -InternalLoadBalancerName $ilb | Update-AzureVM

$epname="TCP-1433-1433-2"
$vmname="DB2"
Get-AzureVM –ServiceName $svc –Name $vmname | Add-AzureEndpoint -Name $epname -LbSetName $lbsetname -Protocol $prot -LocalPort $locport -PublicPort $pubport –DefaultProbe -InternalLoadBalancerName $ilb | Update-AzureVM
Remove an Internal Load Balancing configuration
To remove a virtual machine as an endpoint from an internal load balancer instance, use the following commands:
$svc="<Cloud service name>"
$vmname="<Name of the VM>"
$epname="<Name of the endpoint>"
Get-AzureVM -ServiceName $svc -Name $vmname | Remove-AzureEndpoint -Name $epname | Update-AzureVM
To use these commands, fill in the values, removing the < and >.
Here is an example:
$svc="mytestcloud"
$vmname="DB1"
$epname="TCP-1433-1433"
Get-AzureVM -ServiceName $svc -Name $vmname | Remove-AzureEndpoint -Name $epname | Update-AzureVM
To remove an internal load balancer instance from a cloud service, use the following commands:
$svc="<Cloud service name>"
Remove-AzureInternalLoadBalancer -ServiceName $svc
To use these commands, fill in the value and remove the < and >.
Here is an example:
$svc="mytestcloud"
Remove-AzureInternalLoadBalancer -ServiceName $svc
Additional information about internal load balancer cmdlets
To obtain additional information about Internal Load Balancing cmdlets, run the following commands at a Windows PowerShell prompt:
Get-Help New-AzureInternalLoadBalancerConfig -full
Get-Help Add-AzureInternalLoadBalancer -full
Get-Help Get-AzureInternalLoadbalancer -full
Get-Help Remove-AzureInternalLoadBalancer -full
Next steps
Configure a load balancer distribution mode using source IP affinity