Get started creating an Internet facing Load Balancer (classic) in the Azure classic CLI
An Azure load balancer is a Layer-4 (TCP, UDP) load balancer. The load balancer provides high availability by distributing incoming traffic among healthy service instances in cloud services or virtual machines in a load balancer set. Azure Load Balancer can also present those services on multiple ports, multiple IP addresses, or both.
You can configure a load balancer to:
- Load balance incoming Internet traffic to virtual machines (VMs). We refer to a load balancer in this scenario as an Internet-facing load balancer.
- Load balance traffic between VMs in a virtual network (VNet), between VMs in cloud services, or between on-premises computers and VMs in a cross-premises virtual network. We refer to a load balancer in this scenario as an internal load balancer (ILB).
- Forward external traffic to a specific VM instance.
Important
Before you work with Azure resources, it's important to understand that Azure currently has two deployment models: Azure Resource Manager and classic. Make sure you understand deployment models and tools before you work with any Azure resource. You can view the documentation for different tools by clicking the tabs at the top of this article. This article covers the classic deployment model. You can also Learn how to create an Internet facing load balancer using Azure Resource Manager.
Important
This article contains content which requires the Azure classic CLI. This is an older version of the Azure CLI that should be used only with the Azure classic deployment model.
To install the classic CLI, see Install the Azure classic CLI and to install the current Azure CLI for Azure Resource Manager deployments, see Install Azure CLI.
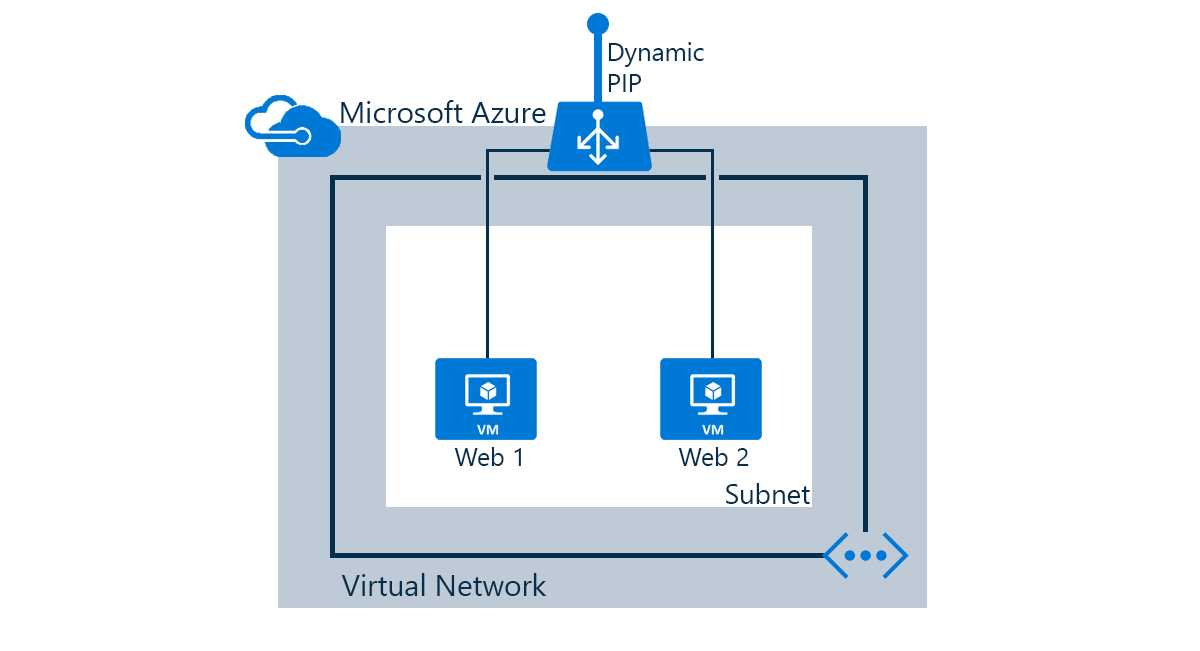
The following tasks will be done in this scenario:
- Create a load balancer that receives network traffic on port 80 and send load-balanced traffic to virtual machines "web1" and "web2"
- Create NAT rules for remote desktop access/SSH for virtual machines behind the load balancer
- Create health probes
Create an Internet facing load balancer using CLI
This guide shows how to create an Internet load balancer based on the scenario above.
If you have never used Azure classic CLI, see Install and Configure the Azure classic CLI and follow the instructions up to the point where you select your Azure account and subscription.
Run the azure config mode command to switch to classic mode, as shown below.
azure config mode asmExpected output:
info: New mode is asm
Create endpoint and load balancer set
The scenario assumes the virtual machines "web1" and "web2" were created. This guide will create a load balancer set using port 80 as public port and port 80 as local port. A probe port is also configured on port 80 and named the load balancer set "lbset".
Step 1
Create the first endpoint and load balancer set using azure network vm endpoint create for virtual machine "web1".
azure vm endpoint create web1 80 --local-port 80 --protocol tcp --probe-port 80 --load-balanced-set-name lbset
Step 2
Add a second virtual machine "web2" to the load balancer set.
azure vm endpoint create web2 80 --local-port 80 --protocol tcp --probe-port 80 --load-balanced-set-name lbset
Step 3
Verify the load balancer configuration using azure vm show .
azure vm show web1
The output will be:
data:    DNSName "contoso.cloudapp.net"
data:    Location "East US"
data:    VMName "web1"
data:    IPAddress "10.0.0.5"
data:    InstanceStatus "ReadyRole"
data:    InstanceSize "Standard_D1"
data:    Image "a699494373c04fc0bc8f2bb1389d6106__Windows-Server-2012-R2-2015
6-en.us-127GB.vhd"
data:    OSDisk hostCaching "ReadWrite"
data:    OSDisk name "joaoma-1-web1-0-201509251804250879"
data:    OSDisk mediaLink "https://XXXXXXXXXXXXXXX.blob.core.windows.
/vhds/joaomatest-web1-2015-09-25.vhd"
data:    OSDisk sourceImageName "a699494373c04fc0bc8f2bb1389d6106__Windows-Se
r-2012-R2-20150916-en.us-127GB.vhd"
data:    OSDisk operatingSystem "Windows"
data:    OSDisk iOType "Standard"
data:    ReservedIPName ""
data:    VirtualIPAddresses 0 address "XXXXXXXXXXXXXXXX"
data:    VirtualIPAddresses 0 name "XXXXXXXXXXXXXXXXXXXX"
data:    VirtualIPAddresses 0 isDnsProgrammed true
data:    Network Endpoints 0 loadBalancedEndpointSetName "lbset"
data:    Network Endpoints 0 localPort 80
data:    Network Endpoints 0 name "tcp-80-80"
data:    Network Endpoints 0 port 80
data:    Network Endpoints 0 loadBalancerProbe port 80
data:    Network Endpoints 0 loadBalancerProbe protocol "tcp"
data:    Network Endpoints 0 loadBalancerProbe intervalInSeconds 15
data:    Network Endpoints 0 loadBalancerProbe timeoutInSeconds 31
data:    Network Endpoints 0 protocol "tcp"
data:    Network Endpoints 0 virtualIPAddress "XXXXXXXXXXXX"
data:    Network Endpoints 0 enableDirectServerReturn false
data:    Network Endpoints 1 localPort 5986
data:    Network Endpoints 1 name "PowerShell"
data:    Network Endpoints 1 port 5986
data:    Network Endpoints 1 protocol "tcp"
data:    Network Endpoints 1 virtualIPAddress "XXXXXXXXXXXX"
data:    Network Endpoints 1 enableDirectServerReturn false
data:    Network Endpoints 2 localPort 3389
data:    Network Endpoints 2 name "Remote Desktop"
data:    Network Endpoints 2 port 58081
info:    vm show command OK
Create a remote desktop endpoint for a virtual machine
You can create a remote desktop endpoint to forward network traffic from a public port to a local port for a specific virtual machine using azure vm endpoint create.
azure vm endpoint create web1 54580 -k 3389
Remove virtual machine from load balancer
You have to delete the endpoint associated to the load balancer set from the virtual machine. Once the endpoint is removed, the virtual machine doesn't belong to the load balancer set anymore.
Using the example above, you can remove the endpoint created for virtual machine "web1" from load balancer "lbset" using the command azure vm endpoint delete.
azure vm endpoint delete web1 tcp-80-80
Note
You can explore more options to manage endpoints using the command azure vm endpoint --help
Next steps
Get started configuring an internal load balancer