使用 Azure CLI 创建使用 IPv6 的公共负载均衡器
注意
本文介绍了一项简介性的 IPv6 功能,该功能允许基本负载均衡器提供 IPv4 和 IPv6 连接。 适用于 Azure VNET 的 IPv6 现在提供综合性 IPv6 连接,可以将 IPv6 连接与虚拟网络集成,包含 IPv6 网络安全组规则、IPv6 用户定义路由、IPv6 基本和标准负载均衡等关键功能。 适用于 Azure VNET 的 IPv6 是建议用于 Azure 中的 IPv6 应用程序的标准。 请参阅适用于 Azure VNET PowerShell 部署的 IPv6
Azure load balancer 是位于第 4 层 (TCP, UDP) 的负载均衡器。 该负载均衡器可以在云服务或负载均衡器集的虚拟机中运行状况良好的服务实例之间分配传入流量,从而提供高可用性。 负载均衡器还可以在多个端口和/或多个 IP 地址上显示这些服务。
示例部署方案
下图演示了使用本文所述示例模板部署的负载均衡解决方案。
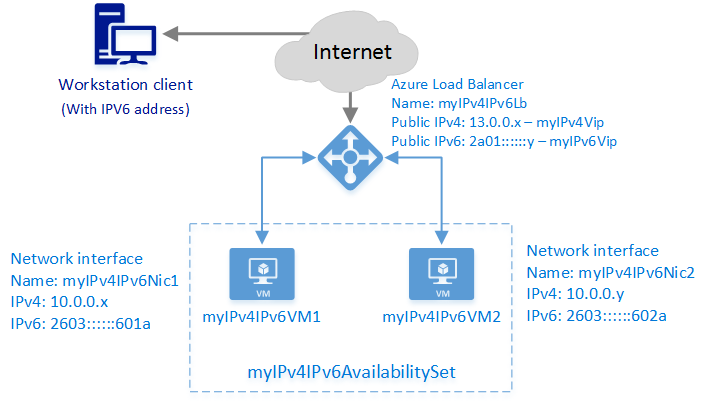
在此方案中,将创建以下 Azure 资源:
- 两个虚拟机 (VM)
- 虚拟网络接口,用于每个已分配 IPv4 和 IPv6 地址的 VM
- 已分配 IPv4 和 IPv6 公共 IP 地址的公共负载均衡器
- 包含两个 VM 的可用性集
- 两个负载均衡规则,用于将公共 VIP 映射到专用终结点
使用 Azure CLI 部署解决方案
以下步骤说明如何使用 Azure CLI 创建公共负载均衡器。 使用 CLI,可单独创建和配置每个对象,再将其合成一个新资源。
创建并配置以下对象以部署负载均衡器:
- 前端 IP 配置:包含传入网络流量的公共 IP 地址。
- 后端地址池:包含从负载均衡器接收网络流量的虚拟机的网络接口 (NIC)。
- 负载均衡规则:所含规则可将负载均衡器上的公共端口映射到后端地址池的端口上。
- 入站 NAT 规则:所含网络地址转换 (NAT) 规则可将负载均衡器上的公共端口映射到后端地址池中特定虚拟机的端口。
- 探测器:包含用于检查后端地址池中虚拟机实例的可用性的运行状况探测器。
设置 Azure CLI
本示例在 PowerShell 命令窗口中运行 Azure CLI 工具。 此处没有使用 Azure PowerShell cmdlet,而是使用 PowerShell 的脚本功能来改善可读性与重用性。
按照链接的文章中的步骤安装和配置 Azure CLI,然后登录到 Azure 帐户。
设置要与 Azure CLI 命令结合使用的 PowerShell 变量:
$subscriptionid = "########-####-####-####-############"  # enter subscription id
$location = "chinaeast2"
$rgName = "pscontosorg1chinaeast209152016"
$vnetName = "contosoIPv4Vnet"
$vnetPrefix = "10.0.0.0/16"
$subnet1Name = "clicontosoIPv4Subnet1"
$subnet1Prefix = "10.0.0.0/24"
$subnet2Name = "clicontosoIPv4Subnet2"
$subnet2Prefix = "10.0.1.0/24"
$dnsLabel = "contoso09152016"
$lbName = "myIPv4IPv6Lb"
创建资源组、负载均衡器、虚拟网络和子网
创建资源组:
az group create --name $rgName --location $location创建负载均衡器:
$lb = az network lb create --resource-group $rgname --location $location --name $lbName创建虚拟网络:
$vnet = az network vnet create --resource-group $rgname --name $vnetName --location $location --address-prefixes $vnetPrefix在此虚拟网络中创建两个子网:
$subnet1 = az network vnet subnet create --resource-group $rgname --name $subnet1Name --address-prefix $subnet1Prefix --vnet-name $vnetName
$subnet2 = az network vnet subnet create --resource-group $rgname --name $subnet2Name --address-prefix $subnet2Prefix --vnet-name $vnetName
创建前端池的公共 IP 地址
设置 PowerShell 变量:
$publicIpv4Name = "myIPv4Vip"
$publicIpv6Name = "myIPv6Vip"
创建前端 IP 池的公共 IP 地址:
$publicipV4 = az network public-ip create --resource-group $rgname --name $publicIpv4Name --location $location --version IPv4 --allocation-method Dynamic --dns-name $dnsLabel
$publicipV6 = az network public-ip create --resource-group $rgname --name $publicIpv6Name --location $location --version IPv6 --allocation-method Dynamic --dns-name $dnsLabel
重要
负载均衡器使用公共 IP 的域标签作为其完全限定的域名 (FQDN)。 这与经典部署不同,后者使用云服务名称作为负载均衡器 FQDN。
在此实例中,FQDN 是 contoso09152016.chinaeast2.chinacloudapp.cn。
创建前端和后端池
在本部分中创建以下 IP 池:
- 前端 IP 池,用于在负载均衡器上接收传入的网络流量。
- 后端 IP 池,前端池将向其发送经过负载均衡的网络流量。
设置 PowerShell 变量:
$frontendV4Name = "FrontendVipIPv4"
$frontendV6Name = "FrontendVipIPv6"
$backendAddressPoolV4Name = "BackendPoolIPv4"
$backendAddressPoolV6Name = "BackendPoolIPv6"
创建前端 IP 池,它与负载均衡器和上一步中创建的公共 IP 相关联。
$frontendV4 = az network lb frontend-ip create --resource-group $rgname --name $frontendV4Name --public-ip-address $publicIpv4Name --lb-name $lbName
$frontendV6 = az network lb frontend-ip create --resource-group $rgname --name $frontendV6Name --public-ip-address $publicIpv6Name --lb-name $lbName
$backendAddressPoolV4 = az network lb address-pool create --resource-group $rgname --name $backendAddressPoolV4Name --lb-name $lbName
$backendAddressPoolV6 = az network lb address-pool create --resource-group $rgname --name $backendAddressPoolV6Name --lb-name $lbName
创建探测、NAT 规则和负载均衡器规则
下例会创建以下项:
- 一个探测规则,用于检查与 TCP 端口 80 的连接。
- 一个 NAT 规则,用于将端口 3389 上的所有传入流量转换为 RDP 的端口 3389。*
- 一个 NAT 规则,用于将端口 3391 上的所有传入流量转换为远程桌面协议 (RDP) 的端口 3389。*
- 用于将端口 80 上的所有传入流量均衡到后端池中的地址端口 80 的负载均衡器规则。
* NAT 规则将关联到负载均衡器后面的特定虚拟机实例。 抵达端口 3389 的网络流量将发送给特定虚拟机以及与 NAT 规则关联的端口。 必须为 NAT 规则指定协议(UDP 或 TCP)。 不能将这两种协议分配给同一个端口。
设置 PowerShell 变量:
$probeV4V6Name = "ProbeForIPv4AndIPv6"
$natRule1V4Name = "NatRule-For-Rdp-VM1"
$natRule2V4Name = "NatRule-For-Rdp-VM2"
$lbRule1V4Name = "LBRuleForIPv4-Port80"
$lbRule1V6Name = "LBRuleForIPv6-Port80"
创建探测。
以下示例创建 TCP 探测,该探测每隔 15 秒检查与后端 TCP 端口 80 的连接。 连续两次失败后,它会将后端资源标记为不可用。
$probeV4V6 = az network lb probe create --resource-group $rgname --name $probeV4V6Name --protocol tcp --port 80 --interval 15 --threshold 2 --lb-name $lbName创建入站 NAT 规则,以便与后端资源建立 RDP 连接:
$inboundNatRuleRdp1 = az network lb inbound-nat-rule create --resource-group $rgname --name $natRule1V4Name --frontend-ip-name $frontendV4Name --protocol Tcp --frontend-port 3389 --backend-port 3389 --lb-name $lbName
$inboundNatRuleRdp2 = az network lb inbound-nat-rule create --resource-group $rgname --name $natRule2V4Name --frontend-ip-name $frontendV4Name --protocol Tcp --frontend-port 3391 --backend-port 3389 --lb-name $lbName
创建负载均衡器规则,根据接收请求的前端将流量发送到不同的后端端口。
$lbruleIPv4 = az network lb rule create --resource-group $rgname --name $lbRule1V4Name --frontend-ip-name $frontendV4Name --backend-pool-name $backendAddressPoolV4Name --probe-name $probeV4V6Name --protocol Tcp --frontend-port 80 --backend-port 80 --lb-name $lbName
$lbruleIPv6 = az network lb rule create --resource-group $rgname --name $lbRule1V6Name --frontend-ip-name $frontendV6Name --backend-pool-name $backendAddressPoolV6Name --probe-name $probeV4V6Name --protocol Tcp --frontend-port 80 --backend-port 8080 --lb-name $lbName
检查设置:
az network lb show --resource-group $rgName --name $lbName预期输出:
info:    Executing command network lb show
info:    Looking up the load balancer "myIPv4IPv6Lb"
data:    Id                              : /subscriptions/########-####-####-####-############/resourceGroups/pscontosorg1chinaeast209152016/providers/Microsoft.Network/loadBalancers/myIPv4IPv6Lb
data:    Name                            : myIPv4IPv6Lb
data:    Type                            : Microsoft.Network/loadBalancers
data:    Location                        : chinaeast2
data:    Provisioning state              : Succeeded
data:
data:    Frontend IP configurations:
data:    Name             Provisioning state  Private IP allocation  Private IP   Subnet  Public IP
data:    --------------- ------------------  --------------------- -----------  ------ ---------
data:    FrontendVipIPv4  Succeeded           Dynamic                                     myIPv4Vip
data:    FrontendVipIPv6  Succeeded           Dynamic                                     myIPv6Vip
data:
data:    Probes:
data:    Name                 Provisioning state  Protocol  Port  Path  Interval  Count
data:    ------------------- ------------------  -------- ----  ---- --------  -----
data:    ProbeForIPv4AndIPv6  Succeeded           Tcp       80          15        2
data:
data:    Backend Address Pools:
data:    Name             Provisioning state
data:    --------------- ------------------
data:    BackendPoolIPv4  Succeeded
data:    BackendPoolIPv6  Succeeded
data:
data:    Load Balancing Rules:
data:    Name                  Provisioning state  Load distribution  Protocol  Frontend port  Backend port  Enable floating IP  Idle timeout in minutes
data:    -------------------- ------------------  ----------------- --------  ------------- ------------  ------------------ -----------------------
data:    LBRuleForIPv4-Port80  Succeeded           Default            Tcp       80             80            false               4
data:    LBRuleForIPv6-Port80  Succeeded           Default            Tcp       80             8080          false               4
data:
data:    Inbound NAT Rules:
data:    Name                 Provisioning state  Protocol  Frontend port  Backend port  Enable floating IP  Idle timeout in minutes
data:    ------------------- ------------------  -------- -------------  ------------ ------------------  -----------------------
data:    NatRule-For-Rdp-VM1  Succeeded           Tcp       3389           3389          false               4
data:    NatRule-For-Rdp-VM2  Succeeded           Tcp       3391           3389          false               4
info:    network lb show
创建 NIC
创建 NIC 并将其关联到 NAT 规则、负载均衡器规则和探测。
设置 PowerShell 变量:
$nic1Name = "myIPv4IPv6Nic1"
$nic2Name = "myIPv4IPv6Nic2"
$subnet1Id = "/subscriptions/$subscriptionid/resourceGroups/$rgName/providers/Microsoft.Network/VirtualNetworks/$vnetName/subnets/$subnet1Name"
$subnet2Id = "/subscriptions/$subscriptionid/resourceGroups/$rgName/providers/Microsoft.Network/VirtualNetworks/$vnetName/subnets/$subnet2Name"
$backendAddressPoolV4Id = "/subscriptions/$subscriptionid/resourceGroups/$rgname/providers/Microsoft.Network/loadbalancers/$lbName/backendAddressPools/$backendAddressPoolV4Name"
$backendAddressPoolV6Id = "/subscriptions/$subscriptionid/resourceGroups/$rgname/providers/Microsoft.Network/loadbalancers/$lbName/backendAddressPools/$backendAddressPoolV6Name"
$natRule1V4Id = "/subscriptions/$subscriptionid/resourceGroups/$rgname/providers/Microsoft.Network/loadbalancers/$lbName/inboundNatRules/$natRule1V4Name"
$natRule2V4Id = "/subscriptions/$subscriptionid/resourceGroups/$rgname/providers/Microsoft.Network/loadbalancers/$lbName/inboundNatRules/$natRule2V4Name"
为每个后端创建一个 NIC,并添加 IPv6 配置:
$nic1 = az network nic create --name $nic1Name --resource-group $rgname --location $location --private-ip-address-version "IPv4" --subnet $subnet1Id --lb-address-pools $backendAddressPoolV4Id --lb-inbound-nat-rules $natRule1V4Id
$nic1IPv6 = az network nic ip-config create --resource-group $rgname --name "IPv6IPConfig" --private-ip-address-version "IPv6" --lb-address-pools $backendAddressPoolV6Id --nic-name $nic1Name

$nic2 = az network nic create --name $nic2Name --resource-group $rgname --location $location --private-ip-address-version "IPv4" --subnet $subnet2Id --lb-address-pools $backendAddressPoolV4Id --lb-inbound-nat-rules $natRule2V4Id
$nic2IPv6 = az network nic ip-config create --resource-group $rgname --name "IPv6IPConfig" --private-ip-address-version "IPv6" --lb-address-pools $backendAddressPoolV6Id --nic-name $nic2Name
创建后端 VM 资源并附加每个 NIC
若要创建 VM,必须有一个存储帐户。 若要实现负载均衡,VM 必须是可用性集的成员。 有关创建 VM 的详细信息,请参阅使用 PowerShell 创建 Azure VM。
设置 PowerShell 变量:
$availabilitySetName = "myIPv4IPv6AvailabilitySet"
$vm1Name = "myIPv4IPv6VM1"
$vm2Name = "myIPv4IPv6VM2"
$nic1Id = "/subscriptions/$subscriptionid/resourceGroups/$rgname/providers/Microsoft.Network/networkInterfaces/$nic1Name"
$nic2Id = "/subscriptions/$subscriptionid/resourceGroups/$rgname/providers/Microsoft.Network/networkInterfaces/$nic2Name"
$imageurn = "MicrosoftWindowsServer:WindowsServer:2012-R2-Datacenter:latest"
$vmUserName = "vmUser"
$mySecurePassword = "PlainTextPassword*1"
警告
本示例为 VM 使用了明文用户名和密码。 以明文形式使用这些凭据时请保持适当的谨慎。 有关在 PowerShell 中更安全处理凭据的方法,请参阅
Get-Credentialcmdlet。创建可用性集:
$availabilitySet = az vm availability-set create --name $availabilitySetName --resource-group $rgName --location $location创建具有关联 NIC 的虚拟机:
az vm create --resource-group $rgname --name $vm1Name --image $imageurn --admin-username $vmUserName --admin-password $mySecurePassword --nics $nic1Id --location $location --availability-set $availabilitySetName --size "Standard_A1"

az vm create --resource-group $rgname --name $vm2Name --image $imageurn --admin-username $vmUserName --admin-password $mySecurePassword --nics $nic2Id --location $location --availability-set $availabilitySetName --size "Standard_A1"