适用于:Azure 逻辑应用(标准)
如果集成方案需要Azure Logic Apps中内置操作和连接器之外的自定义任务或逻辑,请在标准工作流中创建并运行 .NET 代码作为 custom 函数。 然后,工作流可以执行自定义分析、验证,甚至应用业务规则等任务。 通过使用此功能,您可以实施以下任务场景:
- 自定义业务逻辑实现。
- 自定义分析以从入站消息中提取信息。
- 执行数据验证和简单转换。
- 执行计算。
- 调整发送到其他系统(例如 API)的出站消息的格式。
本指南演示如何使用 Visual Studio Code 直接在标准工作流中编写和运行自己的.NET代码。 了解如何使用Visual Studio Code创建、调试和部署本地函数,以便可以一起保留自定义代码和工作流业务流程,在一个会话中调试它们,并将其部署为单个解决方案。
注意
自定义内联.NET代码不适用于以下方案:
- 运行可能超过 10 分钟的进程。
- 尝试大规模的消息和数据转换。
- 执行复杂的批处理和拆分方案。
- 使用实现流式传输的 BizTalk 服务器管道组件。
有关详细信息,请参阅 “限制”。
先决条件
Azure 帐户和订阅。 获取 Azure 帐户。
具有 Azure Logic Apps (Standard) 扩展的最新版 Visual Studio Code。
有关先决条件,请参阅在单租户 Azure Logic Apps 中使用 Visual Studio Code 创建标准工作流。
该扩展提供以下功能和优势:
- 通过创建具有灵活性和控制能力的函数来编写自己的代码,以解决最具挑战性的集成问题。
- 在 Visual Studio Code 中本地调试代码。 在同一调试会话中逐步执行代码和工作流。
- 同步部署代码与工作流。 不需要其他服务计划。
- 支持BizTalk Server迁移方案,以便将自定义.NET投资从本地直接转移到云。
用于代码项目的本地文件夹。
限制
只能在Windows上运行的Visual Studio Code中使用自定义函数功能。 此功能支持将 .NET Framework 和 .NET 8 用于部署和托管在 Azure 上的标准逻辑应用工作流。
无法在Azure门户中使用自定义函数编辑。 但是,若要在工作流中使用来自自定义函数的输出,请执行以下步骤:
将函数部署到 Azure 后,请按照 Azure 门户中“从工作流调用您的代码”的步骤操作。
将此逻辑应用中名为“调用本地函数”的内置操作添加到工作流中。 选择所需的已部署自定义函数并运行代码。
使用后续工作流操作引用自定义函数输出,就像在任何其他工作流中一样。 可以查看内置操作的运行历史记录、输入和输出。
有关常规限制,请参阅 Limits 和 Azure Logic Apps 配置参考。
1:创建代码项目
Visual Studio Code的Azure Logic Apps(标准)扩展包括一个代码项目模板,该模板提供简化的体验,用于编写、调试和部署自己的代码和工作流。 此项目模板创建一个工作区文件和两个示例项目:一个项目用于编写代码,另一个项目用于创建工作流。
注意
不能对代码和工作流使用相同的项目文件夹。
若要创建代码项目,请执行以下步骤:
在 Visual Studio Code 中, 登录到 Azure 帐户。
如果登录花的时间比平时长,Visual Studio Code 会为你提供设备代码,提示你通过 Microsoft 身份验证网站登录。 若要改用代码登录,请执行以下步骤:
选择 “使用设备代码”,然后选择“ 复制并打开”。
选择 “打开链接 ”以打开新的浏览器窗口,并继续访问身份验证网站。
在“登录到你的帐户”页上,输入验证码,然后选择“下一步” 。
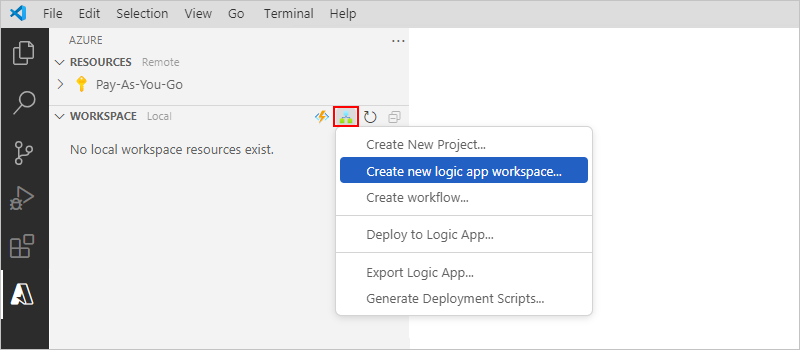
在活动栏上,选择Azure图标。
在 Azure 窗口中,转到 Workspace 部分。 将指针移到标题区域,以便工具栏出现。
在 Azure Logic Apps 菜单中,选择 创建新的逻辑应用工作区。
在 “选择文件夹 ”窗口中,浏览到本地项目文件夹,选择该文件夹,然后选择 “选择”。
在“ 创建新逻辑应用工作区” 窗口中,对于 工作区名称 提示,输入工作区的名称,然后按 Enter。
此示例用作
weather-app工作区名称:
此示例用作
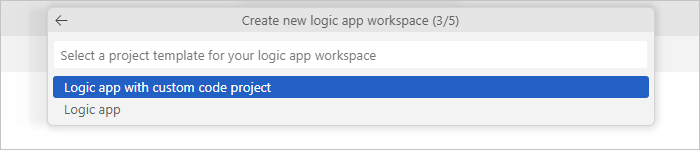
weather-project工作区名称。对于“为新项目选择模板”提示,选择自定义代码项目的逻辑应用。
对于 选择目标框架提示,请选择 .NET Framework 或 .NET 8。
按照后续提示提供以下信息:
提示 示例值 逻辑应用名称 weather-logic-app函数名称用于你的.NET函数项目 WeatherForecastNamespace 用于你的 .NET 函数项目 Contoso.Enterprise为项目的第一个工作流选择模板:
- 有状态工作流
- 无状态工作流
- 自治代理
- 对话代理
- 暂时跳过有状态工作流 工作流名称 weather-workflow对于 “选择要如何打开项目 提示”,请在 当前窗口中选择“打开”。
完成此步骤后,Visual Studio Code 会创建工作区,其中默认包括 .NET 函数项目和逻辑应用项目,例如:
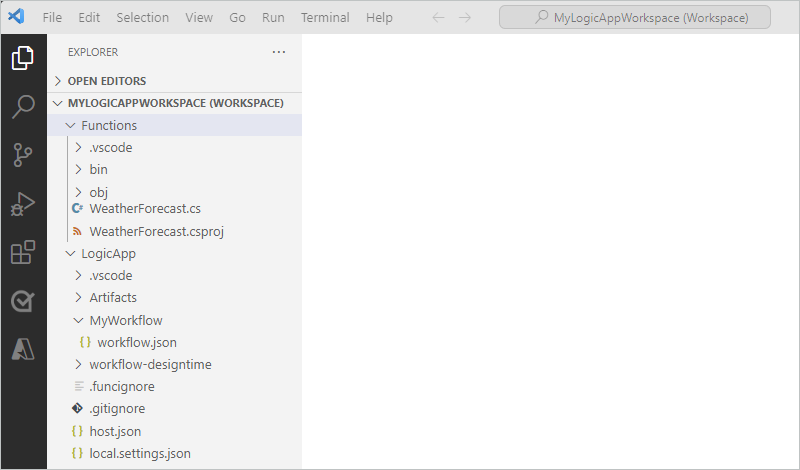
在 “资源管理器” 窗口中,记下工作区中的以下文件夹:
Folder 说明 < workspace-name> 包含你的 .NET 函数项目和逻辑应用工作流项目。 < 逻辑应用名称> 包含用于逻辑应用项目的文件和其他工件。 例如, workflow.json 文件是可在其中生成工作流的工作流定义文件。 < function-name> 包含用于.NET 函数项目的文件和其他工件。 例如,<function-name>.cs 文件是可在其中创作代码的代码文件。 对于为逻辑应用 <logic-app-name> 启用 Azure 连接器提示,请选择“使用 Azure 提供的连接器”。
对于 选择订阅 提示,请选择您想要的 Azure 订阅。
对于 “为新资源选择资源组 ”提示符,请选择所需的资源组或 创建新资源组。
对于 选择新资源的位置提示,请选择部署Azure区域。
对于 Azure 连接器的 选择身份验证方法,请选择用于需要身份验证的连接的身份验证类型。
身份验证类型 说明 托管标识 选择 托管服务标识 ,以在逻辑应用资源上使用系统分配的标识或用户分配的标识。
默认情况下,标准逻辑应用资源已启用系统分配的标识。 但是,需要在目标资源上设置具有角色访问权限的标识以及任何其他要求。
有关详细信息,请参阅 为托管身份分配角色访问权限。连接密钥 使用连接字符串和访问密钥设置对目标资源的访问。
完成这些步骤后,请继续学习下一部分,以便可以编写代码。
2:编写代码
在 “资源管理器” 窗口中,展开函数项目文件夹,然后打开 <函数名称>.cs 文件。
此文件包含示例代码和具有以前提供的值的特定代码元素。
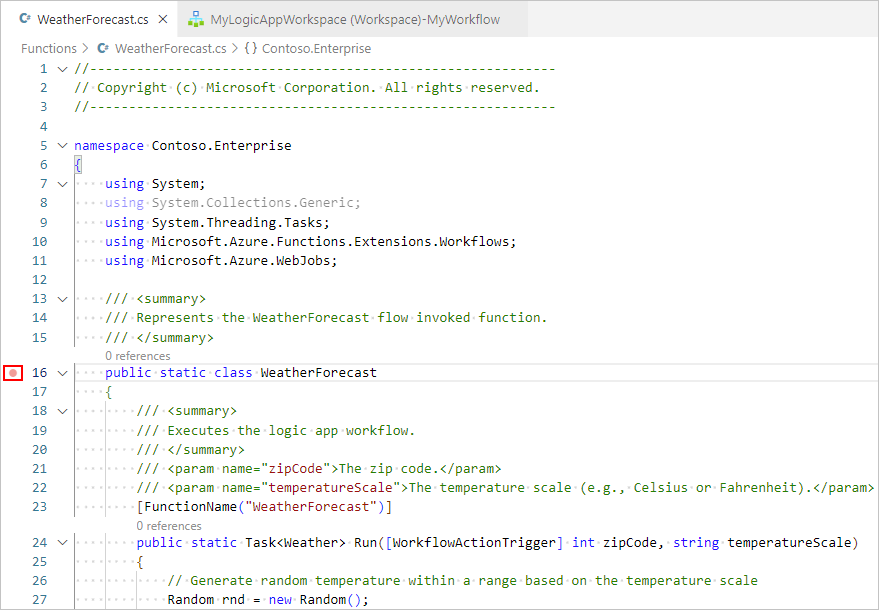
在此示例中, WeatherForecast.cs 函数文件包含以下代码元素和示例值:
Code 元素 价值 命名空间名称 Contoso.Enterprise类名 WeatherForecast函数名称 WeatherForecast函数参数 zipcode、temperatureScale返回类型 Task复杂类型 Weather以下示例展示了完整的示例代码:
//------------------------------------------------------------
// Copyright (c) Microsoft Corporation. All rights reserved.
//------------------------------------------------------------

namespace Contoso.Enterprise
{
    using System;
    using System.Collections.Generic;
    using System.Threading.Tasks;
    using Microsoft.Azure.Functions.Extensions.Workflows;
    using Microsoft.Azure.WebJobs;
    using Microsoft.Extensions.Logging;

    /// <summary>
    /// Represents the WeatherForecast flow invoked function.
    /// </summary>
    public class WeatherForecast
    {

        private readonly ILogger<WeatherForecast> logger;

        public WeatherForecast(ILoggerFactory loggerFactory)
        {
            logger = loggerFactory.CreateLogger<WeatherForecast>();
        }

        /// <summary>
        /// Executes the logic app workflow.
        /// </summary>
        /// <param name="zipCode">The zip code.</param>
        /// <param name="temperatureScale">The temperature scale (e.g., Celsius or Fahrenheit).</param>
        [FunctionName("WeatherForecast")]
        public Task<Weather> Run([WorkflowActionTrigger] int zipCode, string temperatureScale)
        {

            this.logger.LogInformation("Starting WeatherForecast with Zip Code: " + zipCode + " and Scale: " + temperatureScale);

            // Generate random temperature within a range based on the temperature scale
            Random rnd = new Random();
            var currentTemp = temperatureScale == "Celsius" ? rnd.Next(1, 30) : rnd.Next(40, 90);
            var lowTemp = currentTemp - 10;
            var highTemp = currentTemp + 10;

            // Create a Weather object with the temperature information
            var weather = new Weather()
            {
                ZipCode = zipCode,
                CurrentWeather = $"The current weather is {currentTemp} {temperatureScale}",
                DayLow = $"The low for the day is {lowTemp} {temperatureScale}",
                DayHigh = $"The high for the day is {highTemp} {temperatureScale}"
            };

            return Task.FromResult(weather);
        }

        /// <summary>
        /// Represents the weather information for WeatherForecast.
        /// </summary>
        public class Weather
        {
            /// <summary>
            /// Gets or sets the zip code.
            /// </summary>
            public int ZipCode { get; set; }

            /// <summary>
            /// Gets or sets the current weather.
            /// </summary>
            public string CurrentWeather { get; set; }

            /// <summary>
            /// Gets or sets the low temperature for the day.
            /// </summary>
            public string DayLow { get; set; }

            /// <summary>
            /// Gets or sets the high temperature for the day.
            /// </summary>
            public string DayHigh { get; set; }
        }
    }
}
函数定义包括可用于入门的默认
Run方法。 此示例Run方法演示了自定义函数功能可用的一些功能,例如传递不同的输入和输出,包括复杂的.NET类型。函数<名称>.cs文件还包括
ILogger支持将事件记录到 Application Insights 资源的接口。 可以将跟踪信息发送到 Application Insights,并使用工作流中的跟踪信息存储该信息,例如:private readonly ILogger<WeatherForecast> logger; public WeatherForecast(ILoggerFactory loggerFactory) { logger = loggerFactory.CreateLogger<WeatherForecast>(); } [FunctionName("WeatherForecast")] public Task<Weather> Run([WorkflowActionTrigger] int zipCode, string temperatureScale) { this.logger.LogInformation("Starting WeatherForecast with Zip Code: " + zipCode + " and Scale: " + temperatureScale); <...> }将示例函数代码替换为你自己的函数代码,并编辑特定方案的默认
Run方法。 或者,可以复制该函数(包括[FunctionName("<function-name>")]声明),然后使用唯一名称重命名该函数。 然后,可以编辑重命名后的函数以满足你的需求。
此示例继续使用原始示例代码,假设没有更改。
3:编译和生成代码
编写完代码后,对其进行编译以确保不存在生成错误。 .NET函数项目会自动包括生成任务,这些任务可编译代码并将其添加到逻辑应用项目中的 lib\custom 文件夹中,其中工作流查找要运行的自定义函数。 根据.NET版本,这些任务会将程序集置于 lib\custom\net472 或 lib\custom\net8 文件夹中。
执行以下步骤:
在 Visual Studio Code 中的活动栏上,选择 资源管理器。
在 “资源管理器” 窗口中,打开函数项目文件夹的快捷菜单,然后选择“ 生成函数”项目。

生成任务针对函数项目运行。 如果生成成功, “终端 ”窗口会显示 “生成成功” 消息。
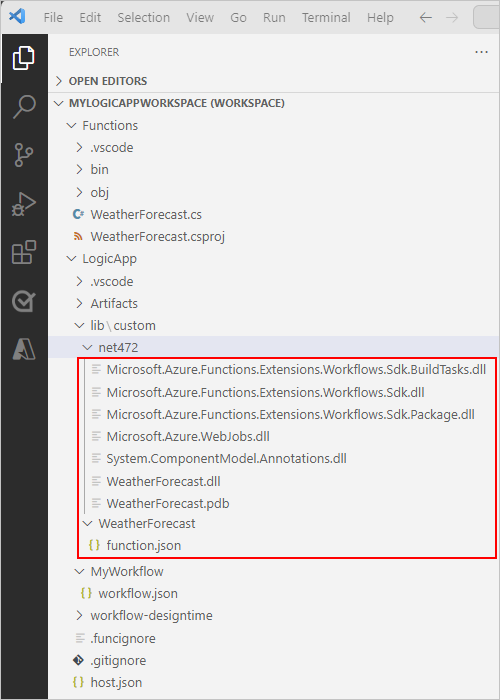
确认你的逻辑应用项目中存在以下项:
在工作区中,展开以下文件夹:<your-logic-app>>lib\\custom>net472 或 net8,根据你的 .NET 版本。 确认名为 net472 或 net8 的子文件夹包含运行代码所需的程序集 (DLL) 文件,包括名为 <function-name> 的文件.dll。
在工作区中,展开以下文件夹:<您的逻辑应用>>lib\custom><function-name>。 确认名为 <function-name> 的子文件夹包含 function.json 文件,该文件包含有关你编写的函数代码的元数据。 工作流设计器使用此文件来确定调用你的代码时所需的输入和输出。
以下示例显示了逻辑应用项目中示例生成的程序集和其他文件:

4:从工作流调用代码
确认代码编译并且逻辑应用项目包含运行代码所需的文件后,请设置工作流以调用代码。
在
“资源管理器” 窗口中,展开工作区名称 logic-app-name 和 workflow-name 打开 workflow.json的快捷菜单,然后选择“ 打开设计器”。
工作流设计器将打开并显示具有以下触发器和操作的默认工作流:
Operation 说明 Trigger 内置名为“收到 HTTP 请求时”的请求触发器。 Action 此逻辑应用中名为“调用本地函数”的内置操作。 Action 仅当使用请求触发器时,您才使用名为“响应”的内置响应操作来回复调用方。 在设计器上,在此 逻辑应用中选择名为“调用本地函数”的操作。
操作的信息窗格随即打开,以便你可以设置自定义函数调用,例如:
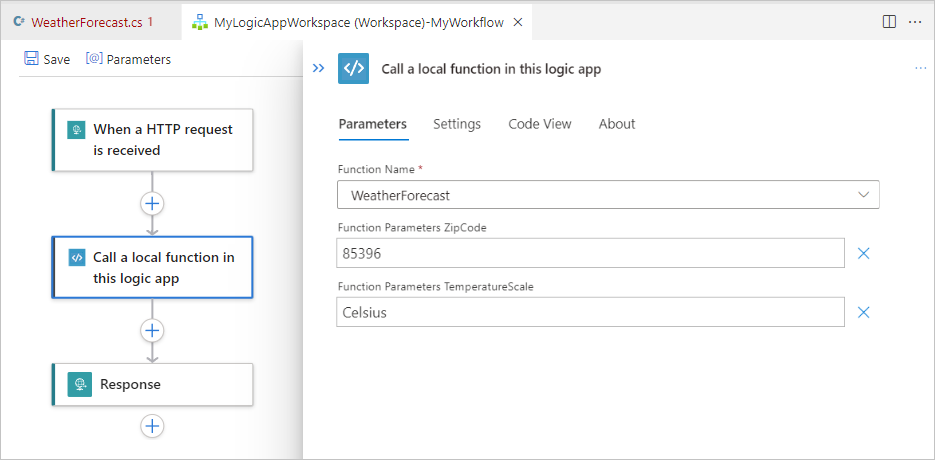
查看并确认 函数名称 参数值已设置为要运行的函数。 查看或更改函数使用的任何其他参数值。
5:调试代码和工作流
对于以下每个 Azure 存储服务,启动 Azurite 存储模拟器:
- Azure Blob 服务
- Azure 队列服务
- Azure 表格服务
在 Visual Studio Code 的“视图”菜单中选择“命令面板”。
出现提示时,从列表中选择 “Azurite:启动 Blob 服务 ”。
从显示的工作目录列表中,选择逻辑应用。
为 Azurite:启动队列服务和 Azurite:启动表服务重复这些步骤。
如果成功,屏幕底部的Visual Studio Code任务栏会显示正在运行的三个存储服务。
按照以下步骤将调试器附加到逻辑应用项目和 .NET 函数项目:
在Visual Studio Code,在活动栏上,选择运行和调试(键盘:Ctrl+Shift+D)。
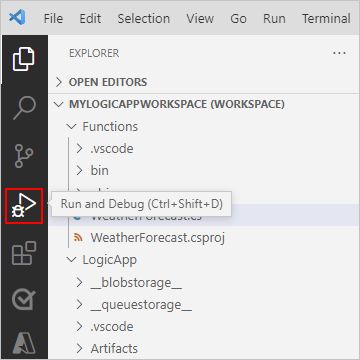
在“运行和调试”列表中,选择具有本地函数(<逻辑应用)的“运行/调试逻辑应用>”,然后选择“播放”(绿色箭头)。

将发生以下事件:
- “终端”窗口随即打开,并显示已开始的调试过程。
- “ 调试控制台” 窗口打开并显示调试状态。
- 在 Visual Studio Code 底部,任务栏变为橙色,表示 .NET 调试程序已加载。
若要设置任何断点,请在函数定义(<函数名称>.cs)或工作流定义(workflow.json)中找到所需的断点行号,然后选择相邻列,例如:
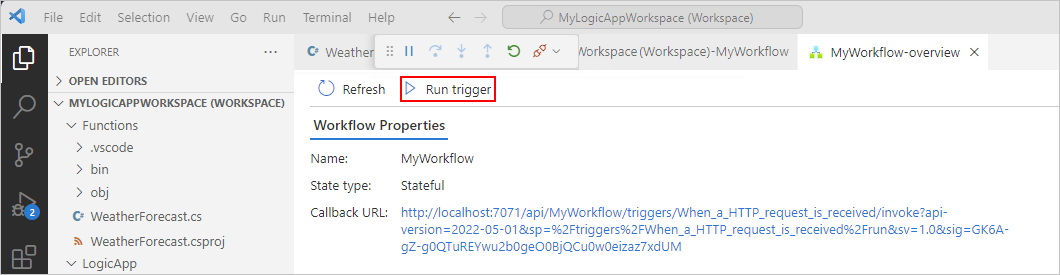
若要在工作流中手动运行请求触发器,请打开工作流的 “概述 ”页:
在逻辑应用项目中,打开 workflow.json 文件的快捷菜单,然后选择“ 概述”。
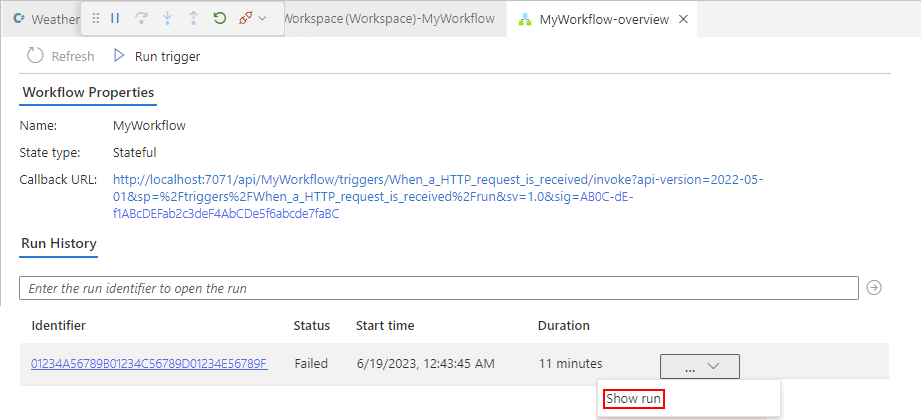
在工作流的“概述”页上,当你想要手动启动工作流时,可以使用“运行触发器”按钮。 在“工作流属性”下,“回叫 URL”值是你的工作流中请求触发器创建的可调用终结点的 URL。 可以向此 URL 发送请求,以从其他应用(包括其他逻辑应用工作流)触发工作流。
在“概述”页工具栏中,选择“运行触发器”。
工作流开始运行后,调试器会激活你的第一个断点。
在“运行”菜单或调试程序工具栏中,选择“调试操作”。
工作流运行完成后,“概述”页会显示已完成的运行以及有关该运行的基本详情。
要查看有关工作流运行的详细信息,请选择已完成的运行。 或者,在“持续时间”列旁边的列表中,选择“显示运行”。
6:部署代码
部署自定义函数的方式与部署逻辑应用项目的方式相同。 无论是从 Visual Studio Code 部署还是使用 CI/CD DevOps 过程,请确保在部署代码之前生成代码。 此外,请确保在部署之前,以下逻辑应用项目文件夹中存在所有依赖程序集:
.NET 4.7.2:lib/custom/net472 文件夹
.NET 8:lib/custom/net8 文件夹
有关详细信息,请参阅将标准工作流从 Visual Studio Code 部署到 Azure。
依赖注入
选择 .NET 8 时,标准工作流中的自定义.NET代码支持 dependency injection (DI)。 此功能允许注册一次服务,使服务在运行时自动提供给自定义代码函数,而不是在每个函数内创建依赖项。
注意
Visual Studio Code中仅.NET 8 个自定义代码项目支持依赖项注入。
如果没有依赖项注入,自定义代码函数通常:
- 直接在函数中创建服务实例。
- 在多个函数或工作流中重复逻辑。
- 将业务逻辑与设置和配置代码混合使用。
随着工作流的增长,自定义代码难以测试、重复使用和维护。 使用依赖项注入,可以:
- 将业务逻辑与工作流执行分开。
- 跨多个自定义代码函数重复使用共享服务。
- 将自定义代码与标准.NET开发模式保持一致。
自定义代码在生产工作流中更易于管理,尤其是在多个工作流依赖于同一逻辑时。
何时使用依赖项注入
如果具有简单或一次性自定义代码函数,则可能不需要依赖项注入。 但是,如果自定义代码具有以下要求,则可能需要使用依赖项注入:
- 多个工作流使用相同的自定义代码函数或共享相同的自定义代码函数。
- 自定义代码函数包含随时间变化的业务或路由逻辑。
- 需要更好的可测试性或长期可维护性。
依赖项注入如何影响自定义.NET函数
依赖项注入不会更改您调用自定义 .NET 函数或执行工作流行为的方式。 此功能只会更改基础自定义代码结构,但会产生相同的结果。 以下步骤描述了此过程:
- Azure Logic Apps 加载了您的自定义代码项目。
- Azure Logic Apps实例化、注册和注入函数所需的服务。
- 该函数使用注入的依赖项运行。
启用依赖项注入
若要将依赖项注入用于自定义.NET代码,请完成以下要求:
创建自定义代码项目时,请选择 .NET 8。
只有.NET 8 个自定义代码项目支持依赖关系注入。
在项目中,添加一个
StartupConfiguration类来定义依赖项列表。 使用IConfigureStartupIServiceCollection实现接口并注册依赖项,例如:using Microsoft.Azure.Functions.Extensions.Workflows; using Microsoft.Extensions.DependencyInjection; public class StartupConfiguration : IConfigureStartup { /// <summary> /// Configures services for the custom code function to use. /// </summary> /// <param name="services">The service collection to configure.</param> public void Configure(IServiceCollection services) { // Register the routing service with dependency injection services.AddSingleton<IRoutingService, OrderRoutingService>(); services.AddSingleton<IDiscountService, DiscountService>(); } }IConfigureStartup接口在Microsoft.Extensions.DependencyInjection中定义。 有关详细信息,请参阅 StartupConfiguration.cs在自定义代码函数类构造函数中,通过将注册的服务定义为构造函数参数来初始化这些服务,而不是在函数中创建它们,例如:
public class MySampleFunction
{
    private readonly ILogger<MySampleFunction> logger;
    private readonly IRoutingService routingService;
    private readonly IDiscountService discountService;

    public MySampleFunction(ILoggerFactory loggerFactory, IRoutingService routingService, IDiscountService discountService)
    {
        this.logger = loggerFactory.CreateLogger<MySampleFunction>();
        this.routingService = routingService;
        this.discountService = discountService;
    }

    // Add your function logic here

}
除了生成和部署自定义代码项目之外,无需执行任何其他步骤、编辑工作流或在Azure Logic Apps进行任何其他设置更改即可启用依赖项注入。
有关详细信息,请参阅 自定义代码依赖关系注入示例。
自带 NuGet 软件包
对于使用 .NET 8 的基于 NuGet 的自定义代码项目,您可以包含和管理自己的 NuGet 包,而无需解决语言工作者宿主所用依赖项的冲突。 直接将程序集依赖项添加到项目中的单独程序集位置。 除了以下例外情况,您可以引入任何与 .NET 8 兼容的依赖的程序集版本,以满足项目的需求:
- Microsoft.Extensions.Logging.Abstractions
- Microsoft.Extensions.DependencyInjection.Abstractions
- Microsoft.Azure.Functions.Extensions.Workflows.Abstractions
故障排查问题
操作信息窗格错误
在工作流设计器中,当你选择名为“调用此逻辑应用中的本地函数”的内置操作时,该操作的信息窗格会显示以下消息:
Failed to retrieve dynamic inputs. Error details:
在此方案中,请检查逻辑应用项目以查看 LogicApp\lib\custom 文件夹是否为空。 如果为空,请在 “终端 ”菜单中选择“ 运行任务>生成函数”。
当前没有具有指定名称的进程在运行
如果在运行工作流时收到此错误消息,则可能将调试器进程附加到 .NET Functions,而不是附加到逻辑应用。
要解决此问题,请在“运行并调试”列表中,选择“附加到逻辑应用 (LogicApp)”,然后选择“运行”(绿色三角形)。
包未正确导入
如果“输出”窗口显示了类似于以下消息的错误,请确保你已至少安装 .NET 6.0。 如果已安装此版本,请尝试卸载,然后重新安装。
C:\Users\yourUserName\.nuget\packages\microsoft.net.sdk.functions\4.2.0\build\Microsoft.NET.Sdk.Functions.targets(83,5): warning : The ExtensionsMetadataGenerator package was not imported correctly. Are you missing 'C:\Users\yourUserName\.nuget\packages\microsoft.azure.webjobs.script.extensionsmetadatagenerator\4.0.1\build\Microsoft.Azure.WebJobs.Script.ExtensionsMetadataGenerator.targets' or 'C:\Users\yourUserName\.nuget\packages\microsoft.azure.webjobs.script.extensionsmetadatagenerator\4.0.1\build\Microsoft.Azure.WebJobs.Script.ExtensionsMetadataGenerator.props'? [C:\Desktop\...\custom-code-project\MyLogicAppWorkspace\Function\WeatherForecast.csproj] WeatherForecast -> C:\Desktop\...\custom-code-project\MyLogicAppWorkspace\Function\\bin\Debug\net472\WeatherForecast.dll C:\Users\yourUserName\.nuget\packages\microsoft.net.sdk.functions\4.2.0\build\Microsoft.NET.Sdk.Functions.Build.targets(32,5): error : It was not possible to find any compatible framework version [C:\Desktop\...\custom-code-project\MyLogicAppWorkspace\Function\WeatherForecast.csproj] C:\Users\yourUserName\.nuget\packages\microsoft.net.sdk.functions\4.2.0\build\Microsoft.NET.Sdk.Functions.Build.targets(32,5): error : The specified framework 'Microsoft.NETCore.App', version '6.0.0' was not found. [C:\Desktop\...\custom-code-project\MyLogicAppWorkspace\Function\WeatherForecast.csproj] C:\Users\yourUserName\.nuget\packages\microsoft.net.sdk.functions\4.2.0\build\Microsoft.NET.Sdk.Functions.Build.targets(32,5): error : - Check application dependencies and target a framework version installed at: [C:\Desktop\...\custom-code-project\MyLogicAppWorkspace\Function\WeatherForecast.csproj]
生成失败
如果函数不包含变量,并且生成代码,“输出”窗口可能会显示以下错误消息:
C:\Users\yourUserName\...\custom-code-project\Function\func.cs (24,64): error CS1031: Type expected [C:\Users\yourUserName\...\custom-code-project\Function\func.csproj]
C:\Users\yourUserName\...\custom-code-project\Function\func.cs (24,64): error CS1001: Identifier expected [C:\Users\yourUserName\...\custom-code-project\Function\func.csproj]
Build FAILED.
C:\Users\yourUserName\...\custom-code-project\Function\func.cs (24,64): error CS1031: Type expected [C:\Users\yourUserName\...\custom-code-project\Function\func.csproj]
C:\Users\yourUserName\...\custom-code-project\Function\func.cs (24,64): error CS1001: Identifier expected [C:\Users\yourUserName\...\custom-code-project\Function\func.csproj]
0 Warning(s)
2 Error(s)
若要解决此问题,请在代码 Run 的方法中添加以下参数:
string parameter1 = null
以下示例显示了 Run 方法签名的显示方式:
public static Task<Weather> Run([WorkflowActionTrigger] int zipCode, string temperatureScale, string parameter1 = null)