适用于: Python SDK azure-ai-ml v2(当前)
本文介绍如何使用开放神经网络Exchange(ONNX)对Azure Machine Learning中的自动化机器学习(AutoML)生成的计算机视觉模型进行预测。
若要使用 ONNX 进行预测,需执行以下操作:
- 从 AutoML 训练过程下载 ONNX 模型文件。
- 了解 ONNX 模型的输入和输出。
- 预处理数据,使其成为输入图像所需的格式。
- 使用 ONNX Runtime 执行适用于 Python 的推理。
- 可视化对象检测和实例分段任务的预测。
ONNX 是机器学习和深度学习模型的开放标准。 它支持在常用的 AI 框架中进行模型导入和导出(互操作性)。 有关更多详细信息,请浏览 ONNX GitHub 项目。
ONNX 运行时是一个支持跨平台推理的开源项目。 ONNX 运行时跨编程语言(包括 Python、C++、C#、C、Java 和 JavaScript)提供 API。 可以使用这些 API 对输入图像执行推理。 将模型导出为 ONNX 格式后,便可以在项目需要的任何编程语言中使用这些 API。
本指南介绍如何使用 Python API for ONNX Runtime对图像进行预测,以便执行热门视觉任务。 可以跨语言使用这些 ONNX 导出的模型。
先决条件
下载 ONNX 模型文件
可以使用 Azure Machine Learning studio UI 或 Azure Machine Learning Python SDK 从 AutoML 运行下载 ONNX 模型文件。 建议使用具有实验名称和父运行 ID 的 SDK 进行下载。
Azure 机器学习工作室
在Azure Machine Learning studio上,通过使用训练笔记本中生成的试验的超链接转到试验,或在 Experiments 选项卡上选择Assets下的实验名称。 然后,选择最佳子运行。
在最佳子运行中,转到 train_artifacts。 使用“下载”按钮手动下载以下文件:
-
labels.json:包含训练数据集中所有类或标签的文件。
-
model.onnx:ONNX 格式的模型。
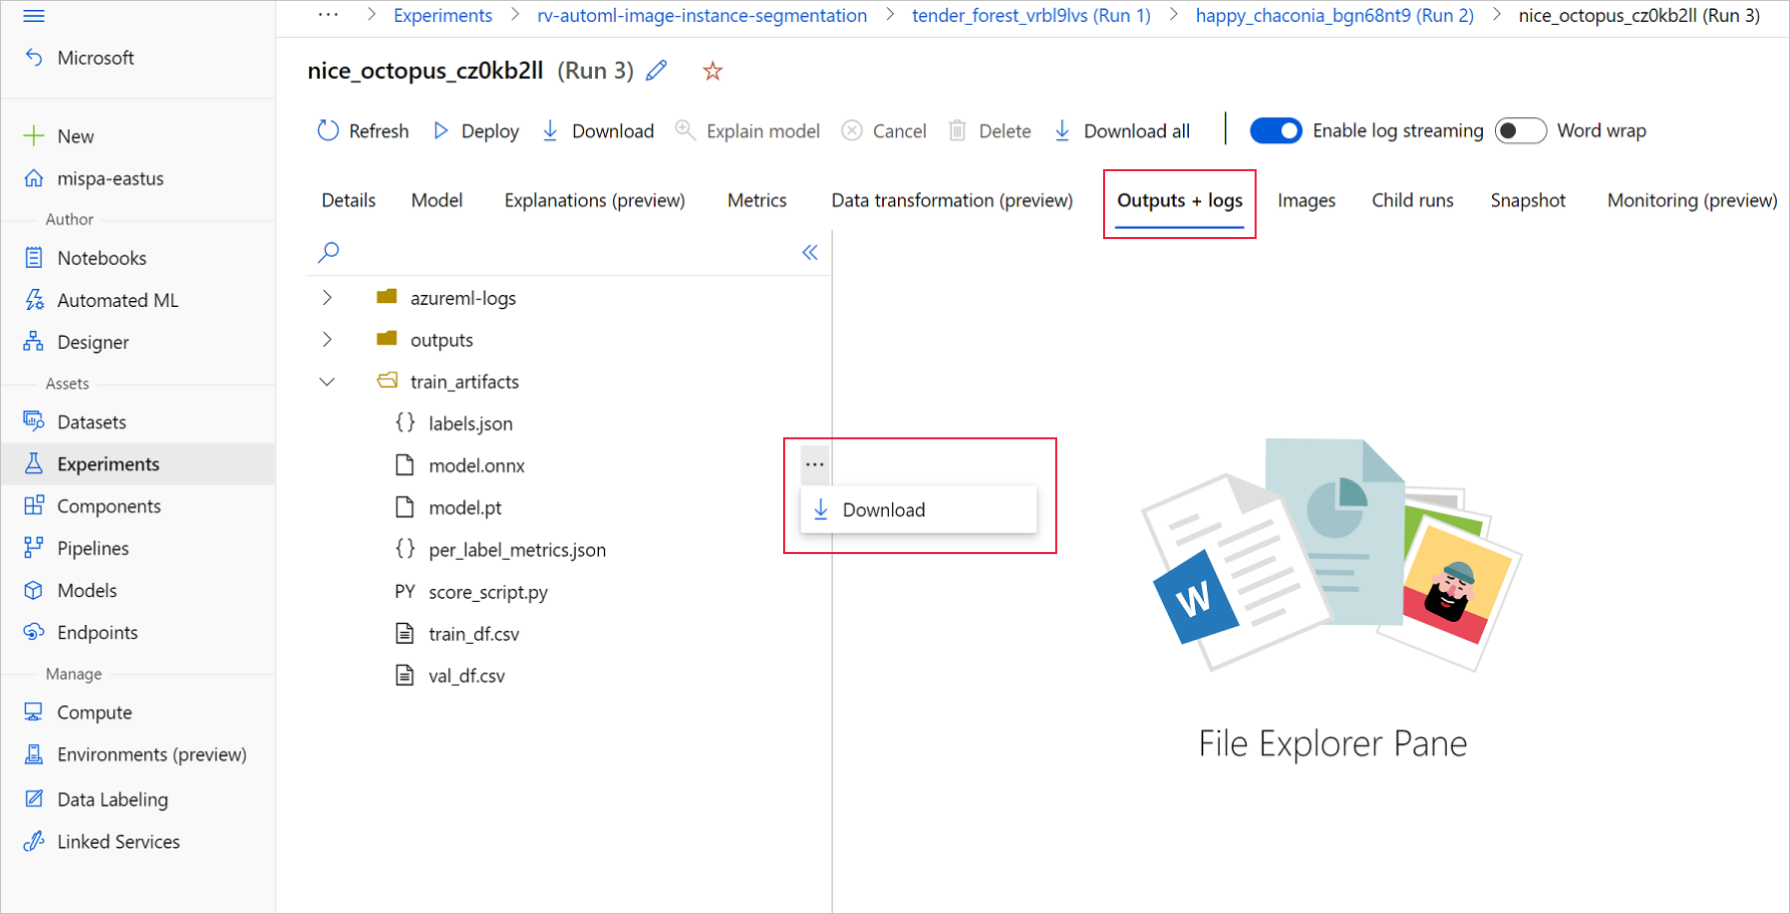
将下载的模型文件保存到目录。 本文中的示例使用 ./automl_models 目录。
Azure Machine Learning Python SDK
在 SDK 中,可以使用实验名称和父运行 ID 选择最佳子运行(按主要指标)。 然后,可以下载 labels.json 和 model.onnx 文件 。
以下代码根据相关的主要指标返回最佳子运行。
from azure.identity import DefaultAzureCredential, InteractiveBrowserCredential
from azure.ai.ml import MLClient
mlflow_client = MlflowClient()

try:
    credential = DefaultAzureCredential()
    credential.get_token("https://management.chinacloudapi.cn/.default")
except Exception:
    credential = InteractiveBrowserCredential()
ml_client = None
try:
    ml_client = MLClient.from_config(credential)
except Exception as ex:
    print(ex)
    # Enter details of your Azure Machine Learning workspace
    subscription_id = ''
    resource_group = ''
    workspace_name = ''
    ml_client = MLClient(credential, subscription_id, resource_group, workspace_name)
import mlflow
from mlflow.tracking.client import MlflowClient

# Obtain the tracking URL from MLClient
MLFLOW_TRACKING_URI = ml_client.workspaces.get(
    name=ml_client.workspace_name
).mlflow_tracking_uri

mlflow.set_tracking_uri(MLFLOW_TRACKING_URI)

# Specify the job name
job_name = ''

# Get the parent run
mlflow_parent_run = mlflow_client.get_run(job_name)
best_child_run_id = mlflow_parent_run.data.tags['automl_best_child_run_id']
# get the best child run
best_run = mlflow_client.get_run(best_child_run_id)
下载 labels.json 文件,其中包含训练数据集中的所有类和标签。
local_dir = './automl_models'
if not os.path.exists(local_dir):
    os.mkdir(local_dir)

labels_file = mlflow_client.download_artifacts(
    best_run.info.run_id, 'train_artifacts/labels.json', local_dir
)
下载 model.onnx 文件。
onnx_model_path = mlflow_client.download_artifacts(
    best_run.info.run_id, 'train_artifacts/model.onnx', local_dir
)
如果使用 ONNX 模型对对象检测和实例分段进行批量推理,请参阅有关批量评分的模型生成的部分。
生成模型进行批量评分
默认情况下,AutoML for Images 支持分类的批量评分。 但是对象检测和实例分割 ONNX 模型不支持批量推理。 若要对于对象检测和实例分段进行批量推断,请使用以下过程为所需的批大小生成 ONNX 模型。 为特定批大小生成的模型不能用于其他批大小。
下载 conda 环境文件,并创建用于命令作业的环境对象。
#  Download conda file and define the environment

conda_file = mlflow_client.download_artifacts(
    best_run.info.run_id, "outputs/conda_env_v_1_0_0.yml", local_dir
)
from azure.ai.ml.entities import Environment
env = Environment(
    name="automl-images-env-onnx",
    description="environment for automl images ONNX batch model generation",
    image="mcr.microsoft.com/azureml/openmpi4.1.0-cuda11.1-cudnn8-ubuntu18.04",
    conda_file=conda_file,
)
使用以下模型特定参数提交脚本。 有关参数的更多详细信息,请参阅模型特定超参数;有关受支持的对象检测模型名称,请参阅受支持的模型体系结构部分。
若要获取创建批处理评分模型所需的参数值,请参阅 AutoML 训练运行 outputs 文件夹下生成的评分脚本。 在最佳子运行的评分文件中,使用模型设置变量中提供的超参数值。
对于多类图像分类,为最佳子运行生成的 ONNX 模型默认支持批量评分。 因此,此任务类型不需要模型特定的参数,可以跳到加载标签和 ONNX 模型文件部分。
对于多标签图像分类,为最佳子运行生成的 ONNX 模型默认支持批量评分。 因此,此任务类型不需要模型特定的参数,可以跳到加载标签和 ONNX 模型文件部分。
inputs = {'model_name': 'fasterrcnn_resnet34_fpn',  # enter the faster rcnn or retinanet model name
         'batch_size': 8,  # enter the batch size of your choice
         'height_onnx': 600,  # enter the height of input to ONNX model
         'width_onnx': 800,  # enter the width of input to ONNX model
         'job_name': job_name,
         'task_type': 'image-object-detection',
         'min_size': 600,  # minimum size of the image to be rescaled before feeding it to the backbone
         'max_size': 1333,  # maximum size of the image to be rescaled before feeding it to the backbone
         'box_score_thresh': 0.3,  # threshold to return proposals with a classification score > box_score_thresh
         'box_nms_thresh': 0.5,  # NMS threshold for the prediction head
         'box_detections_per_img': 100   # maximum number of detections per image, for all classes
         }
inputs = {'model_name': 'yolov5',  # enter the yolo model name
          'batch_size': 8,  # enter the batch size of your choice
          'height_onnx': 640,  # enter the height of input to ONNX model
          'width_onnx': 640,  # enter the width of input to ONNX model
          'job_name': job_name,
          'task_type': 'image-object-detection',
          'img_size': 640,  # image size for inference
          'model_size': 'small',  # size of the yolo model
          'box_score_thresh': 0.1,  # threshold to return proposals with a classification score > box_score_thresh
          'box_iou_thresh': 0.5
        }
inputs = {'model_name': 'maskrcnn_resnet50_fpn',  # enter the maskrcnn model name
         'batch_size': 8,  # enter the batch size of your choice
         'height_onnx': 600,  # enter the height of input to ONNX model
         'width_onnx': 800,  # enter the width of input to ONNX model
         'job_name': job_name,
         'task_type': 'image-instance-segmentation',
         'min_size': 600,  # minimum size of the image to be rescaled before feeding it to the backbone
         'max_size': 1333,  # maximum size of the image to be rescaled before feeding it to the backbone
         'box_score_thresh': 0.3,  # threshold to return proposals with a classification score > box_score_thresh
         'box_nms_thresh': 0.5,  # NMS threshold for the prediction head
         'box_detections_per_img': 100  # maximum number of detections per image, for all classes
         }
下载 ONNX_batch_model_generator_automl_for_images.py 文件并将其保留在当前目录中,然后提交脚本。 使用以下命令提交ONNX_batch_model_generator_automl_for_images.py脚本,该脚本可在azureml-examples GitHub 仓库中获得,以生成指定批大小的 ONNX 模型。 在以下代码中,训练的模型环境用来提交此脚本,以生成 ONNX 模型并将其保存到 outputs 目录。
对于多类图像分类,为最佳子运行生成的 ONNX 模型默认支持批量评分。 因此,此任务类型不需要模型特定的参数,可以跳到加载标签和 ONNX 模型文件部分。
对于多标签图像分类,为最佳子运行生成的 ONNX 模型默认支持批量评分。 因此,此任务类型不需要模型特定的参数,可以跳到加载标签和 ONNX 模型文件部分。
from azure.ai.ml import command

job = command(
    code="./onnx_generator_files",  # local path where the code is stored
    command="python ONNX_batch_model_generator_automl_for_images.py --model_name ${{inputs.model_name}} --batch_size ${{inputs.batch_size}} --height_onnx ${{inputs.height_onnx}} --width_onnx ${{inputs.width_onnx}} --job_name ${{inputs.job_name}} --task_type ${{inputs.task_type}} --min_size ${{inputs.min_size}} --max_size ${{inputs.max_size}} --box_score_thresh ${{inputs.box_score_thresh}} --box_nms_thresh ${{inputs.box_nms_thresh}} --box_detections_per_img ${{inputs.box_detections_per_img}}",
    inputs=inputs,
    environment=env,
    compute=compute_name,
    display_name="ONNX-batch-model-generation-rcnn",
    description="Use the PyTorch to generate ONNX batch scoring model.",
)
returned_job = ml_client.create_or_update(job)
ml_client.jobs.stream(returned_job.name)
from azure.ai.ml import command

job = command(
    code="./onnx_generator_files",  # local path where the code is stored
    command="python ONNX_batch_model_generator_automl_for_images.py --model_name ${{inputs.model_name}} --batch_size ${{inputs.batch_size}} --height_onnx ${{inputs.height_onnx}} --width_onnx ${{inputs.width_onnx}} --job_name ${{inputs.job_name}} --task_type ${{inputs.task_type}} --img_size ${{inputs.img_size}} --model_size ${{inputs.model_size}} --box_score_thresh ${{inputs.box_score_thresh}} --box_iou_thresh ${{inputs.box_iou_thresh}}",
    inputs=inputs,
    environment=env,
    compute=compute_name,
    display_name="ONNX-batch-model-generation",
    description="Use the PyTorch to generate ONNX batch scoring model.",
)
returned_job = ml_client.create_or_update(job)
ml_client.jobs.stream(returned_job.name)
from azure.ai.ml import command

job = command(
    code="./onnx_generator_files",  # local path where the code is stored
    command="python ONNX_batch_model_generator_automl_for_images.py --model_name ${{inputs.model_name}} --batch_size ${{inputs.batch_size}} --height_onnx ${{inputs.height_onnx}} --width_onnx ${{inputs.width_onnx}} --job_name ${{inputs.job_name}} --task_type ${{inputs.task_type}} --min_size ${{inputs.min_size}} --max_size ${{inputs.max_size}} --box_score_thresh ${{inputs.box_score_thresh}} --box_nms_thresh ${{inputs.box_nms_thresh}} --box_detections_per_img ${{inputs.box_detections_per_img}}",
    inputs=inputs,
    environment=env,
    compute=compute_name,
    display_name="ONNX-batch-model-generation-maskrcnn",
    description="Use the PyTorch to generate ONNX batch scoring model.",
)
returned_job = ml_client.create_or_update(job)
ml_client.jobs.stream(returned_job.name)
生成批处理模型后,可以通过 UI 手动从 Outputs+logs>outputs 中下载,或者使用以下方法:
batch_size = 8  # use the batch size used to generate the model
returned_job_run = mlflow_client.get_run(returned_job.name)

# Download run's artifacts/outputs
onnx_model_path = mlflow_client.download_artifacts(
    returned_job_run.info.run_id, 'outputs/model_'+str(batch_size)+'.onnx', local_dir
)
下载模型步骤后,使用 ONNX 运行时Python包通过 model.onnx 文件执行推理。 为进行演示,本文使用如何为每个视觉任务准备图像数据集中的数据集。
我们已使用所有视觉任务各自的数据集为其训练了模型,以演示 ONNX 模型推理。
加载标签和 ONNX 模型文件
以下代码片段加载 labels.json,其中类名已排序。 也就是说,如果 ONNX 模型预测标签 ID 为 2,则它对应于 labels.json 文件中的第三个索引给出的标签名称。
import json
import onnxruntime

labels_file = "automl_models/labels.json"
with open(labels_file) as f:
    classes = json.load(f)
print(classes)
try:
    session = onnxruntime.InferenceSession(onnx_model_path)
    print("ONNX model loaded...")
except Exception as e:
    print("Error loading ONNX file: ", str(e))
使用模型时,务必了解一些特定于模型和特定于任务的详细信息。 这些详细信息包括输入数量和输出数量、用于预处理图像的预期输入形状或格式,以及输出形状,确保你了解特定于模型或特定于任务的输出。
sess_input = session.get_inputs()
sess_output = session.get_outputs()
print(f"No. of inputs : {len(sess_input)}, No. of outputs : {len(sess_output)}")

for idx, input_ in enumerate(range(len(sess_input))):
    input_name = sess_input[input_].name
    input_shape = sess_input[input_].shape
    input_type = sess_input[input_].type
    print(f"{idx} Input name : { input_name }, Input shape : {input_shape}, \
    Input type  : {input_type}")

for idx, output in enumerate(range(len(sess_output))):
    output_name = sess_output[output].name
    output_shape = sess_output[output].shape
    output_type = sess_output[output].type
    print(f" {idx} Output name : {output_name}, Output shape : {output_shape}, \
    Output type  : {output_type}")
每个 ONNX 模型都有一组预定义的输入和输出格式。
此示例应用在包含 134 张图像和 4 个类/标签的数据集上训练的 fridgeObjects 模型,以解释 ONNX 模型推理。 有关训练图像分类任务的详细信息,请参阅 多类图像分类笔记本。
输入是经过预处理的图像。
| 输入名称 |
输入形状 |
输入类型 |
描述 |
| input1 |
(batch_size, num_channels, height, width) |
ndarray(float) |
输入是经过预处理的图像,形状为 (1, 3, 224, 224),批大小为 1,高度和宽度为 224。 这些数字对应于训练示例中 crop_size 所用的值。 |
输出是所有类/标签的 logit 数组。
| 输出名称 |
输出形状 |
输出类型 |
描述 |
| output1 |
(batch_size, num_classes) |
ndarray(float) |
模型返回 logit(没有 softmax)。 例如,对于批大小为 1 和 4 的类,它返回 (1, 4)。 |
此示例使用在具有 128 个图像和 4 个类/标签的多标签 fridgeObjects 数据集上训练的模型来解释 ONNX 模型推理。 有关多标签图像分类的模型训练的详细信息,请参阅 multi-label 图像分类笔记本。
输入是经过预处理的图像。
| 输入名称 |
输入形状 |
输入类型 |
描述 |
| input1 |
(batch_size, num_channels, height, width) |
ndarray(float) |
输入是经过预处理的图像,形状为 (1, 3, 224, 224),批大小为 1,高度和宽度为 224。 这些数字对应于训练示例中 crop_size 所用的值。 |
输出是所有类/标签的 logit 数组。
| 输出名称 |
输出形状 |
输出类型 |
描述 |
| output1 |
(batch_size, num_classes) |
ndarray(float) |
模型返回 logit(没有 sigmoid)。 例如,对于批大小为 1 和 4 的类,它返回 (1, 4)。 |
此对象检测示例使用在 128 个图像和 4 个类/标签的检测数据集上 fridgeObjects 训练的模型来解释 ONNX 模型推理。 此示例训练 Faster R-CNN 模型,以演示推理步骤。 有关训练目标检测模型的详细信息,请参阅 目标检测文档。
输入是经过预处理的图像。
| 输入名称 |
输入形状 |
输入类型 |
描述 |
| 输入 |
(batch_size, num_channels, height, width) |
ndarray(float) |
输入是经过预处理的图像,形状为 (1, 3, 600, 800),批大小为 1,高度为 600,宽度为 800。 |
输出是 output_names 和预测结果的元组。 对此,output_names 和 predictions 都是长度为 3*batch_size 的列表。 对于 Faster R-CNN,输出顺序是框、标签和分数;而对于 RetinaNet,输出顺序是框、分数、标签。
| 输出名称 |
输出形状 |
输出类型 |
描述 |
output_names |
(3*batch_size) |
键列表 |
批大小为 2 时,output_names 为 ['boxes_0', 'labels_0', 'scores_0', 'boxes_1', 'labels_1', 'scores_1'] |
predictions |
(3*batch_size) |
ndarray(float) 列表 |
批大小为 2 时,predictions 的形状为 [(n1_boxes, 4), (n1_boxes), (n1_boxes), (n2_boxes, 4), (n2_boxes), (n2_boxes)]。 对此,每个索引的值与 output_names 中相同的索引对应。 |
下表描述了为图像批中的每个示例返回的框、标签和分数。
| 名称 |
形状 |
类型 |
描述 |
| 箱子 |
(n_boxes, 4),其中每个框都设有 x_min, y_min, x_max, y_max |
ndarray(float) |
模型返回 n 个框及其左上角和右下角坐标。 |
| 标签 |
(n_boxes) |
ndarray(float) |
每个框中对象的标签或类 ID。 |
| 分数 |
(n_boxes) |
ndarray(float) |
每个框中对象的置信度分数。 |
此对象检测示例使用在 128 个图像和 4 个类/标签的检测数据集上 fridgeObjects 训练的模型来解释 ONNX 模型推理。 此示例训练 YOLO 模型,以演示推理步骤。 有关训练目标检测模型的详细信息,请参阅 目标检测文档。
输入是经过预处理的图像,形状为 (1, 3, 640, 640),批大小为 1,高度和宽度为 640。 这些数字对应于训练示例中所用的值。
| 输入名称 |
输入形状 |
输入类型 |
描述 |
| 输入 |
(batch_size, num_channels, height, width) |
ndarray(float) |
输入是经过预处理的图像,形状为 (1, 3, 640, 640),批大小为 1,高度为 640,宽度为 640。 |
ONNX 模型预测包含多个输出。 需要第一个输出才能对检测执行非最大抑制。 为方便使用,自动化 ML 将在执行 NMS 后处理步骤后显示输出格式。 对于批中每个示例,NMS 后的输出是框、标签和分数列表。
| 输出名称 |
输出形状 |
输出类型 |
描述 |
| 输出 |
(batch_size) |
ndarray(float) 列表 |
模型返回批中每个示例的框检测 |
列表中的每个单元格指示形状为 (n_boxes, 6) 的示例的框检测,其中每个框都有 x_min, y_min, x_max, y_max, confidence_score, class_id。
对于此实例分割示例,使用在 fridgeObjects 数据集上训练的 Mask R-CNN 模型,该模型经过 128 张图像和 4 个类别/标签的训练,用于解释 ONNX 模型推理。 有关实例分段模型的训练的详细信息,请参阅 instance 分段笔记本。
重要
仅支持 Mask R-CNN 用于实例分割任务。 输入和输出格式仅基于 Mask R-CNN。
输入是经过预处理的图像。 已导出适用于 Mask R-CNN 的 ONNX 模型,用于处理各种形状的图像。 建议将其调整为与训练图像大小一致的固定大小,以提高性能。
| 输入名称 |
输入形状 |
输入类型 |
描述 |
| 输入 |
(batch_size, num_channels, height, width) |
ndarray(float) |
输入是经过预处理的图像,形状为 (1, 3, input_image_height, input_image_width),批大小为 1,高度和宽度与输入图像类似。 |
输出是 output_names 和预测结果的元组。 对此,output_names 和 predictions 都是长度为4*batch_size 的列表。
| 输出名称 |
输出形状 |
输出类型 |
描述 |
output_names |
(4*batch_size) |
键列表 |
批大小为 2 时,output_names 为 ['boxes_0', 'labels_0', 'scores_0', 'masks_0', 'boxes_1', 'labels_1', 'scores_1', 'masks_1'] |
predictions |
(4*batch_size) |
ndarray(float) 列表 |
批大小为 2 时,predictions 的形状为 [(n1_boxes, 4), (n1_boxes), (n1_boxes), (n1_boxes, 1, height_onnx, width_onnx), (n2_boxes, 4), (n2_boxes), (n2_boxes), (n2_boxes, 1, height_onnx, width_onnx)]。 对此,每个索引的值与 output_names 中相同的索引对应。 |
| 名称 |
形状 |
类型 |
描述 |
| 箱子 |
(n_boxes, 4),其中每个框都设有 x_min, y_min, x_max, y_max |
ndarray(float) |
模型返回 n 个框及其左上角和右下角坐标。 |
| 标签 |
(n_boxes) |
ndarray(float) |
每个框中对象的标签或类 ID。 |
| 分数 |
(n_boxes) |
ndarray(float) |
每个框中对象的置信度分数。 |
| 掩码 |
(n_boxes, 1, height_onnx, width_onnx) |
ndarray(float) |
检测到的对象的掩码(多边形),这些对象具有输入图像的形状高度和宽度。 |
预处理
执行以下预处理步骤,以实现 ONNX 模型推理:
- 将图像转换为 RGB。
- 将图像大小调整为
valid_resize_size 和 valid_resize_size 值,这些值对应于训练期间验证数据集转换时使用的值。
valid_resize_size 的默认值为 256。
- 将图像中心裁剪为
height_onnx_crop_size 和 width_onnx_crop_size。 它与 valid_crop_size 对应,默认值为 224。
- 将
HxWxC 更改为 CxHxW。
- 转换为 float 型。
- 使用 ImageNet 的
mean = [0.485, 0.456, 0.406] 和 std = [0.229, 0.224, 0.225] 进行规范化。
如果在训练期间为超参数valid_resize_size 和 valid_crop_size 选择了不同的值,则应使用这些值。
获取 ONNX 模型所需的输入形状。
batch, channel, height_onnx_crop_size, width_onnx_crop_size = session.get_inputs()[0].shape
batch, channel, height_onnx_crop_size, width_onnx_crop_size
没有使用 PyTorch
import glob
import numpy as np
from PIL import Image

def preprocess(image, resize_size, crop_size_onnx):
    """Perform pre-processing on raw input image

    :param image: raw input image
    :type image: PIL image
    :param resize_size: value to resize the image
    :type image: Int
    :param crop_size_onnx: expected height of an input image in onnx model
    :type crop_size_onnx: Int
    :return: pre-processed image in numpy format
    :rtype: ndarray 1xCxHxW
    """

    image = image.convert('RGB')
    # resize
    image = image.resize((resize_size, resize_size))
    #  center  crop
    left = (resize_size - crop_size_onnx)/2
    top = (resize_size - crop_size_onnx)/2
    right = (resize_size + crop_size_onnx)/2
    bottom = (resize_size + crop_size_onnx)/2
    image = image.crop((left, top, right, bottom))

    np_image = np.array(image)
    # HWC -> CHW
    np_image = np_image.transpose(2, 0, 1) # CxHxW
    # normalize the image
    mean_vec = np.array([0.485, 0.456, 0.406])
    std_vec = np.array([0.229, 0.224, 0.225])
    norm_img_data = np.zeros(np_image.shape).astype('float32')
    for i in range(np_image.shape[0]):
        norm_img_data[i,:,:] = (np_image[i,:,:]/255 - mean_vec[i])/std_vec[i]

    np_image = np.expand_dims(norm_img_data, axis=0) # 1xCxHxW
    return np_image

# following code loads only batch_size number of images for demonstrating ONNX inference
# make sure that the data directory has at least batch_size number of images

test_images_path = "automl_models_multi_cls/test_images_dir/*" # replace with path to images
# Select batch size needed
batch_size = 8
# you can modify resize_size based on your trained model
resize_size = 256
# height and width will be the same for classification
crop_size_onnx = height_onnx_crop_size

image_files = glob.glob(test_images_path)
img_processed_list = []
for i in range(batch_size):
    img = Image.open(image_files[i])
    img_processed_list.append(preprocess(img, resize_size, crop_size_onnx))

if len(img_processed_list) > 1:
    img_data = np.concatenate(img_processed_list)
elif len(img_processed_list) == 1:
    img_data = img_processed_list[0]
else:
    img_data = None

assert batch_size == img_data.shape[0]
使用 PyTorch
import glob
import torch
import numpy as np
from PIL import Image
from torchvision import transforms

def _make_3d_tensor(x) -> torch.Tensor:
    """This function is for images that have less channels.

    :param x: input tensor
    :type x: torch.Tensor
    :return: return a tensor with the correct number of channels
    :rtype: torch.Tensor
    """
    return x if x.shape[0] == 3 else x.expand((3, x.shape[1], x.shape[2]))

def preprocess(image, resize_size, crop_size_onnx):
    transform = transforms.Compose([
        transforms.Resize(resize_size),
        transforms.CenterCrop(crop_size_onnx),
        transforms.ToTensor(),
        transforms.Lambda(_make_3d_tensor),
        transforms.Normalize([0.485, 0.456, 0.406], [0.229, 0.224, 0.225])])

    img_data = transform(image)
    img_data = img_data.numpy()
    img_data = np.expand_dims(img_data, axis=0)
    return img_data

# following code loads only batch_size number of images for demonstrating ONNX inference
# make sure that the data directory has at least batch_size number of images

test_images_path = "automl_models_multi_cls/test_images_dir/*"  # replace with path to images
# Select batch size needed
batch_size = 8
# you can modify resize_size based on your trained model
resize_size = 256
# height and width will be the same for classification
crop_size_onnx = height_onnx_crop_size

image_files = glob.glob(test_images_path)
img_processed_list = []
for i in range(batch_size):
    img = Image.open(image_files[i])
    img_processed_list.append(preprocess(img, resize_size, crop_size_onnx))

if len(img_processed_list) > 1:
    img_data = np.concatenate(img_processed_list)
elif len(img_processed_list) == 1:
    img_data = img_processed_list[0]
else:
    img_data = None

assert batch_size == img_data.shape[0]
执行以下预处理步骤,以实现 ONNX 模型推理。 对于多类图像分类,这些步骤相同。
- 将图像转换为 RGB。
- 将图像大小调整为
valid_resize_size 和 valid_resize_size 值,这些值对应于训练期间验证数据集转换时使用的值。
valid_resize_size 的默认值为 256。
- 将图像中心裁剪为
height_onnx_crop_size 和 width_onnx_crop_size。 这对应于默认值为 224 的 valid_crop_size。
- 将
HxWxC 更改为 CxHxW。
- 转换为 float 型。
- 使用 ImageNet 的
mean = [0.485, 0.456, 0.406] 和 std = [0.229, 0.224, 0.225] 进行规范化。
如果在训练期间为超参数valid_resize_size 和 valid_crop_size 选择了不同的值,则应使用这些值。
获取 ONNX 模型所需的输入形状。
batch, channel, height_onnx_crop_size, width_onnx_crop_size = session.get_inputs()[0].shape
batch, channel, height_onnx_crop_size, width_onnx_crop_size
没有使用 PyTorch
import glob
import numpy as np
from PIL import Image

def preprocess(image, resize_size, crop_size_onnx):
    """Perform pre-processing on raw input image

    :param image: raw input image
    :type image: PIL image
    :param resize_size: value to resize the image
    :type image: Int
    :param crop_size_onnx: expected height of an input image in onnx model
    :type crop_size_onnx: Int
    :return: pre-processed image in numpy format
    :rtype: ndarray 1xCxHxW
    """

    image = image.convert('RGB')
    # resize
    image = image.resize((resize_size, resize_size))
    # center  crop
    left = (resize_size - crop_size_onnx)/2
    top = (resize_size - crop_size_onnx)/2
    right = (resize_size + crop_size_onnx)/2
    bottom = (resize_size + crop_size_onnx)/2
    image = image.crop((left, top, right, bottom))

    np_image = np.array(image)
    # HWC -> CHW
    np_image = np_image.transpose(2, 0, 1) # CxHxW

    # normalize the image
    mean_vec = np.array([0.485, 0.456, 0.406])
    std_vec = np.array([0.229, 0.224, 0.225])
    norm_img_data = np.zeros(np_image.shape).astype('float32')
    for i in range(np_image.shape[0]):
        norm_img_data[i,:,:] = (np_image[i,:,:] / 255 - mean_vec[i]) / std_vec[i]
    np_image = np.expand_dims(norm_img_data, axis=0) # 1xCxHxW
    return np_image

# following code loads only batch_size number of images for demonstrating ONNX inference
# make sure that the data directory has at least batch_size number of images

test_images_path = "automl_models_multi_label/test_images_dir/*" # replace with path to images
# Select batch size needed
batch_size = 8
# you can modify resize_size based on your trained model
resize_size = 256
# height and width will be the same for classification
crop_size_onnx = height_onnx_crop_size

image_files = glob.glob(test_images_path)
img_processed_list = []
for i in range(batch_size):
    img = Image.open(image_files[i])
    img_processed_list.append(preprocess(img, resize_size, crop_size_onnx))

if len(img_processed_list) > 1:
    img_data = np.concatenate(img_processed_list)
elif len(img_processed_list) == 1:
    img_data = img_processed_list[0]
else:
    img_data = None

assert batch_size == img_data.shape[0]
使用 PyTorch
import glob
import torch
import numpy as np
from PIL import Image
from torchvision import transforms

def _make_3d_tensor(x) -> torch.Tensor:
    """This function is for images that have less channels.

    :param x: input tensor
    :type x: torch.Tensor
    :return: return a tensor with the correct number of channels
    :rtype: torch.Tensor
    """
    return x if x.shape[0] == 3 else x.expand((3, x.shape[1], x.shape[2]))

def preprocess(image, resize_size, crop_size_onnx):
    """Perform pre-processing on raw input image

    :param image: raw input image
    :type image: PIL image
    :param resize_size: value to resize the image
    :type image: Int
    :param crop_size_onnx: expected height of an input image in onnx model
    :type crop_size_onnx: Int
    :return: pre-processed image in numpy format
    :rtype: ndarray 1xCxHxW
    """
    transform = transforms.Compose([
        transforms.Resize(resize_size),
        transforms.CenterCrop(crop_size_onnx),
        transforms.ToTensor(),
        transforms.Lambda(_make_3d_tensor),
        transforms.Normalize([0.485, 0.456, 0.406], [0.229, 0.224, 0.225])])

    img_data = transform(image)
    img_data = img_data.numpy()
    img_data = np.expand_dims(img_data, axis=0)

    return img_data

# following code loads only batch_size number of images for demonstrating ONNX inference
# make sure that the data directory has at least batch_size number of images

test_images_path = "automl_models_multi_label/test_images_dir/*"  # replace with path to images
# Select batch size needed
batch_size = 8
# you can modify resize_size based on your trained model
resize_size = 256
# height and width will be the same for classification
crop_size_onnx = height_onnx_crop_size

image_files = glob.glob(test_images_path)
img_processed_list = []
for i in range(batch_size):
    img = Image.open(image_files[i])
    img_processed_list.append(preprocess(img, resize_size, crop_size_onnx))

if len(img_processed_list) > 1:
    img_data = np.concatenate(img_processed_list)
elif len(img_processed_list) == 1:
    img_data = img_processed_list[0]
else:
    img_data = None

assert batch_size == img_data.shape[0]
对于具有 Faster R-CNN 体系结构的对象检测,请遵循与图像分类相同的预处理步骤,但图像裁剪除外。 可以将图像大小调整为高 600 和宽 800。 可以使用以下代码获取预期的输入高度和宽度。
batch, channel, height_onnx, width_onnx = session.get_inputs()[0].shape
batch, channel, height_onnx, width_onnx
然后,执行预处理步骤。
import glob
import numpy as np
from PIL import Image

def preprocess(image, height_onnx, width_onnx):
    """Perform pre-processing on raw input image

    :param image: raw input image
    :type image: PIL image
    :param height_onnx: expected height of an input image in onnx model
    :type height_onnx: Int
    :param width_onnx: expected width of an input image in onnx model
    :type width_onnx: Int
    :return: pre-processed image in numpy format
    :rtype: ndarray 1xCxHxW
    """

    image = image.convert('RGB')
    image = image.resize((width_onnx, height_onnx))
    np_image = np.array(image)
    # HWC -> CHW
    np_image = np_image.transpose(2, 0, 1) # CxHxW
    # normalize the image
    mean_vec = np.array([0.485, 0.456, 0.406])
    std_vec = np.array([0.229, 0.224, 0.225])
    norm_img_data = np.zeros(np_image.shape).astype('float32')
    for i in range(np_image.shape[0]):
        norm_img_data[i,:,:] = (np_image[i,:,:] / 255 - mean_vec[i]) / std_vec[i]
    np_image = np.expand_dims(norm_img_data, axis=0) # 1xCxHxW
    return np_image

# following code loads only batch_size number of images for demonstrating ONNX inference
# make sure that the data directory has at least batch_size number of images

test_images_path = "automl_models_od/test_images_dir/*" # replace with path to images
image_files = glob.glob(test_images_path)
img_processed_list = []
for i in range(batch_size):
    img = Image.open(image_files[i])
    img_processed_list.append(preprocess(img, height_onnx, width_onnx))

if len(img_processed_list) > 1:
    img_data = np.concatenate(img_processed_list)
elif len(img_processed_list) == 1:
    img_data = img_processed_list[0]
else:
    img_data = None

assert batch_size == img_data.shape[0]
对于具有 YOLO 体系结构的对象检测,请遵循与图像分类相同的预处理步骤,但图像裁剪除外。 可以将图像调整为高度 600 和宽度 800,并使用以下代码获取预期的输入高度和宽度。
batch, channel, height_onnx, width_onnx = session.get_inputs()[0].shape
batch, channel, height_onnx, width_onnx
有关 YOLO 所需的预处理,请参阅 yolo_onnx_preprocessing_utils.py。
import glob
import numpy as np
from yolo_onnx_preprocessing_utils import preprocess

# use height and width based on the generated model
test_images_path = "automl_models_od_yolo/test_images_dir/*" # replace with path to images
image_files = glob.glob(test_images_path)
img_processed_list = []
pad_list = []
for i in range(batch_size):
    img_processed, pad = preprocess(image_files[i])
    img_processed_list.append(img_processed)
    pad_list.append(pad)

if len(img_processed_list) > 1:
    img_data = np.concatenate(img_processed_list)
elif len(img_processed_list) == 1:
    img_data = img_processed_list[0]
else:
    img_data = None

assert batch_size == img_data.shape[0]
重要
仅支持 Mask R-CNN 用于实例分割任务。 预处理步骤仅基于 Mask R-CNN。
执行以下预处理步骤,以实现 ONNX 模型推理:
- 将图像转换为 RGB。
- 调整图像大小。
- 将
HxWxC 更改为 CxHxW。
- 转换为 float 型。
- 使用 ImageNet 的
mean = [0.485, 0.456, 0.406] 和 std = [0.229, 0.224, 0.225] 进行规范化。
对于 resize_height 和 resize_width,还可以使用训练期间使用的值,但受 Mask R-CNN 的 min_size 和 max_size超参数 限制。
import glob
import numpy as np
from PIL import Image

def preprocess(image, resize_height, resize_width):
    """Perform pre-processing on raw input image

    :param image: raw input image
    :type image: PIL image
    :param resize_height: resize height of an input image
    :type resize_height: Int
    :param resize_width: resize width of an input image
    :type resize_width: Int
    :return: pre-processed image in numpy format
    :rtype: ndarray of shape 1xCxHxW
    """

    image = image.convert('RGB')
    image = image.resize((resize_width, resize_height))
    np_image = np.array(image)
    # HWC -> CHW
    np_image = np_image.transpose(2, 0, 1)  # CxHxW
    # normalize the image
    mean_vec = np.array([0.485, 0.456, 0.406])
    std_vec = np.array([0.229, 0.224, 0.225])
    norm_img_data = np.zeros(np_image.shape).astype('float32')
    for i in range(np_image.shape[0]):
        norm_img_data[i,:,:] = (np_image[i,:,:]/255 - mean_vec[i])/std_vec[i]
    np_image = np.expand_dims(norm_img_data, axis=0)  # 1xCxHxW
    return np_image

# following code loads only batch_size number of images for demonstrating ONNX inference
# make sure that the data directory has at least batch_size number of images
# use height and width based on the trained model
# use height and width based on the generated model
test_images_path = "automl_models_is/test_images_dir/*" # replace with path to images
image_files = glob.glob(test_images_path)
img_processed_list = []
for i in range(batch_size):
    img = Image.open(image_files[i])
    img_processed_list.append(preprocess(img, height_onnx, width_onnx))

if len(img_processed_list) > 1:
    img_data = np.concatenate(img_processed_list)
elif len(img_processed_list) == 1:
    img_data = img_processed_list[0]
else:
    img_data = None

assert batch_size == img_data.shape[0]
使用 ONNX 运行时进行推理
使用 ONNX 运行时进行推理会根据每个计算机视觉任务而有所不同。
def get_predictions_from_ONNX(onnx_session, img_data):
    """Perform predictions with ONNX runtime

    :param onnx_session: onnx model session
    :type onnx_session: class InferenceSession
    :param img_data: pre-processed numpy image
    :type img_data: ndarray with shape 1xCxHxW
    :return: scores with shapes
            (1, No. of classes in training dataset)
    :rtype: numpy array
    """

    sess_input = onnx_session.get_inputs()
    sess_output = onnx_session.get_outputs()
    print(f"No. of inputs : {len(sess_input)}, No. of outputs : {len(sess_output)}")
    # predict with ONNX Runtime
    output_names = [ output.name for output in sess_output]
    scores = onnx_session.run(output_names=output_names,\
                                               input_feed={sess_input[0].name: img_data})

    return scores[0]

scores = get_predictions_from_ONNX(session, img_data)
def get_predictions_from_ONNX(onnx_session,img_data):
    """Perform predictions with ONNX runtime

    :param onnx_session: onnx model session
    :type onnx_session: class InferenceSession
    :param img_data: pre-processed numpy image
    :type img_data: ndarray with shape 1xCxHxW
    :return: scores with shapes
            (1, No. of classes in training dataset)
    :rtype: numpy array
    """

    sess_input = onnx_session.get_inputs()
    sess_output = onnx_session.get_outputs()
    print(f"No. of inputs : {len(sess_input)}, No. of outputs : {len(sess_output)}")
    # predict with ONNX Runtime
    output_names = [ output.name for output in sess_output]
    scores = onnx_session.run(output_names=output_names,\
                                               input_feed={sess_input[0].name: img_data})

    return scores[0]

scores = get_predictions_from_ONNX(session, img_data)
def get_predictions_from_ONNX(onnx_session, img_data):
    """perform predictions with ONNX runtime

    :param onnx_session: onnx model session
    :type onnx_session: class InferenceSession
    :param img_data: pre-processed numpy image
    :type img_data: ndarray with shape 1xCxHxW
    :return: boxes, labels , scores
            (No. of boxes, 4) (No. of boxes,) (No. of boxes,)
    :rtype: tuple
    """

    sess_input = onnx_session.get_inputs()
    sess_output = onnx_session.get_outputs()

    # predict with ONNX Runtime
    output_names = [output.name for output in sess_output]
    predictions = onnx_session.run(output_names=output_names,\
                                               input_feed={sess_input[0].name: img_data})

    return output_names, predictions

output_names, predictions = get_predictions_from_ONNX(session, img_data)
def get_predictions_from_ONNX(onnx_session,img_data):
    """perform predictions with ONNX Runtime

    :param onnx_session: onnx model session
    :type onnx_session: class InferenceSession
    :param img_data: pre-processed numpy image
    :type img_data: ndarray with shape 1xCxHxW
    :return: boxes, labels , scores
    :rtype: list
    """
    sess_input = onnx_session.get_inputs()
    sess_output = onnx_session.get_outputs()
    # predict with ONNX Runtime
    output_names = [ output.name for output in sess_output]
    pred = onnx_session.run(output_names=output_names,\
                                               input_feed={sess_input[0].name: img_data})
    return pred[0]

result = get_predictions_from_ONNX(session, img_data)
实例分段模型预测框、标签、分数和掩码。 ONNX 输出每个实例的预测掩码,以及相应的边界框和类置信度分数。 您必要时可能需要将二进制掩码转换为多边形。
def get_predictions_from_ONNX(onnx_session, img_data):
    """Perform predictions with ONNX runtime

    :param onnx_session: onnx model session
    :type onnx_session: class InferenceSession
    :param img_data: pre-processed numpy image
    :type img_data: ndarray with shape 1xCxHxW
    :return: boxes, labels , scores , masks with shapes
            (No. of instances, 4) (No. of instances,) (No. of instances,)
            (No. of instances, 1, HEIGHT, WIDTH))
    :rtype: tuple
    """

    sess_input = onnx_session.get_inputs()
    sess_output = onnx_session.get_outputs()
    # predict with ONNX Runtime
    output_names = [ output.name for output in sess_output]
    predictions = onnx_session.run(output_names=output_names,\
                                               input_feed={sess_input[0].name: img_data})
    return output_names, predictions

output_names, predictions = get_predictions_from_ONNX(session, img_data)
后期处理
将 softmax() 应用于预测值,以获取每个类的分类置信度分数(概率)。 然后,将预测出概率最高的类。
没有使用 PyTorch
def softmax(x):
    e_x = np.exp(x - np.max(x, axis=1, keepdims=True))
    return e_x / np.sum(e_x, axis=1, keepdims=True)

conf_scores = softmax(scores)
class_preds = np.argmax(conf_scores, axis=1)
print("predicted classes:", ([(class_idx, classes[class_idx]) for class_idx in class_preds]))
使用 PyTorch
conf_scores = torch.nn.functional.softmax(torch.from_numpy(scores), dim=1)
class_preds = torch.argmax(conf_scores, dim=1)
print("predicted classes:", ([(class_idx.item(), classes[class_idx]) for class_idx in class_preds]))
该步骤不同于多类分类。 需要将 sigmoid 应用于 logits(ONNX 输出),以获取多标签图像分类的置信度分数。
没有使用 PyTorch
def sigmoid(x):
    return 1 / (1 + np.exp(-x))

# we apply a threshold of 0.5 on confidence scores
score_threshold = 0.5
conf_scores = sigmoid(scores)
image_wise_preds = np.where(conf_scores > score_threshold)
for image_idx, class_idx in zip(image_wise_preds[0], image_wise_preds[1]):
    print('image: {}, class_index: {}, class_name: {}'.format(image_files[image_idx], class_idx, classes[class_idx]))
使用 PyTorch
# we apply a threshold of 0.5 on confidence scores
score_threshold = 0.5
conf_scores = torch.sigmoid(torch.from_numpy(scores))
image_wise_preds = torch.where(conf_scores > score_threshold)
for image_idx, class_idx in zip(image_wise_preds[0], image_wise_preds[1]):
    print('image: {}, class_index: {}, class_name: {}'.format(image_files[image_idx], class_idx, classes[class_idx]))
对于多类和多标签分类,可以对 AutoML 中支持的所有模型体系结构执行上述步骤。
对于对象检测,预测将自动采用 height_onnx、width_onnx 的比例。 若要将预测框坐标转换为原始尺寸,可以执行以下计算。
- Xmin * 原始宽度/宽度_onnx
- Ymin * 原始高度/height_onnx
- Xmax * 原始宽度/宽度_onnx
- Ymax * 原始高度/height_onnx
另一种方法是使用以下代码将框尺寸缩放到 [0, 1] 的范围内。 这样做,可以用框坐标与原始图像相应的高度和宽度坐标相乘(如将预测结果可视化部分所述),以获取原始图像维度中的框。
def _get_box_dims(image_shape, box):
    box_keys = ['topX', 'topY', 'bottomX', 'bottomY']
    height, width = image_shape[0], image_shape[1]

    box_dims = dict(zip(box_keys, [coordinate.item() for coordinate in box]))

    box_dims['topX'] = box_dims['topX'] * 1.0 / width
    box_dims['bottomX'] = box_dims['bottomX'] * 1.0 / width
    box_dims['topY'] = box_dims['topY'] * 1.0 / height
    box_dims['bottomY'] = box_dims['bottomY'] * 1.0 / height

    return box_dims

def _get_prediction(boxes, labels, scores, image_shape, classes):
    bounding_boxes = []
    for box, label_index, score in zip(boxes, labels, scores):
        box_dims = _get_box_dims(image_shape, box)

        box_record = {'box': box_dims,
                      'label': classes[label_index],
                      'score': score.item()}

        bounding_boxes.append(box_record)

    return bounding_boxes

# Filter the results with threshold.
# Please replace the threshold for your test scenario.
score_threshold = 0.8
filtered_boxes_batch = []
for batch_sample in range(0, batch_size*3, 3):
    # in case of retinanet change the order of boxes, labels, scores to boxes, scores, labels
    # confirm the same from order of boxes, labels, scores output_names
    boxes, labels, scores = predictions[batch_sample], predictions[batch_sample + 1], predictions[batch_sample + 2]
    bounding_boxes = _get_prediction(boxes, labels, scores, (height_onnx, width_onnx), classes)
    filtered_bounding_boxes = [box for box in bounding_boxes if box['score'] >= score_threshold]
    filtered_boxes_batch.append(filtered_bounding_boxes)
以下代码创建框、标签和分数。 使用这些边界框详细信息执行与 Faster R-CNN 模型相同的后期处理步骤。
from yolo_onnx_preprocessing_utils import non_max_suppression, _convert_to_rcnn_output

result_final = non_max_suppression(
    torch.from_numpy(result),
    conf_thres=0.1,
    iou_thres=0.5)

def _get_box_dims(image_shape, box):
    box_keys = ['topX', 'topY', 'bottomX', 'bottomY']
    height, width = image_shape[0], image_shape[1]

    box_dims = dict(zip(box_keys, [coordinate.item() for coordinate in box]))

    box_dims['topX'] = box_dims['topX'] * 1.0 / width
    box_dims['bottomX'] = box_dims['bottomX'] * 1.0 / width
    box_dims['topY'] = box_dims['topY'] * 1.0 / height
    box_dims['bottomY'] = box_dims['bottomY'] * 1.0 / height

    return box_dims

def _get_prediction(label, image_shape, classes):

    boxes = np.array(label["boxes"])
    labels = np.array(label["labels"])
    labels = [label[0] for label in labels]
    scores = np.array(label["scores"])
    scores = [score[0] for score in scores]

    bounding_boxes = []
    for box, label_index, score in zip(boxes, labels, scores):
        box_dims = _get_box_dims(image_shape, box)

        box_record = {'box': box_dims,
                      'label': classes[label_index],
                      'score': score.item()}

        bounding_boxes.append(box_record)

    return bounding_boxes

bounding_boxes_batch = []
for result_i, pad in zip(result_final, pad_list):
    label, image_shape = _convert_to_rcnn_output(result_i, height_onnx, width_onnx, pad)
    bounding_boxes_batch.append(_get_prediction(label, image_shape, classes))
print(json.dumps(bounding_boxes_batch, indent=1))
可以使用 Faster R-CNN 中所述的步骤(对于 Mask CNN,每个示例都有四个元素:框、标签、分数、掩码),也可以参阅实例分段的将预测结果可视化部分。
将预测结果可视化
使用标签将输入图像可视化。
import matplotlib.image as mpimg
import matplotlib.pyplot as plt
%matplotlib inline

sample_image_index = 0 # change this for an image of interest from image_files list
IMAGE_SIZE = (18, 12)
plt.figure(figsize=IMAGE_SIZE)
img_np = mpimg.imread(image_files[sample_image_index])

img = Image.fromarray(img_np.astype('uint8'), 'RGB')
x, y = img.size

fig,ax = plt.subplots(1, figsize=(15, 15))
# Display the image
ax.imshow(img_np)

label = class_preds[sample_image_index]
if torch.is_tensor(label):
    label = label.item()

conf_score = conf_scores[sample_image_index]
if torch.is_tensor(conf_score):
    conf_score = np.max(conf_score.tolist())
else:
    conf_score = np.max(conf_score)

display_text = '{} ({})'.format(label, round(conf_score, 3))
print(display_text)

color = 'red'
plt.text(30, 30, display_text, color=color, fontsize=30)

plt.show()
使用标签将输入图像可视化。
import matplotlib.image as mpimg
import matplotlib.pyplot as plt
%matplotlib inline

sample_image_index = 0 # change this for an image of interest from image_files list
IMAGE_SIZE = (18, 12)
plt.figure(figsize=IMAGE_SIZE)
img_np = mpimg.imread(image_files[sample_image_index])
img = Image.fromarray(img_np.astype('uint8'), 'RGB')
x, y = img.size

fig,ax = plt.subplots(1, figsize=(15, 15))
# Display the image
ax.imshow(img_np)
# we apply a threshold of 0.5 on confidence scores
score_threshold = 0.5
label_offset_x = 30
label_offset_y = 30
if torch.is_tensor(conf_scores):
    sample_image_scores = conf_scores[sample_image_index].tolist()
else:
    sample_image_scores = conf_scores[sample_image_index]

for index, score in enumerate(sample_image_scores):
    if score > score_threshold:
        label = classes[index]
        display_text = '{} ({})'.format(label, round(score, 3))
        print(display_text)

        color = 'red'
        plt.text(label_offset_x, label_offset_y, display_text, color=color, fontsize=30)
        label_offset_y += 30

plt.show()
使用框和标签将输入图像可视化。
import matplotlib.image as mpimg
import matplotlib.patches as patches
import matplotlib.pyplot as plt
%matplotlib inline

img_np = mpimg.imread(image_files[1])  # replace with desired image index
image_boxes = filtered_boxes_batch[1]  # replace with desired image index

IMAGE_SIZE = (18, 12)
plt.figure(figsize=IMAGE_SIZE)
img = Image.fromarray(img_np.astype('uint8'), 'RGB')
x, y = img.size
print(img.size)

fig,ax = plt.subplots(1)
# Display the image
ax.imshow(img_np)

# Draw box and label for each detection
for detect in image_boxes:
    label = detect['label']
    box = detect['box']
    ymin, xmin, ymax, xmax =  box['topY'], box['topX'], box['bottomY'], box['bottomX']
    topleft_x, topleft_y = x * xmin, y * ymin
    width, height = x * (xmax - xmin), y * (ymax - ymin)
    print('{}: {}, {}, {}, {}'.format(detect['label'], topleft_x, topleft_y, width, height))
    rect = patches.Rectangle((topleft_x, topleft_y), width, height,
                             linewidth=1, edgecolor='green', facecolor='none')

    ax.add_patch(rect)
    color = 'green'
    plt.text(topleft_x, topleft_y, label, color=color)

plt.show()
使用框和标签将输入图像可视化。
import matplotlib.image as mpimg
import matplotlib.patches as patches
import matplotlib.pyplot as plt
%matplotlib inline

img_np = mpimg.imread(image_files[1])  # replace with desired image index
image_boxes = bounding_boxes_batch[1]  # replace with desired image index

IMAGE_SIZE = (18, 12)
plt.figure(figsize=IMAGE_SIZE)
img = Image.fromarray(img_np.astype('uint8'), 'RGB')
x, y = img.size
print(img.size)

fig,ax = plt.subplots(1)
# Display the image
ax.imshow(img_np)

# Draw box and label for each detection
for detect in image_boxes:
    label = detect['label']
    box = detect['box']
    ymin, xmin, ymax, xmax =  box['topY'], box['topX'], box['bottomY'], box['bottomX']
    topleft_x, topleft_y = x * xmin, y * ymin
    width, height = x * (xmax - xmin), y * (ymax - ymin)
    print('{}: {}, {}, {}, {}'.format(detect['label'], topleft_x, topleft_y, width, height))
    rect = patches.Rectangle((topleft_x, topleft_y), width, height,
                             linewidth=1, edgecolor='green', facecolor='none')

    ax.add_patch(rect)
    color = 'green'
    plt.text(topleft_x, topleft_y, label, color=color)

plt.show()
使用掩码和标签将示例输入图像可视化。
import matplotlib.patches as patches
import matplotlib.pyplot as plt
%matplotlib inline

def display_detections(image, boxes, labels, scores, masks, resize_height,
                       resize_width, classes, score_threshold):
    """Visualize boxes and masks

    :param image: raw image
    :type image: PIL image
    :param boxes: box with shape (No. of instances, 4)
    :type boxes: ndarray
    :param labels: classes with shape (No. of instances,)
    :type labels: ndarray
    :param scores: scores with shape (No. of instances,)
    :type scores: ndarray
    :param masks: masks with shape (No. of instances, 1, HEIGHT, WIDTH)
    :type masks:  ndarray
    :param resize_height: expected height of an input image in onnx model
    :type resize_height: Int
    :param resize_width: expected width of an input image in onnx model
    :type resize_width: Int
    :param classes: classes with shape (No. of classes)
    :type classes:  list
    :param score_threshold: threshold on scores in the range of 0-1
    :type score_threshold: float
    :return: None
    """

    _, ax = plt.subplots(1, figsize=(12,9))

    image = np.array(image)
    original_height = image.shape[0]
    original_width = image.shape[1]

    for mask, box, label, score in zip(masks, boxes, labels, scores):
        if score <= score_threshold:
            continue
        mask = mask[0, :, :, None]
        # resize boxes to original raw input size
        box = [box[0]*original_width/resize_width,
               box[1]*original_height/resize_height,
               box[2]*original_width/resize_width,
               box[3]*original_height/resize_height]

        mask = cv2.resize(mask, (image.shape[1], image.shape[0]), 0, 0, interpolation = cv2.INTER_NEAREST)
        # mask is a matrix with values in the range of [0,1]
        # higher values indicate presence of object and vice versa
        # select threshold or cut-off value to get objects present
        mask = mask > score_threshold
        image_masked = image.copy()
        image_masked[mask] = (0, 255, 255)
        alpha = 0.5  # alpha blending with range 0 to 1
        cv2.addWeighted(image_masked, alpha, image, 1 - alpha,0, image)
        rect = patches.Rectangle((box[0], box[1]), box[2] - box[0], box[3] - box[1],\
                                 linewidth=1, edgecolor='b', facecolor='none')
        ax.annotate(classes[label] + ':' + str(np.round(score, 2)), (box[0], box[1]),\
                    color='w', fontsize=12)
        ax.add_patch(rect)

    ax.imshow(image)
    plt.show()

score_threshold = 0.5
img = Image.open(image_files[1])  # replace with desired image index
image_boxes = filtered_boxes_batch[1]  # replace with desired image index
boxes, labels, scores, masks = predictions[4:8]  # replace with desired image index
display_detections(img, boxes.copy(), labels, scores, masks.copy(),
                   height_onnx, width_onnx, classes, score_threshold)
后续步骤