纵向扩展 Service Fabric 群集主节点类型
本文介绍了如何在尽量减少停机时间的情况下纵向扩展 Service Fabric 群集主节点类型。 Service Fabric 群集节点不支持就地 SKU 升级,因为此类操作可能导致数据和可用性丢失。 建议用于纵向扩展 Service Fabric 节点类型的最安全且最可靠的方法是:
向 Service Fabric 群集添加一个新节点类型,该节点类型由升级(或修改)后的虚拟机规模集 SKU 和配置提供支持。 此步骤还涉及为规模集设置新的负载均衡器、子网和公共 IP。
在原始规模集和升级后的规模集一起运行后,逐个禁用原始节点实例,以便将系统服务(或有状态服务的副本)迁移到新规模集。
验证群集和新节点是否正常,然后删除原始规模集(和相关资源)以及已删除节点的节点状态。
下面的内容会引导你完成将示例群集的主节点类型 VM 的 VM 大小和操作系统更新为白银持续性的过程,该持续性由具有 5 个节点的单一规模集提供支持。 我们将对主节点类型进行如下所述的升级:
- 将 VM 大小从 Standard_D2_V2 升级到 Standard D4_V2;
- 从 VM 操作系统 Windows Server 2019 Datacenter 升级到 Windows Server 2022 Datacenter。
警告
在生产群集上尝试执行此过程之前,建议先研究示例模板并对测试群集验证此过程。 群集也可能不可用,但这段不可用的时间较短。
如果集群状态不正常,请勿尝试主节点类型纵向扩展过程,因为这只会进一步破坏集群的稳定性。
GitHub 上提供了我们将要用来完成此示例升级方案的分步 Azure 部署模板。
设置测试群集
接下来让我们设置初始 Service Fabric 测试群集。 首先,下载用于完成此方案的 Azure 资源管理器示例模板。
然后,登录到 Azure 帐户。
# Sign in to your Azure account
Connect-AzAccount -Environment AzureChinaCloud -SubscriptionId "<subscription ID>"
接下来,打开 parameters.json 文件并将 clusterName 的值更新为某个唯一值(在 Azure 中)。
以下命令将引导你生成新的自签名证书并部署测试群集。 如果你已有一个想要使用的证书,请跳到使用现有证书部署群集。
生成自签名证书并部署群集
首先,为 Service Fabric 群集部署分配所需的变量。 根据具体的帐户和环境调整 resourceGroupName、certSubjectName、parameterFilePath 和 templateFilePath 的值:
# Assign deployment variables
$resourceGroupName = "sftestupgradegroup"
$certOutputFolder = "c:\certificates"
$certPassword = "Password!1" | ConvertTo-SecureString -AsPlainText -Force
$certSubjectName = "sftestupgrade.chinaeast.cloudapp.chinacloudapi.cn"
$parameterFilePath = "C:\parameters.json"
$templateFilePath = "C:\Initial-TestClusterSetup.json"
注意
在运行该命令来部署新的 Service Fabric 群集之前,请确保 certOutputFolder 位置存在于你的本地计算机上。
接下来部署 Service Fabric 测试群集:
# Deploy the initial test cluster
New-AzServiceFabricCluster `
    -ResourceGroupName $resourceGroupName `
    -CertificateOutputFolder $certOutputFolder `
    -CertificatePassword $certPassword `
    -CertificateSubjectName $certSubjectName `
    -TemplateFile $templateFilePath `
    -ParameterFile $parameterFilePath
部署完成后,在本地计算机上找到 .pfx 文件 ($certPfx) 并将其导入到证书存储中:
cd c:\certificates
$certPfx = ".\sftestupgradegroup20200312121003.pfx"

Import-PfxCertificate `
     -FilePath $certPfx `
     -CertStoreLocation Cert:\CurrentUser\My `
     -Password (ConvertTo-SecureString Password!1 -AsPlainText -Force)
该操作会返回证书指纹。现在,在连接到新群集以及检查其运行状况时可以使用该指纹。 (请跳过以下部分,其中介绍的是替代的群集部署方法。)
使用现有证书部署群集
另外,你还可以使用现有 Azure Key Vault 证书来部署测试群集。 为此,需要获取对 Key Vault 和证书指纹的引用。
# Key Vault variables
$certUrlValue = "https://sftestupgradegroup.vault.azure.cn/secrets/sftestupgradegroup20200309235308/dac0e7b7f9d4414984ccaa72bfb2ea39"
$sourceVaultValue = "/subscriptions/########-####-####-####-############/resourceGroups/sftestupgradegroup/providers/Microsoft.KeyVault/vaults/sftestupgradegroup"
$thumb = "BB796AA33BD9767E7DA27FE5182CF8FDEE714A70"
接下来,指定群集的资源组名称,并设置 templateFilePath 和 parameterFilePath 位置:
注意
指定的资源组必须已存在,并且与 Key Vault 位于同一区域。
$resourceGroupName = "sftestupgradegroup"
$templateFilePath = "C:\Initial-TestClusterSetup.json"
$parameterFilePath = "C:\parameters.json"
最后,运行以下命令以部署初始测试群集:
# Deploy the initial test cluster
New-AzResourceGroupDeployment `
    -ResourceGroupName $resourceGroupName `
    -TemplateFile $templateFilePath `
    -TemplateParameterFile $parameterFilePath `
    -CertificateThumbprint $thumb `
    -CertificateUrlValue $certUrlValue `
    -SourceVaultValue $sourceVaultValue `
    -Verbose
连接到新群集并检查运行状况
连接到群集,并确保其所有五个节点均正常运行(将 clusterName 和 thumb 变量替换为你自己的值):
# Connect to the cluster
$clusterName = "sftestupgrade.chinaeast.cloudapp.chinacloudapi.cn:19000"
$thumb = "BB796AA33BD9767E7DA27FE5182CF8FDEE714A70"

Connect-ServiceFabricCluster `
    -ConnectionEndpoint $clusterName `
    -KeepAliveIntervalInSec 10 `
    -X509Credential `
    -ServerCertThumbprint $thumb  `
    -FindType FindByThumbprint `
    -FindValue $thumb `
    -StoreLocation CurrentUser `
    -StoreName My

# Check cluster health
Get-ServiceFabricClusterHealth
现在,我们已准备好开始升级过程。
使用升级的规模集部署一个新的主节点类型
若要升级(垂直缩放)某个节点类型,首先需要部署由新的规模集和支持资源提供支持的新节点类型。 与原始规模集一样,新规模集将标记为主要 (isPrimary: true)。 如果你想要纵向扩展非主要节点类型,请参阅纵向扩展 Service Fabric 群集非主要节点类型。 在以下部分创建的资源最终会成为群集中新的主节点类型,而原始主节点类型资源则会被删除。
使用升级的规模集更新群集模板
下面是原始群集部署模板中用来添加新的主节点类型和支持资源的逐节修改。
已经在 Step1-AddPrimaryNodeType.json 模板文件中为你执行了此步骤的必需更改,下面将详细解释这些更改。 如果需要,你可以跳过说明并继续获取 Key Vault 参考,并部署已更新的模板,该模板用于将新的主节点类型添加到群集。
注意
请确保所用名称不同于原始主节点类型的原始节点类型、规模集、负载均衡器、公共 IP 和子网,因为在此过程的一个后续步骤中会删除这些资源。
在现有虚拟网络中创建一个新的子网
{
    "name": "[variables('subnet1Name')]",
    "properties": {
        "addressPrefix": "[variables('subnet1Prefix')]"
    }
}
创建具有唯一 domainNameLabel 的一个新公共 IP
{
    "apiVersion": "[variables('publicIPApiVersion')]",
    "type": "Microsoft.Network/publicIPAddresses",
    "name": "[concat(variables('lbIPName'),'-',variables('vmNodeType1Name'))]",
    "location": "[variables('computeLocation')]",
    "properties": {
        "dnsSettings": {
            "domainNameLabel": "[concat(variables('dnsName'),'-','nt1')]"
        },
        "publicIPAllocationMethod": "Dynamic"
    },
    "tags": {
        "resourceType": "Service Fabric",
        "clusterName": "[parameters('clusterName')]"
    }
}
为公共 IP 创建一个新的负载均衡器
"dependsOn": [
    "[concat('Microsoft.Network/publicIPAddresses/',concat(variables('lbIPName'),'-',variables('vmNodeType1Name')))]"
]
创建一个新的虚拟机规模集(包含升级的 VM 和 OS SKU)
节点类型引用
"nodeTypeRef": "[variables('vmNodeType1Name')]"
VM SKU
"sku": {
    "name": "[parameters('vmNodeType1Size')]",
    "capacity": "[parameters('nt1InstanceCount')]",
    "tier": "Standard"
}
OS SKU
"imageReference": {
    "publisher": "[parameters('vmImagePublisher1')]",
    "offer": "[parameters('vmImageOffer1')]",
    "sku": "[parameters('vmImageSku1')]",
    "version": "[parameters('vmImageVersion1')]"
}
如果要更改 Linux 群集中的 OS SKU
在 Windows 群集中,属性 vmImage 的值为“Windows”,而 Linux 群集中同一属性的值为所使用的 OS 映像的名称。 例如 - Ubuntu20_04(使用最新的 vm 映像名称)。
因此,如果要在 Linux 群集中更改 VM 映像 (OS SKU),请同时更新 Service Fabric 群集资源上的 vmImage 设置。
#Update the property vmImage with the required OS name in your ARM template
{
    "vmImage": "[parameter(newVmImageName]"
}
注意:newVmImageName 的示例:Ubuntu20_04
也可以使用以下 PowerShell 命令来更新群集资源:
# Update cluster vmImage to target OS. This registers the SF runtime package type that is supplied for upgrades.
Update-AzServiceFabricVmImage -ResourceGroupName $resourceGroup -ClusterName $clusterName -VmImage Ubuntu20_04
另外,请确保包含工作负荷所需的任何其他扩展。
向群集添加新的主节点类型
现在,新的节点类型 (vmNodeType1Name) 具有其自己的名称、子网、IP、负载均衡器和规模集,可以重复使用原始节点类型中的所有其他变量(例如 nt0applicationEndPort、nt0applicationStartPort 和 nt0fabricTcpGatewayPort):
"name": "[variables('vmNodeType1Name')]",
"applicationPorts": {
    "endPort": "[variables('nt0applicationEndPort')]",
    "startPort": "[variables('nt0applicationStartPort')]"
},
"clientConnectionEndpointPort": "[variables('nt0fabricTcpGatewayPort')]",
"durabilityLevel": "Bronze",
"ephemeralPorts": {
    "endPort": "[variables('nt0ephemeralEndPort')]",
    "startPort": "[variables('nt0ephemeralStartPort')]"
},
"httpGatewayEndpointPort": "[variables('nt0fabricHttpGatewayPort')]",
"isPrimary": true,
"reverseProxyEndpointPort": "[variables('nt0reverseProxyEndpointPort')]",
"vmInstanceCount": "[parameters('nt1InstanceCount')]"
实现模板和 parameters 文件中的所有更改后,转到下一部分获取 Key Vault 引用并将更新部署到群集。
获取 Key Vault 引用
若要部署已更新的配置,你需要多次引用 Key Vault 中存储的群集证书。 查找这些值的最简单方法是使用 Azure 门户。 需要:
群集证书的 Key Vault URL。 在 Azure 门户上你的 Key Vault 中,选择“证书”><所需的证书>>“机密标识符”:
$certUrlValue="https://sftestupgradegroup.vault.azure.cn/secrets/sftestupgradegroup20200309235308/dac0e7b7f9d4414984ccaa72bfb2ea39"群集证书的指纹。 (如果已连接到初始群集来检查其运行状况,则可能已获取此证书。)在 Azure 门户上的同一证书边栏选项卡(“证书”>“所需的证”)中,复制“X.509 SHA-1 指纹(十六进制)”:
$thumb = "BB796AA33BD9767E7DA27FE5182CF8FDEE714A70"Key Vault 的资源 ID。 在 Azure 门户上你的 Key Vault 中,选择“属性”>“资源 ID”:
$sourceVaultValue = "/subscriptions/########-####-####-####-############/resourceGroups/sftestupgradegroup/providers/Microsoft.KeyVault/vaults/sftestupgradegroup"
部署已更新的模板
根据需要调整 templateFilePath 并运行以下命令:
# Deploy the new node type and its resources
$templateFilePath = "C:\Step1-AddPrimaryNodeType.json"

New-AzResourceGroupDeployment `
    -ResourceGroupName $resourceGroupName `
    -TemplateFile $templateFilePath `
    -TemplateParameterFile $parameterFilePath `
    -CertificateThumbprint $thumb `
    -CertificateUrlValue $certUrlValue `
    -SourceVaultValue $sourceVaultValue `
    -Verbose
部署完成后,再次检查群集运行状况,并确保两种节点类型的所有节点都正常运行。
Get-ServiceFabricClusterHealth
将种子节点迁移到新节点类型
现在,我们已准备好将原始节点类型更新为非主节点类型,并开始禁用其节点。 节点禁用时,群集的系统服务和种子节点会迁移到新的规模集。
取消将原始节点类型标记为主节点类型的操作
首先,从原始节点类型中删除模板中的 isPrimary 指定。
{
    "isPrimary": false,
}
然后,使用更新来部署模板。 此部署会启动种子节点到新规模集的迁移。
$templateFilePath = "C:\Step2-UnmarkOriginalPrimaryNodeType.json"

New-AzResourceGroupDeployment `
    -ResourceGroupName $resourceGroupName `
    -TemplateFile $templateFilePath `
    -TemplateParameterFile $parameterFilePath `
    -CertificateThumbprint $thumb `
    -CertificateUrlValue $certUrlValue `
    -SourceVaultValue $sourceVaultValue `
    -Verbose
注意
完成种子节点到新规模集的迁移需要一段时间。 为了保证数据一致性,每次只能更改一个种子节点。 每次进行种子节点更改都需要更新群集;因此,替换种子节点需要执行群集升级两次(添加和删除节点各需要执行一次)。 在此示例方案中升级 5 个种子节点需要执行群集升级 10 次。
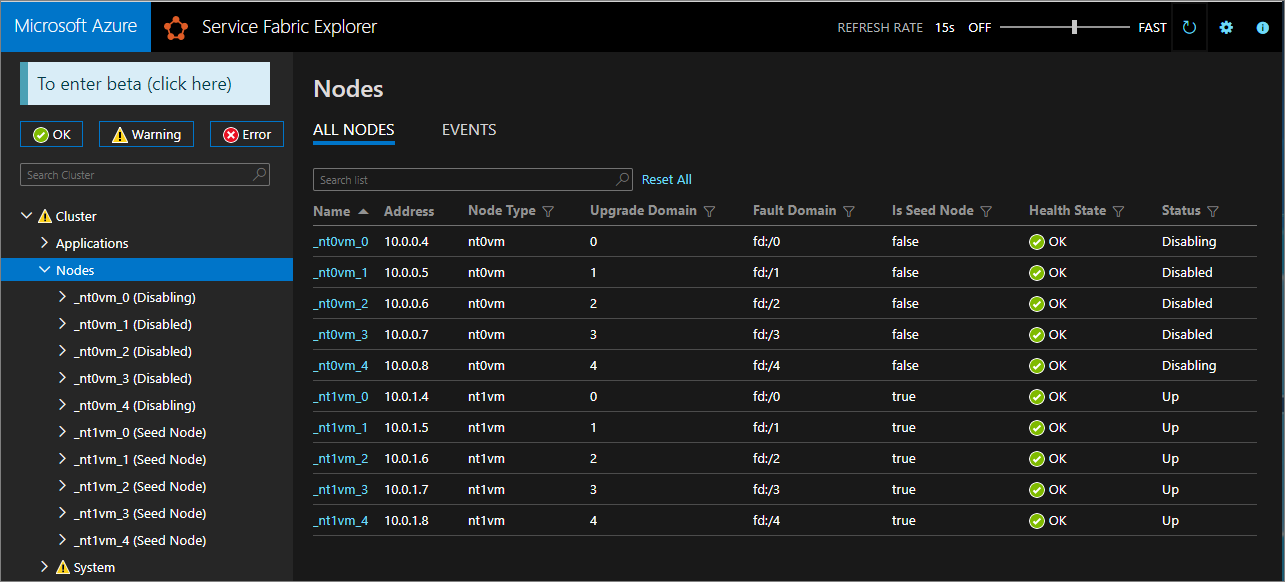
使用 Service Fabric Explorer 来监视种子节点到新规模集的迁移。 原始节点类型 (nt0vm) 的节点在“是种子节点”列中应当全都为“false”,新节点类型 (nt1vm) 的节点应为“true”。
禁用原始节点类型规模集中的节点
在所有种子节点都迁移到新规模集后,你可以禁用原始规模集的节点。
# Disable the nodes in the original scale set.
$nodeType = "nt0vm"
$nodes = Get-ServiceFabricNode

Write-Host "Disabling nodes..."
foreach($node in $nodes)
{
  if ($node.NodeType -eq $nodeType)
  {
    $node.NodeName

    Disable-ServiceFabricNode -Intent RemoveNode -NodeName $node.NodeName -Force
  }
}
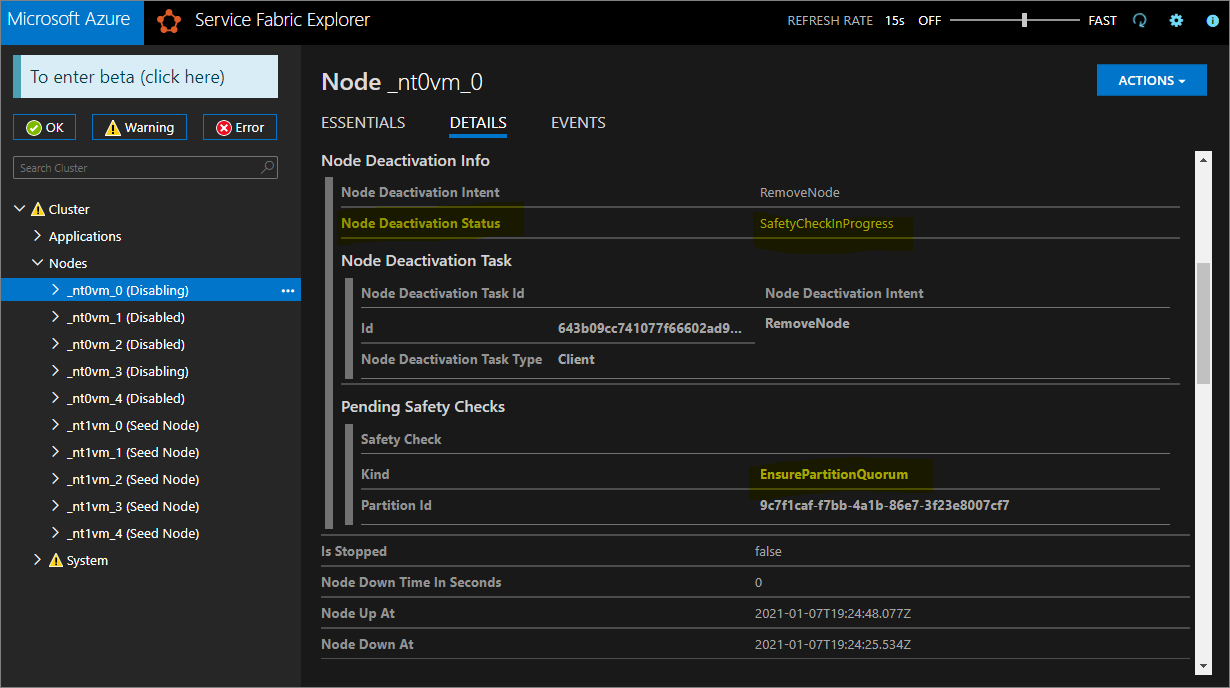
使用 Service Fabric Explorer 监视原始规模集中的节点从“正在禁用”状态到“已禁用”状态的转换进度。
对于“白银”和“黄金”持续性,某些节点会进入“已禁用”状态,而另一些节点可能会保持“正在禁用”状态。 在 Service Fabric Explorer 中,检查处于“正在禁用”状态的节点的“详细信息”选项卡。 如果它们显示了“EnsurePartitionQuorem”(确保基础设施服务分区的仲裁)类型的“挂起的安全检查”,则可以放心地继续操作。
如果群集为“青铜”持续性,请等待所有节点进入“已禁用”状态。
停止已禁用节点上的数据
现在,你可以停止已禁用节点上的数据。
# Stop data on the disabled nodes.
foreach($node in $nodes)
{
  if ($node.NodeType -eq $nodeType)
  {
    $node.NodeName

    Start-ServiceFabricNodeTransition -Stop -OperationId (New-Guid) -NodeInstanceId $node.NodeInstanceId -NodeName $node.NodeName -StopDurationInSeconds 10000
  }
}
删除原始节点类型并清理其资源
我们已准备好删除原始节点类型及其关联的资源,以结束垂直缩放过程。
删除原始规模集
首先删除节点类型的支持规模集。
$scaleSetName = "nt0vm"
$scaleSetResourceType = "Microsoft.Compute/virtualMachineScaleSets"

Remove-AzResource -ResourceName $scaleSetName -ResourceType $scaleSetResourceType -ResourceGroupName $resourceGroupName -Force
删除原始 IP 和负载均衡器资源
你现在可以删除原始 IP 和负载均衡器资源。 在此步骤中,你还将更新 DNS 名称。
注意
如果你已在使用“标准”SKU 公共 IP 和负载均衡器,则此步骤是可选的。 这种情况下,你在同一个负载均衡器下可以有多个规模集/节点类型。
运行以下命令,根据需要修改 $lbname 值。
# Delete the original IP and load balancer resources
$lbName = "LB-sftestupgrade-nt0vm"
$lbResourceType = "Microsoft.Network/loadBalancers"
$ipResourceType = "Microsoft.Network/publicIPAddresses"
$oldPublicIpName = "PublicIP-LB-FE-nt0vm"
$newPublicIpName = "PublicIP-LB-FE-nt1vm"

$oldPrimaryPublicIP = Get-AzPublicIpAddress -Name $oldPublicIpName  -ResourceGroupName $resourceGroupName
$primaryDNSName = $oldPrimaryPublicIP.DnsSettings.DomainNameLabel
$primaryDNSFqdn = $oldPrimaryPublicIP.DnsSettings.Fqdn

Remove-AzResource -ResourceName $lbName -ResourceType $lbResourceType -ResourceGroupName $resourceGroupName -Force
Remove-AzResource -ResourceName $oldPublicIpName -ResourceType $ipResourceType -ResourceGroupName $resourceGroupName -Force

$PublicIP = Get-AzPublicIpAddress -Name $newPublicIpName  -ResourceGroupName $resourceGroupName
$PublicIP.DnsSettings.DomainNameLabel = $primaryDNSName
$PublicIP.DnsSettings.Fqdn = $primaryDNSFqdn
Set-AzPublicIpAddress -PublicIpAddress $PublicIP
从原始节点类型中删除节点状态
原始节点类型节点的“运行状况状态”现在会显示“错误”。 从群集中删除其节点状态。
# Remove state of the obsolete nodes from the cluster
$nodeType = "nt0vm"
$nodes = Get-ServiceFabricNode

Write-Host "Removing node state..."
foreach($node in $nodes)
{
  if ($node.NodeType -eq $nodeType)
  {
    $node.NodeName

    Remove-ServiceFabricNodeState -NodeName $node.NodeName -Force
  }
}
Service Fabric Explorer 现在应当仅反映新节点类型 (nt1vm) 的五个节点,所有节点的“运行状况状态”值均为“正常”。 “群集运行状况状态”仍会显示“错误”。 接下来,我们将通过更新模板以反映最新的更改并重新进行部署来修正这个问题。
更新部署模板以反映最近进行了纵向扩展的主节点类型
已经在 Step3-CleanupOriginalPrimaryNodeType.json 模板文件中为你执行了此步骤的必需更改,下面的各部分将详细解释这些模板更改。 如果需要,你可以跳过说明,继续部署已更新的模板,完成本教程。
更新群集管理终结点
更新部署模板上的群集 managementEndpoint 以引用新的 IP(方法是将“vmNodeType0Name”更新为“vmNodeType1Name”)。
"managementEndpoint": "[concat('https://',reference(concat(variables('lbIPName'),'-',variables('vmNodeType1Name'))).dnsSettings.fqdn,':',variables('nt0fabricHttpGatewayPort'))]",
删除原始节点类型引用
从部署模板的 Service Fabric 资源中删除原始节点类型引用:
"name": "[variables('vmNodeType0Name')]",
"applicationPorts": {
    "endPort": "[variables('nt0applicationEndPort')]",
    "startPort": "[variables('nt0applicationStartPort')]"
},
"clientConnectionEndpointPort": "[variables('nt0fabricTcpGatewayPort')]",
"durabilityLevel": "Bronze",
"ephemeralPorts": {
    "endPort": "[variables('nt0ephemeralEndPort')]",
    "startPort": "[variables('nt0ephemeralStartPort')]"
},
"httpGatewayEndpointPort": "[variables('nt0fabricHttpGatewayPort')]",
"isPrimary": true,
"reverseProxyEndpointPort": "[variables('nt0reverseProxyEndpointPort')]",
"vmInstanceCount": "[parameters('nt0InstanceCount')]"
将运行状况策略配置为忽略现有错误
(仅适用于“白银”和更高级别持续性的群集)更新模板中的群集资源,并通过在群集资源属性下添加“applicationDeltaHealthPolicies”,将运行状况策略配置为忽略 fabric:/System 应用程序运行状况,如下所示。 以下策略会忽略现有错误,但不允许新的运行状况错误。
"upgradeDescription":
{
 "forceRestart": false,
 "upgradeReplicaSetCheckTimeout": "10675199.02:48:05.4775807",
 "healthCheckWaitDuration": "00:05:00",
 "healthCheckStableDuration": "00:05:00",
 "healthCheckRetryTimeout": "00:45:00",
 "upgradeTimeout": "12:00:00",
 "upgradeDomainTimeout": "02:00:00",
 "healthPolicy": {
   "maxPercentUnhealthyNodes": 100,
   "maxPercentUnhealthyApplications": 100
 },
 "deltaHealthPolicy":
 {
   "maxPercentDeltaUnhealthyNodes": 0,
   "maxPercentUpgradeDomainDeltaUnhealthyNodes": 0,
   "maxPercentDeltaUnhealthyApplications": 0,
   "applicationDeltaHealthPolicies":
   {
       "fabric:/System":
       {
           "defaultServiceTypeDeltaHealthPolicy":
           {
                   "maxPercentDeltaUnhealthyServices": 0
           }
       }
   }
 }
}
删除原始节点类型的支持资源
从 ARM 模板和参数文件中删除与原始节点类型相关的所有其他资源。 删除以下内容:
    "vmImagePublisher": {
      "value": "MicrosoftWindowsServer"
    },
    "vmImageOffer": {
      "value": "WindowsServer"
    },
    "vmImageSku": {
      "value": "2019-Datacenter"
    },
    "vmImageVersion": {
      "value": "latest"
    },
部署已完成的模板
最后,部署修改后的 Azure 资源管理器模板。
# Deploy the updated template file
$templateFilePath = "C:\Step3-CleanupOriginalPrimaryNodeType"

New-AzResourceGroupDeployment `
    -ResourceGroupName $resourceGroupName `
    -TemplateFile $templateFilePath `
    -TemplateParameterFile $parameterFilePath `
    -CertificateThumbprint $thumb `
    -CertificateUrlValue $certUrlValue `
    -SourceVaultValue $sourceVaultValue `
    -Verbose
注意
此步骤将需要一段时间,通常最长为两个小时。
升级会更改“InfrastructureService”的设置,因此需要重启节点。 在这种情况下,将忽略 forceRestart。 参数 upgradeReplicaSetCheckTimeout 指定 Service Fabric 等待分区进入安全状态(如果尚未进入安全状态)的最长时间。 一旦节点上的所有分区都已通过安全检查,Service Fabric 就会在该节点上继续升级。 可将参数 upgradeTimeout 的值减至 6 小时,但若要获得最高安全性,应使用 12 小时。
部署完成后,在 Azure 门户中验证 Service Fabric 资源的“状态”是否为“就绪”。 验证你是否可以访问新的 Service Fabric Explorer 终结点、“群集运行状况状态”是否为“正常”,以及任何已部署的应用程序是否都能正常运行。
现在,你已经完成了垂直缩放群集主节点类型的操作!
后续步骤
- 了解如何向群集添加节点类型
- 了解应用程序可伸缩性。
- 横向扩展或缩减 Azure 群集
- 使用 fluent Azure 计算 SDK 以编程方式缩放 Azure 群集。
- 横向扩展或缩减独立群集。