注意
基本计划和标准计划于 2025 年 3 月 17 日进入退休期。 有关详细信息,请参阅 Azure Spring Apps 停用公告。
本文介绍了如何在 Azure Spring Apps 中生成和收集结构化应用程序日志数据。 Azure Spring Apps 使用正确的配置通过 Log Analytics 提供有用的应用程序日志查询和分析。
日志架构要求
若要改进日志查询体验,应用程序日志必须采用 JSON 格式,并遵循某个架构。 Azure Spring Apps 使用此架构分析你的应用程序并流式传输到 Log Analytics。
注意
启用 JSON 日志格式会导致难以从控制台读取日志流式处理输出。 若要获取人类可读的输出,请将 --format-json 参数追加到 az spring app logs CLI 命令。 请参阅设置 JSON 结构化日志的格式。
JSON 架构要求:
| JSON 密钥 | JSON 值类型 | 必需 | Log Analytics 中的列 | 说明 |
|---|---|---|---|---|
| 时间戳 | 字符串 | 是 | 应用时间戳 | UTC 格式的时间戳 |
| 记录器 | 字符串 | 否 | 记录器 | 记录器 |
| 水平仪 | 字符串 | 否 | 自定义等级 | 日志级别 |
| 会话 | 字符串 | 否 | 线程 | 会话 |
| 消息 | 字符串 | 否 | 消息 | 日志消息 |
| stackTrace | 字符串 | 否 | StackTrace | 异常堆栈跟踪 |
| 例外类 (exceptionClass) | 字符串 | 否 | 异常类(ExceptionClass) | 异常类名称 |
| mdc | 嵌套的 JSON | 否 | 映射的诊断上下文 | |
| mdc.traceId | 字符串 | 否 | TraceId | 分布式跟踪的跟踪 ID |
| mdc.spanId | 字符串 | 否 | SpanId | 分布式跟踪的范围 ID |
- “timestamp”字段是必需的,并且应当采用 UTC 格式,所有其他字段都是可选的。
- “mdc”字段中的“traceId”和“spanId”用于跟踪。
- 在单个行中记录每条 JSON 记录。
日志记录示例
{"timestamp":"2021-01-08T09:23:51.280Z","logger":"com.example.demo.HelloController","level":"ERROR","thread":"http-nio-1456-exec-4","mdc":{"traceId":"c84f8a897041f634","spanId":"c84f8a897041f634"},"stackTrace":"java.lang.RuntimeException: get an exception\r\n\tat com.example.demo.HelloController.throwEx(HelloController.java:54)\r\n\","message":"Got an exception","exceptionClass":"RuntimeException"}
限制
JSON 日志的每行最多包含 16 K 字节。 如果单个日志记录的 JSON 输出超过此限制,它将分成多行,并将每个原始行收集到 Log 列中,而不会在结构上进行分析。
通常,这种情况发生在使用深度 stacktrace 的异常日志记录上(特别是在已启用 AppInsights 进程内代理时)。 将限制设置应用到 stacktrace 输出(请参阅下面的配置示例)以确保正确分析最终输出。
生成遵循架构的 JSON 日志
对于 Spring 应用程序,可以使用常用的记录框架(例如 logback 和 log4j2)生成预期的 JSON 日志格式。
使用 logback 进行记录
使用 Spring Boot 入门版时,默认情况下将使用 Logback。 对于 Logback 应用,请使用 logstash-encoder 生成 JSON 格式的日志。 Spring Boot 版本 2.1 及更高版本支持此方法。
此过程:
在 pom.xml 文件中添加 logstash 依赖项。
<dependency>
    <groupId>net.logstash.logback</groupId>
    <artifactId>logstash-logback-encoder</artifactId>
    <version>6.5</version>
</dependency>
更新
logback-spring.xml配置文件以设置 JSON 格式。<configuration> <appender name="stdout" class="ch.qos.logback.core.ConsoleAppender"> <encoder class="net.logstash.logback.encoder.LoggingEventCompositeJsonEncoder"> <providers> <timestamp> <fieldName>timestamp</fieldName> <timeZone>UTC</timeZone> </timestamp> <loggerName> <fieldName>logger</fieldName> </loggerName> <logLevel> <fieldName>level</fieldName> </logLevel> <threadName> <fieldName>thread</fieldName> </threadName> <nestedField> <fieldName>mdc</fieldName> <providers> <mdc /> </providers> </nestedField> <stackTrace> <fieldName>stackTrace</fieldName> <!-- maxLength - limit the length of the stack trace --> <throwableConverter class="net.logstash.logback.stacktrace.ShortenedThrowableConverter"> <maxDepthPerThrowable>200</maxDepthPerThrowable> <maxLength>14000</maxLength> <rootCauseFirst>true</rootCauseFirst> </throwableConverter> </stackTrace> <message /> <throwableClassName> <fieldName>exceptionClass</fieldName> </throwableClassName> </providers> </encoder> </appender> <root level="info"> <appender-ref ref="stdout" /> </root> </configuration>使用带
-spring后缀(如logback-spring.xml)的日志记录配置文件时,可基于 Spring 活动配置文件设置日志记录配置。<configuration> <springProfile name="dev"> <!-- JSON appender definitions for local development, in human readable format --> <include resource="org/springframework/boot/logging/logback/defaults.xml" /> <include resource="org/springframework/boot/logging/logback/console-appender.xml" /> <root level="info"> <appender-ref ref="CONSOLE" /> </root> </springProfile> <springProfile name="!dev"> <!-- JSON appender configuration from previous step, used for staging / production --> ... </springProfile> </configuration>对于本地开发,请使用 JVM 参数
-Dspring.profiles.active=dev运行 Spring 应用程序,然后可看到人工可读的日志,而不是 JSON 格式的行。
使用 log4j2 进行记录
对于 log4j2 应用,请使用 json-template-layout 生成 JSON 格式的日志。 Spring Boot 2.1+ 版支持此方法。
此过程:
在
spring-boot-starter-logging文件中排除spring-boot-starterspring-boot-starter-log4j2、添加依赖项log4j-layout-template-json。<dependency> <groupId>org.springframework.boot</groupId> <artifactId>spring-boot-starter-web</artifactId> <exclusions> <exclusion> <groupId>org.springframework.boot</groupId> <artifactId>spring-boot-starter-logging</artifactId> </exclusion> </exclusions> </dependency> <dependency> <groupId>org.springframework.boot</groupId> <artifactId>spring-boot-starter-log4j2</artifactId> </dependency> <dependency> <groupId>org.apache.logging.log4j</groupId> <artifactId>log4j-layout-template-json</artifactId> <version>2.14.0</version> </dependency>在类路径中准备一个 JSON 布局模板文件
jsonTemplate.json。{ "mdc": { "$resolver": "mdc" }, "exceptionClass": { "$resolver": "exception", "field": "className" }, "stackTrace": { "$resolver": "exception", "field": "stackTrace", "stringified": true }, "message": { "$resolver": "message", "stringified": true }, "thread": { "$resolver": "thread", "field": "name" }, "timestamp": { "$resolver": "timestamp", "pattern": { "format": "yyyy-MM-dd'T'HH:mm:ss.SSS'Z'", "timeZone": "UTC" } }, "level": { "$resolver": "level", "field": "name" }, "logger": { "$resolver": "logger", "field": "name" } }在
log4j2-spring.xml配置文件中使用此 JSON 布局模板。<configuration> <appenders> <console name="Console" target="SYSTEM_OUT"> <!-- maxStringLength - limit the length of the stack trace --> <JsonTemplateLayout eventTemplateUri="classpath:jsonTemplate.json" maxStringLength="14000" /> </console> </appenders> <loggers> <root level="info"> <appender-ref ref="Console" /> </root> </loggers> </configuration>
在 Log Analytics 中分析日志
正确设置应用程序后,应用程序控制台日志会流式传输到 Log Analytics。 此结构可在 Log Analytics 中实现高效查询。
在 Log Analytics 中查看日志结构
请按以下过程操作:
转到你的服务实例的服务概述页。
选择“监视”部分中的“日志”条目 。
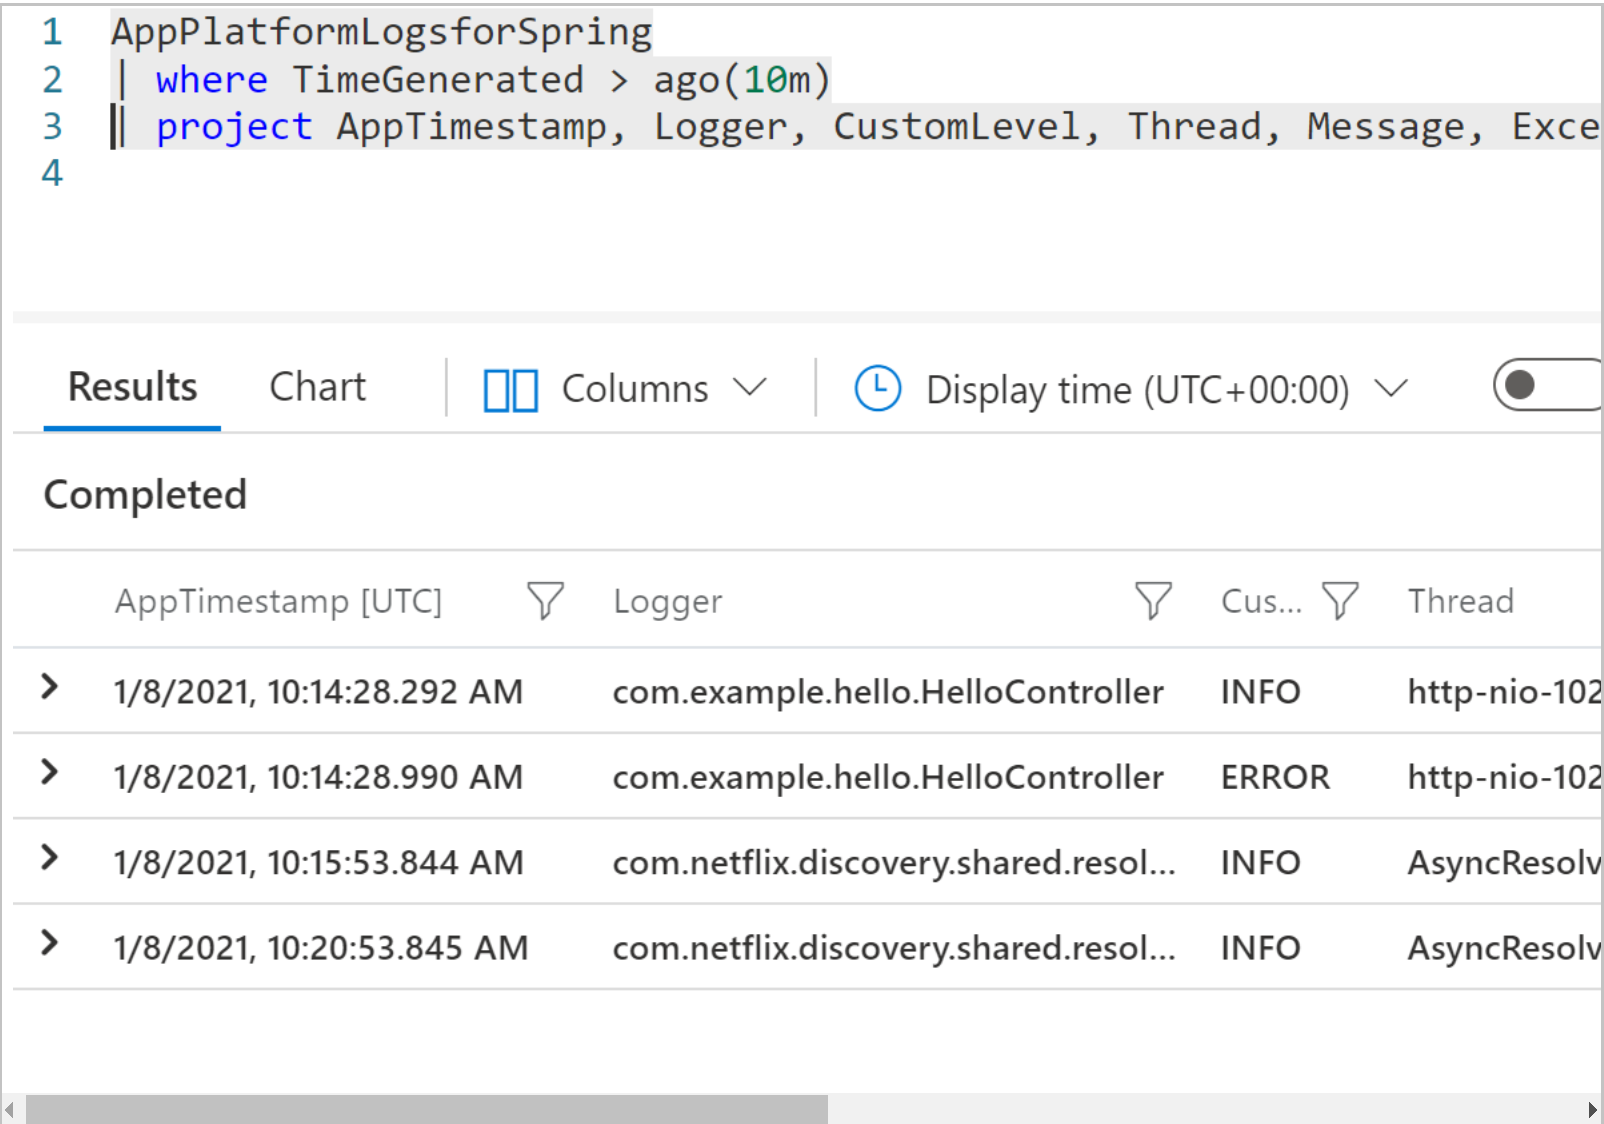
运行此查询。
AppPlatformLogsforSpring
| where TimeGenerated > ago(1h)
| project AppTimestamp, Logger, CustomLevel, Thread, Message, ExceptionClass, StackTrace, TraceId, SpanId
将返回应用程序日志,如下图所示:
显示包含错误的日志条目
若要查看包含错误的日志条目,请运行以下查询:
AppPlatformLogsforSpring
| where TimeGenerated > ago(1h) and CustomLevel == "ERROR"
| project AppTimestamp, Logger, ExceptionClass, StackTrace, Message, AppName
| sort by AppTimestamp
使用此查询查找错误,或修改查询词以查找特定的异常类或错误代码。
显示特定 traceId 的日志条目
若要查看特定跟踪 ID“trace_id”的日志条目,请运行以下查询:
AppPlatformLogsforSpring
| where TimeGenerated > ago(1h)
| where TraceId == "trace_id"
| project AppTimestamp, Logger, TraceId, SpanId, StackTrace, Message, AppName
| sort by AppTimestamp
后续步骤
- 若要详细了解日志查询,请参阅 Azure Monitor 中的日志查询入门。
