重要
目前无法使用灵活业务流程模式从另一租户共享的映像创建虚拟机规模集。
从 Azure Compute Gallery 中存储的专用化映像版本创建规模集。 若要使用通用化映像版本创建规模集,请参阅从通用化映像创建规模集。
重要
从专用化映像创建新规模集时,VM 会保留原始 VM 的计算机名。 其他特定于计算机的信息(如 CMID)也会保留。 此重复信息可能会导致问题。 使用专用化映像时,请注意应用程序依赖哪些类型的计算机特定信息。
在这些示例中,请根据需要替换资源名称。
从库创建规模集
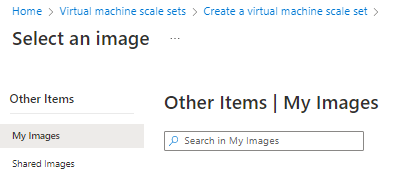
使用存储在 Azure Compute Gallery 中的映像创建规模集与使用市场映像创建规模集相同,但选择映像时,请选择“查看所有映像”。

“选择映像”页将打开。 如果所需映像位于自己的库中,请选择“我的映像”,或者,如果映像是从其他人的库中与你共享的,请选择“共享映像”。
如果选择在本地安装并使用 CLI,本教程要求运行 Azure CLI 2.35.0 或更高版本。 运行 az --version 即可查找版本。 如果需要进行安装或升级,请参阅安装 Azure CLI。
使用 az sig image-definition list 列出库中的映像定义,以查看定义的名称和 ID。
resourceGroup=myGalleryRG
gallery=myGallery
az sig image-definition list \
   --resource-group $resourceGroup \
   --gallery-name $gallery \
   --query "[].[name, id]" \
   --output tsv
使用 az vmss create 创建一个规模集,使用 --specialized 参数来指示映像是专用化映像。
使用 --image 的映像定义 ID 从可用的最新映像版本创建规模集实例。 还可以通过提供 --image 的映像版本 ID 从特定版本创建规模集实例。 请注意,使用特定映像版本意味着:如果该特定映像版本由于已删除或已从区域中删除而无法使用,则自动化可能会失败。 建议使用映像定义 ID 来创建新的 VM(除非需要特定的映像版本)。
在此示例中,我们将从 myImageDefinition 映像的最新版本创建实例。
az group create --name myResourceGroup --location chinanorth2
az vmss create \
   --resource-group myResourceGroup \
   --name myScaleSet \
   --image "/subscriptions/<Subscription ID>/resourceGroups/myGalleryRG/providers/Microsoft.Compute/galleries/myGallery/images/myImageDefinition" \
   --specialized
在此示例中,我们使用映像定义 ID 来确保新 VM 会使用最新版本的映像。 也可通过将映像版本 ID 用作 -ImageReferenceId 来使用特定版本。 例如,若要使用映像版本 1.0.0,请键入:-ImageReferenceId "/subscriptions/<subscription ID where the gallery is located>/resourceGroups/myGalleryRG/providers/Microsoft.Compute/galleries/myGallery/images/myImageDefinition/versions/1.0.0"。
请注意,使用特定映像版本意味着:如果该特定映像版本由于已删除或已从区域中删除而无法使用,则自动化可能会失败。 建议使用映像定义 ID 来创建新的 VM(除非需要特定的映像版本)。
以下示例在 chinanorth2 位置的 myVMSSRG 资源组中创建一个名为 myScaleSet 的规模集。 将基于“myGalleryRG”资源组的“myGallery”映像库中的“myImageDefinition”映像创建该规模集。 出现提示时,请为该规模集中的 VM 实例设置自己的管理凭据。
# Get the image definition

$imageDefinition = Get-AzGalleryImageDefinition `
   -GalleryName myGallery `
   -ResourceGroupName myGalleryRG `
   -Name myImageDefinition

# Define variables for the scale set
$resourceGroupName = "myVMSSRG"
$scaleSetName = "myScaleSet"
$location = "China North 2"

# Create a resource group
New-AzResourceGroup -ResourceGroupName $resourceGroupName -Location $location

# Create a networking pieces
$subnet = New-AzVirtualNetworkSubnetConfig `
  -Name "mySubnet" `
  -AddressPrefix 10.0.0.0/24
$vnet = New-AzVirtualNetwork `
  -ResourceGroupName $resourceGroupName `
  -Name "myVnet" `
  -Location $location `
  -AddressPrefix 10.0.0.0/16 `
  -Subnet $subnet
$publicIP = New-AzPublicIpAddress `
  -ResourceGroupName $resourceGroupName `
  -Location $location `
  -AllocationMethod Static `
  -Name "myPublicIP"
$frontendIP = New-AzLoadBalancerFrontendIpConfig `
  -Name "myFrontEndPool" `
  -PublicIpAddress $publicIP
$backendPool = New-AzLoadBalancerBackendAddressPoolConfig -Name "myBackEndPool"
$inboundNATPool = New-AzLoadBalancerInboundNatPoolConfig `
  -Name "myRDPRule" `
  -FrontendIpConfigurationId $frontendIP.Id `
  -Protocol TCP `
  -FrontendPortRangeStart 50001 `
  -FrontendPortRangeEnd 50010 `
  -BackendPort 3389
# Create the load balancer and health probe
$lb = New-AzLoadBalancer `
  -ResourceGroupName $resourceGroupName `
  -Name "myLoadBalancer" `
  -Location $location `
  -FrontendIpConfiguration $frontendIP `
  -BackendAddressPool $backendPool `
  -InboundNatPool $inboundNATPool
Add-AzLoadBalancerProbeConfig -Name "myHealthProbe" `
  -LoadBalancer $lb `
  -Protocol TCP `
  -Port 80 `
  -IntervalInSeconds 15 `
  -ProbeCount 2
Add-AzLoadBalancerRuleConfig `
  -Name "myLoadBalancerRule" `
  -LoadBalancer $lb `
  -FrontendIpConfiguration $lb.FrontendIpConfigurations[0] `
  -BackendAddressPool $lb.BackendAddressPools[0] `
  -Protocol TCP `
  -FrontendPort 80 `
  -BackendPort 80 `
  -Probe (Get-AzLoadBalancerProbeConfig -Name "myHealthProbe" -LoadBalancer $lb)
Set-AzLoadBalancer -LoadBalancer $lb

# Create IP address configurations
$ipConfig = New-AzVmssIpConfig `
  -Name "myIPConfig" `
  -LoadBalancerBackendAddressPoolsId $lb.BackendAddressPools[0].Id `
  -LoadBalancerInboundNatPoolsId $inboundNATPool.Id `
  -SubnetId $vnet.Subnets[0].Id

# Create a configuration
$vmssConfig = New-AzVmssConfig `
    -Location $location `
    -SkuCapacity 2 `
    -SkuName "Standard_DS2" `
    -UpgradePolicyMode "Automatic"

# Reference the image version
Set-AzVmssStorageProfile $vmssConfig `
  -OsDiskCreateOption "FromImage" `
  -ImageReferenceId $imageDefinition.Id

# Complete the configuration

Add-AzVmssNetworkInterfaceConfiguration `
  -VirtualMachineScaleSet $vmssConfig `
  -Name "network-config" `
  -Primary $true `
  -IPConfiguration $ipConfig

# Create the scale set
New-AzVmss `
  -ResourceGroupName $resourceGroupName `
  -Name $scaleSetName `
  -VirtualMachineScaleSet $vmssConfig
创建和配置所有的规模集资源和 VM 需要几分钟时间。
后续步骤
可使用模板创建 Azure Compute Gallery 资源。 提供多个 Azure 快速入门模板: