How to create an unmanaged VM image from an Azure VM
This article covers using storage accounts. We recommend that you use managed disks and managed images instead of a storage account. For more information, see Capture a managed image of a generalized VM in Azure.
This article shows you how to use Azure PowerShell to create an image of a generalized Azure VM using a storage account. You can then use the image to create another VM. The image includes the OS disk and the data disks that are attached to the virtual machine. The image doesn't include the virtual network resources, so you need to set up those resources when you create the new VM.
Generalize the VM
This section shows you how to generalize your Windows virtual machine for use as an image. Generalizing a VM removes all your personal account information, among other things, and prepares the machine to be used as an image. For details about Sysprep, see How to Use Sysprep: An Introduction.
Make sure the server roles running on the machine are supported by Sysprep. For more information, see Sysprep Support for Server Roles
Important
If you are uploading your VHD to Azure for the first time, make sure you have prepared your VM before running Sysprep.
You can also generalize a Linux VM using sudo waagent -deprovision+user and then use PowerShell to capture the VM. For information about using the CLI to capture a VM, see How to generalize and capture a Linux virtual machine using the Azure CLI.
Sign in to the Windows virtual machine.
Open the Command Prompt window as an administrator. Change the directory to %windir%\system32\sysprep, and then run
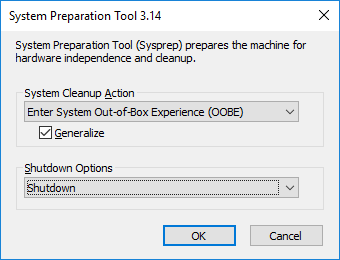
sysprep.exe.In the System Preparation Tool dialog box, select Enter System Out-of-Box Experience (OOBE), and make sure that the Generalize check box is selected.
In Shutdown Options, select Shutdown.
Click OK.
When Sysprep completes, it shuts down the virtual machine.
Important
Do not restart the VM until you are done uploading the VHD to Azure or creating an image from the VM. If the VM accidentally gets restarted, run Sysprep to generalize it again.
Log in to Azure PowerShell
Open Azure PowerShell and sign in to your Azure account.
Connect-AzAccountA pop-up window opens for you to enter your Azure account credentials.
Get the subscription IDs for your available subscriptions.
Get-AzSubscriptionSet the correct subscription using the subscription ID.
Select-AzSubscription -SubscriptionId "<subscriptionID>"
Deallocate the VM and set the state to generalized
Important
You cannot add, edit or remove tags from a VM once it is marked as generalized. If you want to add a tag to the VM, make sure you add the tags before marking it as generalized.
Deallocate the VM resources.
Stop-AzVM -ResourceGroupName <resourceGroup> -Name <vmName>The Status for the VM in the Azure portal changes from Stopped to Stopped (deallocated).
Set the status of the virtual machine to Generalized.
Set-AzVm -ResourceGroupName <resourceGroup> -Name <vmName> -GeneralizedCheck the status of the VM. The OSState/generalized section for the VM should have the DisplayStatus set to VM generalized.
$vm = Get-AzVM -ResourceGroupName <resourceGroup> -Name <vmName> -Status
$vm.Statuses
Create the image
Create an unmanaged virtual machine image in the destination storage container using this command. The image is created in the same storage account as the original virtual machine. The -Path parameter saves a copy of the JSON template for the source VM to your local computer. The -DestinationContainerName parameter is the name of the container that you want to hold your images. If the container doesn't exist, it is created for you.
Save-AzVMImage -ResourceGroupName <resourceGroupName> -Name <vmName> `
    -DestinationContainerName <destinationContainerName> -VHDNamePrefix <templateNamePrefix> `
    -Path <C:\local\Filepath\Filename.json>
You can get the URL of your image from the JSON file template. Go to the resources > storageProfile > osDisk > image > uri section for the complete path of your image. The URL of the image looks like: https://<storageAccountName>.blob.core.windows.net/system/Microsoft.Compute/Images/<imagesContainer>/<templatePrefix-osDisk>.xxxxxxxx-xxxx-xxxx-xxxx-xxxxxxxxxxxx.vhd.
You can also verify the URI in the portal. The image is copied to a container named system in your storage account.
Create a VM from the image
Now you can create one or more VMs from the unmanaged image.
Set the URI of the VHD
The URI for the VHD to use is in the format: https://mystorageaccount.blob.core.windows.net/mycontainer/MyVhdName.vhd. In this example the VHD named myVHD is in the storage account mystorageaccount in the container mycontainer.
$imageURI = "https://mystorageaccount.blob.core.windows.net/mycontainer/myVhd.vhd"
Create a virtual network
Create the vNet and subnet of the virtual network.
Create the subnet. The following sample creates a subnet named mySubnet in the resource group myResourceGroup with the address prefix of 10.0.0.0/24.
$rgName = "myResourceGroup"
$subnetName = "mySubnet"
$singleSubnet = New-AzVirtualNetworkSubnetConfig -Name $subnetName -AddressPrefix 10.0.0.0/24
Create the virtual network. The following sample creates a virtual network named myVnet in the West US location with the address prefix of 10.0.0.0/16.
$location = "West US"
$vnetName = "myVnet"
$vnet = New-AzVirtualNetwork -Name $vnetName -ResourceGroupName $rgName -Location $location `
    -AddressPrefix 10.0.0.0/16 -Subnet $singleSubnet
Create a public IP address and network interface
To enable communication with the virtual machine in the virtual network, you need a public IP address and a network interface.
Create a public IP address. This example creates a public IP address named myPip.
$ipName = "myPip"
$pip = New-AzPublicIpAddress -Name $ipName -ResourceGroupName $rgName -Location $location `
    -AllocationMethod Dynamic
Create the NIC. This example creates a NIC named myNic.
$nicName = "myNic"
$nic = New-AzNetworkInterface -Name $nicName -ResourceGroupName $rgName -Location $location `
    -SubnetId $vnet.Subnets[0].Id -PublicIpAddressId $pip.Id
Create the network security group and an RDP rule
To be able to log in to your VM using RDP, you need to have a security rule that allows RDP access on port 3389.
This example creates an NSG named myNsg that contains a rule called myRdpRule that allows RDP traffic over port 3389. For more information about NSGs, see Opening ports to a VM in Azure using PowerShell.
$nsgName = "myNsg"

$rdpRule = New-AzNetworkSecurityRuleConfig -Name myRdpRule -Description "Allow RDP" `
    -Access Allow -Protocol Tcp -Direction Inbound -Priority 110 `
    -SourceAddressPrefix Internet -SourcePortRange * `
    -DestinationAddressPrefix * -DestinationPortRange 3389

$nsg = New-AzNetworkSecurityGroup -ResourceGroupName $rgName -Location $location `
    -Name $nsgName -SecurityRules $rdpRule
Create a variable for the virtual network
Create a variable for the completed virtual network.
$vnet = Get-AzVirtualNetwork -ResourceGroupName $rgName -Name $vnetName
Create the VM
The following PowerShell completes the virtual machine configurations and uses unmanaged image as the source for the new installation.
    # Enter a new user name and password to use as the local administrator account
    # for remotely accessing the VM.
    $cred = Get-Credential

    # Name of the storage account where the VHD is located. This example sets the
    # storage account name as "myStorageAccount"
    $storageAccName = "myStorageAccount"

    # Name of the virtual machine. This example sets the VM name as "myVM".
    $vmName = "myVM"

    # Size of the virtual machine. This example creates "Standard_D2_v2" sized VM.
    # See the VM sizes documentation for more information:
    # https://azure.microsoft.com/documentation/articles/virtual-machines-windows-sizes/
    $vmSize = "Standard_D2_v2"

    # Computer name for the VM. This examples sets the computer name as "myComputer".
    $computerName = "myComputer"

    # Name of the disk that holds the OS. This example sets the
    # OS disk name as "myOsDisk"
    $osDiskName = "myOsDisk"

    # Assign a SKU name. This example sets the SKU name as "Standard_LRS"
    # Valid values for -SkuName are: Standard_LRS - locally redundant storage, Standard_ZRS - zone redundant
    # storage, Standard_GRS - geo redundant storage, Standard_RAGRS - read access geo redundant storage,
    # Premium_LRS - premium locally redundant storage.
    $skuName = "Standard_LRS"

    # Get the storage account where the uploaded image is stored
    $storageAcc = Get-AzStorageAccount -ResourceGroupName $rgName -AccountName $storageAccName

    # Set the VM name and size
    $vmConfig = New-AzVMConfig -VMName $vmName -VMSize $vmSize

    #Set the Windows operating system configuration and add the NIC
    $vm = Set-AzVMOperatingSystem -VM $vmConfig -Windows -ComputerName $computerName `
        -Credential $cred -ProvisionVMAgent -EnableAutoUpdate
    $vm = Add-AzVMNetworkInterface -VM $vm -Id $nic.Id

    # Create the OS disk URI
    $osDiskUri = '{0}vhds/{1}-{2}.vhd' `
        -f $storageAcc.PrimaryEndpoints.Blob.ToString(), $vmName.ToLower(), $osDiskName

    # Configure the OS disk to be created from the existing VHD image (-CreateOption fromImage).
    $vm = Set-AzVMOSDisk -VM $vm -Name $osDiskName -VhdUri $osDiskUri `
        -CreateOption fromImage -SourceImageUri $imageURI -Windows

    # Create the new VM
    New-AzVM -ResourceGroupName $rgName -Location $location -VM $vm
Verify that the VM was created
When complete, you should see the newly created VM in the Azure portal under Browse > Virtual machines, or by using the following PowerShell commands:
    $vmList = Get-AzVM -ResourceGroupName $rgName
    $vmList.Name
Next steps
To manage your new virtual machine with Azure PowerShell, see Manage virtual machines using Azure Resource Manager and PowerShell.