Capture an image of an Azure Windows virtual machine created with the classic deployment model
Important
Classic VMs will be retired on March 1, 2023.
If you use IaaS resources from ASM, please complete your migration by March 1, 2023. We encourage you to make the switch sooner to take advantage of the many feature enhancements in Azure Resource Manager.
For more information, see Migrate your IaaS resources to Azure Resource Manager by March 1, 2023.
Note
Azure has two different deployment models for creating and working with resources: Resource Manager and Classic. This article covers using the Classic deployment model. Microsoft recommends that most new deployments use the Resource Manager model. For Resource Manager model information, see Capture a managed image of a generalized VM in Azure.
Starting November 15, 2017, virtual machines will be available only in the Azure portal.
This article shows you how to capture an Azure virtual machine running Windows so you can use it as an image to create other virtual machines. This image includes the operating system disk and any data disks that are attached to the virtual machine. It doesn't include networking configurations, so you'll need to set up network configurations when you create the other virtual machines that use the image.
Azure stores the image under VM images (classic), a Compute service that is listed when you view all the Azure services. This is the same place where any images you've uploaded are stored. For details about images, see About images for virtual machines.
Before you begin
These steps assume that you've already created an Azure virtual machine and configured the operating system, including attaching any data disks. If you haven't done this yet, see the following articles for information on creating and preparing the virtual machine:
- Create a virtual machine from an image
- How to attach a data disk to a virtual machine
- Make sure the server roles are supported with Sysprep. For more information, see Sysprep Support for Server Roles.
Warning
This process deletes the original virtual machine after it's captured.
Prior to capturing an image of an Azure virtual machine, it is recommended the target virtual machine be backed up. Azure virtual machines can be backed up using Azure Backup. For details, see Back up Azure virtual machines. Other solutions are available from certified partners. To find out what’s currently available, search the Azure Marketplace.
Capture the virtual machine
In the Azure portal, Connect to the virtual machine. For instructions, see How to sign in to a virtual machine running Windows Server.
Open a Command Prompt window as an administrator.
Change the directory to
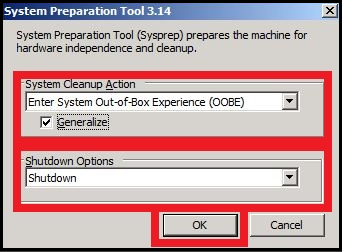
%windir%\system32\sysprep, and then run sysprep.exe.The System Preparation Tool dialog box appears. Do the following:
- In System Cleanup Action, select Enter System Out-of-Box Experience (OOBE) and make sure that Generalize is checked. For more information about using Sysprep, see How to Use Sysprep: An Introduction.
- In Shutdown Options, select Shutdown.
- Click OK.
Sysprep shuts down the virtual machine, which changes the status of the virtual machine in the Azure portal to Stopped.
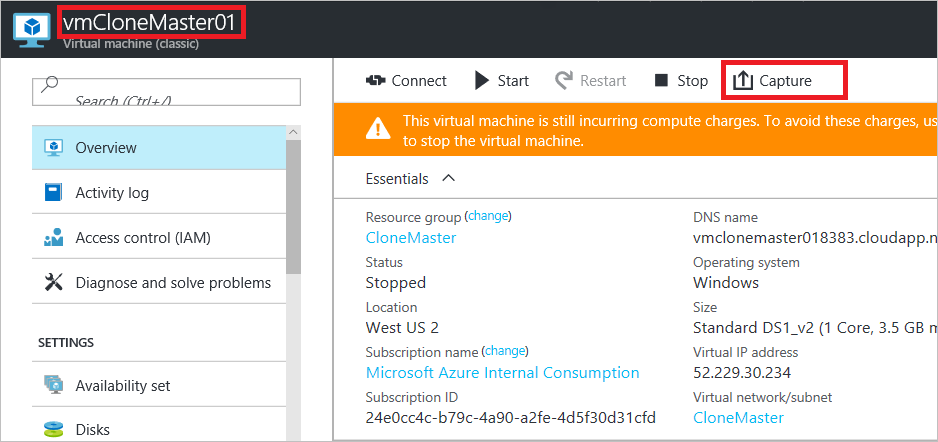
In the Azure portal, click Virtual Machines (classic) and select the virtual machine you want to capture. The VM images (classic) group is listed under Compute when you view All services.
On the command bar, click Capture.
The Capture the Virtual Machine dialog box appears.
In Image name, type a name for the new image. In Image label, type a label for the new image.
Click I've run Sysprep on the virtual machine. This checkbox refers to the actions with Sysprep in steps 3-5. An image must be generalized by running Sysprep before you add a Windows Server image to your set of custom images.
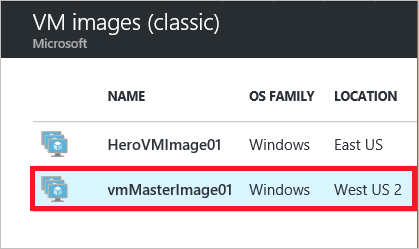
Once the capture completes, the new image becomes available in the Marketplace, in the Compute, VM images (classic) container.
Next steps
The image is ready to be used to create virtual machines. To do this, you'll create a virtual machine by selecting the All services menu item at the bottom of the services menu, then VM images (classic) in the Compute group. For instructions, see Create a virtual machine from an image.