Connect to a SQL Server Virtual Machine on Azure (Classic Deployment)
Overview
This topic describes how to connect to your SQL Server instance running on an Azure virtual machine. It covers some general connectivity scenarios and then provides detailed steps for configuring SQL Server connectivity in an Azure VM.
Important
Azure has two different deployment models for creating and working with resources: Resource Manager and Classic. This article covers using the Classic deployment model. Microsoft recommends that most new deployments use the Resource Manager model. If you are using Resource Manager VMs, see Connect to a SQL Server Virtual Machine on Azure using Resource Manager.
Connection scenarios
The way a client connects to SQL Server running on a Virtual Machine differs depending on the location of the client and the machine/networking configuration. These scenarios include:
- Connect to SQL Server in the same cloud service
- Connect to SQL Server over the internet
- Connect to SQL Server in the same virtual network
Note
Before you connect with any of these methods, you must follow the steps in this article to configure connectivity.
Connect to SQL Server in the same cloud service
Multiple virtual machines can be created in the same cloud service. To understand this virtual machines scenario, see How to connect virtual machines with a virtual network or cloud service. This scenario is when a client on one virtual machine attempts to connect to SQL Server running on another virtual machine in the same cloud service.
In this scenario, you can connect using the VM Name (also shown as Computer Name or hostname in the portal). This is the name you provided for the VM during creation. For example, if you named your SQL VM mysqlvm, a client VM in the same cloud service could use the following connection string to connect:
Server=mysqlvm;Integrated Security=false;User ID=<login_name>;Password=<your_password>
Connect to SQL Server over the Internet
If you want to connect to your SQL Server database engine from the Internet, you must create a virtual machine endpoint for incoming TCP communication. This Azure configuration step, directs incoming TCP port traffic to a TCP port that is accessible to the virtual machine.
To connect over the internet, you must use the VM's DNS name and the VM endpoint port number (configured later in this article). To find the DNS Name, navigate to the Azure portal, and select Virtual machines (classic). Then select your virtual machine. The DNS name is shown in the Overview section.
For example, consider a classic virtual machine named mysqlvm with a DNS Name of mysqlvm7777.cloudapp.net and a VM endpoint of 57500. Assuming properly configured connectivity, the following connection string could be used to access the virtual machine from anywhere on the internet:
Server=mycloudservice.cloudapp.net,57500;Integrated Security=false;User ID=<login_name>;Password=<your_password>
Although this enables connectivity for clients over the internet, this does not imply that anyone can connect to your SQL Server. Outside clients have to the correct username and password. For additional security, don't use the well-known port 1433 for the public virtual machine endpoint. And if possible, consider adding an ACL on your endpoint to restrict traffic only to the clients you permit. For instructions on using ACLs with endpoints, see Manage the ACL on an endpoint.
Note
It is important to note that when you use this technique to communicate with SQL Server, all outgoing data from the Azure datacenter is subject to normal pricing on outbound data transfers.
Connect to SQL Server in the same virtual network
Virtual Network enables additional scenarios. You can connect VMs in the same virtual network, even if those VMs exist in different cloud services. And with a site-to-site VPN, you can create a hybrid architecture that connects VMs with on-premises networks and machines.
Virtual networks also enables you to join your Azure VMs to a domain. This is the only way to use Windows Authentication to SQL Server. The other connection scenarios require SQL Authentication with user names and passwords.
If you are going to configure a domain environment and Windows Authentication, you do not need to use the steps in this article to configure the public endpoint or the SQL Authentication and logins. In this scenario, you can connect to your SQL Server instance by specifying the SQL Server VM name in the connection string. The following example assumes that Windows Authentication has also been configured and that the user has been granted access to the SQL Server instance.
Server=mysqlvm;Integrated Security=true
Steps for configuring SQL Server connectivity in an Azure VM
The following steps demonstrate how to connect to the SQL Server instance over the internet using SQL Server Management Studio (SSMS). However, the same steps apply to making your SQL Server virtual machine accessible for your applications, running both on-premises and in Azure.
Before you can connect to the instance of SQL Server from another VM or the internet, you must complete the following tasks as described in the sections that follow:
- Create a TCP endpoint for the virtual machine
- Open TCP ports in the Windows firewall
- Configure SQL Server to listen on the TCP protocol
- Configure SQL Server for mixed mode authentication
- Create SQL Server authentication logins
- Determine the DNS name of the virtual machine
- Connect to the Database Engine from another computer
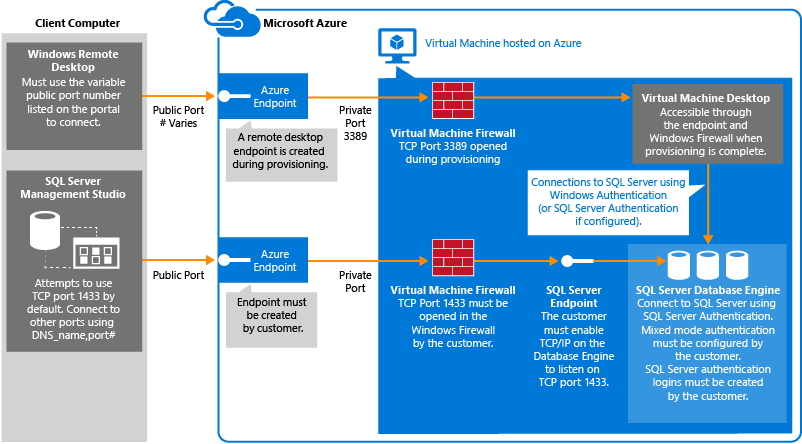
The connection path is summarized by the following diagram:
Create a TCP endpoint for the virtual machine
In order to access SQL Server from the internet, the virtual machine must have an endpoint to listen for incoming TCP communication. This Azure configuration step, directs incoming TCP port traffic to a TCP port that is accessible to the virtual machine.
Note
If you are connecting within the same cloud service or virtual network, you do not have to create a publicly accessible endpoint. In that case, you could continue to the next step. For more information, see Connection Scenarios.
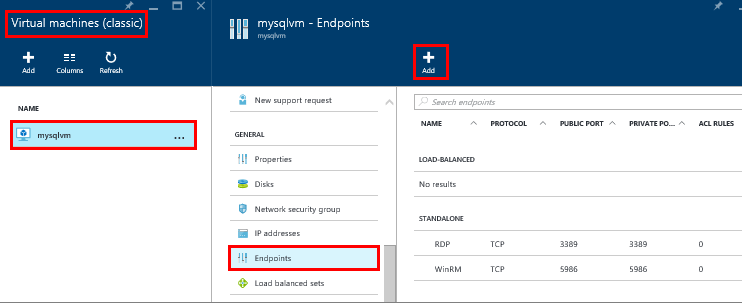
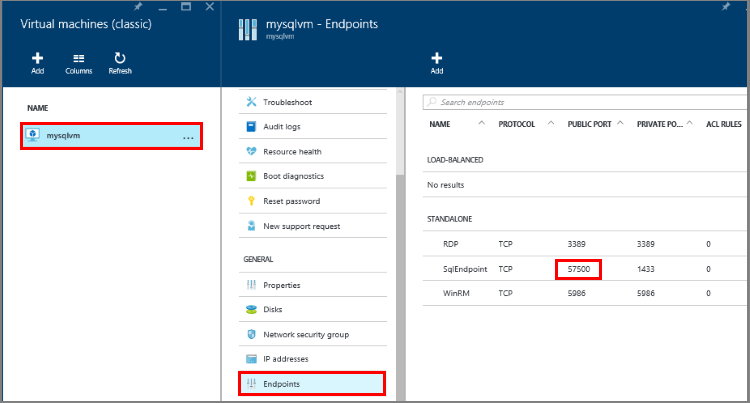
On the Azure Portal, select Virtual machines (classic).
Then select you SQL Server virtual machine.
Select Endpoints, and then click the Add button at the top of the Endpoints blade.
On the Add Endpoint blade, provide a Name such as SQLEndpoint.
Select TCP for the Protocol.
For Public port, specify a port number such as 57500.
For Private port, specify SQL Server's listening port, which defaults to 1433.
Click Ok to create the endpoint.
Open TCP ports in the Windows firewall for the default instance of the Database Engine
Connect to the virtual machine with Remote Desktop. For detailed instructions on connecting to the VM, see Open a SQL VM with Remote Desktop.
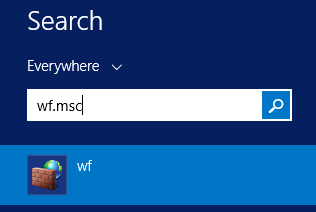
Once signed in, at the Start screen, type WF.msc, and then hit ENTER.
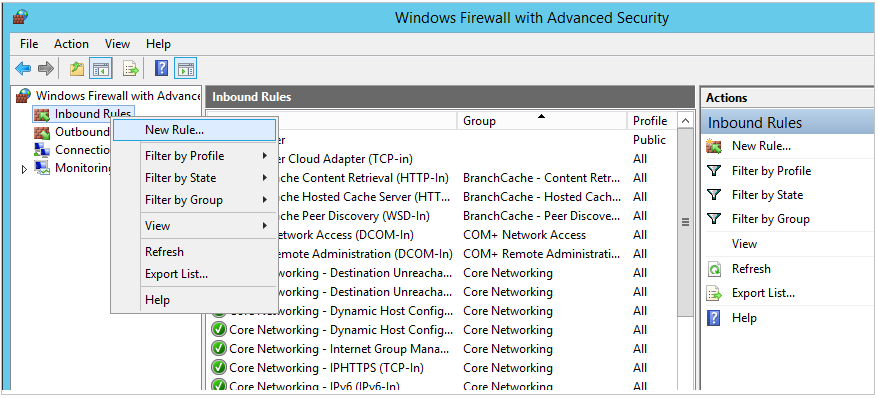
In the Windows Firewall with Advanced Security, in the left pane, right-click Inbound Rules, and then click New Rule in the action pane.
In the New Inbound Rule Wizard dialog box, under Rule Type, select Port, and then click Next.
In the Protocol and Ports dialog, use the default TCP. In the Specific local ports box, then type the port number of the instance of the Database Engine (1433 for the default instance or your choice for the private port in the endpoint step).
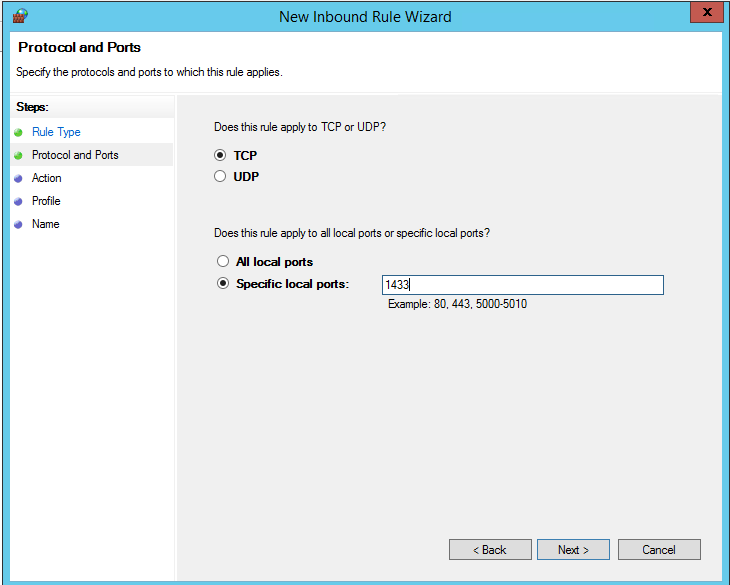
Click Next.
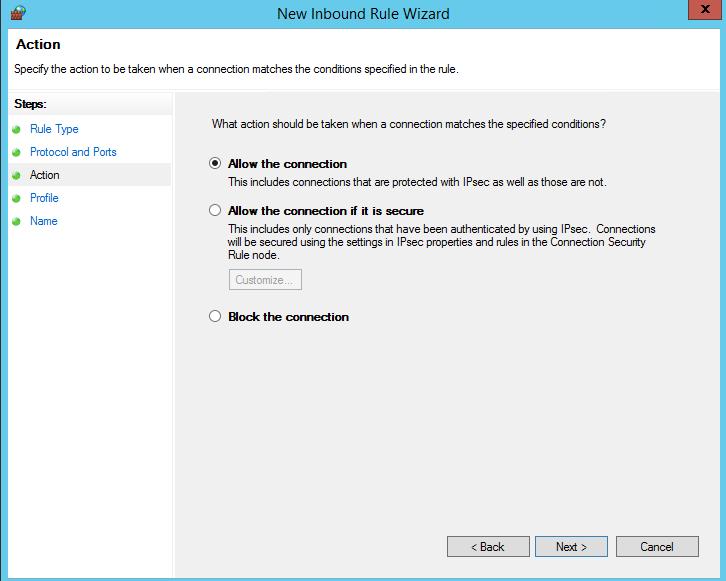
In the Action dialog box, select Allow the connection, and then click Next.
Security Note: Selecting Allow the connection if it is secure can provide additional security. Select this option if you want to configure additional security options in your environment.
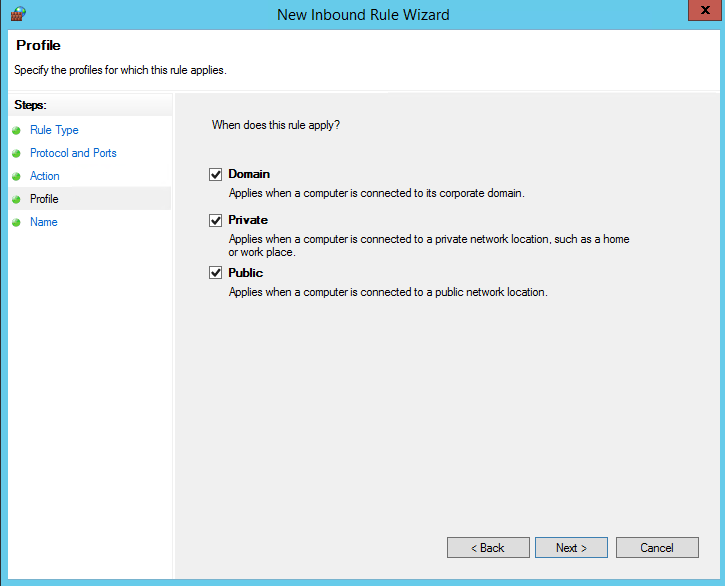
In the Profile dialog box, select Public, Private, and Domain. Then click Next.
Security Note: Selecting Public allows access over the internet. Whenever possible, select a more restrictive profile.
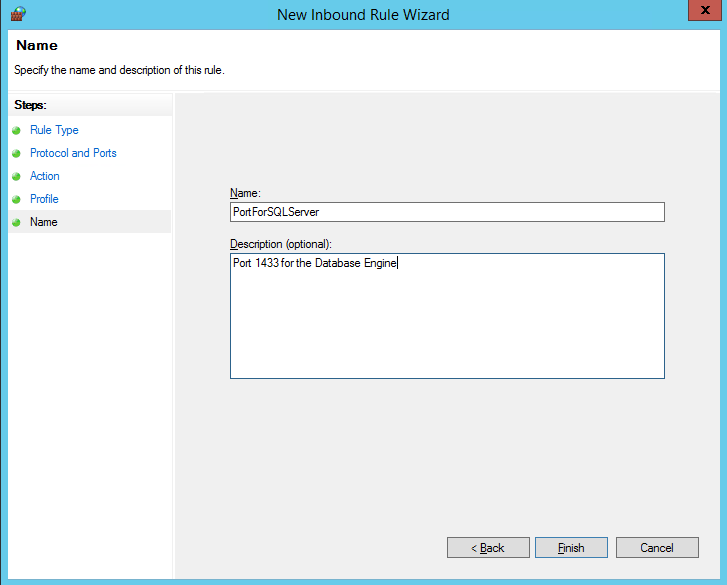
In the Name dialog box, type a name and description for this rule, and then click Finish.
Open additional ports for other components as needed. For more information, see Configuring the Windows Firewall to Allow SQL Server Access.
Configure SQL Server to listen on the TCP protocol
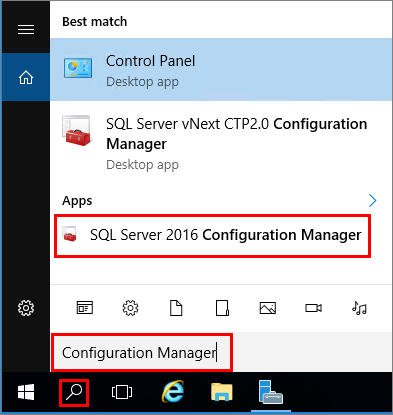
While connected to the virtual machine with remote desktop, search for Configuration Manager:
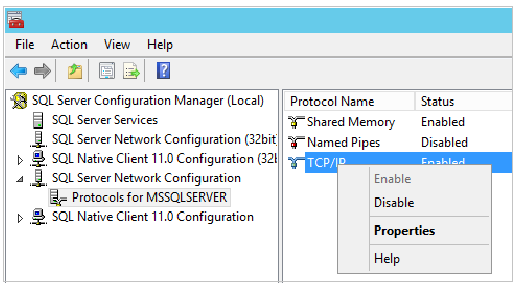
In SQL Server Configuration Manager, in the console pane, expand SQL Server Network Configuration.
In the console pane, click Protocols for MSSQLSERVER (the default instance name.) In the details pane, right-click TCP and click Enable if it is not already enabled.
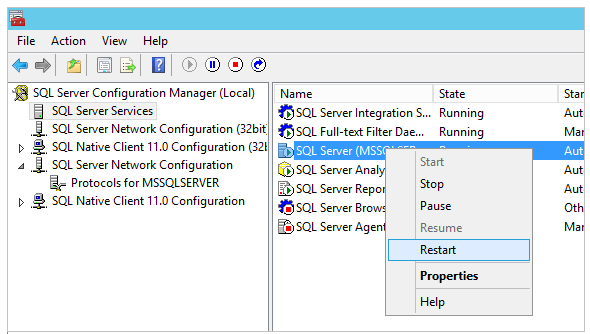
In the console pane, click SQL Server Services. In the details pane, right-click SQL Server (instance name) (the default instance is SQL Server (MSSQLSERVER)), and then click Restart, to stop and restart the instance of SQL Server.
Close SQL Server Configuration Manager.
For more information about enabling protocols for the SQL Server Database Engine, see Enable or Disable a Server Network Protocol.
Configure SQL Server for mixed mode authentication
The SQL Server Database Engine cannot use Windows Authentication without domain environment. To connect to the Database Engine from another computer, configure SQL Server for mixed mode authentication. Mixed mode authentication allows both SQL Server Authentication and Windows Authentication.
Note
Configuring mixed mode authentication might not be necessary if you have configured an Azure Virtual Network with a configured domain environment.
While connected to the virtual machine, on the Start page, type SQL Server Management Studio and click the selected icon.
The first time you open Management Studio it must create the users Management Studio environment. This may take a few moments.
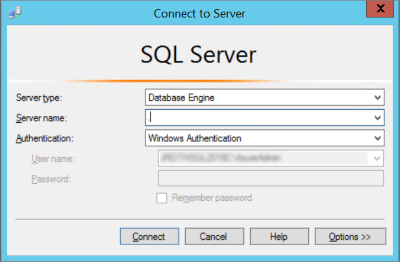
Management Studio presents the Connect to Server dialog box. In the Server name box, type the name of the virtual machine to connect to the Database Engine with the Object Explorer (Instead of the virtual machine name you can also use (local) or a single period as the Server name). Select Windows Authentication, and leave your_VM_name\your_local_administrator in the User name box. Click Connect.
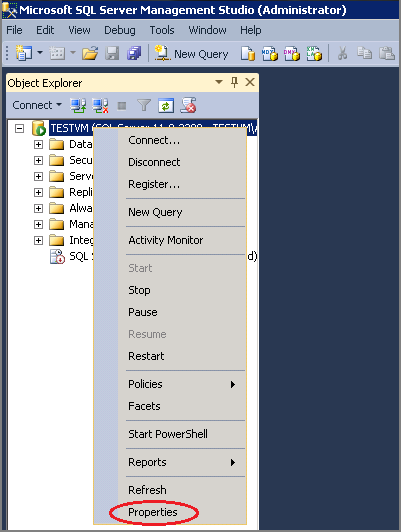
In SQL Server Management Studio Object Explorer, right-click the name of the instance of SQL Server (the virtual machine name), and then click Properties.
On the Security page, under Server authentication, select SQL Server and Windows Authentication mode, and then click OK.
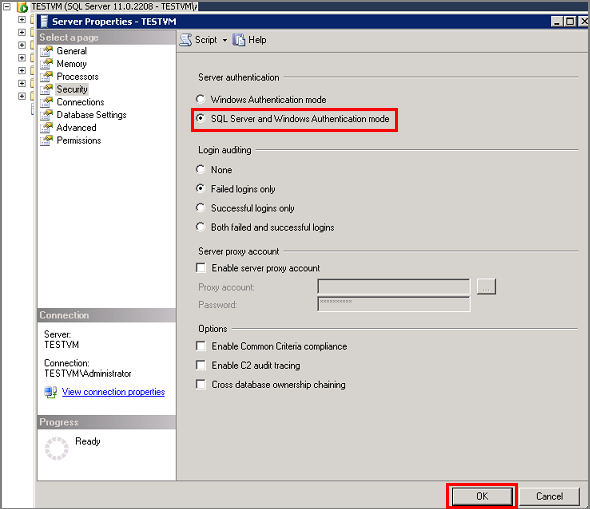
In the SQL Server Management Studio dialog box, click OK to acknowledge the requirement to restart SQL Server.
In Object Explorer, right-click your server, and then click Restart. (If SQL Server Agent is running, it must also be restarted.)
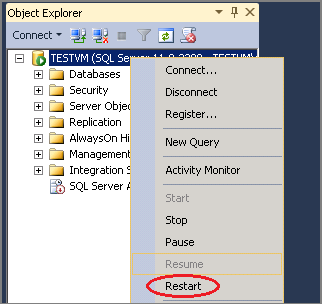
In the SQL Server Management Studio dialog box, click Yes to agree that you want to restart SQL Server.
Create SQL Server authentication logins
To connect to the Database Engine from another computer, you must create at least one SQL Server authentication login.
In SQL Server Management Studio Object Explorer, expand the folder of the server instance in which you want to create the new login.
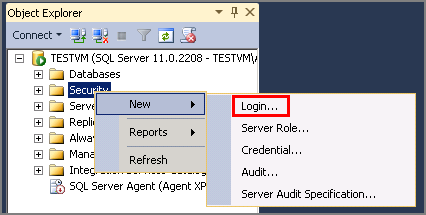
Right-click the Security folder, point to New, and select Login....
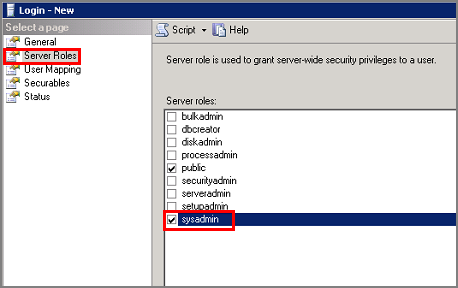
In the Login - New dialog box, on the General page, enter the name of the new user in the Login name box.
Select SQL Server authentication.
In the Password box, enter a password for the new user. Enter that password again into the Confirm Password box.
Select the password enforcement options required (Enforce password policy, Enforce password expiration, and User must change password at next login). If you are using this login for yourself, you do not need to require a password change at the next login.
From the Default database list, select a default database for the login. master is the default for this option. If you have not yet created a user database, leave this set to master.

If this is the first login you are creating, you may want to designate this login as a SQL Server administrator. If so, on the Server Roles page, check sysadmin.
Note
Members of the sysadmin fixed server role have complete control of the Database Engine. You should carefully restrict membership in this role.
Click OK.
For more information about SQL Server logins, see Create a Login.
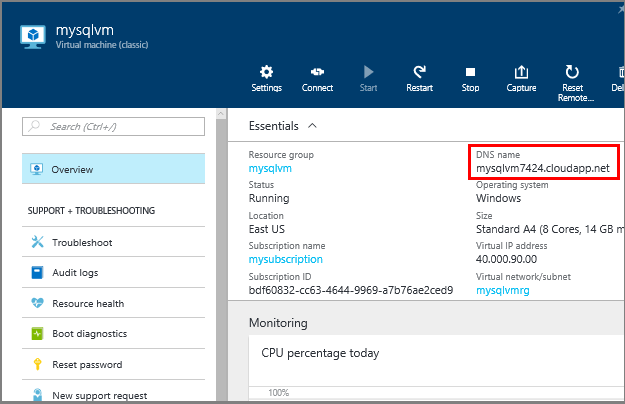
Determine the DNS name of the virtual machine
To connect to the SQL Server Database Engine from another computer, you must know the Domain Name System (DNS) name of the virtual machine. (This is the name the internet uses to identify the virtual machine. You can use the IP address, but the IP address might change when Azure moves resources for redundancy or maintenance. The DNS name will be stable because it can be redirected to a new IP address.)
In the Azure Portal (or from the previous step), select Virtual machines (classic).
Select your SQL VM.
On the Virtual machine blade, copy the DNS name for the virtual machine.
Connect to the Database Engine from another computer
On a computer connected to the internet, open SQL Server Management Studio.
In the Connect to Server or Connect to Database Engine dialog box, in the Server name box, enter the DNS name of the virtual machine (determined in the previous task) and a public endpoint port number in the format of DNSName,portnumber such as mysqlvm.cloudapp.net,57500.
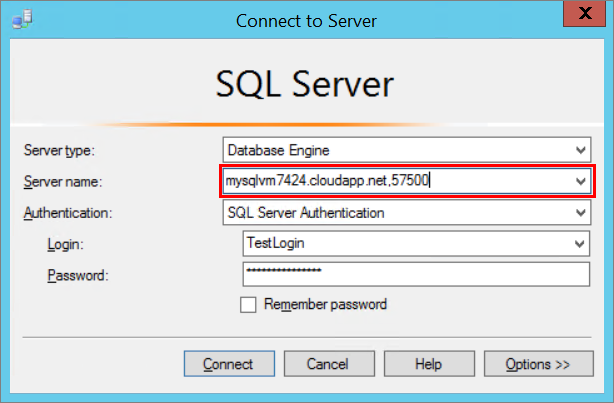
If you don't remember the public endpoint port number you previously created, you can find it in the Endpoints area of the Virtual machine blade.
In the Authentication box, select SQL Server Authentication.
In the Login box, type the name of a login that you created in an earlier task.
In the Password box, type the password of the login that you create in an earlier task.
Click Connect.
Next Steps
If you are also planning to use AlwaysOn Availability Groups for high availability and disaster recovery, you should consider implementing a listener. Database clients connect to the listener rather than directly to one of the SQL Server instances. The listener routes clients to the primary replica in the availability group. For more information, see Configure an ILB listener for AlwaysOn Availability Groups in Azure.
It is important to review all of the security best practices for SQL Server running on an Azure virtual machine. For more information, see Security Considerations for SQL Server in Azure Virtual Machines.
Explore the Learning Path for SQL Server on Azure virtual machines.
For other topics related to running SQL Server in Azure VMs, see SQL Server on Azure Virtual Machines.