Install the Azure Virtual Machine Agent in offline mode
The Azure Virtual Machine Agent (VM Agent) provides useful features, such as local administrator password reset and script pushing. This article shows you how to install the VM Agent for an offline Windows virtual machine (VM).
When to use the VM Agent in offline mode
Install the VM Agent in offline mode if the VM Agent isn't installed and you can't RDP to the VM.
If you can RDP to the VM, you only have to download and install the VM Agent manually.
How to install the VM Agent in offline mode
Use the following steps to install the VM Agent in offline mode.
Step 1: Attach the OS disk of the VM to another VM as a data disk
Take a snapshot for the OS disk of the affected VM, create a disk from the snapshot, and then attach the disk to a troubleshoot VM. For more information, see Troubleshoot a Windows VM by attaching the OS disk to a recovery VM using the Azure portal. For the classic VM, delete the VM and keep the OS disk, and then attach the OS disk to the troubleshoot VM.
Connect to the troubleshooter VM. Open Computer management > Disk management. Verify that the OS disk is online and that drive letters are assigned to the disk partitions.
Step 2: Modify the OS disk to install the Azure VM Agent
Make a remote desktop connection to the troubleshooter VM.
In the troubleshooter VM, browse to the OS disk that you attached, and then open the \windows\system32\config folder. Copy all of the files in this folder as a backup, in case a rollback is required.
Start the Registry Editor (regedit.exe).
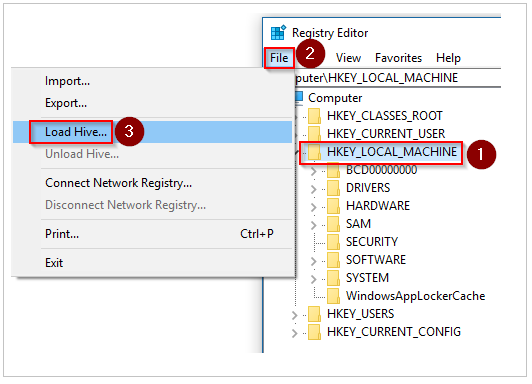
Select the HKEY_LOCAL_MACHINE key. On the menu, select File > Load Hive:
Browse to the \windows\system32\config\SYSTEM folder on the OS disk that you attached. For the name of the hive, enter BROKENSYSTEM. The new registry hive is displayed under the HKEY_LOCAL_MACHINE key.
If the attached OS disk has the VM agent installed, perform a backup of the current configuration. If it doesn't have VM agent installed, move to the next step.
Rename the \windowsazure folder to \windowsazure.old.
Export the following registries:
- HKEY_LOCAL_MACHINE\BROKENSYSTEM\ControlSet001\Services\WindowsAzureGuestAgent
- HKEY_LOCAL_MACHINE\BROKENSYSTEM\ControlSet001\Services\RdAgent
Use the existing files on the troubleshooter VM as a repository for the VM Agent installation. Complete the following steps:
From the troubleshooter VM, export the following subkeys in registry format (.reg):
HKEY_LOCAL_MACHINE\SYSTEM\ControlSet001\Services\WindowsAzureGuestAgent
HKEY_LOCAL_MACHINE\SYSTEM\ControlSet001\Services\RdAgent
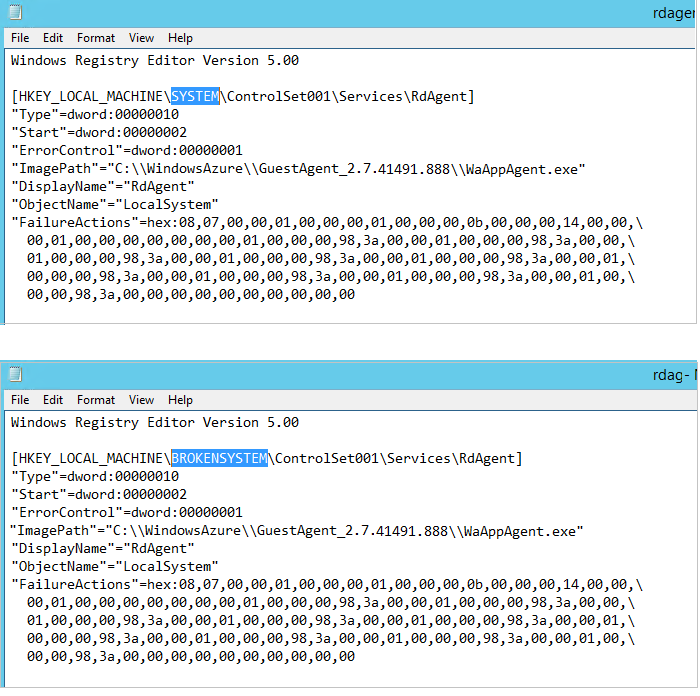
Edit the registry files. In each file, change the entry value SYSTEM to BROKENSYSTEM (as shown in the following images) and save the file. Remember the ImagePath of the current VM agent. We will need to copy the corresponding folder to the attached OS disk.
Import the registry files into the repository by double-clicking each registry file.
Verify that the following subkeys are successfully imported into the BROKENSYSTEM hive:
- WindowsAzureGuestAgent
- RdAgent
Copy the installation folder of the current VM Agent to the attached OS disk:
On the OS disk that you attached, create a folder that's named WindowsAzure in the root path.
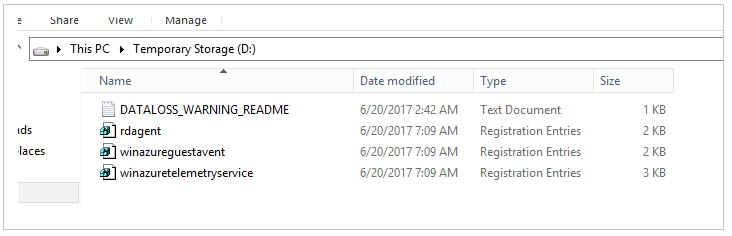
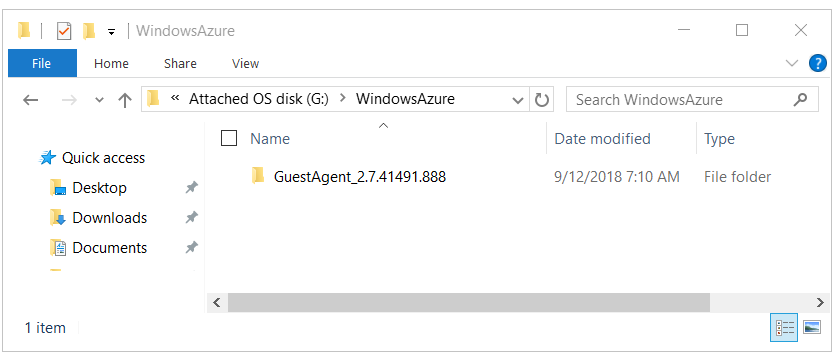
Go to C:\WindowsAzure on the troubleshooter VM, and look for any folder that is named C:\WindowsAzure\GuestAgent_X.X.XXXX.XXX. Copy the GuestAgent folder that has latest version number from C:\WindowsAzure to the WindowsAzure folder in the attached OS disk. If you aren't sure which folder should be copied, copy all GuestAgent folders. The following image shows an example of the GuestAgent folder that is copied to the attached OS disk. If you can't find the GuestAgent folder, check for the imagePath of WindowsAzureGuestAgent registry subkey for the accurate path.
Select BROKENSYSTEM. From the menu, select File > Unload Hive.
Detach the OS disk, and then change the OS disk for the affected VM. For the classic VM, create a new VM by using the repaired OS disk.
Access the VM. Notice that the RdAgent is running and the logs are being generated.
If you created the VM by using the Resource Manager deployment model, you're done.
Use the ProvisionGuestAgent property for classic VMs
Important
Classic VMs will be retired on September 1, 2023
If you use IaaS resources from ASM, please complete your migration by September 1, 2023. We encourage you to make the switch sooner to take advantage of the many feature enhancements in Azure Resource Manager.
For more information, see Migrate your IaaS resources to Azure Resource Manager by September 1, 2023.
If you created the VM by using the classic model, use the Azure PowerShell module to update the ProvisionGuestAgent property. The property informs Azure that the VM has the VM Agent installed.
To set the ProvisionGuestAgent property, run the following commands in Azure PowerShell:
$vm = Get-AzureVM –ServiceName <cloud service name> –Name <VM name>
$vm.VM.ProvisionGuestAgent = $true
Update-AzureVM –Name <VM name> –VM $vm.VM –ServiceName <cloud service name>
Then run the Get-AzureVM command. Notice that the GuestAgentStatus property is now populated with data:
Get-AzureVM –ServiceName <cloud service name> –Name <VM name>
GuestAgentStatus:Microsoft.WindowsAzure.Commands.ServiceManagement.Model.PersistentVMModel.GuestAgentStatus
Next steps
Contact us for help
If you have questions or need help, create a support request, or ask Azure community support. You can also submit product feedback to Azure feedback community.
Feedback
Coming soon: Throughout 2024 we will be phasing out GitHub Issues as the feedback mechanism for content and replacing it with a new feedback system. For more information see: https://aka.ms/ContentUserFeedback.
Submit and view feedback for