Configure Azure Key Vault Integration for SQL Server on Azure Virtual Machines (Classic)
Overview
There are multiple SQL Server encryption features, such as transparent data encryption (TDE), column level encryption (CLE), and backup encryption. These forms of encryption require you to manage and store the cryptographic keys you use for encryption. The Azure Key Vault (AKV) service is designed to improve the security and management of these keys in a secure and highly available location. The SQL Server Connector enables SQL Server to use these keys from Azure Key Vault.
Important
Azure has two different deployment models for creating and working with resources: Resource Manager and Classic. This article covers using the Classic deployment model. Microsoft recommends that most new deployments use the Resource Manager model.
If you are running SQL Server with on-premises machines, there are steps you can follow to access Azure Key Vault from your on-premises SQL Server computer. But for SQL Server in Azure VMs, you can save time by using the Azure Key Vault Integration feature. With a few Azure PowerShell cmdlets to enable this feature, you can automate the configuration necessary for a SQL VM to access your key vault.
When this feature is enabled, it automatically installs the SQL Server Connector, configures the EKM provider to access Azure Key Vault, and creates the credential to allow you to access your vault. If you looked at the steps in the previously mentioned on-premises documentation, you can see that this feature automates steps 2 and 3. The only thing you would still need to do manually is to create the key vault and keys. From there, the entire setup of your SQL VM is automated. Once this feature has completed this setup, you can execute T-SQL statements to begin encrypting your databases or backups as you normally would.
Prepare for AKV Integration
To use Azure Key Vault Integration to configure your SQL Server VM, there are several prerequisites:
The following sections describe these prerequisites and the information you need to collect to later run the PowerShell cmdlets.
Note
We recommend that you use the Azure Az PowerShell module to interact with Azure. See Install Azure PowerShell to get started. To learn how to migrate to the Az PowerShell module, see Migrate Azure PowerShell from AzureRM to Az.
Install Azure PowerShell
Make sure you have installed the latest Azure PowerShell module. For more information, see How to install and configure Azure PowerShell.
Register an application in your Azure Active Directory
First, you need to have an Azure Active Directory (AAD) in your subscription. Among many benefits, this allows you to grant permission to your key vault for certain users and applications.
Next, register an application with AAD. This will give you a Service Principal account that has access to your key vault, which your VM will need. In the Azure Key Vault article, you can find these steps in the Register an application with Azure Active Directory section, or you can see the steps with screenshots in the Get an identity for the application section of this blog post. Before completing these steps, you need to collect the following information during this registration that is needed later when you enable Azure Key Vault Integration on your SQL VM.
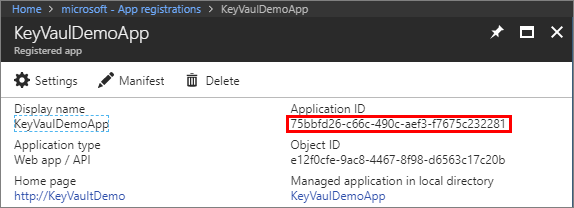
After the application is added, find the Application ID (also known as AAD ClientID or AppID) on the Registered app blade. The application ID is assigned later to the $spName (Service Principal name) parameter in the PowerShell script to enable Azure Key Vault Integration.
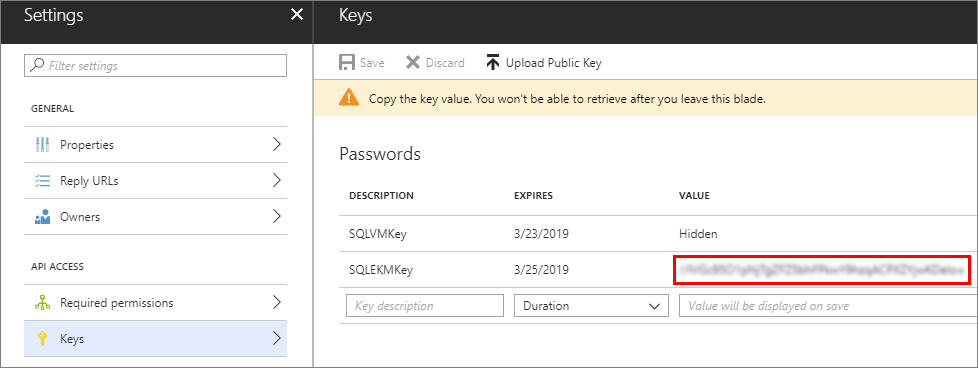
During these steps when you create your key, copy the secret for your key as is shown in the following screenshot. This key secret is assigned later to the $spSecret (Service Principal secret) parameter in the PowerShell script.
The application ID and the secret will also be used to create a credential in SQL Server.
You must authorize this new application ID (or client ID) to have the following access permissions: get, wrapKey, unwrapKey. This is done with the Set-AzKeyVaultAccessPolicy cmdlet. For more information, see Azure Key Vault overview.
Create a key vault
In order to use Azure Key Vault to store the keys you will use for encryption in your VM, you need access to a key vault. If you have not already set up your key vault, create one by following the steps in the Getting Started with Azure Key Vault article. Before completing these steps, there is some information you need to collect during this set up that is needed later when you enable Azure Key Vault Integration on your SQL VM.
New-AzKeyVault -VaultName 'ContosoKeyVault' -ResourceGroupName 'ContosoResourceGroup' -Location 'East Asia'
When you get to the Create a key vault step, note the returned vaultUri property, which is the key vault URL. In the example provided in that step, shown below, the key vault name is ContosoKeyVault, therefore the key vault URL would be https://contosokeyvault.vault.azure.net/.
The key vault URL is assigned later to the $akvURL parameter in the PowerShell script to enable Azure Key Vault Integration.
After the key vault is created, we need to add a key to the key vault, this key will be referred when we create an asymmetric key create in SQL Server later.
Configure AKV Integration
Use PowerShell to configure Azure Key Vault Integration. The following sections provide an overview of the required parameters and then a sample PowerShell script.
Install the SQL Server IaaS Extension
First, install the SQL Server IaaS Extension.
Understand the input parameters
The following table lists the parameters required to run the PowerShell script in the next section.
| Parameter | Description | Example |
|---|---|---|
| $akvURL | The key vault URL | "https://contosokeyvault.vault.azure.net/" |
| $spName | Service Principal name | "fde2b411-33d5-4e11-af04eb07b669ccf2" |
| $spSecret | Service Principal secret | "9VTJSQwzlFepD8XODnzy8n2V01Jd8dAjwm/azF1XDKM=" |
| $credName | Credential name: AKV Integration creates a credential within SQL Server, allowing the VM to have access to the key vault. Choose a name for this credential. | "mycred1" |
| $vmName | Virtual machine name: The name of a previously created SQL VM. | "myvmname" |
| $serviceName | Service name: The Cloud Service name that is associated with the SQL VM. | "mycloudservicename" |
Enable AKV Integration with PowerShell
The New-AzureVMSqlServerKeyVaultCredentialConfig cmdlet creates a configuration object for the Azure Key Vault Integration feature. The Set-AzureVMSqlServerExtension configures this integration with the KeyVaultCredentialSettings parameter. The following steps show how to use these commands.
In Azure PowerShell, first configure the input parameters with your specific values as described in the previous sections of this topic. The following script is an example.
$akvURL = "https:\//contosokeyvault.vault.azure.net/"
$spName = "fde2b411-33d5-4e11-af04eb07b669ccf2"
$spSecret = "9VTJSQwzlFepD8XODnzy8n2V01Jd8dAjwm/azF1XDKM="
$credName = "mycred1"
$vmName = "myvmname"
$serviceName = "mycloudservicename"
Then use the following script to configure and enable AKV Integration.
$secureakv =  $spSecret | ConvertTo-SecureString -AsPlainText -Force
$akvs = New-AzureVMSqlServerKeyVaultCredentialConfig -Enable -CredentialName $credname -AzureKeyVaultUrl $akvURL -ServicePrincipalName $spName -ServicePrincipalSecret $secureakv
Get-AzureVM -ServiceName $serviceName -Name $vmName | Set-AzureVMSqlServerExtension -KeyVaultCredentialSettings $akvs | Update-AzureVM
The SQL IaaS Agent Extension will update the SQL VM with this new configuration.
Next steps
After enabling Azure Key Vault Integration, you can enable SQL Server encryption on your SQL VM. First, you will need to create an asymmetric key inside your key vault and a symmetric key within SQL Server on your VM. Then, you will be able to execute T-SQL statements to enable encryption for your databases and backups.
There are several forms of encryption you can take advantage of:
The following Transact-SQL scripts provide examples for each of these areas.
Prerequisites for examples
Each example is based on the two prerequisites: an asymmetric key from your key vault called CONTOSO_KEY and a credential created by the AKV Integration feature called Azure_EKM_cred. The following Transact-SQL commands setup these prerequisites for running the examples.
USE master;
GO

--create credential
--The <<SECRET>> here requires the <Application ID> (without hyphens) and <Secret> to be passed together without a space between them.
CREATE CREDENTIAL Azure_EKM_cred
    WITH IDENTITY = 'keytestvault', --keyvault
    SECRET = '<<SECRET>>'
FOR CRYPTOGRAPHIC PROVIDER AzureKeyVault_EKM_Prov;


--Map the credential to a SQL login that has sysadmin permissions. This allows the SQL login to access the key vault when creating the asymmetric key in the next step.
ALTER LOGIN [SQL_Login]
ADD CREDENTIAL Azure_EKM_cred;


CREATE ASYMMETRIC KEY CONTOSO_KEY
FROM PROVIDER [AzureKeyVault_EKM_Prov]
WITH PROVIDER_KEY_NAME = 'KeyName_in_KeyVault',  --The key name here requires the key we created in the key vault
CREATION_DISPOSITION = OPEN_EXISTING;
Transparent Data Encryption (TDE)
Create a SQL Server login to be used by the Database Engine for TDE, then add the credential to it.
USE master;
-- Create a SQL Server login associated with the asymmetric key
-- for the Database engine to use when it loads a database
-- encrypted by TDE.
CREATE LOGIN EKM_Login
FROM ASYMMETRIC KEY CONTOSO_KEY;
GO

-- Alter the TDE Login to add the credential for use by the
-- Database Engine to access the key vault
ALTER LOGIN EKM_Login
ADD CREDENTIAL Azure_EKM_cred;
GO
Create the database encryption key that will be used for TDE.
USE ContosoDatabase;
GO

CREATE DATABASE ENCRYPTION KEY
WITH ALGORITHM = AES_128
ENCRYPTION BY SERVER ASYMMETRIC KEY CONTOSO_KEY;
GO

-- Alter the database to enable transparent data encryption.
ALTER DATABASE ContosoDatabase
SET ENCRYPTION ON;
GO
Encrypted backups
Create a SQL Server login to be used by the Database Engine for encrypting backups, and add the credential to it.
USE master;
-- Create a SQL Server login associated with the asymmetric key
-- for the Database engine to use when it is encrypting the backup.
CREATE LOGIN EKM_Login
FROM ASYMMETRIC KEY CONTOSO_KEY;
GO

-- Alter the Encrypted Backup Login to add the credential for use by
-- the Database Engine to access the key vault
ALTER LOGIN EKM_Login
ADD CREDENTIAL Azure_EKM_cred ;
GO
Backup the database specifying encryption with the asymmetric key stored in the key vault.
USE master;
BACKUP DATABASE [DATABASE_TO_BACKUP]
TO DISK = N'[PATH TO BACKUP FILE]'
WITH FORMAT, INIT, SKIP, NOREWIND, NOUNLOAD,
ENCRYPTION(ALGORITHM = AES_256, SERVER ASYMMETRIC KEY = [CONTOSO_KEY]);
GO
Column Level Encryption (CLE)
This script creates a symmetric key protected by the asymmetric key in the key vault, and then uses the symmetric key to encrypt data in the database.
CREATE SYMMETRIC KEY DATA_ENCRYPTION_KEY
WITH ALGORITHM=AES_256
ENCRYPTION BY ASYMMETRIC KEY CONTOSO_KEY;

DECLARE @DATA VARBINARY(MAX);

--Open the symmetric key for use in this session
OPEN SYMMETRIC KEY DATA_ENCRYPTION_KEY
DECRYPTION BY ASYMMETRIC KEY CONTOSO_KEY;

--Encrypt syntax
SELECT @DATA = ENCRYPTBYKEY(KEY_GUID('DATA_ENCRYPTION_KEY'), CONVERT(VARBINARY,'Plain text data to encrypt'));

-- Decrypt syntax
SELECT CONVERT(VARCHAR, DECRYPTBYKEY(@DATA));

--Close the symmetric key
CLOSE SYMMETRIC KEY DATA_ENCRYPTION_KEY;
Additional resources
For more information on how to use these encryption features, see Using EKM with SQL Server Encryption Features.
Note that the steps in this article assume that you already have SQL Server running on an Azure virtual machine. If not, see Provision a SQL Server virtual machine in Azure. For other guidance on running SQL Server on Azure VMs, see SQL Server on Azure Virtual Machines overview.