Control routing and use virtual appliances (classic) using the Azure CLI
Although the use of system routes facilitates traffic automatically for your deployment, there are cases in which you want to control the routing of packets through a virtual appliance. You can do so by creating user defined routes that specify the next hop for packets flowing to a specific subnet to go to your virtual appliance instead, and enabling IP forwarding for the VM running as the virtual appliance.
Some of the cases where virtual appliances can be used include:
- Monitoring traffic with an intrusion detection system (IDS)
- Controlling traffic with a firewall
For more information about UDR and IP forwarding, visit User Defined Routes and IP Forwarding.
Important
Before you work with Azure resources, it's important to understand that Azure currently has two deployment models: Azure Resource Manager and classic. Make sure you understand deployment models and tools before you work with any Azure resource. You can view the documentation for different tools by clicking the tabs at the top of this article.
This article covers the classic deployment model. You can also control routing and use virtual appliances in the Resource Manager deployment model.
Scenario
To better illustrate how to create UDRs, this document uses the following scenario:
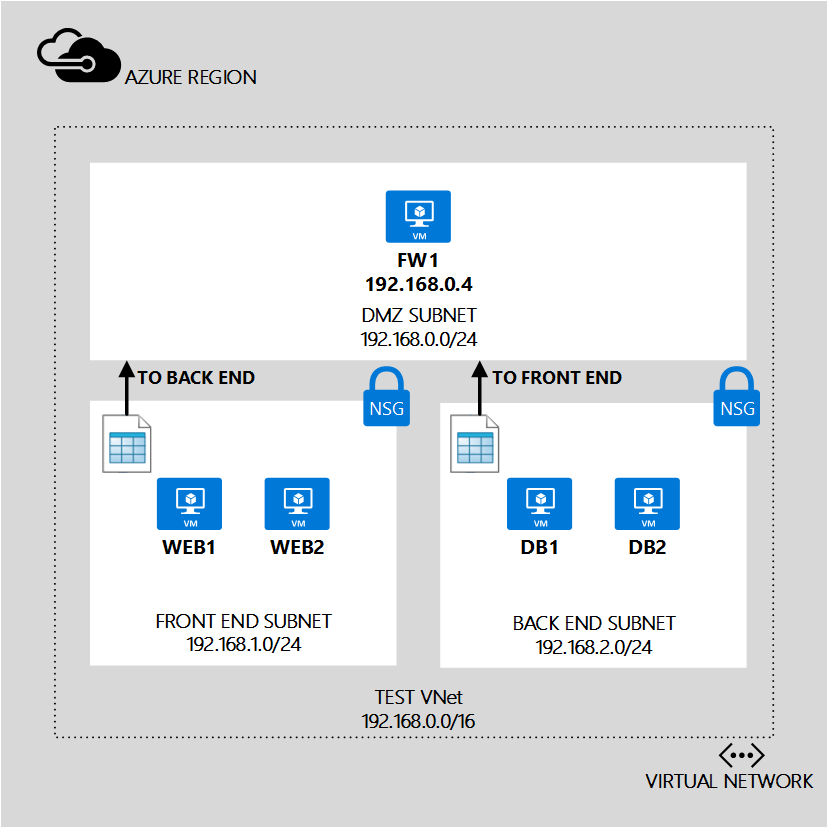
In this scenario, you create one UDR for the Front-end subnet and another UDR for the Back-end subnet, as follows:
- UDR-FrontEnd. The front-end UDR is applied to the FrontEnd subnet, and contain one route:
- RouteToBackend. This route sends all traffic to the back-end subnet to the FW1 virtual machine.
- UDR-BackEnd. The back-end UDR is applied to the BackEnd subnet, and contain one route:
- RouteToFrontend. This route sends all traffic to the front-end subnet to the FW1 virtual machine.
The combination of these routes ensures that all traffic destined from one subnet to another is routed to the FW1 virtual machine, which is being used as a virtual appliance. You also need to turn on IP forwarding for the FW1 VM, to ensure it can receive traffic destined to other VMs.
The sample Azure CLI commands below expect a simple environment already created based on the scenario above. If you want to run the commands as they are displayed in this document, create the environment shown in create a VNet (classic) using the Azure CLI.
Prerequisite: Install the Azure CLI
To perform the steps in this article, install the Azure CLI and sign in to Azure.
Note
If you don't have an Azure account, you need one. Sign up for a free trial here. In addition, to follow along you need to have either jq or some other JSON parsing tool or library installed.
Create the UDR for the front end subnet
To create the route table and route needed for the front end subnet based on the scenario above, follow the steps below.
Run the following command to switch to classic mode:
azure config mode asmOutput:
info: New mode is asmRun the following command to create a route table for the front-end subnet:
azure network route-table create -n UDR-FrontEnd -l uswestOutput:
 info:    Executing command network route-table create
 info:    Creating route table "UDR-FrontEnd"
 info:    Getting route table "UDR-FrontEnd"
 data:    Name                            : UDR-FrontEnd
 data:    Location                        : West US
 info:    network route-table create command OK
Parameters:
- -l (or --location). Azure region where the new NSG will be created. For our scenario, westus.
- -n (or --name). Name for the new NSG. For our scenario, NSG-FrontEnd.
Run the following command to create a route in the route table to send all traffic destined to the back-end subnet (192.168.2.0/24) to the FW1 VM (192.168.0.4):
azure network route-table route set -r UDR-FrontEnd -n RouteToBackEnd -a 192.168.2.0/24 -t VirtualAppliance -p 192.168.0.4Output:
 info:    Executing command network route-table route set
 info:    Getting route table "UDR-FrontEnd"
 info:    Setting route "RouteToBackEnd" in a route table "UDR-FrontEnd"
 info:    network route-table route set command OK
Parameters:
- -r (or --route-table-name). Name of the route table where the route will be added. For our scenario, UDR-FrontEnd.
- -a (or --address-prefix). Address prefix for the subnet where packets are destined to. For our scenario, 192.168.2.0/24.
- -t (or --next-hop-type). Type of object traffic will be sent to. Possible values are VirtualAppliance, VirtualNetworkGateway, VNETLocal, Internet, or None.
- -p (or --next-hop-ip-address). IP address for next hop. For our scenario, 192.168.0.4.
Run the following command to associate the route table created with the FrontEnd subnet:
azure network vnet subnet route-table add -t TestVNet -n FrontEnd -r UDR-FrontEndOutput:
 info:    Executing command network vnet subnet route-table add
 info:    Looking up the subnet "FrontEnd"
 info:    Looking up network configuration
 info:    Looking up network gateway route tables in virtual network "TestVNet" subnet "FrontEnd"
 info:    Associating route table "UDR-FrontEnd" and subnet "FrontEnd"
 info:    Looking up network gateway route tables in virtual network "TestVNet" subnet "FrontEnd"
 data:    Route table name                : UDR-FrontEnd
 data:      Location                      : West US
 data:      Routes:
 info:    network vnet subnet route-table add command OK
Parameters:
- -t (or --vnet-name). Name of the VNet where the subnet is located. For our scenario, TestVNet.
- -n (or --subnet-name. Name of the subnet the route table will be added to. For our scenario, FrontEnd.
Create the UDR for the back-end subnet
To create the route table and route needed for the back-end subnet based on the scenario, complete the following steps:
Run the following command to create a route table for the back-end subnet:
azure network route-table create -n UDR-BackEnd -l uswestRun the following command to create a route in the route table to send all traffic destined to the front-end subnet (192.168.1.0/24) to the FW1 VM (192.168.0.4):
azure network route-table route set -r UDR-BackEnd -n RouteToFrontEnd -a 192.168.1.0/24 -t VirtualAppliance -p 192.168.0.4Run the following command to associate the route table with the BackEnd subnet:
azure network vnet subnet route-table add -t TestVNet -n BackEnd -r UDR-BackEnd