Create a VM (Classic) with multiple NICs using PowerShell
You can create virtual machines (VMs) in Azure and attach multiple network interfaces (NICs) to each of your VMs. Multiple NICs enable separation of traffic types across NICs. For example, one NIC might communicate with the Internet, while another communicates only with internal resources not connected to the Internet. The ability to separate network traffic across multiple NICs is required for many network virtual appliances, such as application delivery and WAN optimization solutions.
Important
Azure has two different deployment models for creating and working with resources: Resource Manager and classic. This article covers using the classic deployment model. Microsoft recommends that most new deployments use the Resource Manager model. Learn how to perform these steps using the Resource Manager deployment model.
Scenario
This document walks through a deployment that uses multiple NICs in VMs in a specific scenario. In this scenario, you have a two-tiered IaaS workload hosted in Azure. Each tier is deployed in its own subnet in a virtual network (VNet). The front-end tier is composed of several web servers, grouped together in a load balancer set for high availability. The back-end tier is composed of several database servers. The database servers are deployed with two NICs each, one for database access, the other for management. The scenario also includes Network Security Groups (NSGs) to control what traffic is allowed to each subnet, and NIC in the deployment. The following picture shows the basic architecture of this scenario:
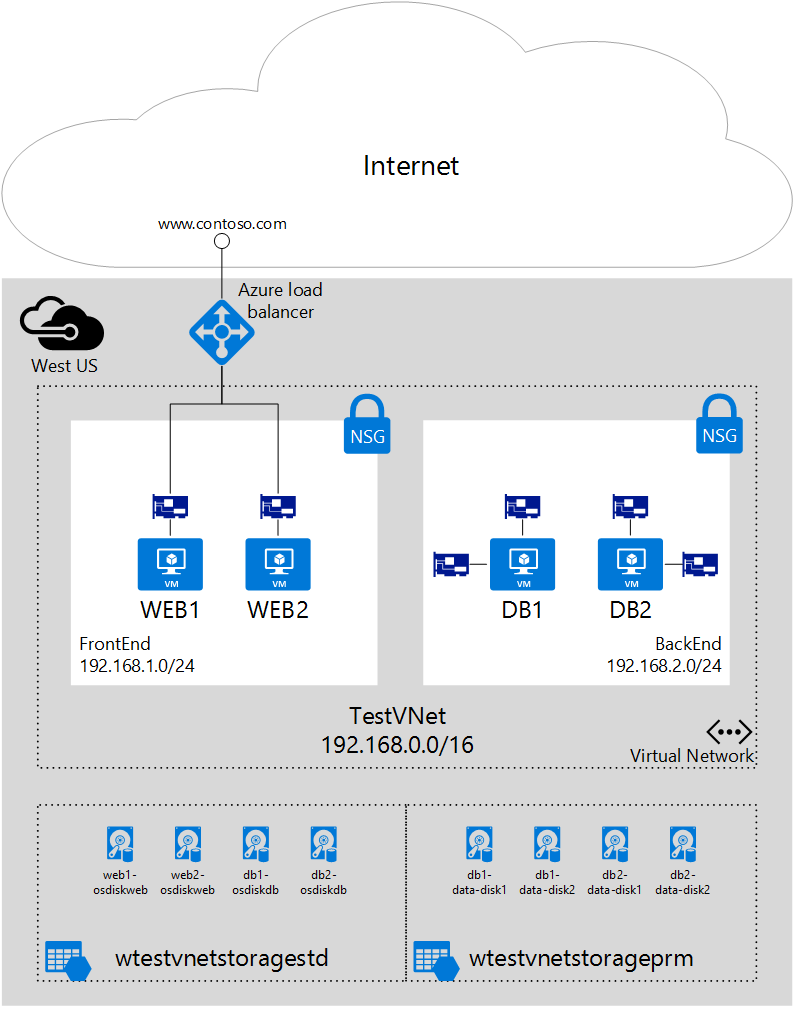
The following steps use a resource group named IaaSStory for the WEB servers and a resource group named IaaSStory-BackEnd for the DB servers.
Prerequisites
Before you can create the DB servers, you need to create the IaaSStory resource group with all the necessary resources for this scenario. To create these resources, complete the steps that follow. Create a virtual network by following the steps in the Create a virtual network article.
Prerequisite: Install the Azure PowerShell module
To perform the steps in this article, you need to install and configure the Azure PowerShell module. Be sure to complete all of the instructions. After the installation is finished, sign in to Azure and select your subscription.
Note
You need an Azure account to complete these steps. If you don't have an Azure account, you can sign up for a free trial.
Create the back-end VMs
The back-end VMs depend on the creation of the following resources:
- Backend subnet. The database servers will be part of a separate subnet, to segregate traffic. The script below expects this subnet to exist in a vnet named WTestVnet.
- Storage account for data disks. For better performance, the data disks on the database servers will use solid state drive (SSD) technology, which requires a premium storage account. Make sure the Azure location you deploy to support premium storage.
- Availability set. All database servers will be added to a single availability set, to ensure at least one of the VMs is up and running during maintenance.
Step 1 - Start your script
You can download the full PowerShell script used here. Follow the steps below to change the script to work in your environment.
Change the values of the variables below based on your existing resource group deployed above in Prerequisites.
 $location              = "West US"
 $vnetName              = "WTestVNet"
 $backendSubnetName     = "BackEnd"
Change the values of the variables below based on the values you want to use for your backend deployment.
 $backendCSName         = "IaaSStory-Backend"
 $prmStorageAccountName = "iaasstoryprmstorage"
 $avSetName             = "ASDB"
 $vmSize                = "Standard_DS3"
 $diskSize              = 127
 $vmNamePrefix          = "DB"
 $dataDiskSuffix        = "datadisk"
 $ipAddressPrefix       = "192.168.2."
 $numberOfVMs           = 2
Step 2 - Create necessary resources for your VMs
You need to create a new cloud service and a storage account for the data disks for all VMs. You also need to specify an image, and a local administrator account for the VMs. To create these resources, complete the following steps:
Create a new cloud service.
New-AzureService -ServiceName $backendCSName -Location $locationCreate a new premium storage account.
 New-AzureStorageAccount -StorageAccountName $prmStorageAccountName `
 -Location $location -Type Premium_LRS
Set the storage account created above as the current storage account for your subscription.
 $subscription = Get-AzureSubscription | where {$_.IsCurrent -eq $true}
 Set-AzureSubscription -SubscriptionName $subscription.SubscriptionName `
 -CurrentStorageAccountName $prmStorageAccountName
Select an image for the VM.
 $image = Get-AzureVMImage `
 | where{$_.ImageFamily -eq "SQL Server 2014 RTM Web on Windows Server 2012 R2"} `
 | sort PublishedDate -Descending `
 | select -ExpandProperty ImageName -First 1
Set the local administrator account credentials.
$cred = Get-Credential -Message "Enter username and password for local admin account"
Step 3 - Create VMs
You need to use a loop to create as many VMs as you want, and create the necessary NICs and VMs within the loop. To create the NICs and VMs, execute the following steps.
Start a
forloop to repeat the commands to create a VM and two NICs as many times as necessary, based on the value of the$numberOfVMsvariable.for ($suffixNumber = 1; $suffixNumber -le $numberOfVMs; $suffixNumber++){Create a
VMConfigobject specifying the image, size, and availability set for the VM.$vmName = $vmNamePrefix + $suffixNumber $vmConfig = New-AzureVMConfig -Name $vmName ` -ImageName $image ` -InstanceSize $vmSize ` -AvailabilitySetName $avSetNameProvision the VM as a Windows VM.
 Add-AzureProvisioningConfig -VM $vmConfig -Windows `
 	-AdminUsername $cred.UserName `
 	-Password $cred.GetNetworkCredential().Password
Set the default NIC and assign it a static IP address.
 Set-AzureSubnet			-SubnetNames $backendSubnetName -VM $vmConfig
 Set-AzureStaticVNetIP 	-IPAddress ($ipAddressPrefix+$suffixNumber+3) -VM $vmConfig
Add a second NIC for each VM.
 Add-AzureNetworkInterfaceConfig -Name ("RemoteAccessNIC"+$suffixNumber) `
 -SubnetName $backendSubnetName `
 -StaticVNetIPAddress ($ipAddressPrefix+(53+$suffixNumber)) `
 -VM $vmConfig
Create to data disks for each VM.
 $dataDisk1Name = $vmName + "-" + $dataDiskSuffix + "-1"
 Add-AzureDataDisk -CreateNew -VM $vmConfig `
 -DiskSizeInGB $diskSize `
 -DiskLabel $dataDisk1Name `
 -LUN 0

 $dataDisk2Name = $vmName + "-" + $dataDiskSuffix + "-2"
 Add-AzureDataDisk -CreateNew -VM $vmConfig `
 -DiskSizeInGB $diskSize `
 -DiskLabel $dataDisk2Name `
 -LUN 1
Create each VM, and end the loop.
 New-AzureVM -VM $vmConfig `
 -ServiceName $backendCSName `
 -Location $location `
 -VNetName $vnetName
 }
Step 4 - Run the script
Now that you downloaded and changed the script based on your needs, runt the script to create the back-end database VMs with multiple NICs.
Save your script and run it from the PowerShell command prompt, or PowerShell ISE. You will see the initial output, as shown below.
 OperationDescription    OperationId                          OperationStatus

 New-AzureService        xxxxxxxx-xxxx-xxxx-xxxx-xxxxxxxxxxxx Succeeded
 New-AzureStorageAccount xxxxxxxx-xxxx-xxxx-xxxx-xxxxxxxxxxxx Succeeded

 WARNING: No deployment found in service: 'IaaSStory-Backend'.
Fill out the information needed in the credentials prompt and click OK. The following output is returned.
 New-AzureVM             xxxxxxxx-xxxx-xxxx-xxxx-xxxxxxxxxxxx Succeeded
 New-AzureVM             xxxxxxxx-xxxx-xxxx-xxxx-xxxxxxxxxxxx Succeeded
Step 5 - Configure routing within the VM's operating system
Azure DHCP assigns a default gateway to the first (primary) network interface attached to the virtual machine. Azure does not assign a default gateway to additional (secondary) network interfaces attached to a virtual machine. Therefore, you are unable to communicate with resources outside the subnet that a secondary network interface is in, by default. Secondary network interfaces can, however, communicate with resources outside their subnet. To configure routing for secondary network interfaces, see the following articles: