Azure Monitor 中的日志引入 API 让你能将自定义数据发送到 Log Analytics 工作区。 本教程使用 Azure 资源管理器模板(ARM 模板)来逐步配置支持 API 所需的组件,然后使用 REST API 以及适用于 .NET、Go、Java、JavaScript 和 Python 的客户端库提供示例应用程序。
注意
本教程使用 ARM 模板配置支持日志引入 API 所需的组件。 有关使用 Azure 门户 UI 配置这些组件的类似教程,请参阅教程:使用日志引入 API 将数据发送到 Azure Monitor 日志(Azure 门户)。
配置日志引入 API 所需的步骤如下:
- 创建 Microsoft Entra 应用程序 以进行针对 API 的身份验证。
- 在 Log Analytics 工作区中创建自定义表。 这是你将向其发送数据的表。
- 创建数据收集规则 (DCR) 以将数据定向到目标表。
- 授予 Microsoft Entra 应用程序对 DCR 的访问权限。
- 有关使用日志引入 API 发送数据的示例代码,请参阅使用日志引入 API 将数据发送到 Azure Monitor 的示例代码。
注意
本文包括使用 DCR 引入终结点或数据收集终结点 (DCE) 的选项。 任选其一,但如果使用专用链接,则在使用 Logs 引入 API 时需要 DCE。 请参阅何时需要 DCE?。
先决条件
要完成本教程,需要:
- Log Analytics 工作区,你在其中至少拥有参与者权限。
- 在工作区中创建 DCR 对象的权限。
收集工作区详细信息
首先从工作区收集所需的信息。
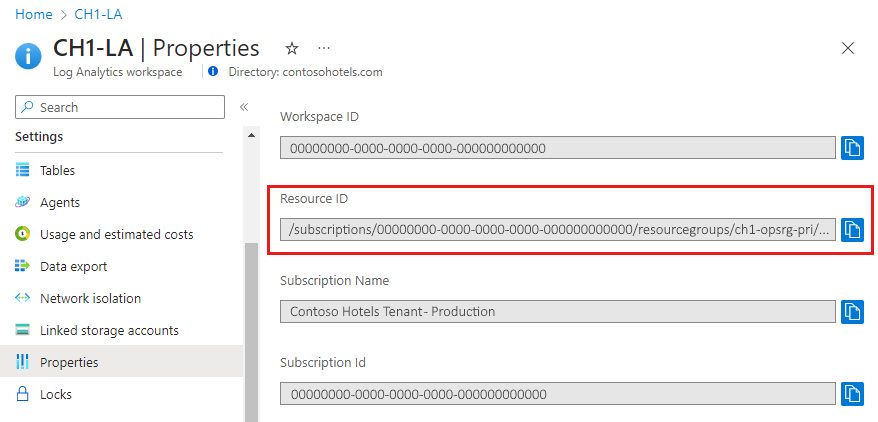
在 Azure 门户的 Log Analytics workspaces 菜单中,转到你的工作区。 在“属性”页中,复制“资源 ID”并保存它以供稍后使用。 记录订阅 ID、资源组名称、工作区名称和工作区区域。
注意
这些模板使用这些单个值来构造工作区资源 ID。
创建 Microsoft Entra 应用程序
首先,注册 Microsoft Entra 应用程序以进行针对 API 的身份验证。
注意
任何资源管理器身份验证方案均受支持,但本教程中遵循的是客户端凭据授予流方案。
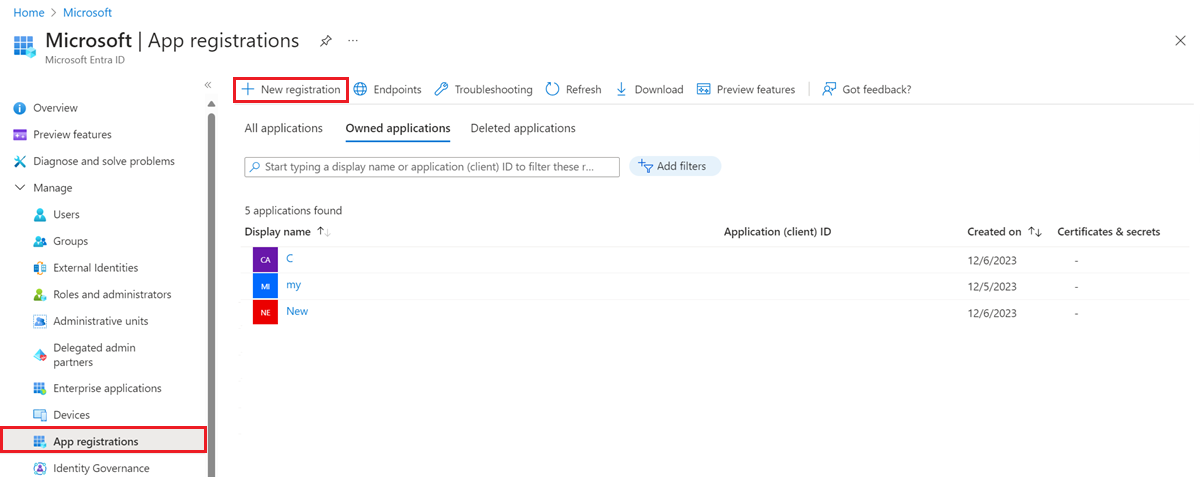
在 Azure 门户中的“Microsoft Entra ID”菜单上,选择“应用注册”“新建注册”。>
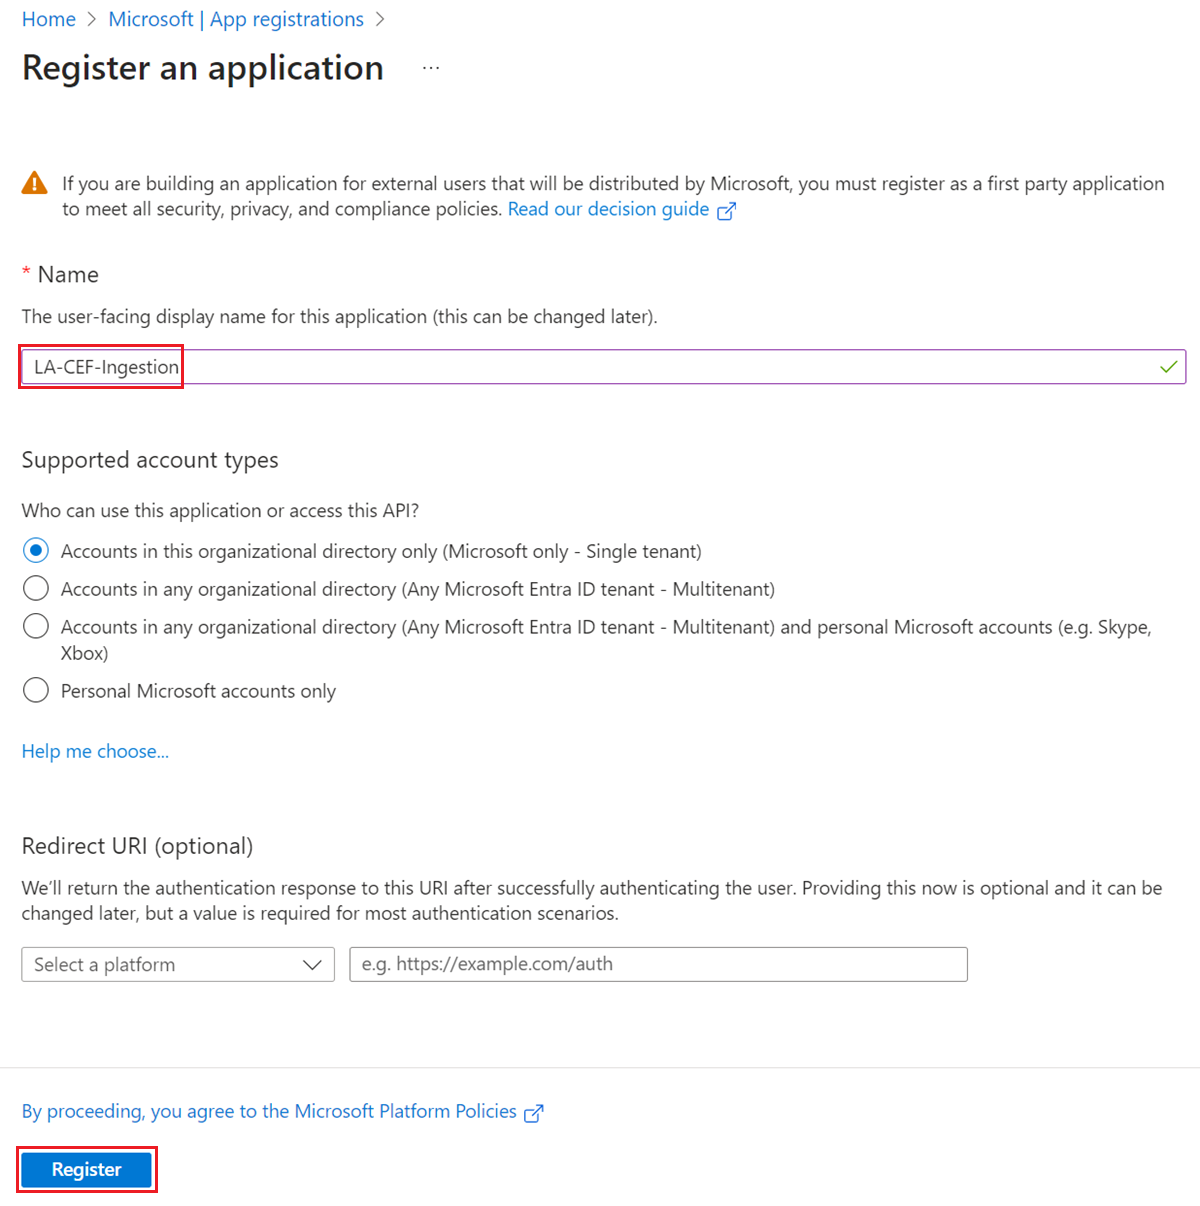
为应用程序命名,并更改租户范围(如果默认值不适合你的环境)。 重定向 URI不是必需的。
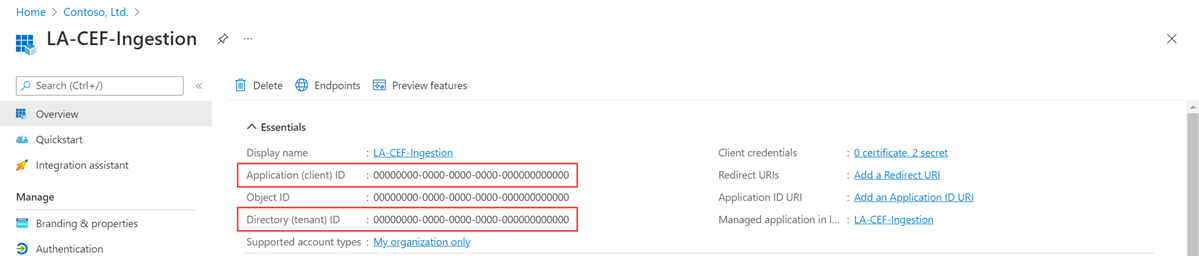
注册后,可以查看应用程序的详细信息。 记下 应用程序(客户端) ID 和 目录(租户) ID。 在后续步骤中,您将需要用到这些值。
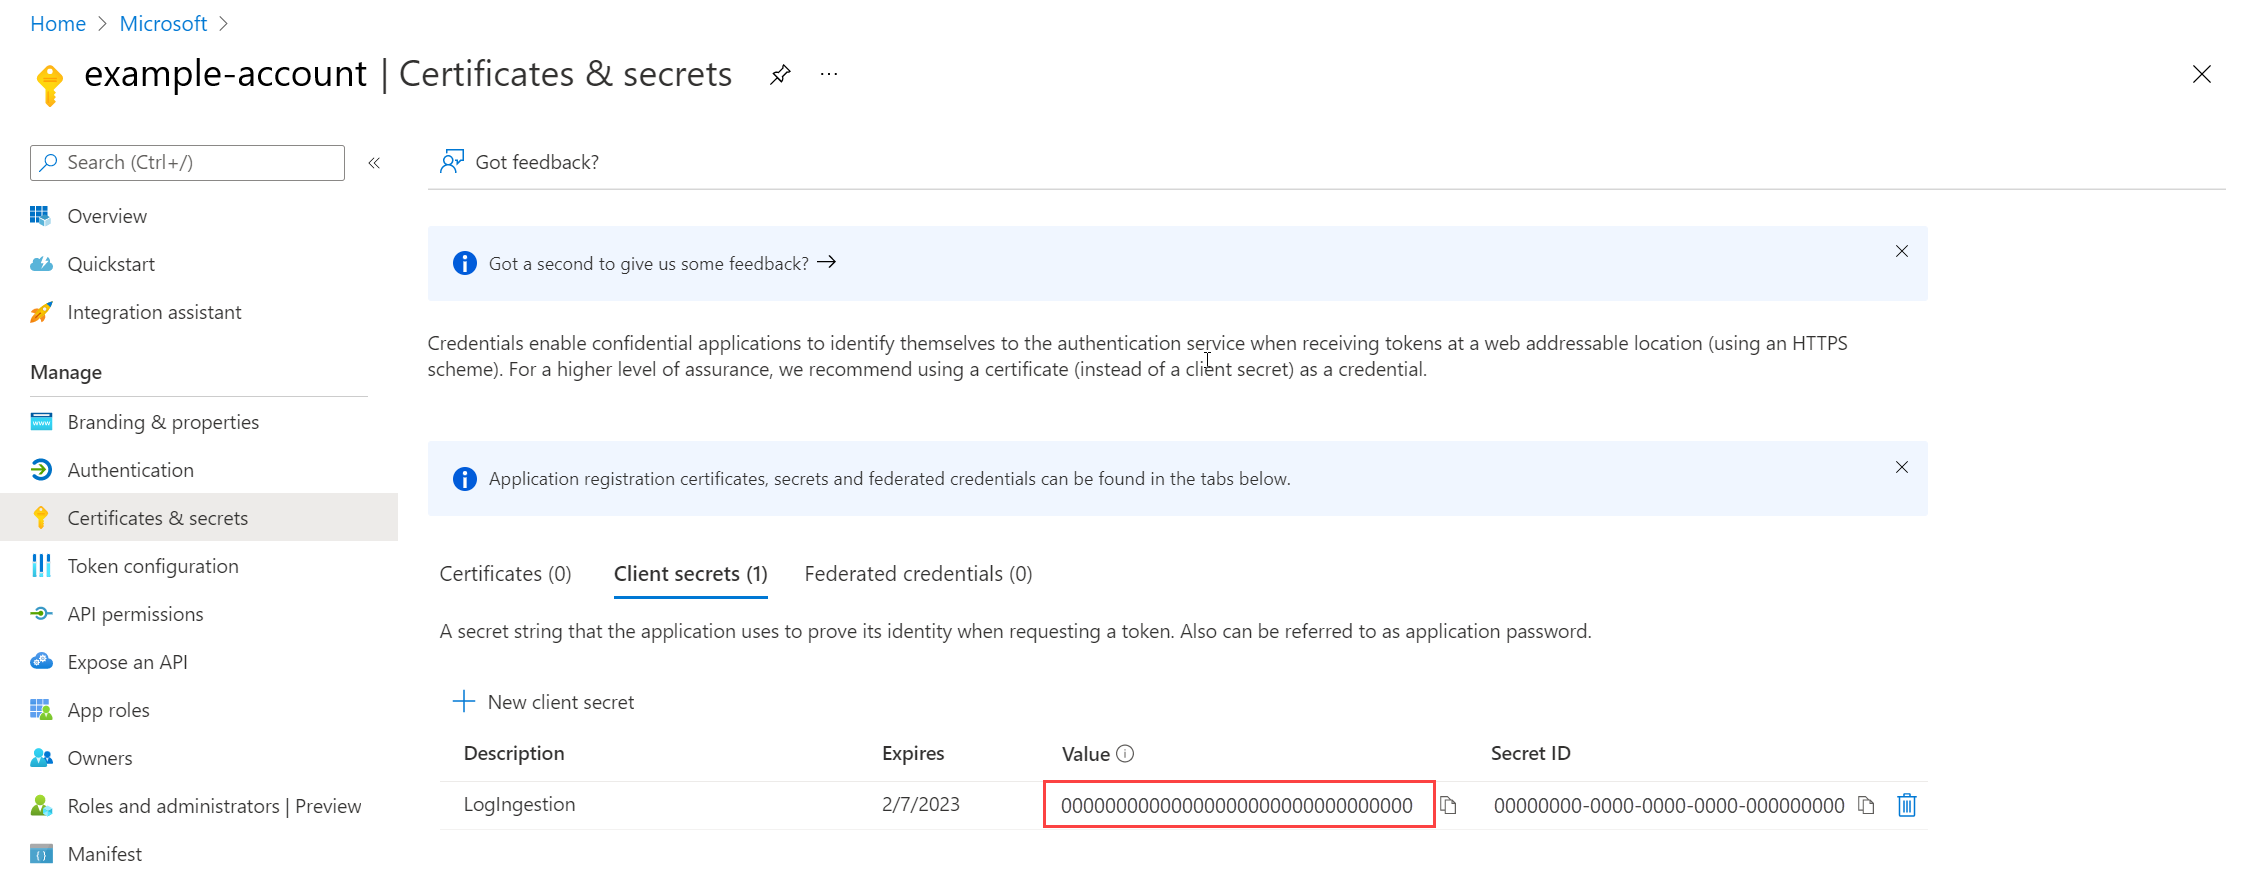
生成应用程序客户端密码,这类似于创建与用户名配合使用的密码。 选择“证书和密码”“新建客户端密码”>。 为该机密命名,以表明其用途,并选择到期时间期限。
注意
此处选择了选项“12 个月”。 对于生产实现,请遵循机密轮换过程的最佳做法,或使用更安全的身份验证模式(例如证书)。

选择 添加 以保存机密,然后记下 值。 请确保记录此值,因为在离开此页面后无法恢复此值。 像保护密码一样采取同样的安全措施,因为它在功能上与密码等同。

创建数据收集终结点
DCE 为发送到 Azure Monitor 的数据提供数据引入终结点。 如果使用没有专用链接的 DCR 引入终结点,请跳过本部分。 如果使用 DCE,请对其进行配置,将其链接到 DCR,并在应用程序中使用其数据引入终结点。 DCE 必须与 DCR 和目标Log Analytics工作区位于同一区域。
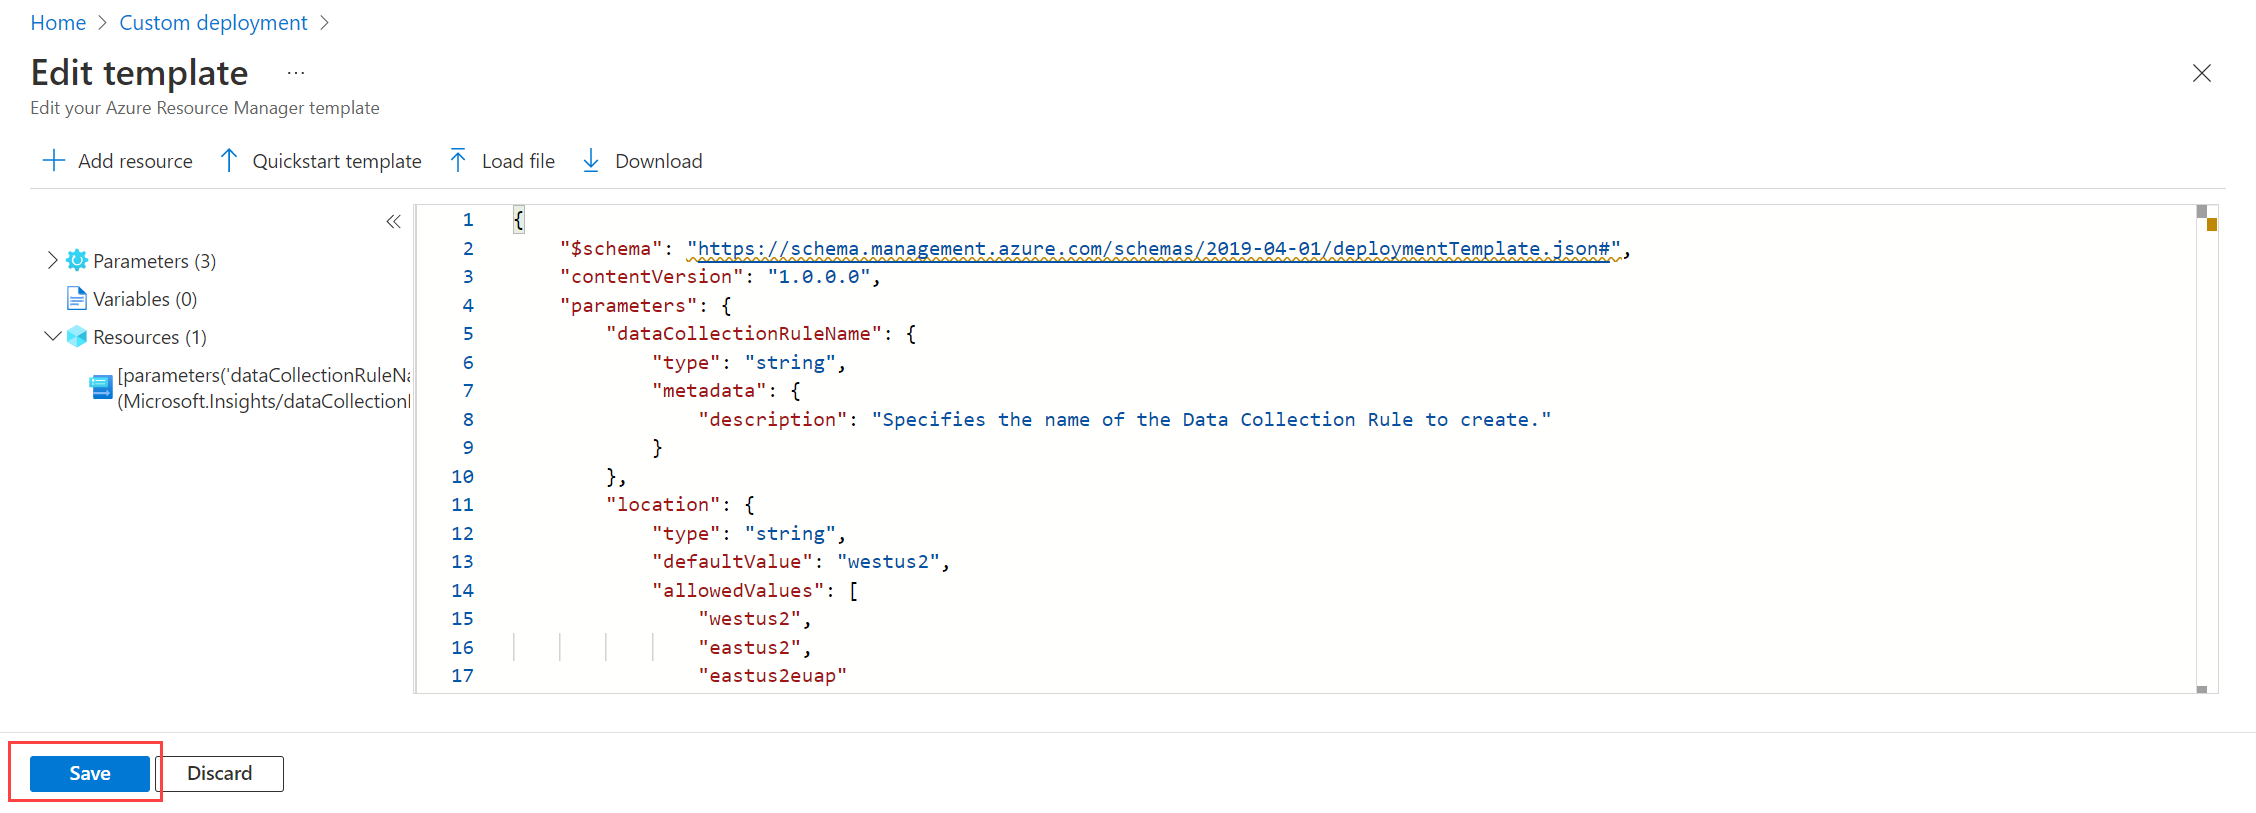
在 Azure 门户的搜索框中,输入“模板”,然后选择“部署自定义模板”。

选择“在编辑器中生成自己的模板”。

对于门户过程,请使用 ARM 模板 选项卡,在编辑器中配置模板,然后选择“ 保存”。 也可以改用 Bicep 部署命令对应的 Bicep 等效写法。
注意
以下模板为本教程创建 DCE:
- 使用与工作区和 DCR 相同的区域。
- 该示例允许公用网络访问。 对于通过专用链接接入,请遵循Azure Monitor 专用链接 配置并保留所需的网络设置。
模板部署创建或更新资源;它们不是部分 PATCH 操作。 如果重复使用现有的 DCE,请保留其网络访问、标识、标记和其他必需配置。
以下Bicep示例使用
Microsoft.Insights/dataCollectionEndpoints资源类型。@description('Specifies the name of the data collection endpoint to create.') param dataCollectionEndpointName string = '<DataCollectionEndpointName>' @description('Specifies the region for the data collection endpoint.') param azureRegion string = '<AzureRegion>' resource dataCollectionEndpoint 'Microsoft.Insights/dataCollectionEndpoints@<ApiVersion>' = { name: dataCollectionEndpointName location: azureRegion properties: { networkAcls: { publicNetworkAccess: 'Enabled' } } } output dataCollectionEndpointId string = dataCollectionEndpoint.id在 “自定义部署 ”屏幕上,指定要存储 DCE 的 订阅 和 资源组 ,并提供模板参数。 将
azureRegion设置为工作区的区域。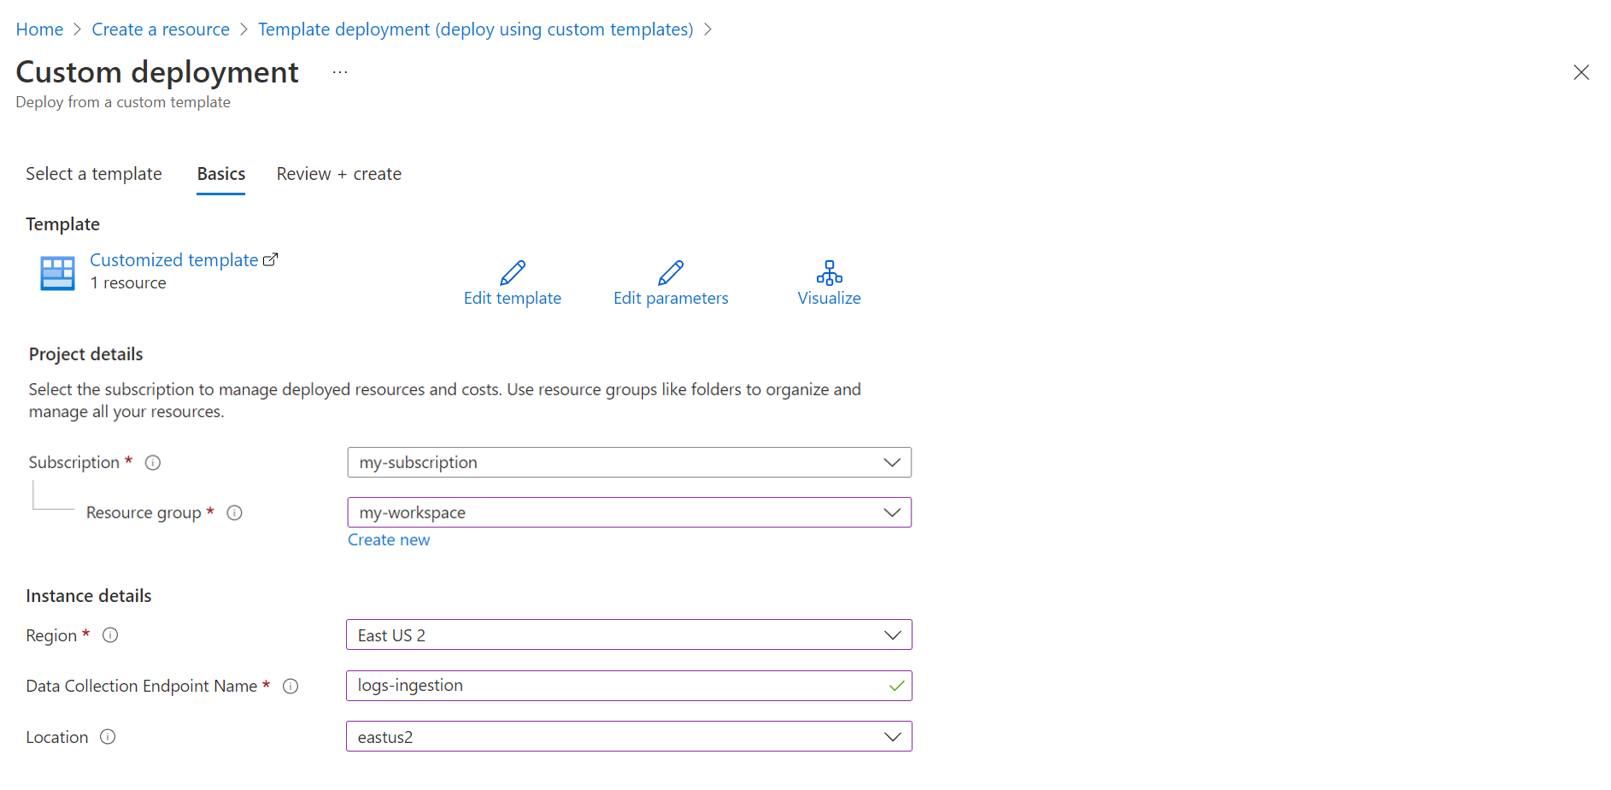
选择“查看 + 创建”,然后在查看详细信息后选择“创建”。
选择“JSON 视图”以查看 DCE 的其他详细信息。 复制在后续步骤中所需的资源 ID 和 logsIngestion 终结点。


在 Log Analytics 工作区中创建新表
必须先创建自定义表,然后才能将数据发送到该表。 创建表时,请考虑以下约束:
- 每一列都需要
name、type和description属性。 - 如果未指定属性
isHidden和isDefaultDisplay,则两者都默认为false。 - 可能的数据类型为
string、、int、long、realboolean、dateTime和dynamic。 API 和门户 UI 接受guid为列类型,但 GUID 存储并查询为string类型。 在数据收集规则中定义流时,请将 GUID 列声明为string。 有关详细信息,请参阅 GUID 列和数据类型差异。 - 自定义表必须使用后缀
_CL。
注意
本教程使用 PowerShell,通过 Azure Monitor 表 API 进行 REST API 调用。 你也可以使用任何其他有效的方法来发起这些调用。
为本教程使用新的 MyTable_CL 表。 将请求应用到现有表之前,请保留其其他列及其计划和保留设置。
运行以下代码以创建教程的
MyTable_CL表。注意
表名称与 DCR 输出流和链接的应用程序示例匹配。
以下Azure PowerShell示例使用 Invoke-AzRestMethod 调用
Tables - Create Or UpdateREST API 操作。
在Log Analytics工作区中创建新表
# Set variables
$resourceGroupName = "<ResourceGroupName>"
$workspaceName = "<WorkspaceName>"
$tableName = "MyTable_CL"
$apiVersion = "<ApiVersion>"

# Get the subscription ID from the current Azure PowerShell context
$subscriptionId = (Get-AzContext).Subscription.Id

# Build request URL
$apiEndpoint = "https://management.chinacloudapi.cn"
$path = "/subscriptions/$subscriptionId/resourceGroups/$resourceGroupName"
$provider = "Microsoft.OperationalInsights/workspaces/$workspaceName"
$queryString = "?api-version=$apiVersion"
$url = "$apiEndpoint$path/providers/$provider/tables/$tableName$queryString"

# Build request body
$tableParams = @'
{
  "properties": {
    "schema": {
      "name": "MyTable_CL",
      "columns": [
        {
          "name": "TimeGenerated",
          "type": "dateTime",
          "description": "The time at which the data was generated"
        },
        {
          "name": "Computer",
          "type": "string",
          "description": "The computer that generated the data"
        },
        {
          "name": "AdditionalContext",
          "type": "dynamic",
          "description": "Additional message properties"
        },
        {
          "name": "CounterName",
          "type": "string",
          "description": "Name of the counter"
        },
        {
          "name": "CounterValue",
          "type": "real",
          "description": "Value collected for the counter"
        }
      ]
    }
  }
}
'@

# Define parameters for Invoke-AzRestMethod
$invokeAzRestMethodParams = @{
  Uri = $url
  Method = "PUT"
  Payload = $tableParams
}

# Create the table
Invoke-AzRestMethod @invokeAzRestMethodParams
创建数据收集规则
DCR 定义接收数据后如何处理数据。 这包括:
- 发送到终结点的数据架构定义。
- 在将数据发送到工作区之前应用于数据的转换。
- 转换后的数据的目标工作区和表。
注意
在部署任一 DCR 模板之前:
- 在目标工作区中使用上一部分的架构创建
MyTable_CL表。 - 如果适用,请对 DCR、工作区和 DCE 使用相同的Azure区域。
- 选择 DCR 摄取终结点变体,或使用具有现有 DCE 及其订阅、资源组和资源名称的 DCE 变体。
- 重复使用现有 DCR 时,保留它仍需要的流、目标、数据流、身份和其他设置。
模板部署创建或更新资源;它们不是部分 PATCH 操作。 重用 DCR 时,保留其现有流、目标、数据流、标识和其他必需设置。
在 Azure 门户的搜索框中,输入“模板”,然后选择“部署自定义模板”。
选择“在编辑器中生成自己的模板”。
选择所需的终结点变体。 对于门户过程,请在编辑器中的 ARM 模板 选项卡中配置模板,然后选择“ 保存”。 或者,使用Bicep部署命令部署其Bicep对应项。
DCR 数据引入终结点
注意
请注意此模板中定义的 DCR 中的以下详细信息:
-
streamDeclarations:传入数据的列定义。 -
destinations:目标工作区。 -
dataFlows:将流与目标工作区匹配,并指定转换查询和目标表。 目标查询的输出是发送到目标表的内容。
以下Bicep示例使用
Microsoft.Insights/dataCollectionRules资源类型。
使用直接引入端点创建 DCR
@description('Specifies the name of the data collection rule to create.') param dataCollectionRuleName string = '<DataCollectionRuleName>' @description('Specifies the region for the data collection rule.') param azureRegion string = '<AzureRegion>' @description('Specifies the subscription that contains the workspace.') param workspaceSubscriptionId string = '<WorkspaceSubscriptionId>' @description('Specifies the resource group that contains the workspace.') param workspaceResourceGroupName string = '<WorkspaceResourceGroupName>' @description('Specifies the name of the existing Log Analytics workspace.') param workspaceName string = '<WorkspaceName>' var workspaceResourceId = resourceId( workspaceSubscriptionId, workspaceResourceGroupName, 'Microsoft.OperationalInsights/workspaces', workspaceName ) resource dataCollectionRule 'Microsoft.Insights/dataCollectionRules@<ApiVersion>' = { name: dataCollectionRuleName location: azureRegion kind: 'Direct' properties: { streamDeclarations: { 'Custom-MyTable': { columns: [ { name: 'Time' type: 'datetime' } { name: 'Computer' type: 'string' } { name: 'AdditionalContext' type: 'string' } { name: 'CounterName' type: 'string' } { name: 'CounterValue' type: 'real' } ] } } destinations: { logAnalytics: [ { workspaceResourceId: workspaceResourceId name: 'myworkspace' } ] } dataFlows: [ { streams: [ 'Custom-MyTable' ] destinations: [ 'myworkspace' ] transformKql: 'source | extend jsonContext = parse_json(AdditionalContext) | project TimeGenerated = Time, Computer, AdditionalContext = jsonContext, CounterName=tostring(jsonContext.CounterName), CounterValue=toreal(jsonContext.CounterValue)' outputStream: 'Custom-MyTable_CL' } ] } } output dataCollectionRuleId string = dataCollectionRule.id数据收集终结点
注意
请注意此模板中定义的 DCR 中的以下详细信息:
-
dataCollectionEndpointId:数据收集终结点的资源 ID。 -
streamDeclarations:传入数据的列定义。 -
destinations:目标工作区。 -
dataFlows:将流与目标工作区匹配,并指定转换查询和目标表。 目标查询的输出是发送到目标表的内容。
以下Bicep示例使用
Microsoft.Insights/dataCollectionRules资源类型。
创建使用数据收集终结点的 DCR
@description('Specifies the name of the data collection rule to create.') param dataCollectionRuleName string = '<DataCollectionRuleName>' @description('Specifies the region for the data collection rule.') param azureRegion string = '<AzureRegion>' @description('Specifies the subscription that contains the workspace.') param workspaceSubscriptionId string = '<WorkspaceSubscriptionId>' @description('Specifies the resource group that contains the workspace.') param workspaceResourceGroupName string = '<WorkspaceResourceGroupName>' @description('Specifies the name of the existing Log Analytics workspace.') param workspaceName string = '<WorkspaceName>' @description('Specifies the subscription that contains the data collection endpoint.') param endpointSubscriptionId string = '<EndpointSubscriptionId>' @description('Specifies the resource group that contains the data collection endpoint.') param endpointResourceGroupName string = '<EndpointResourceGroupName>' @description('Specifies the name of the existing data collection endpoint.') param dataCollectionEndpointName string = '<DataCollectionEndpointName>' var workspaceResourceId = resourceId( workspaceSubscriptionId, workspaceResourceGroupName, 'Microsoft.OperationalInsights/workspaces', workspaceName ) var endpointResourceId = resourceId( endpointSubscriptionId, endpointResourceGroupName, 'Microsoft.Insights/dataCollectionEndpoints', dataCollectionEndpointName ) resource dataCollectionRule 'Microsoft.Insights/dataCollectionRules@<ApiVersion>' = { name: dataCollectionRuleName location: azureRegion kind: 'Direct' properties: { dataCollectionEndpointId: endpointResourceId streamDeclarations: { 'Custom-MyTable': { columns: [ { name: 'Time' type: 'datetime' } { name: 'Computer' type: 'string' } { name: 'AdditionalContext' type: 'string' } { name: 'CounterName' type: 'string' } { name: 'CounterValue' type: 'real' } ] } } destinations: { logAnalytics: [ { workspaceResourceId: workspaceResourceId name: 'myworkspace' } ] } dataFlows: [ { streams: [ 'Custom-MyTable' ] destinations: [ 'myworkspace' ] transformKql: 'source | extend jsonContext = parse_json(AdditionalContext) | project TimeGenerated = Time, Computer, AdditionalContext = jsonContext, CounterName=tostring(jsonContext.CounterName), CounterValue=toreal(jsonContext.CounterValue)' outputStream: 'Custom-MyTable_CL' } ] } } output dataCollectionRuleId string = dataCollectionRule.id-
在“自定义部署”屏幕上,指定用于存储 DCR 的“订阅”和“资源组”。 提供
dataCollectionRuleName、azureRegion、workspaceSubscriptionId、workspaceResourceGroupName和workspaceName。 对于 DCE 变体,还提供endpointSubscriptionId、endpointResourceGroupName和dataCollectionEndpointName。 将azureRegion设置为工作区的区域。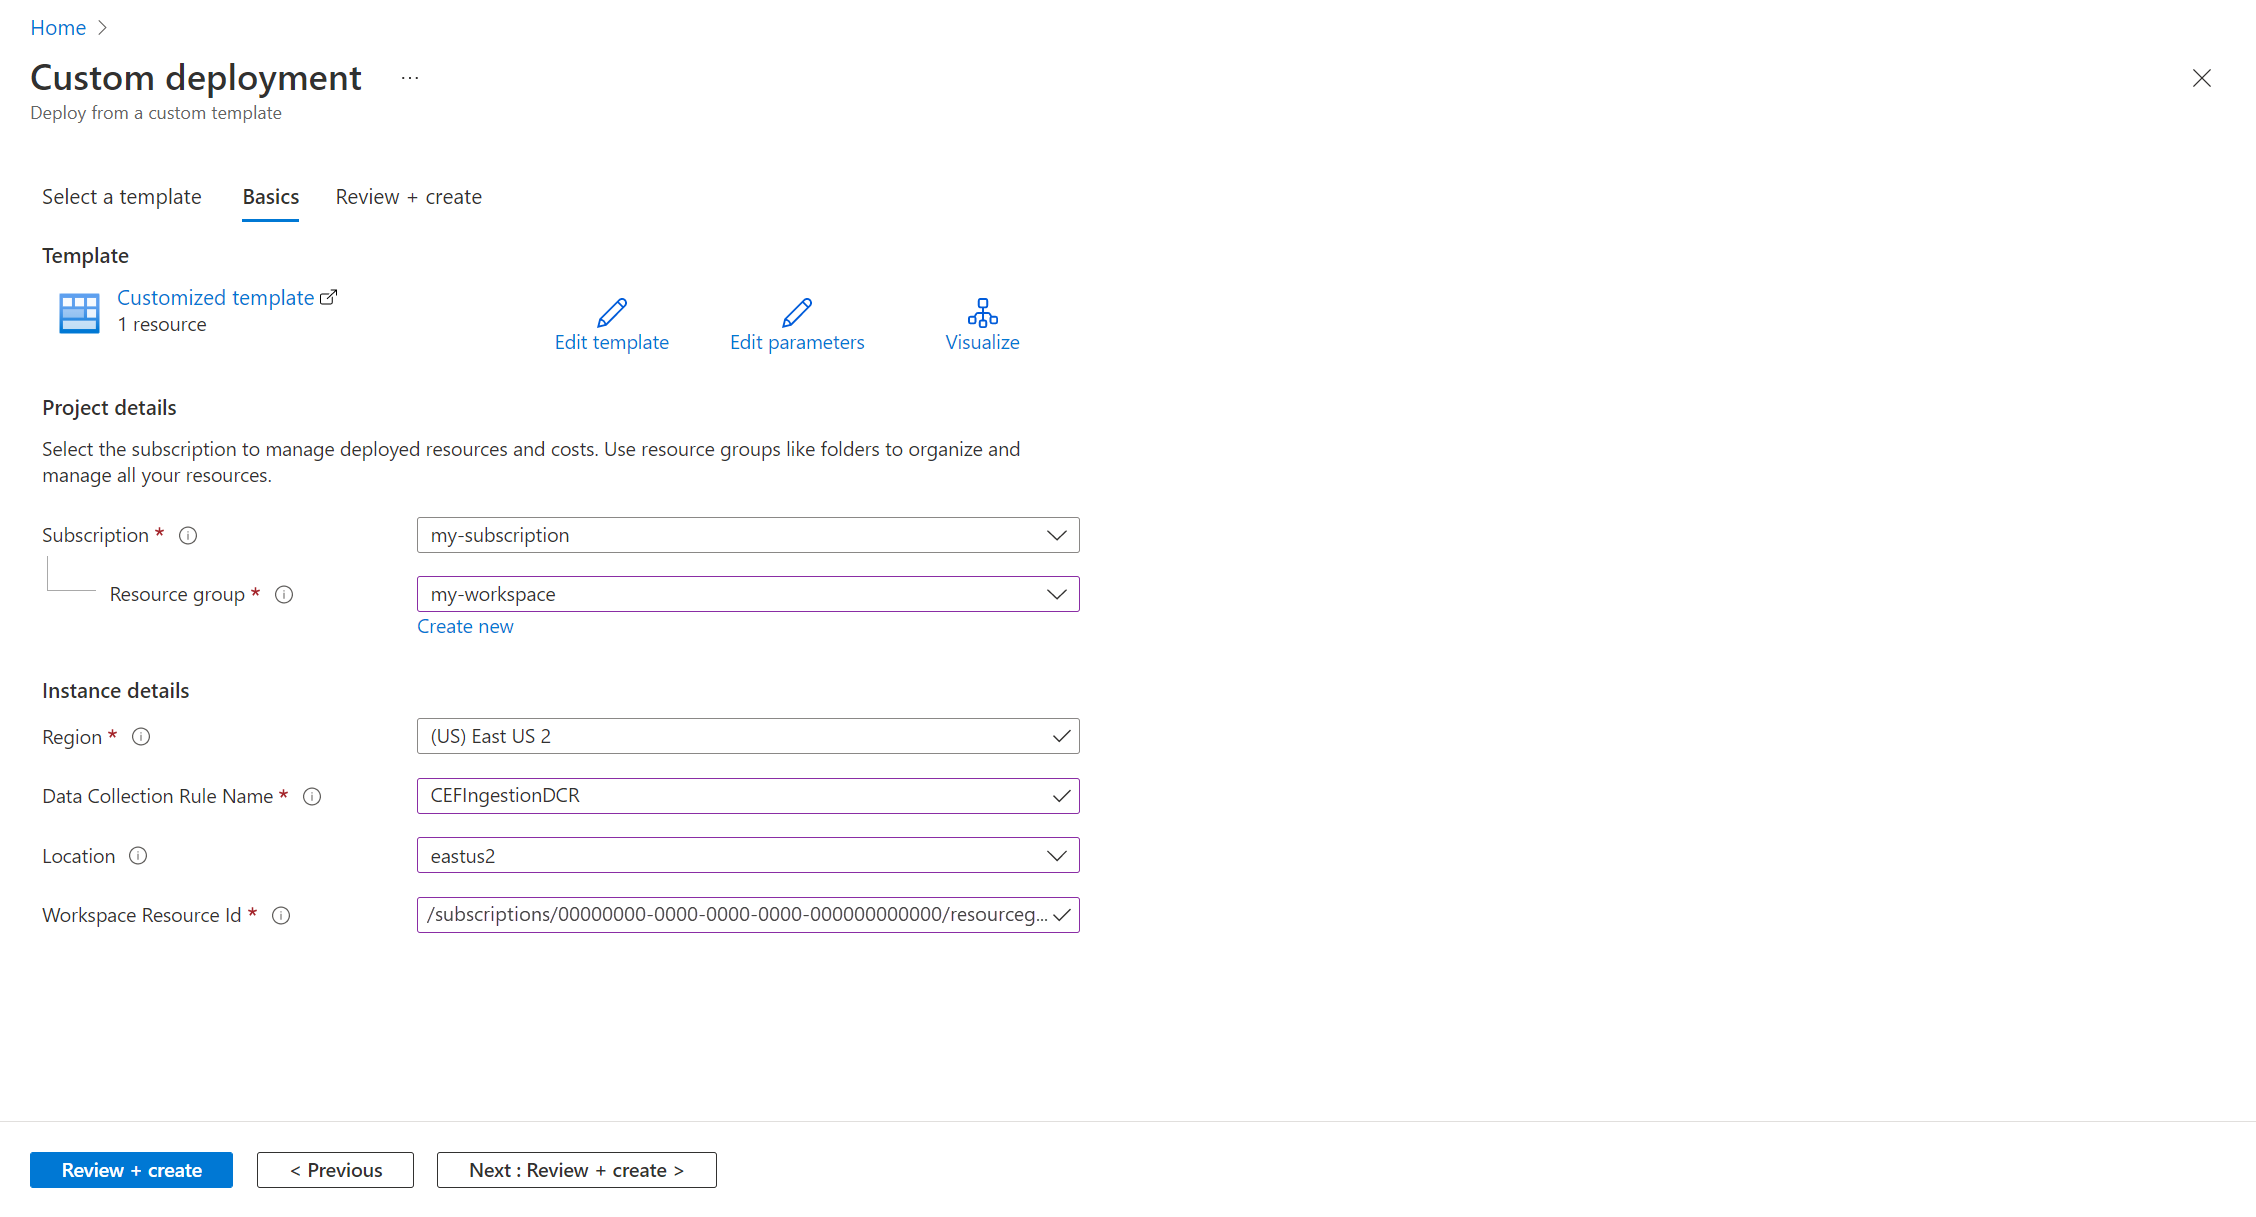
选择“查看 + 创建”,然后在查看详细信息后选择“创建”。
部署完成后,展开“部署详细信息”框,并选择你的 DCR 以查看其详细信息。 选择 JSON View。
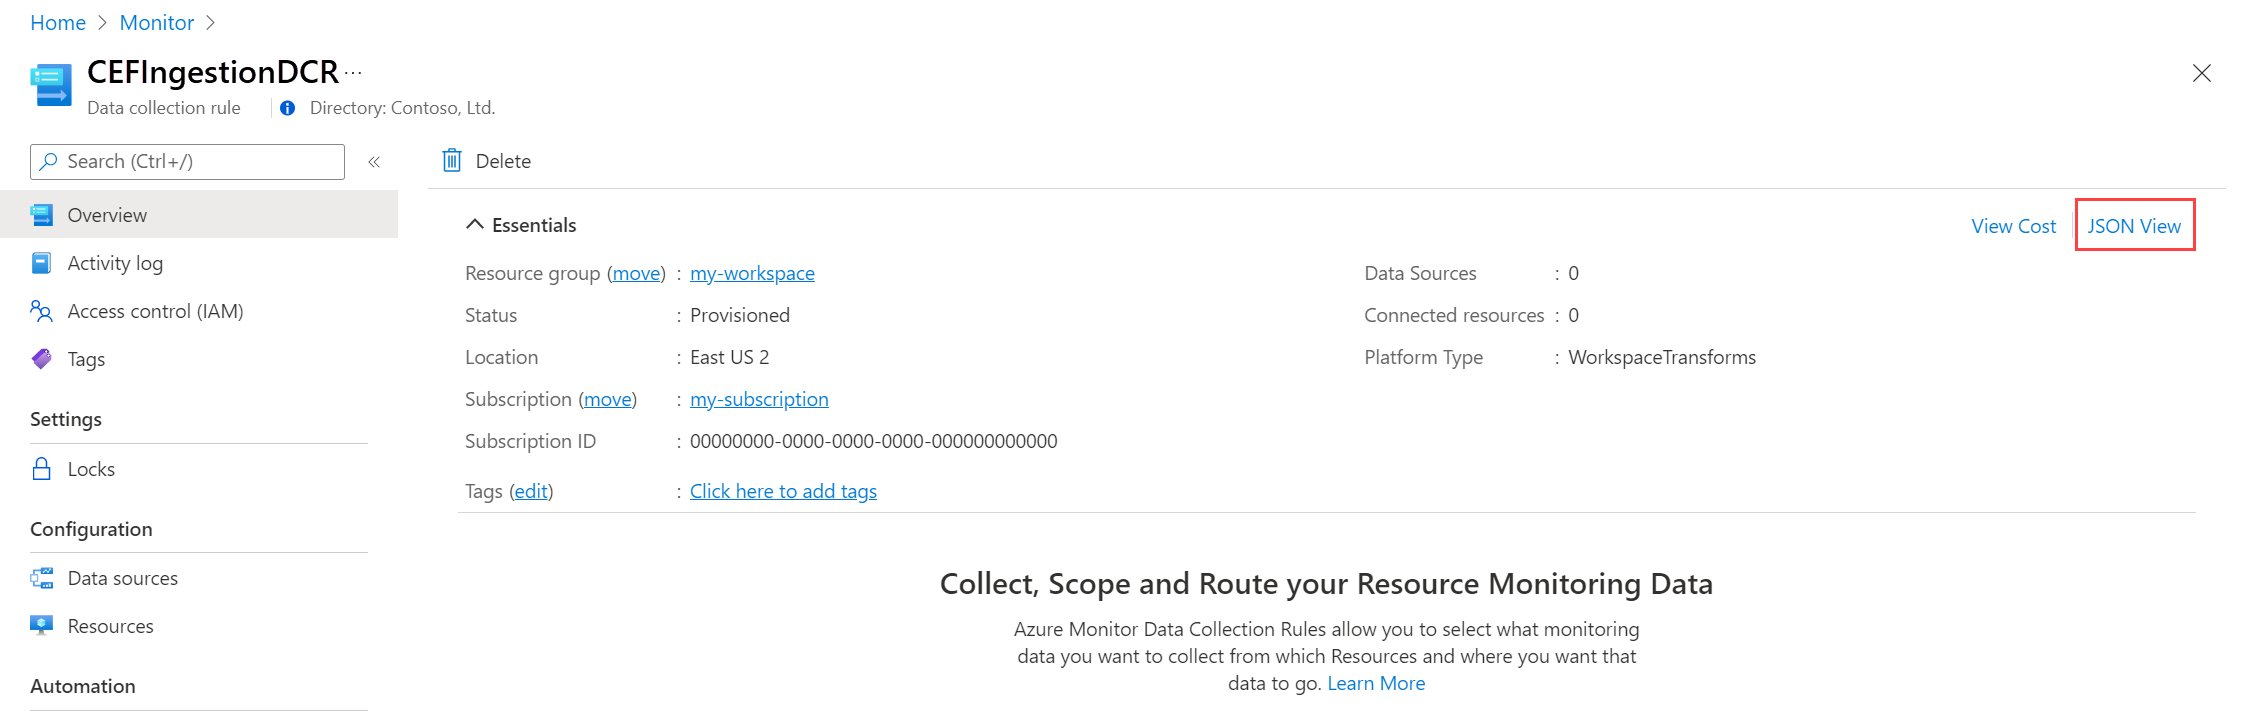
复制 DCR 的不可变 ID 和日志引入 URI。 当你使用 API 将数据发送到 Azure Monitor时,你会用到这些。

为 DCR 分配权限
创建 DCR 后,需要向应用程序授予其权限。 权限将允许使用正确应用程序 ID 和应用程序密钥的任何应用程序将数据发送到新的 DCR。
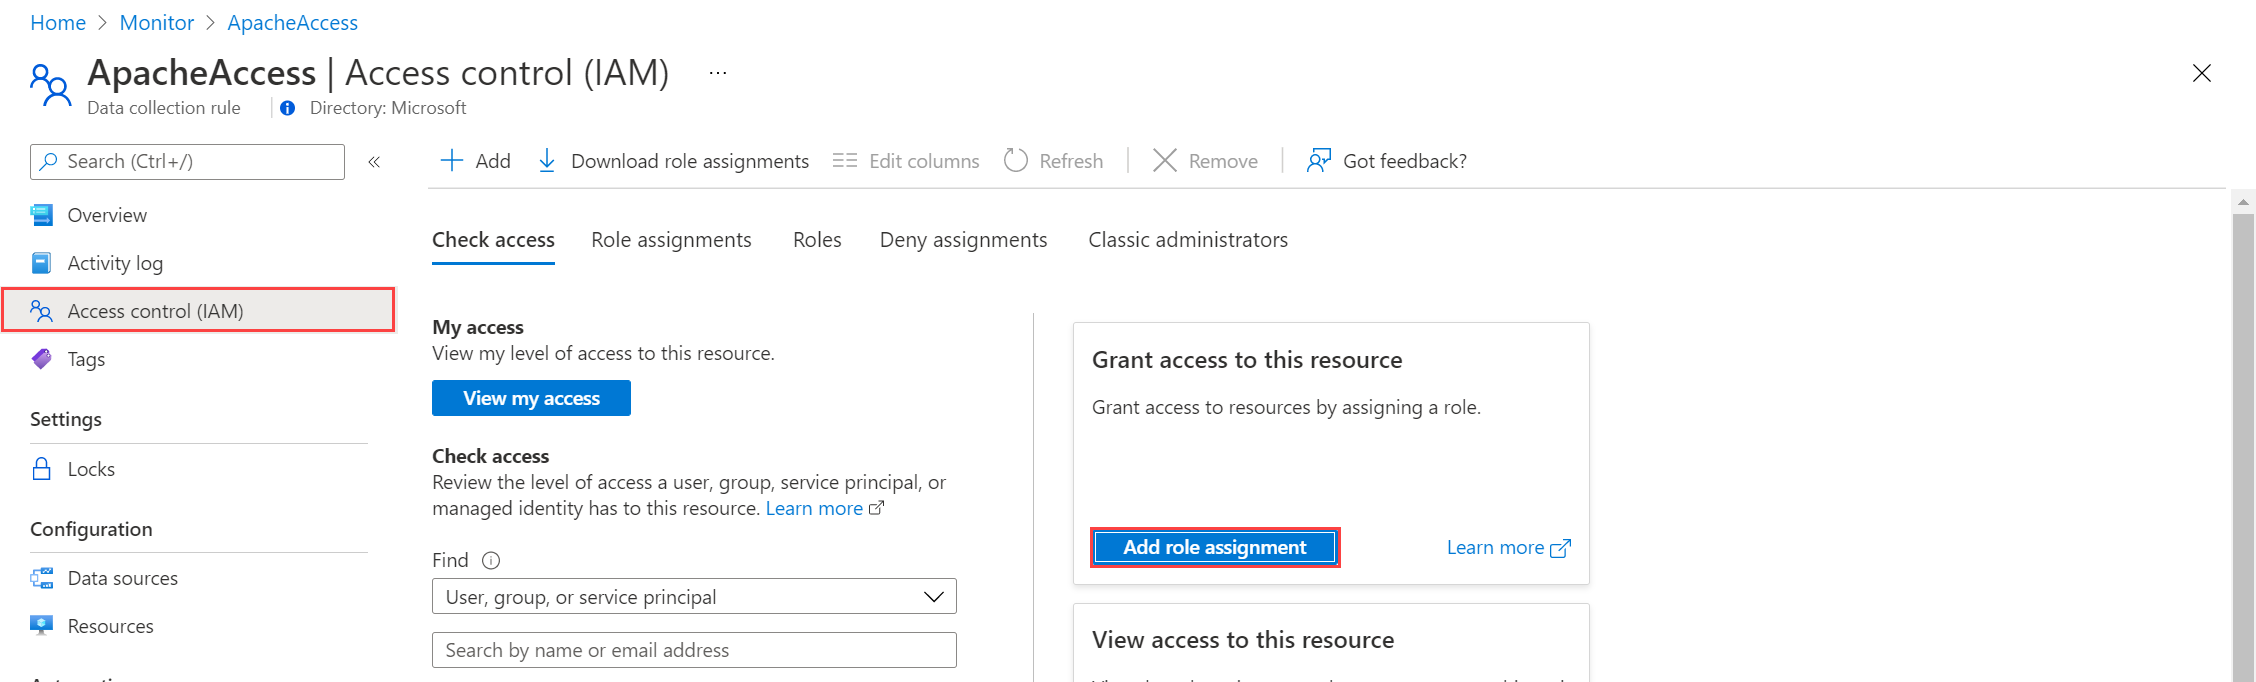
在 Azure 门户的 DCR 中,选择“访问控制(IAM)”“添加角色分配”。
选择“监视指标发布者”,然后选择“下一步”。 可以改为创建带有
Microsoft.Insights/Telemetry/Write数据操作的自定义操作。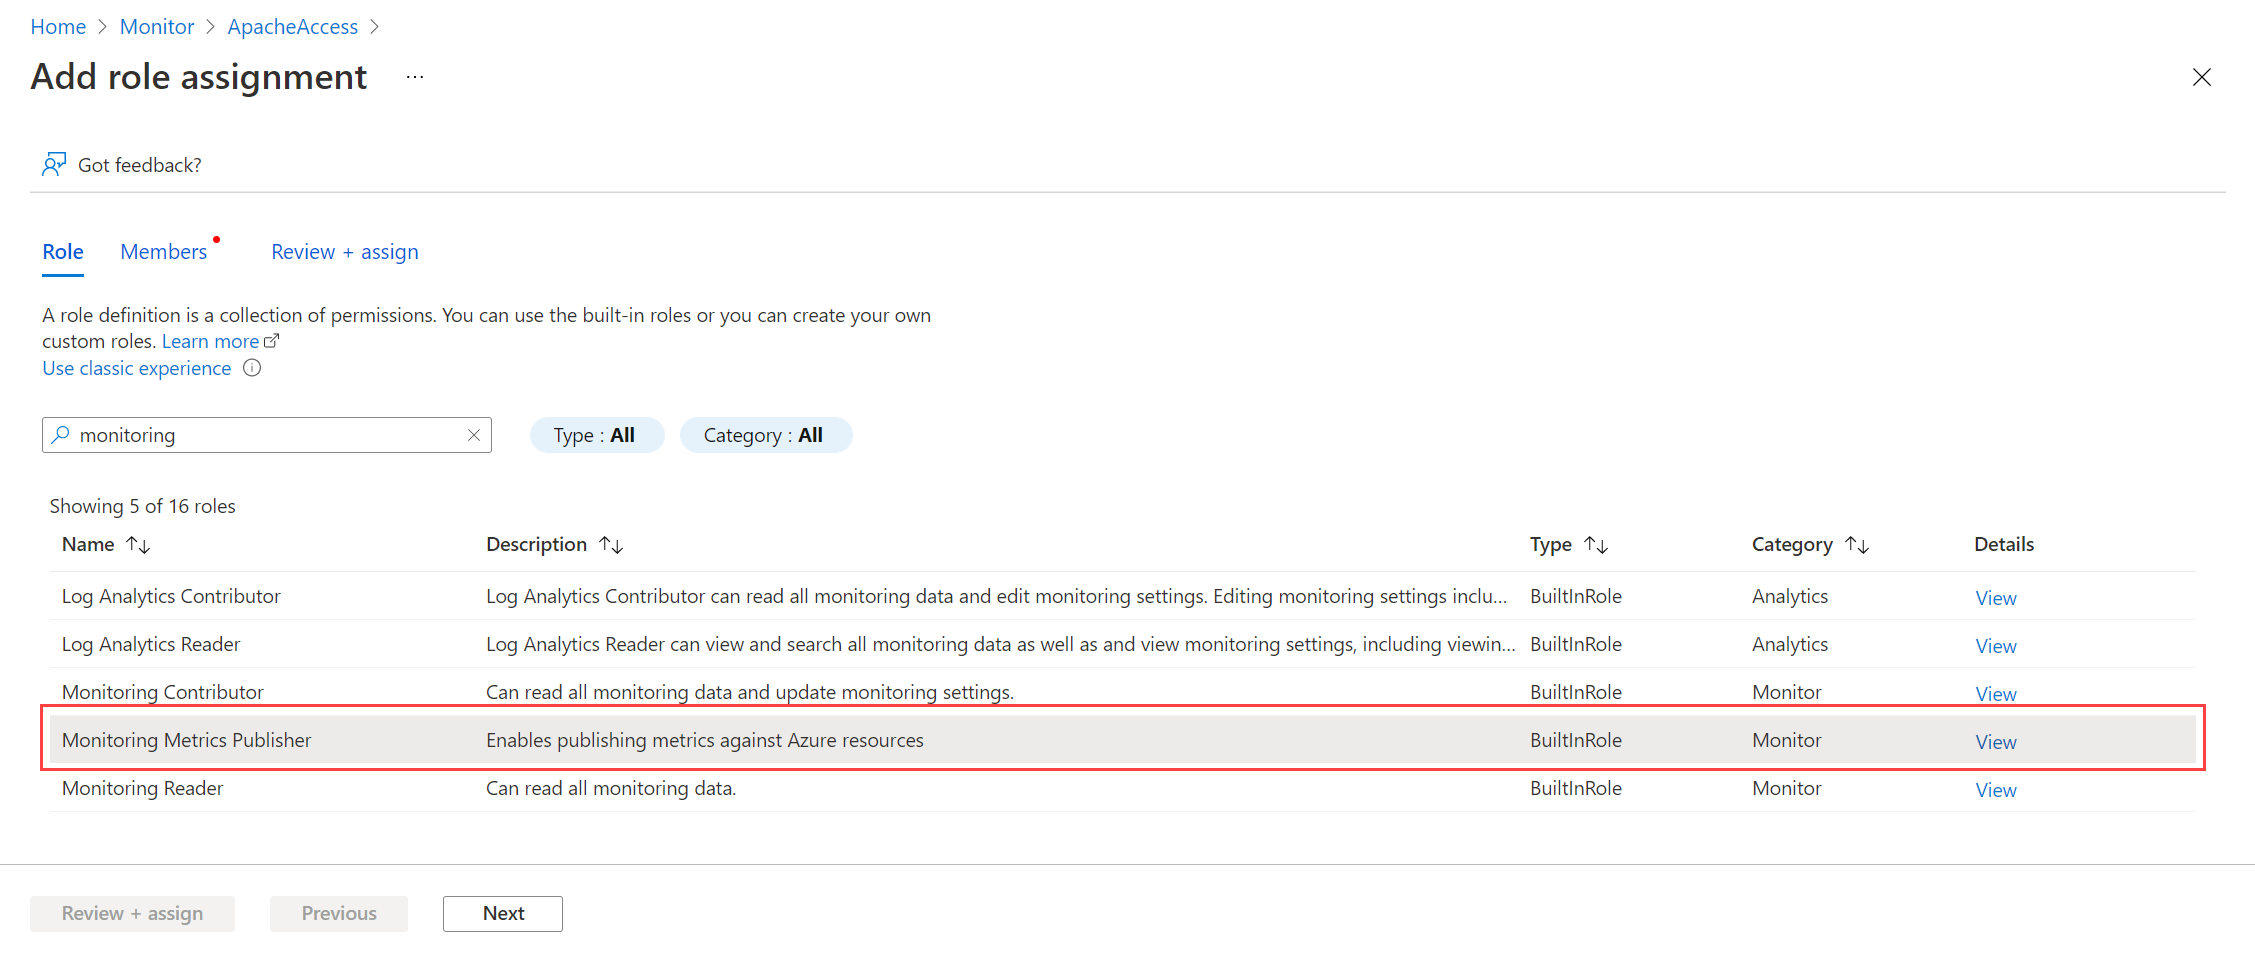
为“将访问权限分配给”选择“用户、组或服务主体”,然后选择“选择成员”。 选择你创建的应用程序,然后选择“选择”。
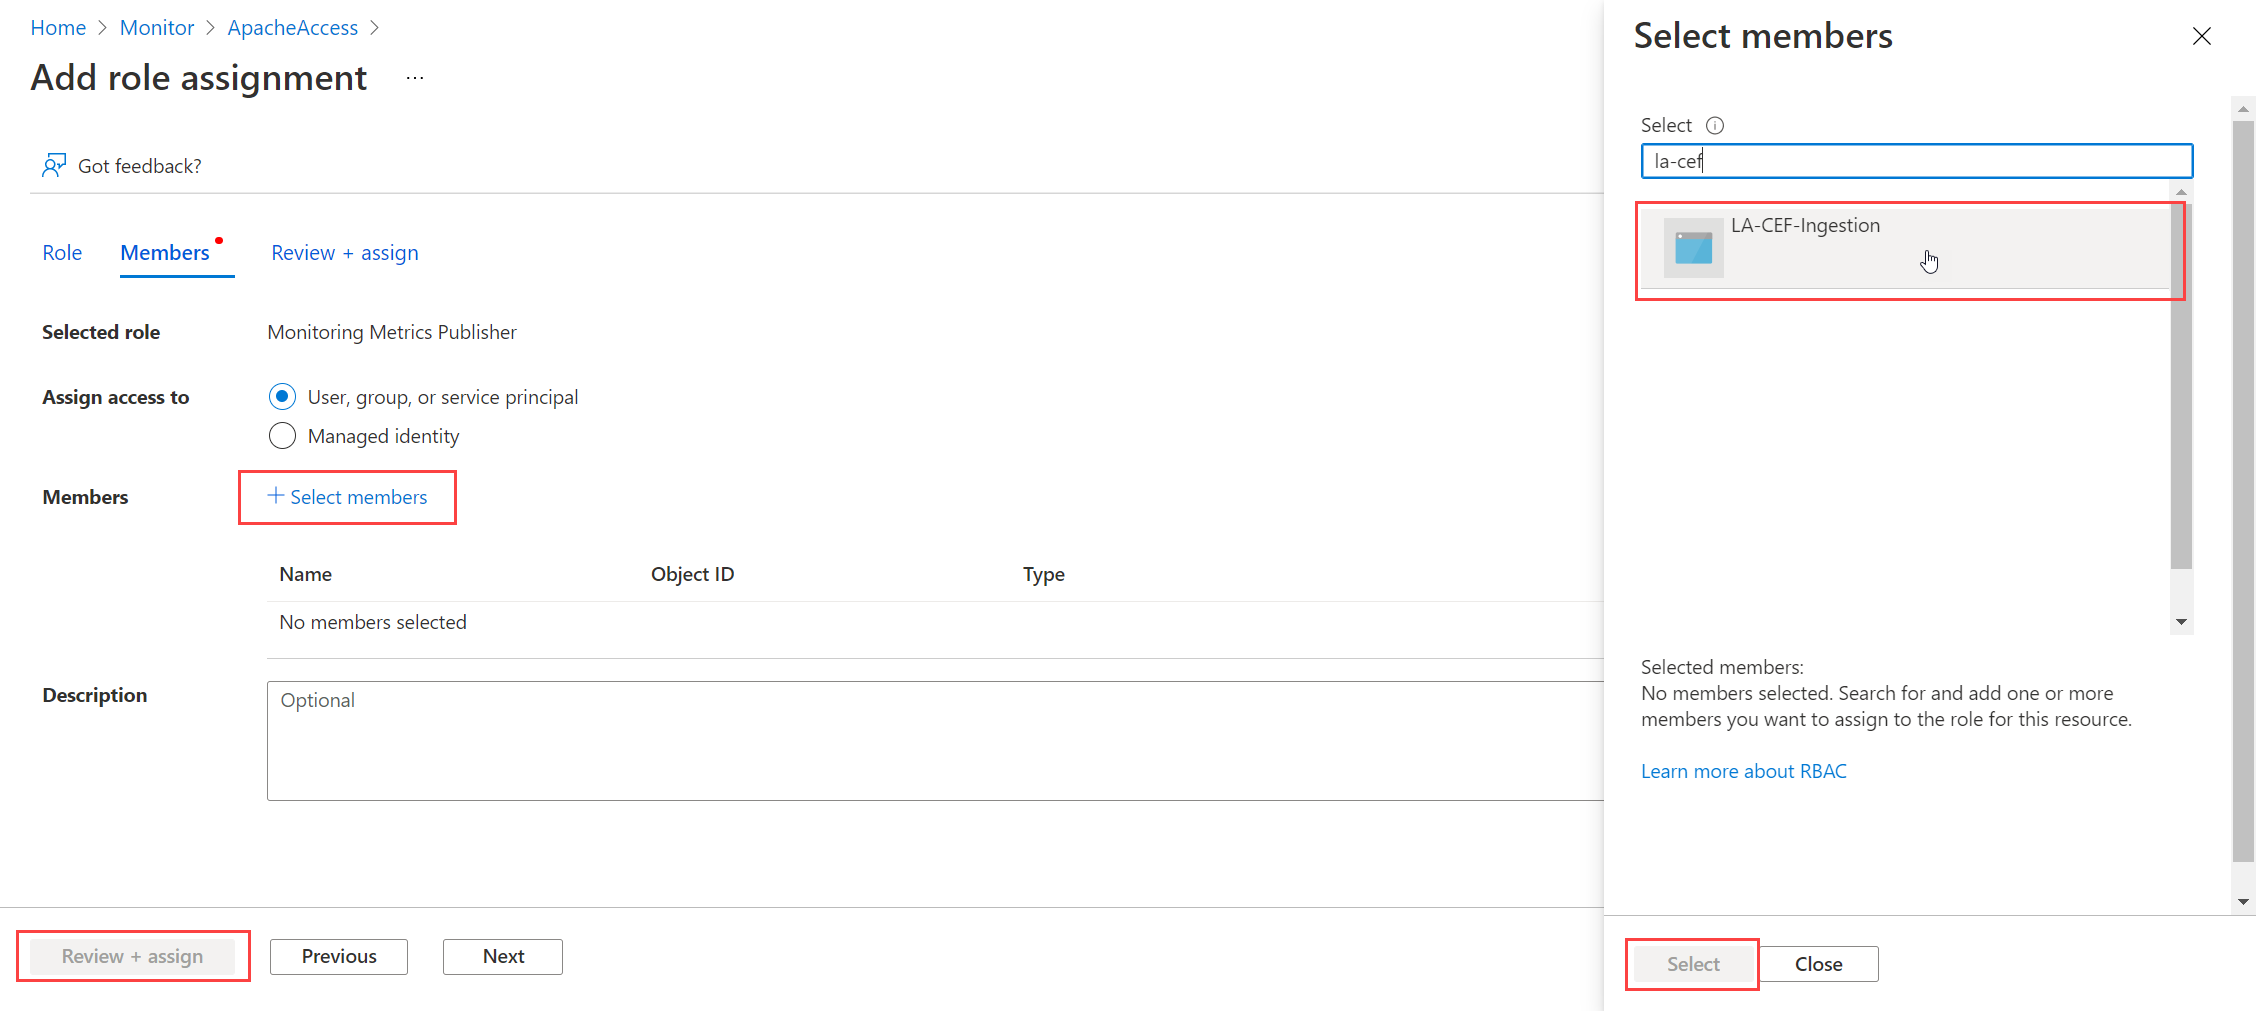
在保存角色分配之前,选择“查看 + 分配”并验证详细信息。


代码示例
有关使用本教程中创建的组件的示例代码,请参阅使用日志引入 API 将数据发送到 Azure Monitor 的示例代码。