Note
Access to this page requires authorization. You can try signing in or changing directories.
Access to this page requires authorization. You can try changing directories.
Important
Effective May 1, 2025, Azure AD B2C will no longer be available to purchase for new customers. Learn more in our FAQ.
Before you begin, use the Choose a policy type selector at the top of this page to choose the type of policy you’re setting up. Azure Active Directory B2C offers two methods to define how users interact with your applications: through predefined user flows or through fully configurable custom policies. The steps required in this article are different for each method.
The OAuth 2.0 client credentials grant flow permits an app (confidential client) to use its own credentials, instead of impersonating a user, to authenticate when calling web resource, such as REST API. This type of grant is commonly used for server-to-server interactions that must run in the background, without immediate interaction with a user. These types of applications are often referred to as daemons or service accounts.
In the client credentials flow, permissions are granted directly to the application itself by an administrator. When the app presents a token to a resource, the resource enforces that the app itself has authorization to perform an action since there's no user involved in the authentication. This article covers the steps needed to authorize an application to call an API, and how to get the tokens needed to call that API.
Note
This feature is in public preview.
App registration overview
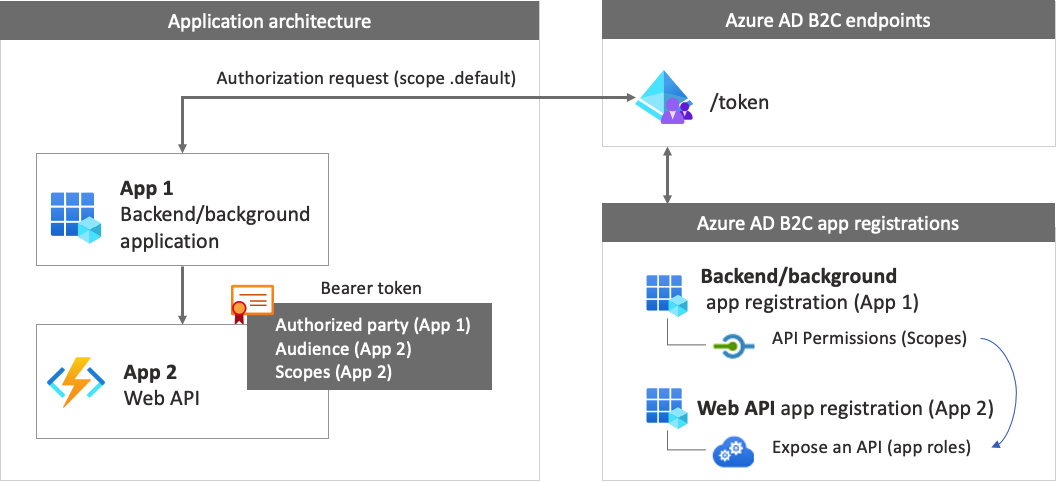
To enable your app to sign in with client credentials, then call a web API, you register two applications in the Azure AD B2C directory.
The application registration enables your app to sign in with Azure AD B2C. The app registration process generates an application ID, also known as the client ID, which uniquely identifies your app. You also create a client secret, which your app uses to securely acquire the tokens.
The web API registration enables your app to call a secure web API. The registration includes the web API scopes. The scopes provide a way to manage permissions to protected resources, such as your web API. Then, you grant your application permissions to the web API scopes. When an access token is requested, your app specifies the
.defaultscope parameter of the request. Azure AD B2C returns the web API scopes granted to your app.
The app architecture and registrations are illustrated in the following diagram:
Step 1: Register the web API app
In this step, you register the web API (App 2) with its scopes. Later, you grant your application (App 1) permission to those scopes. If you already have such an app registration, skip this step, then move to the next one, Step 1.1 Define web API roles (scopes).
To create the web API app registration (App ID: 2), follow these steps:
Sign in to the Azure portal.
Make sure you're using the directory that contains your Azure AD B2C tenant. Select the Directories + subscriptions icon in the portal toolbar.
On the Portal settings | Directories + subscriptions page, find your Azure AD B2C directory in the Directory name list, and then select Switch.
In the Azure portal, search for and select Azure AD B2C.
Select App registrations, and then select New registration.
For Name, enter a name for the application (for example, my-api1). Leave the default values for Redirect URI and Supported account types.
Select Register.
After the app registration is completed, select Overview.
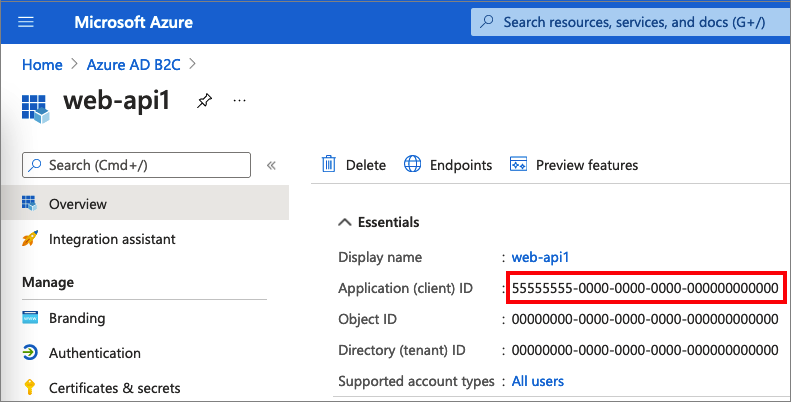
Record the Application (client) ID value for later use when you configure the web application.
Step 1.1 Define web API roles (scopes)
In this step, you configure the web API Application ID URI, then define App roles. The app roles, used by the OAuth 2.0 scopes and defined on an application registration representing your API. Your application uses the Application ID URI with the .default scope. To define app roles, follow these steps:
Select the web API that you created, for example my-api1.
Under Manage, select Expose an API.
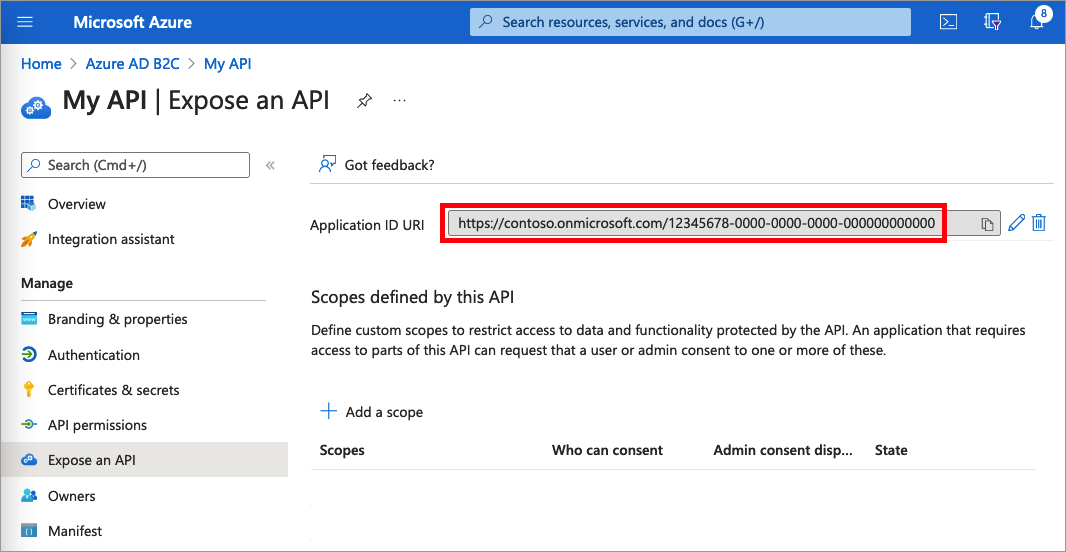
Next to Application ID URI, select the Set link. Replace the default value (GUID) with a unique name (for example, api), and then select Save.
Copy the Application ID URI. The following screenshot shows how to copy the Application ID URI.
Under Manage, select Manifest to open the application manifest editor. In the editor, locate the
appRolessetting, and define app roles that targetapplications. Each app role definition must have a global unique identifier (GUID) for itsidvalue. Generate a new GUID by runningnew-guidcommand in the Microsoft PowerShell, or an online GUID generator. Thevalueproperty of each app role definition appears in the scope, thescpclaim. Thevalueproperty can't contain spaces. The following example demonstrates two app roles, read and write:"appRoles": [ { "allowedMemberTypes": ["Application"], "displayName": "Read", "id": "d6a15e20-f83c-4264-8e61-5082688e14c8", "isEnabled": true, "description": "Readers have the ability to read tasks.", "value": "app.read" }, { "allowedMemberTypes": ["Application"], "displayName": "Write", "id": "204dc4ab-51e1-439f-8c7f-31a1ebf3c7b9", "isEnabled": true, "description": "Writers have the ability to create tasks.", "value": "app.write" }],At the top of the page, select Save to save the manifest changes.
Step 2: Register an application
To enable your app to sign in with Azure AD B2C using client credentials flow, you can use an existing application or register a new one (App 1).
If you're using an existing app, make sure the app's accessTokenAcceptedVersion is set to 2:
- In the Azure portal, search for and select Azure AD B2C.
- Select App registrations, and then select your existing app from the list.
- In the left menu, under Manage, select Manifest to open the manifest editor.
- Locate the
accessTokenAcceptedVersionelement, and set its value to2. - At the top of the page, select Save to save the changes.
To create a new web app registration, follow these steps:
In the Azure portal, search for and select Azure AD B2C
Select App registrations, and then select New registration.
Enter a Name for the application. For example, ClientCredentials_app.
Leave the other values as they are, and then select Register.
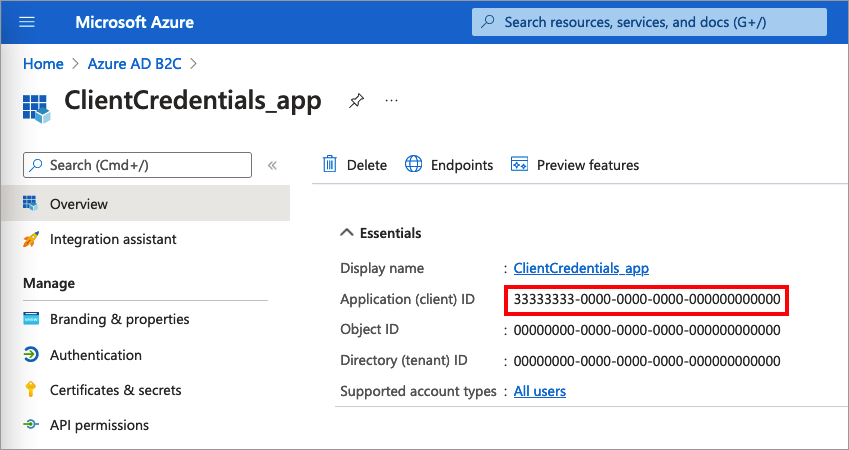
Record the Application (client) ID for use in a later step.
Step 2.1 Create a client secret
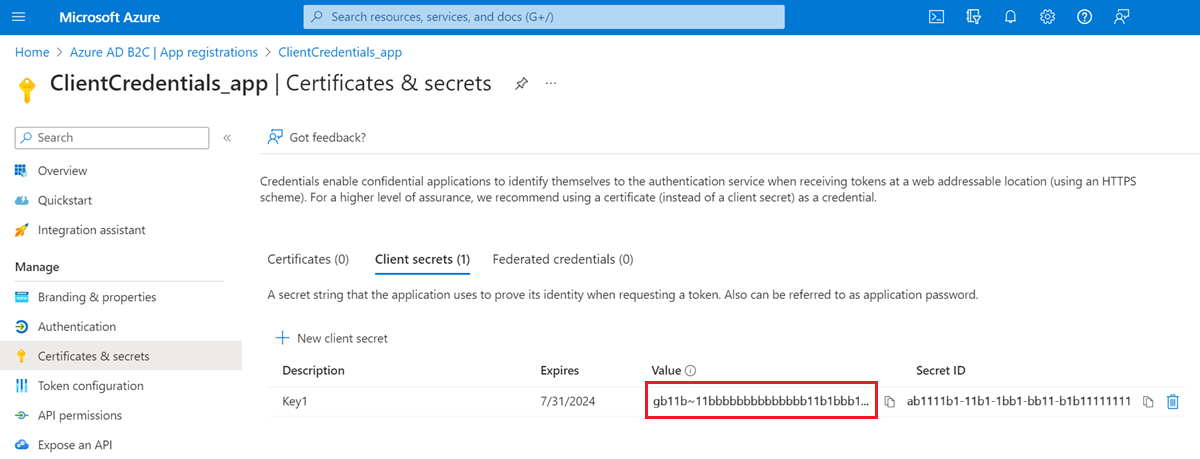
Create a client secret for the registered application. Your app uses the client secret to prove its identity when it requests tokens.
Under Manage, select Certificates & secrets.
Select New client secret.
In the Description box, enter a description for the client secret (for example, clientsecret1).
Under Expires, select a duration for which the secret is valid, and then select Add.
Record the secret's Value. You use this value for configuration in a later step.
Step 2.2 Grant the app permissions for the web API
To grant your app (App 1) permissions, follow these steps:
Select App registrations, and then select the app that you created (App 1).
Under Manage, select API permissions.
Under Configured permissions, select Add a permission.
Select the My APIs tab.
Select the API (App 2) to which the web application should be granted access. For example, enter my-api1.
Select Application permission.
Under Permission, expand app, and then select the scopes that you defined earlier (for example, app.read and app.write).
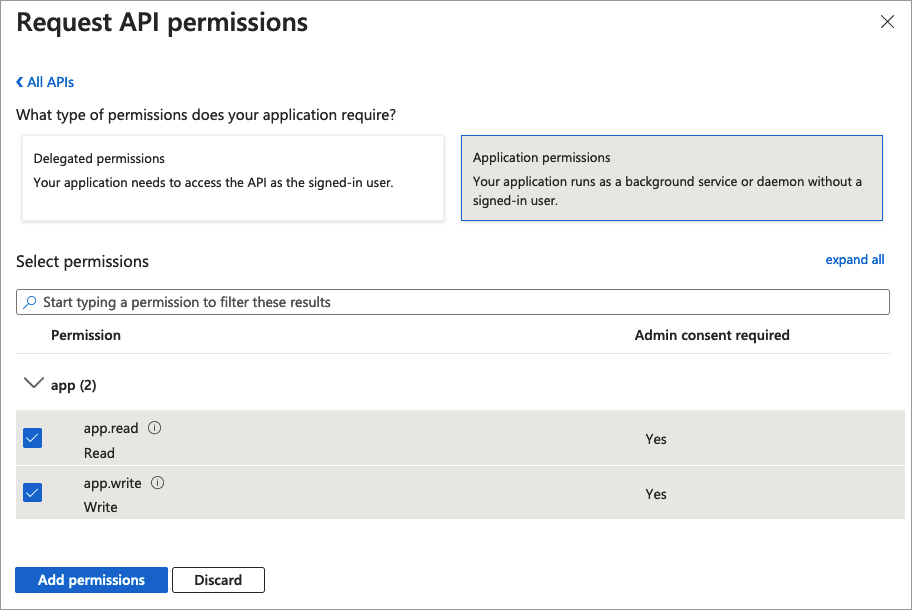
Select Add permissions.
Select Grant admin consent for <your tenant name>.
Select Yes.
Select Refresh, and then verify that Granted for ... appears under Status for both scopes.
Step 3: Obtain an access token
There are no specific actions to enable the client credentials for user flows or custom policies. Both Azure AD B2C user flows and custom policies support the client credentials flow. If you haven't done so already, create a user flow or a custom policy. Then, use your favorite API development application to generate an authorization request. Construct a call like this example with the following information as the body of the POST request:
https://<tenant-name>.b2clogin.cn/<tenant-name>.partner.onmschina.cn/<policy>/oauth2/v2.0/token
- Replace
<tenant-name>with the name of your Azure AD B2C tenant. For example,contoso.b2clogin.cn. - Replace
<policy>with the full name of your user flow, or custom policy. Note, all types of user flows and custom policies support client credentials flow. You can use any user flow or custom policy you have, or create a new one, such as sign-up or sign-in.
| Key | Value |
|---|---|
| grant_type | client_credentials |
| client_id | The Client ID from the Step 2 Register an application. |
| client_secret | The Client secret value from Step 2.1 Create a client secret. |
| scope | The Application ID URI from Step 1.1 Define web API roles (scopes) and .default. For example https://contoso.partner.onmschina.cn/api/.default, or https://contoso.partner.onmschina.cn/aaaabbbb-0000-cccc-1111-dddd2222eeee/.default. |
The actual POST request looks like the following example:
Request:
POST /<tenant-name>.partner.onmschina.cn/B2C_1A_SUSI/oauth2/v2.0/token HTTP/1.1
Host: <tenant-name>.b2clogin.cn
Content-Type: application/x-www-form-urlencoded

grant_type=client_credentials
&client_id=11112222-bbbb-3333-cccc-4444dddd5555
&client_secret=FyX7Q~DuPJ...
&scope=https%3A%2F%2Fcontoso.partner.onmschina.cn%2Fapi%2F.default
Response:
{
    "access_token": "eyJ0eXAiOiJKV1QiLCJhbGciOiJSUzI1NiIsImtpZCI6IlBFcG5OZDlnUkNWWUc2dUs...",
    "token_type": "Bearer",
    "not_before": 1645172292,
    "expires_in": 3600,
    "expires_on": 1645175892,
    "resource": "11112222-bbbb-3333-cccc-4444dddd5555"
}
Learn about the return access token claims. The following table lists the claims that are related to the client credentials flow.
| Claim | Description | Value |
|---|---|---|
aud |
Identifies the intended recipient of the token. | The Client ID of the API. |
sub |
The service principal associate with the application that initiated the request. | It's the service principal of the client_id of the authorization request. |
azp |
Authorized party - the party to which the access token was issued. | The Client ID of the application that initiated the request. It's the same value you specified in the client_id of the authorization request. |
scp |
The set of scopes exposed by your application API (space delimiter). | In client credentials flow, the authorization request asks for the .default scope, while the token contains the list of scopes exposed (and consented by the app administrator) by the API. For example, app.read app.write. |
Step 3.1 Obtain an access token with script
Use the following PowerShell script to test your configuration:
$appId = "<client ID>"
$secret = "<client secret>"
$endpoint = "https://<tenant-name>.b2clogin.cn/<tenant-name>.partner.onmschina.cn/<policy>/oauth2/v2.0/token"
$scope = "<Your API id uri>/.default"
$body = "grant_type=client_credentials&scope=" + $scope + "&client_id=" + $appId + "&client_secret=" + $secret

$token = Invoke-RestMethod -Method Post -Uri $endpoint -Body $body
Use the following cURL script to test your configuration:
curl --location --request POST 'https://<your-tenant>.b2clogin.cn/<your-tenant>.partner.onmschina.cn/<policy>/oauth2/v2.0/token' \
--header 'Content-Type: application/x-www-form-urlencoded' \
--form 'grant_type="client_credentials"' \
--form 'client_id="<client ID>"' \
--form 'client_secret="<client secret>"' \
--form 'scope="<Your API id uri>/.default"'
Step 4: Customize the token
This feature is available only for custom policies. For setup steps, select Custom policy in the preceding selector.
Custom policies provide a way to extend the token issuance process. To customize the user journey of the OAuth 2.0 Client credentials, follow the guidance how to configure a client credentials user journey. Then, in the JwtIssuer technical profile, add the ClientCredentialsUserJourneyId metadata with a reference to the user journey you created.
The following example shows how to add the ClientCredentialsUserJourneyId to the token issuer technical profile.
<TechnicalProfile Id="JwtIssuer">
  <Metadata>
    <Item Key="ClientCredentialsUserJourneyId">ClientCredentialsJourney</Item>
  </Metadata>
</TechnicalProfile>
The following example shows a client credentials user journey. The first and the last orchestration steps are required.
<UserJourneys>
  <UserJourney Id="ClientCredentialsJourney">
    <OrchestrationSteps>
      <!-- [Required] Do the client credentials -->
      <OrchestrationStep Order="1" Type="ClaimsExchange">
        <ClaimsExchanges>
          <ClaimsExchange Id="ClientCredSetupExchange" TechnicalProfileReferenceId="ClientCredentials_Setup" />
        </ClaimsExchanges>
      </OrchestrationStep>

      <!-- [Optional] Call a REST API or claims transformation -->
      <OrchestrationStep Order="2" Type="ClaimsExchange">
        <ClaimsExchanges>
          <ClaimsExchange Id="TokenAugmentation" TechnicalProfileReferenceId="TokenAugmentation" />
        </ClaimsExchanges>
      </OrchestrationStep>

      <!-- [Required] Issue the access token -->
      <OrchestrationStep Order="3" Type="SendClaims" CpimIssuerTechnicalProfileReferenceId="JwtIssuer" />
    </OrchestrationSteps>
  </UserJourney>
</UserJourneys>