Note
Access to this page requires authorization. You can try signing in or changing directories.
Access to this page requires authorization. You can try changing directories.
Important
Effective May 1, 2025, Azure AD B2C will no longer be available to purchase for new customers. Learn more in our FAQ.
Azure Active Directory B2C (Azure AD B2C) custom policy allows you to interact with application logic that you implement outside of Azure AD B2C. To do so, you make an HTTP call to an endpoint. Azure AD B2C custom policies provide RESTful technical profile for this purpose. By using this capability, you can implement features that aren't available within Azure AD B2C custom policy.
In this article, you learn how to:
Create and deploy a sample Node.js app for use as a RESTful service.
Make an HTTP call to the Node.js RESTful service by using the RESTful technical profile.
Handle or report an error that a RESTful service returns to your custom policy.
Scenario overview
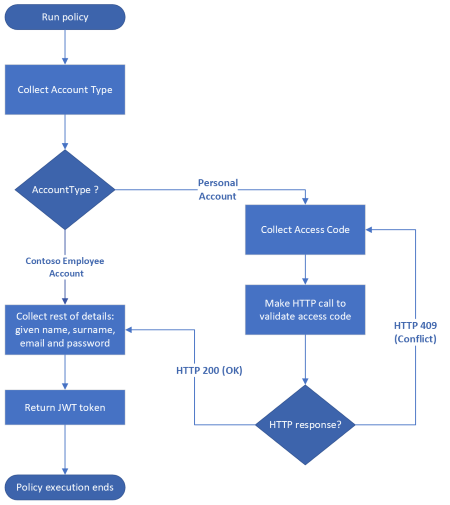
In Create branching in user journey by using Azure AD B2C custom policies, users who select Personal Account need to provide a valid invitation access code to proceed. We use a static access code, but real world apps don't work this way. If the service that issues the access codes is external to your custom policy, you must make a call to that service, and pass the access code input by the user for validation. If the access code is valid, the service returns an HTTP 200 OK response, and Azure AD B2C issues JWT. Otherwise, the service returns an HTTP 4xx response, and the user must reenter an access code.

Prerequisites
If you don't have one already, create an Azure AD B2C tenant that is linked to your Azure subscription.
You must have Node.js installed in your computer.
You must have Visual Studio Code (VS Code) installed in your computer.
Complete the steps in Validate user inputs by using Azure AD B2C custom policy. This article is a part of Create and run your own custom policies how-to guide series.
Note
This article is part of the Create and run your own custom policies in Azure Active Directory B2C how-to guide series. We recommend that you start this series from the first article.
Step 1 - Create and deploy a Node.js app
You need to deploy an app, which serves as your external app. Your custom policy then makes an HTTP call to this app.
Step 1.1 - Create the Node.js app
Create a folder to host your node application, such as
access-code-app.In your terminal, change directory into your Node app folder, such as
cd access-code-app, and runnpm init -y. This command creates a defaultpackage.jsonfile for your Node.js project.In your terminal, run
npm install express body-parser. This command installs the Express framework and the body-parser package.In your project, create
index.jsfile.In VS Code, open the
index.jsfile, and then add the following code:const express = require('express'); let bodyParser = require('body-parser') //Create an express instance const app = express(); app.use( bodyParser.json() ); // to support JSON-encoded bodies app.use(bodyParser.urlencoded({ // to support URL-encoded bodies extended: true })); app.post('/validate-accesscode', (req, res) => { let accessCode = '88888'; if(accessCode == req.body.accessCode){ res.status(200).send(); }else{ let errorResponse = { "version" :"1.0", "status" : 409, "code" : "errorCode", "requestId": "requestId", "userMessage" : "The access code you entered is incorrect. Please try again.", "developerMessage" : `The provided code ${req.body.accessCode} does not match the expected code for user.`, "moreInfo" :"https://learn.microsoft.com/azure/active-directory-b2c/string-transformations" }; res.status(409).send(errorResponse); } }); app.listen(80, () => { console.log(`Access code service listening on port !` + 80); });You can observe that when a user submits a wrong access code, you can return an error directly from the REST API. Custom policies allow you to return an HTTP 4xx error message, such as, 400 (bad request), or 409 (Conflict) response status code with a response JSON body formatted as shown in
errorResponsevariable. The source of the accessCode in the app could be read from a database. Learn more about Returning validation error message.To test the app works as expected, use the following steps:
- In your terminal, run the
node index.jscommand to start your app server. - To make a POST request similar to the one shown in this example, you can use an HTTP client such as Microsoft PowerShell.
    POST http://localhost/validate-accesscode HTTP/1.1
    Host: localhost
    Content-Type: application/x-www-form-urlencoded

    accessCode=user-code-code
Replace
user-code-codewith an access code input by the user, such as54321. If you're using PowerShell, run the following script.$accessCode="54321" $endpoint="http://localhost/validate-accesscode" $body=$accessCode $response=Invoke-RestMethod -Method Post -Uri $endpoint -Body $body echo $responseIf you use an incorrect access code, the response looks similar to the following JSON snippet:
{ "version": "1.0", "status": 409, "code": "errorCode", "requestId": "requestId", "userMessage": "The access code you entered is incorrect. Please try again.", "developerMessage": "The provided code 54321 does not match the expected code for user.", "moreInfo": "https://learn.microsoft.com/azure/active-directory-b2c/string-transformations" }- In your terminal, run the
Your REST service can return HTTP 4xx status code, but the value of status in the JSON response must be 409.
At this point, you're ready to deploy your Node.js app.
Step 1.2 - Deploy the Node.js app in Azure App Service
For your custom policy to reach your Node.js app, it needs to be reachable, so, you need to deploy it. In this article, you deploy the app by using Azure App Service, but you use an alternative hosting approach.
Follow the steps in Deploy your app to Azure to deploy your Node.js app to Azure. For the Name of the app, use a descriptive name such as custompolicyapi. Hence:
App URL looks similar to
https://custompolicyapi.chinacloudsites.cn.Service endpoint looks similar to
https://custompolicyapi.chinacloudsites.cn/validate-accesscode.
You can test the app you've deployed by using an HTTP client such as Microsoft PowerShell. This time, use https://custompolicyapi.chinacloudsites.cn/validate-accesscode URL as the endpoint.
Step 2 - Call the REST API
Now that your app is running, you need to make an HTTP call from your custom policy. Azure AD B2C custom policy provides a RESTful technical profile that you use to call an external service.
Step 2.1 - Define a RESTful technical profile
In your ContosoCustomPolicy.XML file, locate the ClaimsProviders section, and define a new RESTful technical profile by using the following code:
    <!--<ClaimsProviders>-->
        <ClaimsProvider>
            <DisplayName>HTTP Request Technical Profiles</DisplayName>
            <TechnicalProfiles>
                <TechnicalProfile Id="ValidateAccessCodeViaHttp">
                    <DisplayName>Check that the user has entered a valid access code by using Claims Transformations</DisplayName>
                    <Protocol Name="Proprietary" Handler="Web.TPEngine.Providers.RestfulProvider, Web.TPEngine, Version=1.0.0.0, Culture=neutral, PublicKeyToken=null" />
                    <Metadata>
                        <Item Key="ServiceUrl">https://custompolicyapi.chinacloudsites.cn/validate-accesscode</Item>
                        <Item Key="SendClaimsIn">Body</Item>
                        <Item Key="AuthenticationType">None</Item>
                        <Item Key="AllowInsecureAuthInProduction">true</Item>
                    </Metadata>
                    <InputClaims>
                        <InputClaim ClaimTypeReferenceId="accessCode" PartnerClaimType="accessCode" />
                    </InputClaims>
                </TechnicalProfile>
            </TechnicalProfiles>
        </ClaimsProvider>
    <!--</ClaimsProviders>-->
From the protocol, you can observe that we configure the Technical Profile to use the RestfulProvider. You can also observe the following information it the metadata section:
The
ServiceUrlrepresents the API endpoint. Its value ishttps://custompolicyapi.chinacloudsites.cn/validate-accesscode. If you deployed your Node.js app using an alternative method, make sure to update the endpoint value.SendClaimsInspecifies how the input claims are sent to the RESTful claims provider. Possible values:Body (default),Form,Header,UrlorQueryString. When you useBody, such as in this article, you invoke the POST HTTP verb, and the data you send to the API if formatted as key, value pairs in the body of the request. Learn how to invoke the GET HTTP verb, and pass data as query string.AuthenticationTypespecifies the type of authentication that the RESTful claims provider performs. Our RESTful claims provider calls an unprotected endpoint, so we set ourAuthenticationTypeto None. If you set authentication type toBearer, you need to add a CryptographicKeys element, which specifies the storage for your access token. Learn more about the types of authentication that the RESTful claims provider supports.The PartnerClaimType attribute in the
InputClaimspecifies how you receive your data in the API.
Step 2.2 - Update validation technical profile
In Create branching in user journey by using Azure AD B2C custom policy, you validated the accessCode by using a claims transformation. In this article, you validate the accessCode by making an HTTP call to an external service. So, you'll need to update your custom policy to reflect the new approach.
Locate the AccessCodeInputCollector technical profile, and update the ValidationTechnicalProfile element's ReferenceId to ValidateAccessCodeViaHttp:
from:
<ValidationTechnicalProfile ReferenceId="CheckAccessCodeViaClaimsTransformationChecker"/>
to:
<ValidationTechnicalProfile ReferenceId="ValidateAccessCodeViaHttp"/>
At this point, the Technical Profile with Id CheckAccessCodeViaClaimsTransformationChecker isn't needed and can be removed.
Step 3 - Upload custom policy file
Make sure your Node.js app is running, and then follow the steps in Upload custom policy file to upload your policy file. If you're uploading a file with same name as the one already in the portal, make sure you select Overwrite the custom policy if it already exists.
Step 4 - Test the custom policy
Follow the steps in Test the custom policy to test your custom policy:
- For Account Type, select Personal Account
- Enter the rest of the details as required, and then select Continue. You see a new screen.
- For Access Code, enter 88888, and then select Continue. After the policy finishes execution, you're redirected to
https://jwt.ms, and you see a decoded JWT. If you repeat the procedure, and enter a different Access Code, other than 88888, you see an error, The access code you entered is incorrect. Please try again.
Step 5 - Enable debug mode
In development, you may want to see detailed errors sent by the API, such as developerMessage and moreInfo. In this case, you need to enable debug mode in your RESTful technical provider.
Locate your ValidateAccessCodeViaHttp technical provider, and add the following item in the technical provider's
metadata:<Item Key="DebugMode">true</Item>Save the changes and upload your policy file.
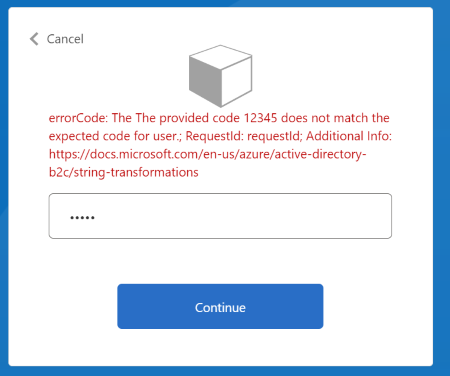
Test your custom policy. Make sure you use a wrong input for your Access Code. You see an error similar to the one shown in this screenshot:

Handle complex request JSON payloads
If the REST API that you call requires you to send a complex JSON payload, you can create the payload by using GenerateJson JSON claims transformations. Once you generate the payload, you can then use ClaimUsedForRequestPayload metadata option to the name of the claim containing the JSON payload.
For example, use the following claims transformation to generate a JSON payload:
    <ClaimsTransformation Id="GenerateRequestBodyClaimsTransformation" TransformationMethod="GenerateJson">
        <InputClaims>
            <InputClaim ClaimTypeReferenceId="email" TransformationClaimType="customerEntity.email" />
            <InputClaim ClaimTypeReferenceId="objectId" TransformationClaimType="customerEntity.userObjectId" />
            <InputClaim ClaimTypeReferenceId="givenName" TransformationClaimType="customerEntity.firstName" />
            <InputClaim ClaimTypeReferenceId="surname" TransformationClaimType="customerEntity.lastName" />
            <InputClaim ClaimTypeReferenceId="accessCode" TransformationClaimType="customerEntity.accessCode" />
        </InputClaims>
        <InputParameters>
            <InputParameter Id="customerEntity.role.name" DataType="string" Value="Administrator" />
            <InputParameter Id="customerEntity.role.id" DataType="long" Value="1" />
        </InputParameters>
        <OutputClaims>
            <OutputClaim ClaimTypeReferenceId="requestBodyPayload" TransformationClaimType="outputClaim" />
        </OutputClaims>
    </ClaimsTransformation>
The ClaimsTransformation generates the following JSON object:
{
   "customerEntity":{
      "email":"john.s@contoso.com",
      "userObjectId":"aaaaaaaa-0000-1111-2222-bbbbbbbbbbbb",
      "firstName":"John",
      "lastName":"Smith",
      "accessCode":"88888",
      "role":{
         "name":"Administrator",
         "id": 1
      }
   }
}
Then, update the Metadata, InputClaimsTransformations, and InputClaims of your RESTful technical provider as shown below:
    <Metadata>
        <Item Key="ClaimUsedForRequestPayload">requestBodyPayload</Item>
        <!--Other Metadata items -->
    </Metadata>

    <!--Execute your InputClaimsTransformations to generate your request Payload-->
    <InputClaimsTransformations>
        <InputClaimsTransformation ReferenceId="GenerateRequestBodyClaimsTransformation" />
    </InputClaimsTransformations>

    <InputClaims>
        <InputClaim ClaimTypeReferenceId="requestBodyPayload" />
    </InputClaims>
Receive data from REST API
If your REST API returns data, which you want to include as claims in your policy, you can receive it by specifying claims in the OutputClaims element of the RESTful technical profile. If the name of the claim defined in your policy is different from the name defined in the REST API, you need to map these names by using the PartnerClaimType attribute.
Related content
Next, learn: