Note
Access to this page requires authorization. You can try signing in or changing directories.
Access to this page requires authorization. You can try changing directories.
Document Translation is a cloud-based feature of the Azure Translator service that asynchronously translates whole documents in supported languages and various file formats. In this quickstart, learn to use Document Translation with a programming language of your choice to translate a source document into a target language while preserving structure and text formatting.
Prerequisites
Note
Document Translation is currently supported in the Translator (single-service) resource only, and is not included in the Cognitive Services (multi-service) resource.
Document Translation is only supported in the S1 Standard Service Plan (Pay-as-you-go) or in the D3 Volume Discount Plan. See Cognitive Services pricing—Translator.
To get started, you need:
An active Azure account. If you don't have one, you can create a Trial.
An Azure Blob Storage account. You also need to create containers in your Azure Blob Storage account for your source and target files:
- Source container. This container is where you upload your files for translation (required).
- Target container. This container is where your translated files are stored (required).
A single-service Translator resource (not a multi-service Cognitive Services resource):
Complete the Translator project and instance details fields as follows:
Subscription. Select one of your available Azure subscriptions.
Resource Group. You can create a new resource group or add your resource to a pre-existing resource group that shares the same lifecycle, permissions, and policies.
Resource Region. Choose a specific region. If you're planning on using a system-assigned managed identity for authentication, choose a geographic region like China North.
Name. Enter the name you have chosen for your resource. The name you choose must be unique within Azure.
Note
Document Translation requires a custom domain endpoint. The value that you enter in the Name field will be the custom domain name parameter for your endpoint.
Pricing tier. Document Translation isn't supported in the free tier. Select Standard S1 to try the service.
Select Review + Create.
Review the service terms and select Create to deploy your resource.
After your resource has successfully deployed, select Go to resource.
Retrieve your key and document translation endpoint
*Requests to the Translator service require a read-only key and custom endpoint to authenticate access. The custom domain endpoint is a URL formatted with your resource name, hostname, and Translator subdirectories and is available in the Azure portal.
If you've created a new resource, after it deploys, select Go to resource. If you have an existing Document Translation resource, navigate directly to your resource page.
In the left rail, under Resource Management, select Keys and Endpoint.
Copy and paste your
keyanddocument translation endpointin a convenient location, such as Microsoft Notepad. Only one key is necessary to make an API call.You paste your
keyanddocument translation endpointinto the code samples to authenticate your request to the Document Translation service.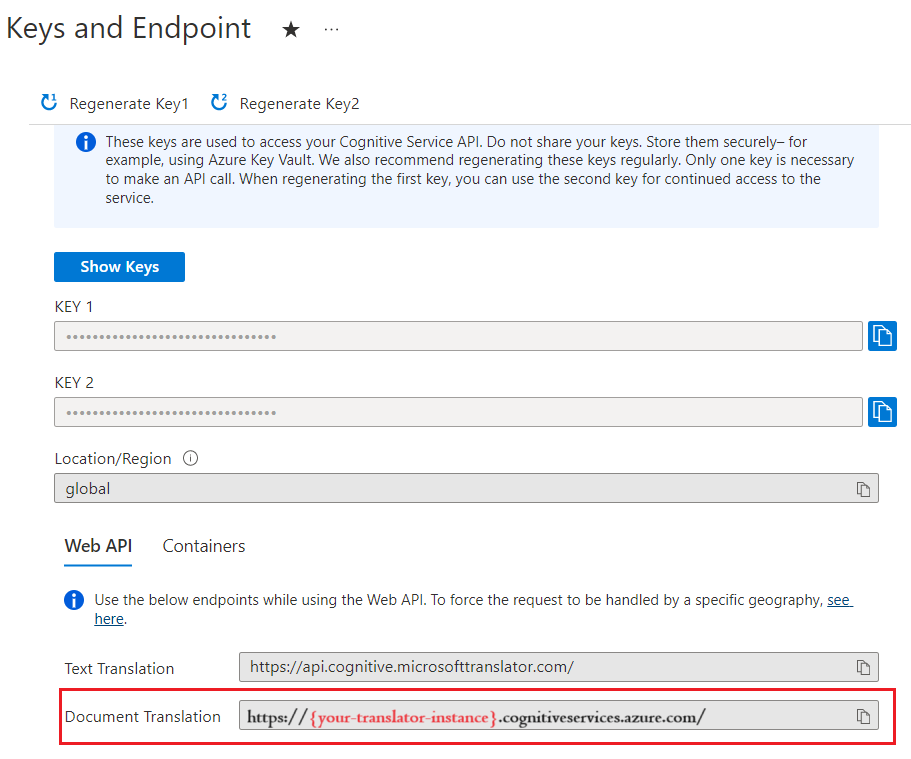
Create Azure Blob Storage containers
You need to create containers in your Azure Blob Storage account for source and target files.
- Source container. This container is where you upload your files for translation (required).
- Target container. This container is where your translated files are stored (required).
Required authentication
The sourceUrl , targetUrl , and optional glossaryUrl must include a Shared Access Signature (SAS) token, appended as a query string. The token can be assigned to your container or specific blobs. See Create SAS tokens for Document Translation process.
- Your source container or blob must have designated read and list access.
- Your target container or blob must have designated write and list access.
- Your glossary blob must have designated read and list access.
Tip
- If you're translating multiple files (blobs) in an operation, delegate SAS access at the container level.
- If you're translating a single file (blob) in an operation, delegate SAS access at the blob level.
- As an alternative to SAS tokens, you can use a system-assigned managed identity for authentication.
Sample document
For this project, you need a source document uploaded to your source container. You can download our document translation sample document for this quickstart. The source language is English.
HTTP request
A batch Document Translation request is submitted to your Translator service endpoint via a POST request. If successful, the POST method returns a 202 Accepted response code and the service creates a batch request. The translated documents are listed in your target container.
For detailed information regarding Azure Translator Service request limits, see Document Translation request limits.
Headers
The following headers are included with each Document Translation API request:
| HTTP header | Description |
|---|---|
| Ocp-Apim-Subscription-Key | Required: The value is the Azure key for your Translator or Cognitive Services resource. |
| Content-Type | Required: Specifies the content type of the payload. Accepted values are application/json or charset=UTF-8. |
POST request body
- The POST request body is a JSON object named
inputs. - The
inputsobject contains bothsourceURLandtargetURLcontainer addresses for your source and target language pairs. - The
prefixandsuffixare case-sensitive strings to filter documents in the source path for translation. Theprefixfield is often used to delineate subfolders for translation. Thesuffixfield is most often used for file extensions. - A value for the
glossariesfield (optional) is applied when the document is being translated. - The
targetUrlfor each target language must be unique.
Set up your C#/.NET environment
For this quickstart, we use the latest version of Visual Studio IDE to build and run the application.
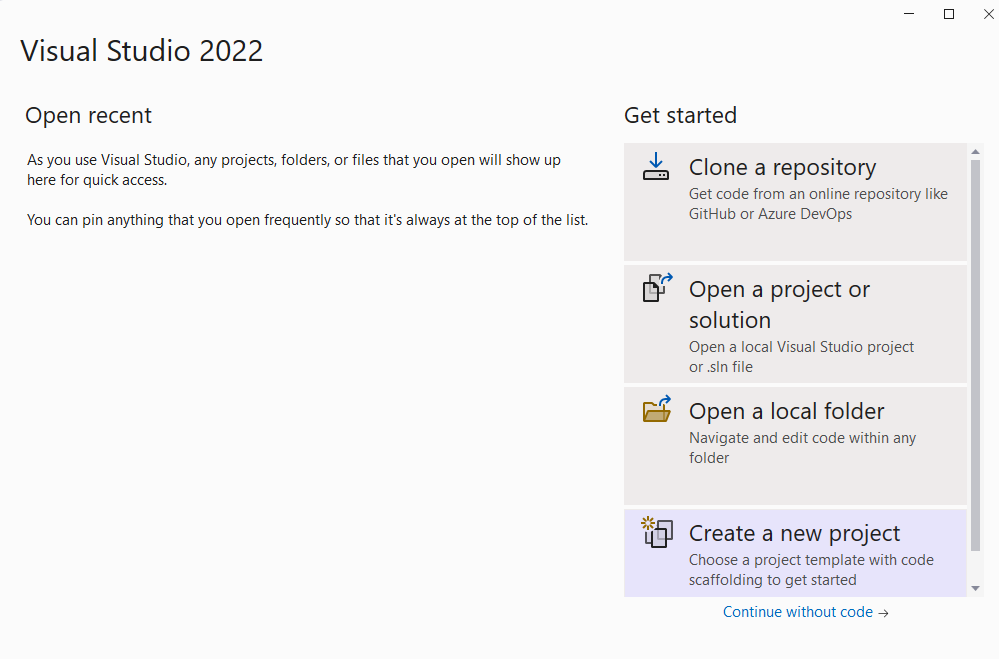
Start Visual Studio.
On the Get started page, choose Create a new project.
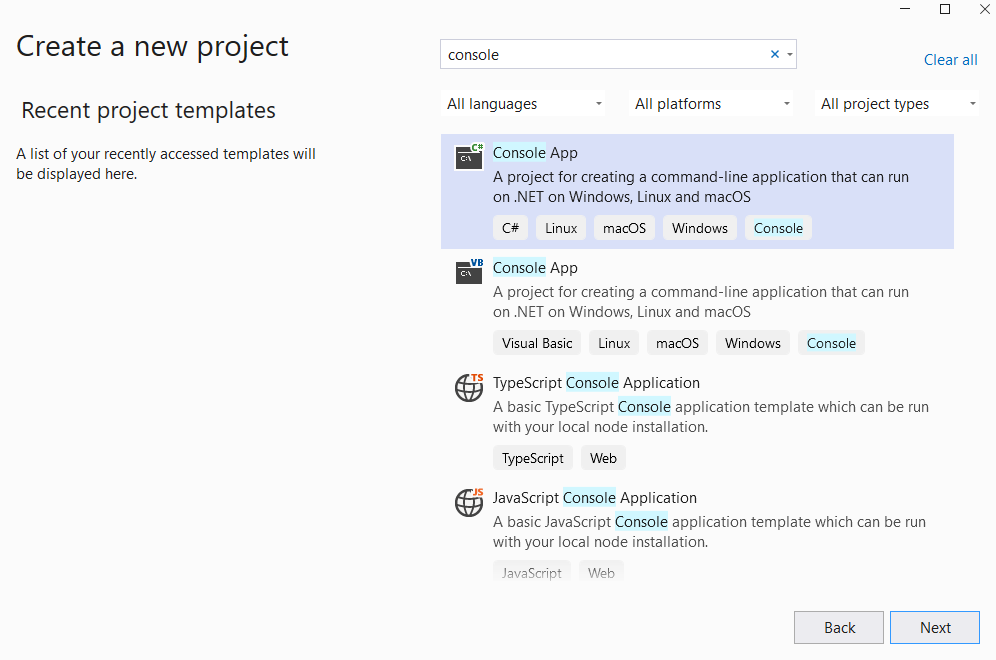
On the Create a new project page, enter console in the search box. Choose the Console Application template, then choose Next.
In the Configure your new project dialog window, enter
document-translation-qsin the Project name box. Then choose Next.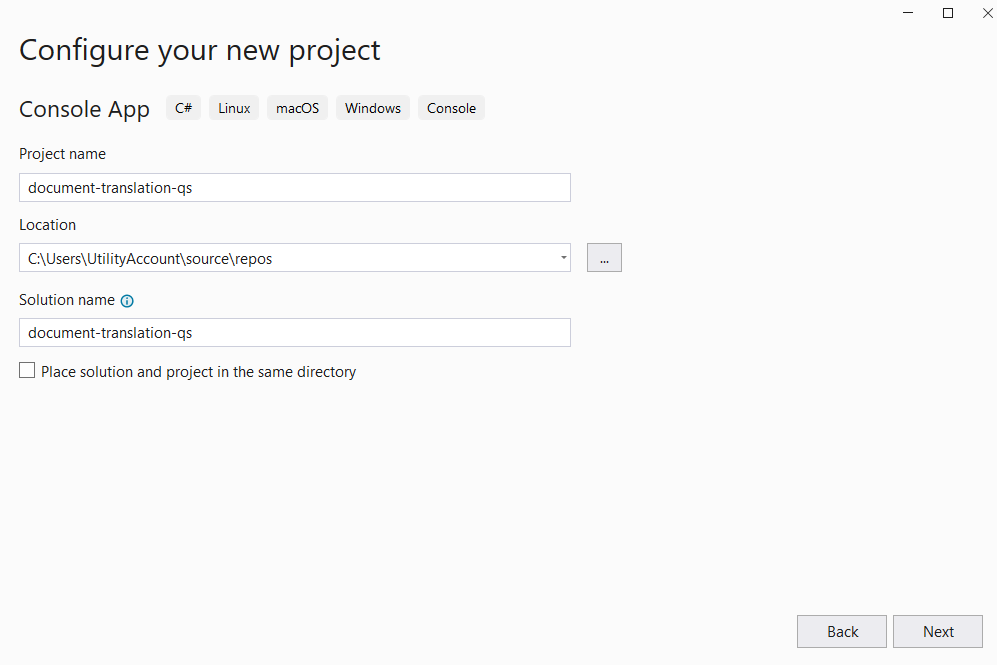
In the Additional information dialog window, select .NET 6.0 (Long-term support), and then select Create.

Install Newtonsoft.Json
Right-click on your document-translation-qs project and select Manage NuGet Packages... .
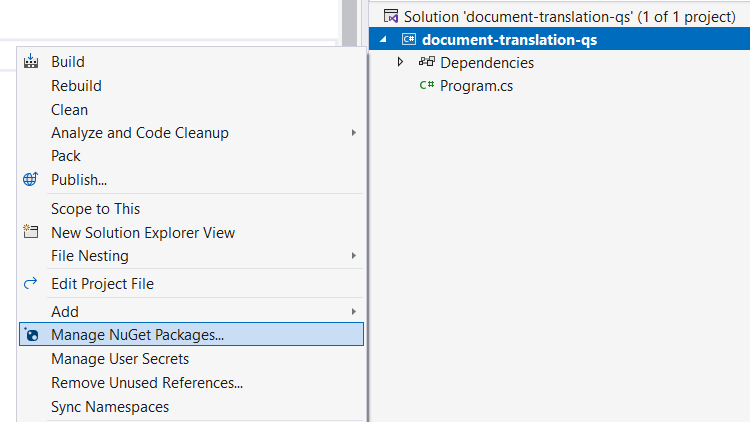
Select the Browse tab and type NewtonsoftJson.

Select the latest stable version from the dropdown menu and install the package in your project.

Translate all documents in a storage container
Note
- Starting with .NET 6, new projects using the
consoletemplate generate a new program style that differs from previous versions. - The new output uses recent C# features that simplify the code you need to write.
- When you use the newer version, you only need to write the body of the
Mainmethod. You don't need to include top-level statements, global using directives, or implicit using directives. - For more information, see New C# templates generate top-level statements.
Open the Program.cs file.
Delete the pre-existing code, including the line
Console.Writeline("Hello World!").Copy and paste the document translation code sample into the Program.cs file.
Update
{your-document-translation-endpoint}and{your-key}with values from your Azure portal Translator instance.Update
{your-source-container-SAS-URL}and{your-target-container-SAS-URL}with values from your Azure portal Storage account containers instance.
Code sample
Important
Remember to remove the key from your code when you're done, and never post it publicly. For production, use a secure way of storing and accessing your credentials like Azure Key Vault. For more information, see Cognitive Services security.
using System.Text;

class Program
{
    private static readonly string endpoint = "{your-document-translator-endpoint}/translator/text/batch/v1.0";

    private static readonly string key = "{your-key}";

    static readonly string route = "/batches";
    static readonly string sourceURL = "\" {your-source-container-SAS-URL}\"";
    static readonly string targetURL = " \"{your-target-container-SAS-URL}\"";


    static readonly string json = ("{\"inputs\": [{\"source\": {\"sourceUrl\":"+sourceURL+" ,\"storageSource\": \"AzureBlob\",\"language\": \"en\"}, \"targets\": [{\"targetUrl\":"+targetURL+",\"storageSource\": \"AzureBlob\",\"category\": \"general\",\"language\": \"es\"}]}]}");

    static async Task Main(string[] args)
    {
        using HttpClient client = new HttpClient();
        using HttpRequestMessage request = new HttpRequestMessage();
        {

            StringContent content = new StringContent(json, Encoding.UTF8, "application/json");

            request.Method = HttpMethod.Post;
            request.RequestUri = new Uri(endpoint + route);
            request.Headers.Add("Ocp-Apim-Subscription-Key", key);
            request.Content = content;

            HttpResponseMessage response = await client.SendAsync(request);
            string result = response.Content.ReadAsStringAsync().Result;
            if (response.IsSuccessStatusCode)
            {
                Console.WriteLine($"Status code: {response.StatusCode}");
                Console.WriteLine();
                Console.WriteLine($"Response Headers:");
                Console.WriteLine(response.Headers);
            }
            else
                Console.Write("Error");

        }

    }

}
Run your application
Once you've added a code sample to your application, choose the green Start button next to document-translation-qs to build and run your program, or press F5.
:::image type="content" source="../../media/visual-studio/run-visual-studio.png" alt-text="Screenshot: run your Visual Studio program.":::
Upon successful completion:
- The translated documents can be found in your target container.
- The successful POST method returns a
202 Acceptedresponse code indicating that the service created the batch request. - The POST request also returns response headers including
Operation-Locationthat provides a value used in subsequent GET requests.
Set up your Go environment
You can use any text editor to write Go applications. We recommend using the latest version of Visual Studio Code and the Go extension.
Tip
If you're new to Go, try the Get started with Go Learn module.
If you haven't already done so, download and install Go.
Download the Go version for your operating system.
Once the download is complete, run the installer.
Open a command prompt and enter the following to confirm Go was installed:
 ```console
   go version
 ```
Translate all documents in a storage container
In a console window (such as cmd, PowerShell, or Bash), create a new directory for your app called document-translation-qs, and navigate to it.
Create a new Go file named document-translation.go in the document-translation-qs directory.
Copy and paste the document translation code sample into your document-translation.go file.
Update
{your-document-translation-endpoint}and{your-key}with values from your Azure portal Translator instance.Update the
{your-source-container-SAS-URL}and{your-target-container-SAS-URL}with values from your Azure portal Storage account containers instance.
Code sample
Important
Remember to remove the key from your code when you're done, and never post it publicly. For production, use a secure way of storing and accessing your credentials like Azure Key Vault. For more information, see Cognitive Services security.
package main

import (
    "bytes"
  "encoding/json"
    "fmt"
    "net/http"
)

func main() {

    httpposturl := "{your-document-translation-endpoint}/translator/text/batch/v1.0/batches"
    fmt.Println("Response", httpposturl)

    var jsonData = []byte(`{
    "inputs": [
        {
            "source": {
                "sourceUrl": "{your-source-container-SAS-URL}"
            },
            "targets": [
                {
                    "{your-target-container-SAS-URL}",
                    "language": "fr"
                }
            ]
        }
    ]
}`)

    request, error := http.NewRequest("POST", httpposturl, bytes.NewBuffer(jsonData))
    request.Header.Set("Content-Type", "application/json")
    request.Header.Set("Ocp-Apim-Subscription-Key", "{your-key}")

    client := &http.Client{}
    response, error := client.Do(request)
    if error != nil {
        panic(error)
    }
    defer response.Body.Close()

    fmt.Println("response Status:", response.Status)
    var printHeader = (response.Header)
    prettyJSON, _ := json.MarshalIndent(printHeader, "", "  ")
    fmt.Printf("%s\n", prettyJSON)
}
Run your Go application
Once you've added a code sample to your application, your Go program can be executed in a command or terminal prompt. Make sure your prompt's path is set to the document-translation-qs folder and use the following command:
```console
 go run document-translation.go
```
Upon successful completion:
- The translated documents can be found in your target container.
- The successful POST method returns a
202 Acceptedresponse code indicating that the service created the batch request. - The POST request also returns response headers including
Operation-Locationthat provides a value used in subsequent GET requests.
Set up your Java environment
For this quickstart, we use the Gradle build automation tool to create and run the application.
You should have the latest version of Visual Studio Code or your preferred IDE. See Java in Visual Studio Code.
Tip
- Visual Studio Code offers a Coding Pack for Java for Windows and macOS.The coding pack is a bundle of VS Code, the Java Development Kit (JDK), and a collection of suggested extensions by Microsoft. The Coding Pack can also be used to fix an existing development environment.
- If you are using VS Code and the Coding Pack For Java, install the Gradle for Java extension.
If you aren't using Visual Studio Code, make sure you have the following installed in your development environment:
A Java Development Kit (OpenJDK) version 8 or later.
Gradle, version 6.8 or later.
Create a new Gradle project
In console window (such as cmd, PowerShell, or Bash), create a new directory for your app called document-translation, and navigate to it.
mkdir document-translation && document-translationmkdir document-translation; cd document-translationRun the
gradle initcommand from the document-translation directory. This command creates essential build files for Gradle, including build.gradle.kts, which is used at runtime to create and configure your application.gradle init --type basicWhen prompted to choose a DSL, select Kotlin.
Accept the default project name (document-translation) by selecting Return or Enter.
Note
It may take a few minutes for the entire application to be created, but soon you should see several folders and files including
build-gradle.kts.Update
build.gradle.ktswith the following code:
plugins {
  java
  application
}
application {
  mainClass.set("DocumentTranslation")
}
repositories {
  mavenCentral()
}
dependencies {
  implementation("com.squareup.okhttp3:okhttp:4.10.0")
  implementation("com.google.code.gson:gson:2.9.0")
}
Translate all documents in a storage container
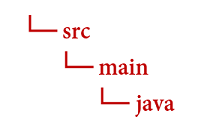
From the document-translation directory, run the following command:
mkdir -p src/main/javaThe command creates the following directory structure:
Navigate to the
javadirectory and create a file namedDocumentTranslation.java.Tip
You can create a new file using PowerShell.
Open a PowerShell window in your project directory by holding down the Shift key and right-clicking the folder.
Enter the following command New-Item DocumentTranslation.java.
You can also create a new file in your IDE named
DocumentTranslation.javaand save it to thejavadirectory.
Copy and paste the document translation code sample into your DocumentTranslation.java file.
Update
{your-document-translation-endpoint}and{your-key}with values from your Azure portal Translator instance.Update the
{your-source-container-SAS-URL}and{your-target-container-SAS-URL}with values from your Azure portal Storage account containers instance.
Code sample
Important
Remember to remove the key from your code when you're done, and never post it publicly. For production, use a secure way of storing and accessing your credentials like Azure Key Vault. For more information, see Cognitive Services security.
import java.io.*;
import java.net.*;
import java.util.*;
import okhttp3.*;

public class DocumentTranslation {
    String key = "{your-key}";

    String endpoint = "{your-document-translation-endpoint}/translator/text/batch/v1.0";

    String path = endpoint + "/batches";

    String sourceSASUrl = "{your-source-container-SAS-URL}";

    String targetSASUrl = "{your-target-container-SAS-URL}";

    String jsonInputString = (String.format("{\"inputs\":[{\"source\":{\"sourceUrl\":\"%s\"},\"targets\":[{\"targetUrl\":\"%s\",\"language\":\"fr\"}]}]}", sourceSASUrl, targetSASUrl));

    OkHttpClient client = new OkHttpClient();

    public void post() throws IOException {
        MediaType mediaType = MediaType.parse("application/json");
        RequestBody body = RequestBody.create(mediaType,  jsonInputString);
        Request request = new Request.Builder()
                .url(path).post(body)
                .addHeader("Ocp-Apim-Subscription-Key", key)
                .addHeader("Content-type", "application/json")
                .build();
        Response response = client.newCall(request).execute();
        System.out.println(response.code());
        System.out.println(response.headers());
    }

  public static void main(String[] args) {
        try {
            DocumentTranslation sampleRequest = new DocumentTranslation();
            sampleRequest.post();
        } catch (Exception e) {
            System.out.println(e);
        }
    }
}
Build and run your Java application
Once you've added a code sample to your application, navigate back to your main project directory, document-translation, open a console window, and enter the following commands:
Build your application with the
buildcommand:gradle buildRun your application with the
runcommand:gradle run
Upon successful completion:
- The translated documents can be found in your target container.
- The successful POST method returns a
202 Acceptedresponse code indicating that the service created the batch request. - The POST request also returns response headers including
Operation-Locationthat provides a value used in subsequent GET requests.
Set up your Node.js environment
For this quickstart, we use the Node.js JavaScript runtime environment to create and run the application.
If you haven't done so already, install the latest version of Node.js. Node Package Manager (npm) is included with the Node.js installation.
Tip
If you're new to Node.js, try the Introduction to Node.js Learn module.
In a console window (such as cmd, PowerShell, or Bash), create and navigate to a new directory for your app named
document-translation.mkdir document-translation && cd document-translationmkdir document-translation; cd document-translationRun the npm init command to initialize the application and scaffold your project.
npm initSpecify your project's attributes by accepting the prompts presented in the terminal.
- The most important attributes are name, version number, and entry point.
- We recommend keeping
index.jsfor the entry point name. The description, test command, GitHub repository, keywords, author, and license information are optional attributes—they can be skipped for this project. - Accept the suggestions in parentheses by selecting Return or Enter.
- After you've completed the prompts, a
package.jsonfile will be created in your document-translation directory.
Use npm to install the
axiosHTTP library anduuidpackage in your document-translation app directory:npm install axios uuid
Translate all documents in a storage container
Create the
index.jsfile in the app directory.Tip
You can create a new file using PowerShell.
Open a PowerShell window in your project directory by holding down the Shift key and right-clicking the folder.
Enter the following command New-Item index.js.
You can also create a new file named
index.jsin your IDE and save it to thedocument-translationdirectory.
Copy and paste the document translation code sample into your
index.jsfile.Update
{your-document-translation-endpoint}and{your-key}with values from your Azure portal Translator instance.Update the
{your-source-container-SAS-URL}and{your-target-container-SAS-URL}with values from your Azure portal Storage account containers instance.
Code sample
Important
Remember to remove the key from your code when you're done, and never post it publicly. For production, use a secure way of storing and accessing your credentials like Azure Key Vault. For more information, see Cognitive Services security.
const axios = require('axios').default;

let endpoint = '{your-document-translation-endpoint}/translator/text/batch/v1.0';
let route = '/batches';
let key = '{your-key}';
let sourceSASUrl = "{your-source-container-SAS-URL}";
let targetSASUrl = "{your-target-container-SAS-URL}"

let data = JSON.stringify({"inputs": [
  {
      "source": {
          "sourceUrl": sourceSASUrl,
          "storageSource": "AzureBlob",
          "language": "en"
      },
      "targets": [
          {
              "targetUrl": targetSASUrl,
              "storageSource": "AzureBlob",
              "category": "general",
              "language": "es"}]}]});

let config = {
  method: 'post',
  baseURL: endpoint,
  url: route,
  headers: {
    'Ocp-Apim-Subscription-Key': key,
    'Content-Type': 'application/json'
  },
  data: data
};

axios(config)
.then(function (response) {
  let result = { statusText: response.statusText, statusCode: response.status, headers: response.headers };
  console.log()
  console.log(JSON.stringify(result, null, 2));
})
.catch(function (error) {
  console.log(error);
});
Run your JavaScript application
Once you've added the code sample to your application, run your program:
Navigate to your application directory (document-translation).
Enter and run the following command in your terminal:
node index.js
Upon successful completion:
- The translated documents can be found in your target container.
- The successful POST method returns a
202 Acceptedresponse code indicating that the service created the batch request. - The POST request also returns response headers including
Operation-Locationthat provides a value used in subsequent GET requests.
Set up your Python project
If you haven't done so already, install the latest version of Python 3.x. The Python installer package (pip) is included with the Python installation.
Tip
If you're new to Python, try the Introduction to Python Learn module.
Open a terminal window and use pip to install the Requests library and uuid0 package:
pip install requests uuid
Translate all documents in a storage container
Using your preferred editor or IDE, create a new directory for your app named
document-translation.Create a new Python file called document-translation.py in your document-translation directory.
Copy and paste the document translation code sample into your
document-translation.pyfile.Update
{your-document-translation-endpoint}and{your-key}with values from your Azure portal Translator instance.Update the
{your-source-container-SAS-URL}and{your-target-container-SAS-URL}with values from your Azure portal Storage account containers instance.
Code sample
Important
Remember to remove the key from your code when you're done, and never post it publicly. For production, use a secure way of storing and accessing your credentials like Azure Key Vault. For more information, see Cognitive Services security.
import requests

endpoint = '{your-document-translation-endpoint}'
key =  '{your-key}'
path = 'translator/text/batch/v1.0/batches'
constructed_url = endpoint + path

sourceSASUrl = '{your-source-container-SAS-URL}'

targetSASUrl = '{your-target-container-SAS-URL}'

body= {
    "inputs": [
        {
            "source": {
                "sourceUrl": sourceSASUrl,
                "storageSource": "AzureBlob",
                "language": "en"
            },
            "targets": [
                {
                    "targetUrl": targetSASUrl,
                    "storageSource": "AzureBlob",
                    "category": "general",
                    "language": "es"
                }
            ]
        }
    ]
}
headers = {
  'Ocp-Apim-Subscription-Key': key,
  'Content-Type': 'application/json',
}

response = requests.post(constructed_url, headers=headers, json=body)
response_headers = response.headers

print(f'response status code: {response.status_code}\nresponse status: {response.reason}\n\nresponse headers:\n')

for key, value in response_headers.items():
    print(key, ":", value)
Run your Python application
Once you've added a code sample to your application, build and run your program:
Navigate to your document-translation directory.
Enter and run the following command in your console:
python document-translation.py
Upon successful completion:
- The translated documents can be found in your target container.
- The successful POST method returns a
202 Acceptedresponse code indicating that the service created the batch request. - The POST request also returns response headers including
Operation-Locationthat provides a value used in subsequent GET requests.
Set up your programming environment
In this quickstart, we use the cURL command line tool to make Document Translation REST API calls.
Note
The cURL package is pre-installed on most Windows 10 and Windows 11 and most macOS and Linux distributions. You can check the package version with the following commands:
Windows: curl.exe -V.
macOS curl -V
Linux: curl --version
If you don't have cURL installed, here are links for your platform:
Translate documents (POST Request)
Using your preferred editor or IDE, create a new directory for your app named
document-translation.Create a new json file called document-translation.json in your document-translation directory.
Copy and paste the document translation request sample into your
document-translation.jsonfile. Replace{your-source-container-SAS-URL}and{your-target-container-SAS-URL}with values from your Azure portal Storage account containers instance.**Request sample**{ "inputs":[ { "source":{ "sourceUrl":"{your-source-container-SAS-URL}" }, "targets":[ { "targetUrl":"{your-target-container-SAS-URL}", "language":"fr" } ] } ] }
Build and run the POST request
Before you run the POST request, replace {your-source-container-SAS-URL} and {your-key} with the endpoint value from your Azure portal Translator instance.
Important
Remember to remove the key from your code when you're done, and never post it publicly. For production, use a secure way of storing and accessing your credentials like Azure Key Vault. For more information, see Cognitive Services security.
PowerShell
cmd /c curl "{your-document-translator-endpoint}/translator/text/batch/v1.0/batches" -i -X POST --header "Content-Type: application/json" --header "Ocp-Apim-Subscription-Key: {your-key}" --data "@document-translation.json"
command prompt / terminal
curl "{your-document-translator-endpoint}/translator/text/batch/v1.0/batches" -i -X POST --header "Content-Type: application/json" --header "Ocp-Apim-Subscription-Key: {your-key}" --data "@document-translation.json"
Upon successful completion:
- The translated documents can be found in your target container.
- The successful POST method returns a
202 Acceptedresponse code indicating that the service created the batch request. - The POST request also returns response headers including
Operation-Locationthat provides a value used in subsequent GET requests.
That's it, congratulations! In this quickstart, you used Document Translation to translate a document while preserving it's original structure and data format.
Next steps
Learn more about Document Translation: