Try the latest version of Azure AI Translator. In this quickstart, get started using the Translator service to translate text using a programming language of your choice or the REST API. For this project, we recommend using the free pricing tier (F0), while you're learning the technology, and later upgrading to a paid tier for production.
You need an active Azure subscription. If you don't have an Azure subscription, you can create one for trial
The core operation of the Translator service is translating text. In this quickstart, you build a request using a programming language of your choice that takes a single source (from) and provides two outputs (to). Then we review some parameters that can be used to adjust both the request and the response.
Set up your Visual Studio project
Make sure you have the current version of Visual Studio IDE.
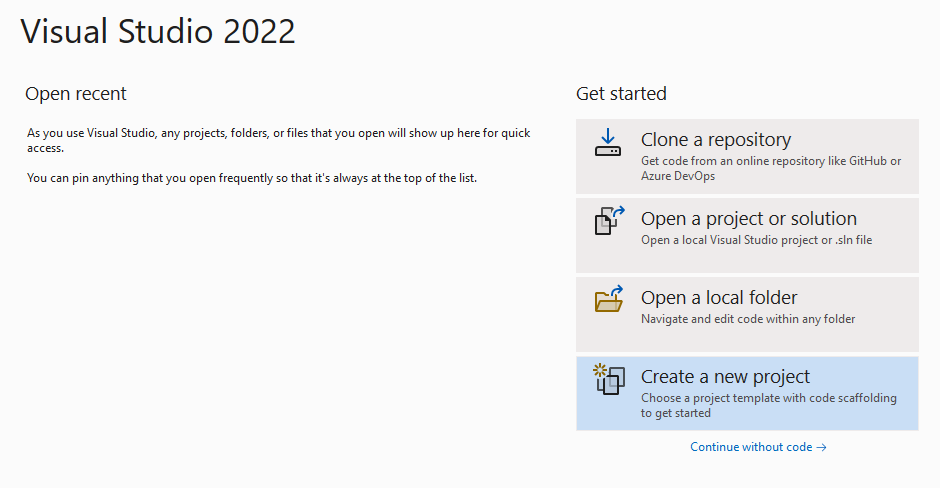
Open Visual Studio.
On the Start page, choose Create a new project.
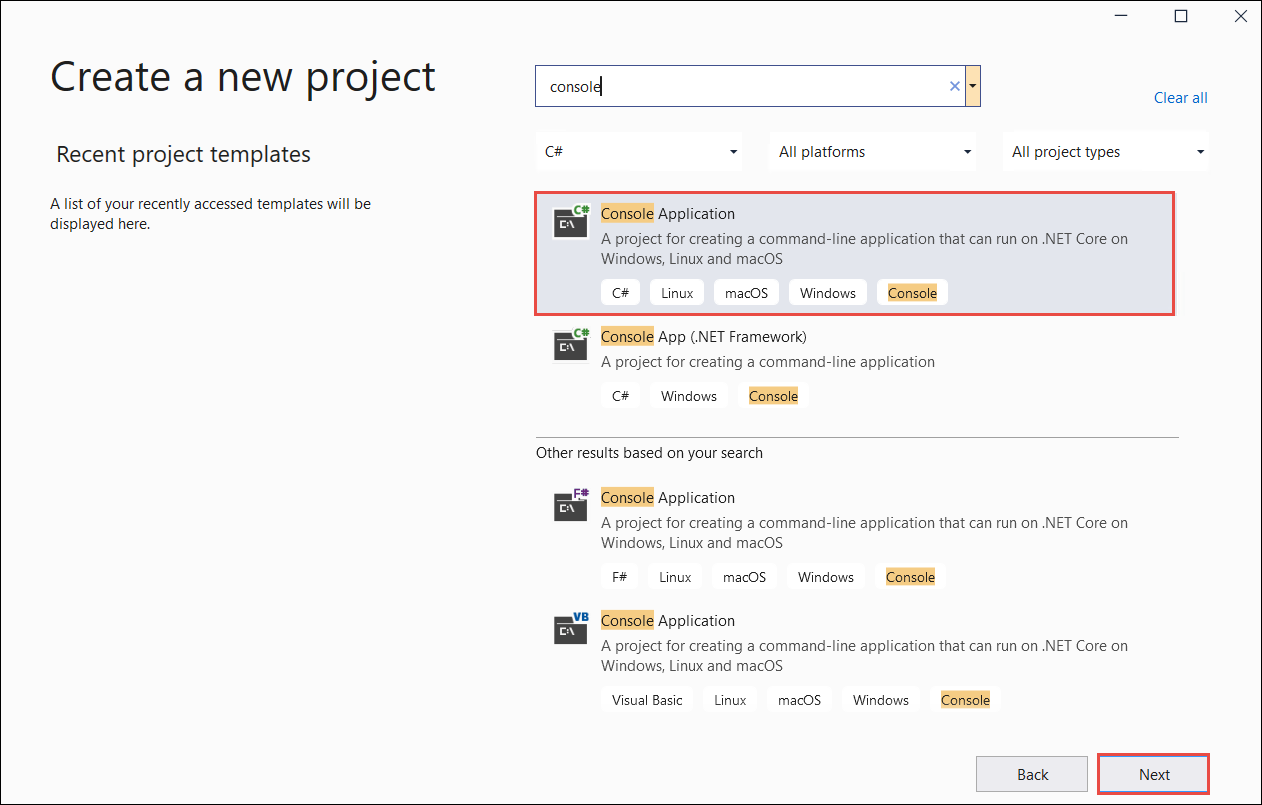
On the Create a new project page, enter console in the search box. Choose the Console Application template, then choose Next.
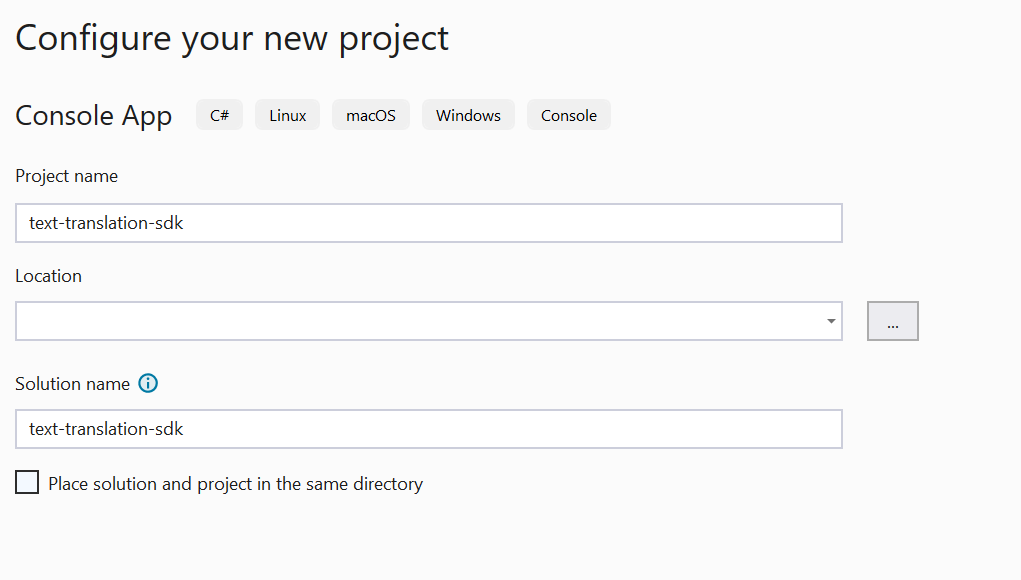
In the Configure your new project dialog window, enter translator_quickstart in the Project name box. Leave the "Place solution and project in the same directory" checkbox unchecked and select Next.
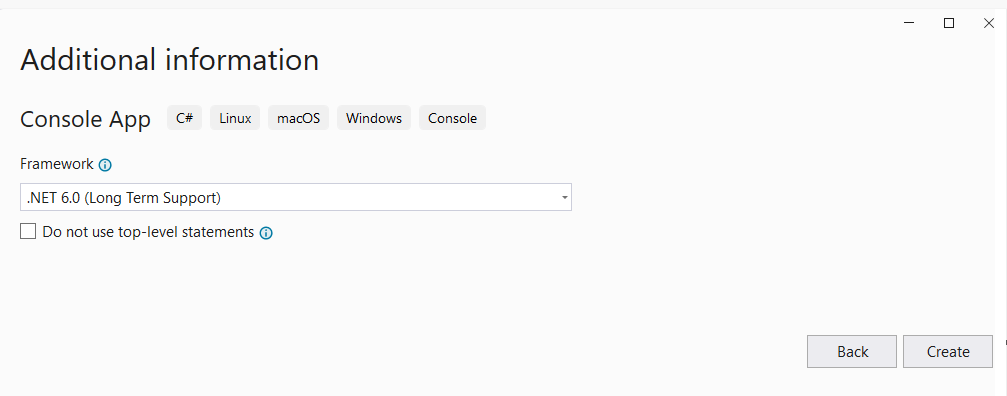
In the Additional information dialog window, make sure .NET 6.0 (Long-term support) is selected. Leave the "Don't use top-level statements" checkbox unchecked and select Create.
Install the Newtonsoft.json package with NuGet
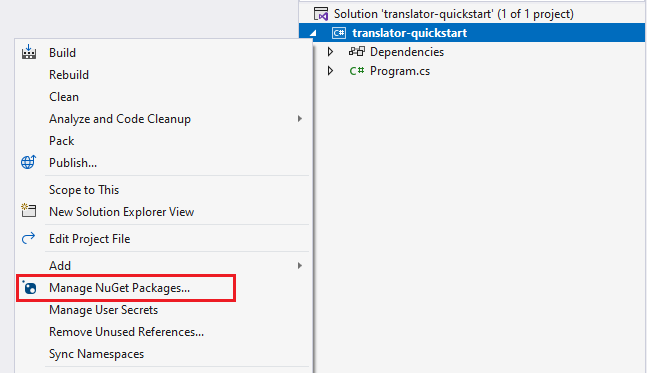
Right-click on your translator_quickstart project and select Manage NuGet Packages... .
Select the Browse tab and type Newtonsoft.json.
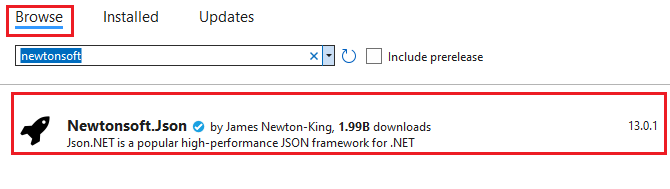
To add the package to your project, select install from the right package manager window.

Build your C# application
Note
- Starting with .NET 6, new projects using the
console template generate a new program style that differs from previous versions.
- The new output uses recent C# features that simplify the code you need to write.
- When you use the newer version, you only need to write the body of the
Main method. You don't need to include top-level statements, global using directives, or implicit using directives.
- For more information, see New C# templates generate top-level statements.
Open the Program.cs file.
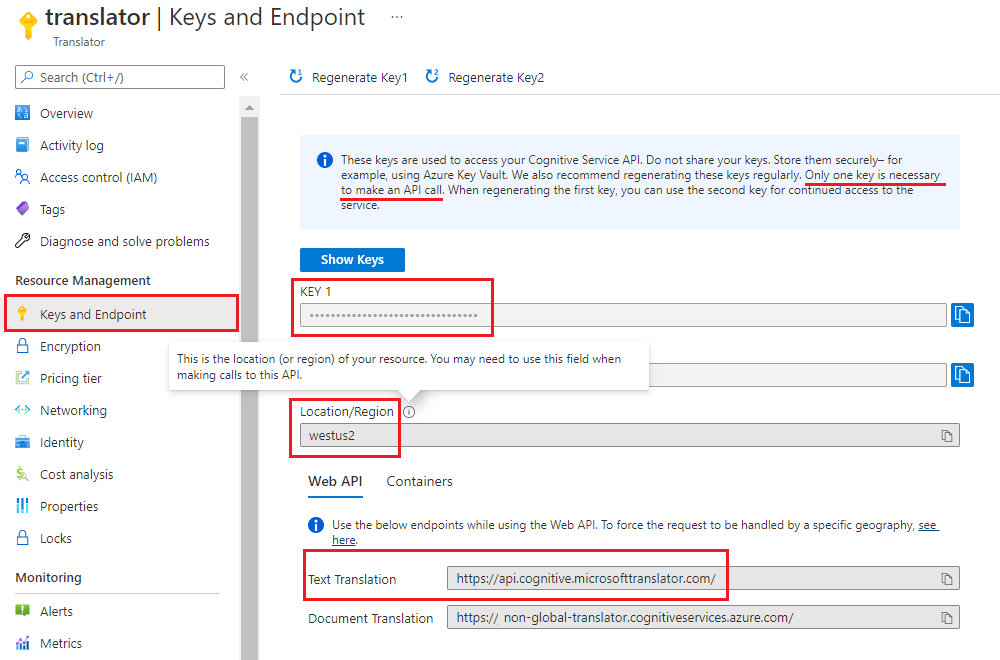
Delete the existing code, including the line Console.WriteLine("Hello World!"). Copy and paste the code sample into your application's Program.cs file. Make sure you update the key variable with the value from your Azure portal Translator instance:
using System.Text;
using Newtonsoft.Json;

class Program
{
    private static readonly string key = "<your-translator-key>";
    private static readonly string endpoint = "https://api.translator.azure.cn";

    // location, also known as region.
    // required if you're using a multi-service or regional (not global) resource. It can be found in the Azure portal on the Keys and Endpoint page.
    private static readonly string location = "<YOUR-RESOURCE-LOCATION>";

    static async Task Main(string[] args)
    {
        // Input and output languages are defined as parameters.
        string route = "/translate?api-version=3.0&from=en&to=fr&to=zu";
        string textToTranslate = "I would really like to drive your car around the block a few times!";
        object[] body = new object[] { new { Text = textToTranslate } };
        var requestBody = JsonConvert.SerializeObject(body);

        using (var client = new HttpClient())
        using (var request = new HttpRequestMessage())
        {
            // Build the request.
            request.Method = HttpMethod.Post;
            request.RequestUri = new Uri(endpoint + route);
            request.Content = new StringContent(requestBody, Encoding.UTF8, "application/json");
            request.Headers.Add("Ocp-Apim-Subscription-Key", key);
            // location required if you're using a multi-service or regional (not global) resource.
            request.Headers.Add("Ocp-Apim-Subscription-Region", location);

            // Send the request and get response.
            HttpResponseMessage response = await client.SendAsync(request).ConfigureAwait(false);
            // Read response as a string.
            string result = await response.Content.ReadAsStringAsync();
            Console.WriteLine(result);
        }
    }
}
Once you add a code sample to your application, choose the green start button next to formRecognizer_quickstart to build and run your program, or press F5.

Translation output:
After a successful call, you should see the following response:
[
    {
        "detectedLanguage": {
            "language": "en",
            "score": 1.0
        },
        "translations": [
            {
                "text": "J'aimerais vraiment conduire votre voiture autour du pâté de maisons plusieurs fois!",
                "to": "fr"
            },
            {
                "text": "Ngingathanda ngempela ukushayela imoto yakho endaweni evimbelayo izikhathi ezimbalwa!",
                "to": "zu"
            }
        ]
    }
]
Set up your Go environment
You can use any text editor to write Go applications. We recommend using the latest version of Visual Studio Code and Go extension.
Make sure the latest version of Go is installed:
Download the Go programming language version for your operating system.
Once the download is complete, run the installer.
Open a command prompt and enter the following to confirm Go was installed:
go version
Build your Go application
In a console window (such as cmd, PowerShell, or Bash), create a new directory for your app called translator-app, and navigate to it.
Create a new GO file named translation.go from the translator-app directory.
Copy and paste the provided code sample into your translation.go file. Make sure you update the key variable with the value from your Azure portal Translator instance:
package main

import (
    "bytes"
    "encoding/json"
    "fmt"
    "log"
    "net/http"
    "net/url"
)

func main() {
    key := "<YOUR-TRANSLATOR-KEY>"
    endpoint := "https://api.translator.azure.cn/"
    uri := endpoint + "/translate?api-version=3.0"

    // location, also known as region.
    // required if you're using a multi-service or regional (not global) resource. It can be found in the Azure portal on the Keys and Endpoint page.
    location := "<YOUR-RESOURCE-LOCATION>"

    // Build the request URL. See: https://go.dev/pkg/net/url/#example_URL_Parse
    u, _ := url.Parse(uri)
    q := u.Query()
    q.Add("from", "en")
    q.Add("to", "fr")
    q.Add("to", "zu")
    u.RawQuery = q.Encode()

    // Create an anonymous struct for your request body and encode it to JSON
    body := []struct {
        Text string
    }{
        {Text: "I would really like to drive your car around the block a few times."},
    }
    b, _ := json.Marshal(body)

    // Build the HTTP POST request
    req, err := http.NewRequest("POST", u.String(), bytes.NewBuffer(b))
    if err != nil {
        log.Fatal(err)
    }
    // Add required headers to the request
    req.Header.Add("Ocp-Apim-Subscription-Key", key)
    // location required if you're using a multi-service or regional (not global) resource.
    req.Header.Add("Ocp-Apim-Subscription-Region", location)
    req.Header.Add("Content-Type", "application/json")

    // Call the Translator API
    res, err := http.DefaultClient.Do(req)
    if err != nil {
        log.Fatal(err)
    }

    // Decode the JSON response
    var result interface{}
    if err := json.NewDecoder(res.Body).Decode(&result); err != nil {
        log.Fatal(err)
    }
    // Format and print the response to terminal
    prettyJSON, _ := json.MarshalIndent(result, "", "  ")
    fmt.Printf("%s\n", prettyJSON)
}
Once you add a code sample to your application, your Go program can be executed in a command or terminal prompt. Make sure your prompt's path is set to the translator-app folder and use the following command:
go run translation.go
Translation output:
After a successful call, you should see the following response:
[
    {
        "detectedLanguage": {
            "language": "en",
            "score": 1.0
        },
        "translations": [
            {
                "text": "J'aimerais vraiment conduire votre voiture autour du pâté de maisons plusieurs fois!",
                "to": "fr"
            },
            {
                "text": "Ngingathanda ngempela ukushayela imoto yakho endaweni evimbelayo izikhathi ezimbalwa!",
                "to": "zu"
            }
        ]
    }
]
Set up your Java environment
You should have the latest version of Visual Studio Code or your preferred IDE. See Java in Visual Studio Code.
Tip
- Visual Studio Code offers a Coding Pack for Java for Windows and macOS.The coding pack is a bundle of VS Code, the Java Development Kit (JDK), and a collection of suggested extensions by Microsoft. The Coding Pack can also be used to fix an existing development environment.
- If you are using VS Code and the Coding Pack For Java, install the Gradle for Java extension.
If you aren't using Visual Studio Code, make sure you have the following installed in your development environment:
Create a new Gradle project
In console window (such as cmd, PowerShell, or Bash), create a new directory for your app called translator-text-app, and navigate to it.
mkdir translator-text-app && translator-text-app
mkdir translator-text-app; cd translator-text-app
Run the gradle init command from the translator-text-app directory. This command creates essential build files for Gradle, including build.gradle.kts, which is used at runtime to create and configure your application.
gradle init --type basic
When prompted to choose a DSL, select Kotlin.
Accept the default project name (translator-text-app) by selecting Return or Enter.
Update build.gradle.kts with the following code:
plugins {
  java
  application
}
application {
  mainClass.set("TranslatorText")
}
repositories {
  mavenCentral()
}
dependencies {
  implementation("com.squareup.okhttp3:okhttp:4.10.0")
  implementation("com.google.code.gson:gson:2.9.0")
}
Create your Java Application
From the translator-text-app directory, run the following command:
mkdir -p src/main/java
You create the following directory structure:
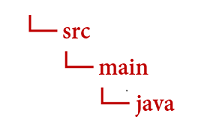
Navigate to the java directory and create a file named TranslatorText.java.
Tip
You can create a new file using PowerShell.
Open a PowerShell window in your project directory by holding down the Shift key and right-clicking the folder.
Type the following command New-Item TranslatorText.java.
You can also create a new file in your IDE named TranslatorText.java and save it to the java directory.
Open the TranslatorText.java file in your IDE and copy then paste the following code sample into your application. Make sure you update the key with one of the key values from your Azure portal Translator instance:
import java.io.IOException;

import com.google.gson.*;
import okhttp3.MediaType;
import okhttp3.OkHttpClient;
import okhttp3.Request;
import okhttp3.RequestBody;
import okhttp3.Response;

public class TranslatorText {
    private static String key = "<your-translator-key";

    // location, also known as region.
   // required if you're using a multi-service or regional (not global) resource. It can be found in the Azure portal on the Keys and Endpoint page.
    private static String location = "<YOUR-RESOURCE-LOCATION>";


    // Instantiates the OkHttpClient.
    OkHttpClient client = new OkHttpClient();

    // This function performs a POST request.
    public String Post() throws IOException {
        MediaType mediaType = MediaType.parse("application/json");
        RequestBody body = RequestBody.create(mediaType,
                "[{\"Text\": \"I would really like to drive your car around the block a few times!\"}]");
        Request request = new Request.Builder()
                .url("https://api.translator.azure.cn/translate?api-version=3.0&from=en&to=fr&to=zu")
                .post(body)
                .addHeader("Ocp-Apim-Subscription-Key", key)
                // location required if you're using a multi-service or regional (not global) resource.
                .addHeader("Ocp-Apim-Subscription-Region", location)
                .addHeader("Content-type", "application/json")
                .build();
        Response response = client.newCall(request).execute();
        return response.body().string();
    }

    // This function prettifies the json response.
    public static String prettify(String json_text) {
        JsonParser parser = new JsonParser();
        JsonElement json = parser.parse(json_text);
        Gson gson = new GsonBuilder().setPrettyPrinting().create();
        return gson.toJson(json);
    }

    public static void main(String[] args) {
        try {
            TranslatorText translateRequest = new TranslatorText();
            String response = translateRequest.Post();
            System.out.println(prettify(response));
        } catch (Exception e) {
            System.out.println(e);
        }
    }
}
Build and run your Java application
Once you add a code sample to your application, navigate back to your main project directory—translator-text-app, open a console window, and enter the following commands:
Build your application with the build command:
gradle build
Run your application with the run command:
gradle run
Translation output:
After a successful call, you should see the following response:
[
  {
    "translations": [
      {
        "text": "J'aimerais vraiment conduire votre voiture autour du pâté de maisons plusieurs fois!",
        "to": "fr"
      },
      {
        "text": "Ngingathanda ngempela ukushayela imoto yakho endaweni evimbelayo izikhathi ezimbalwa!",
        "to": "zu"
      }
    ]
  }
]
Set up your Node.js Express project
Make sure the latest version of Node.js is installed. Node Package Manager (npm) is included with the Node.js installation.
In a console window (such as cmd, PowerShell, or Bash), create and navigate to a new directory for your app named translator-app.
mkdir translator-app && cd translator-app
mkdir translator-app; cd translator-app
Run the npm init command to initialize the application and scaffold your project.
npm init
Specify your project's attributes using the prompts presented in the terminal.
- The most important attributes are name, version number, and entry point.
- We recommend keeping
index.js for the entry point name. The description, test command, GitHub repository, keywords, author, and license information are optional attributes—they can be skipped for this project.
- Accept the suggestions in parentheses by selecting Return or Enter.
- After you complete the prompts, a
package.json file will be created in your translator-app directory.
Open a console window and use npm to install the axios HTTP library and uuid package:
npm install axios uuid
Create the index.js file in the application directory.
Tip
You can create a new file using PowerShell.
Open a PowerShell window in your project directory by holding down the Shift key and right-clicking the folder.
Type the following command New-Item index.js.
You can also create a new file named index.js in your IDE and save it to the translator-app directory.
Build your JavaScript application
Add the following code sample to your index.js file. Make sure you update the key variable with the value from your Azure portal Translator instance:
    const axios = require('axios').default;
    const { v4: uuidv4 } = require('uuid');

    let key = "<your-translator-key>";
    let endpoint = "https://api.translator.azure.cn";

    // location, also known as region.
    // required if you're using a multi-service or regional (not global) resource. It can be found in the Azure portal on the Keys and Endpoint page.
    let location = "<YOUR-RESOURCE-LOCATION>";

    axios({
        baseURL: endpoint,
        url: '/translate',
        method: 'post',
        headers: {
            'Ocp-Apim-Subscription-Key': key,
             // location required if you're using a multi-service or regional (not global) resource.
            'Ocp-Apim-Subscription-Region': location,
            'Content-type': 'application/json',
            'X-ClientTraceId': uuidv4().toString()
        },
        params: {
            'api-version': '3.0',
            'from': 'en',
            'to': 'fr,zu'
        },
        data: [{
            'text': 'I would really like to drive your car around the block a few times!'
        }],
        responseType: 'json'
    }).then(function(response){
        console.log(JSON.stringify(response.data, null, 4));
    })
Run your JavaScript application
Once you add the code sample to your application, run your program:
Navigate to your application directory (translator-app).
Type the following command in your terminal:
node index.js
Translation output:
After a successful call, you should see the following response:
[
    {
        "translations": [
            {
                "text": "J'aimerais vraiment conduire votre voiture autour du pâté de maisons plusieurs fois!",
                "to": "fr"
            },
            {
                "text": "Ngingathanda ngempela ukushayela imoto yakho endaweni evimbelayo izikhathi ezimbalwa!",
                "to": "zu"
            }
        ]
    }
]
Set up your Python project
Make sure the latest version of Python 3.x is installed. The Python installer package (pip) is included with the Python installation.
Open a terminal window and use pip to install the Requests library and uuid0 package:
pip install requests uuid
Note
We will also use a Python built-in package called json. It's used to work with JSON data.
Build your Python application
Create a new Python file called translator-app.py in your preferred editor or IDE.
Add the following code sample to your translator-app.py file. Make sure you update the key with one of the values from your Azure portal Translator instance.
import requests, uuid, json

# Add your key and endpoint
key = "<your-translator-key>"
endpoint = "https://api.translator.azure.cn"

# location, also known as region.
# required if you're using a multi-service or regional (not global) resource. It can be found in the Azure portal on the Keys and Endpoint page.
location = "<YOUR-RESOURCE-LOCATION>"

path = '/translate'
constructed_url = endpoint + path

params = {
    'api-version': '3.0',
    'from': 'en',
    'to': ['fr', 'zu']
}

headers = {
    'Ocp-Apim-Subscription-Key': key,
    # location required if you're using a multi-service or regional (not global) resource.
    'Ocp-Apim-Subscription-Region': location,
    'Content-type': 'application/json',
    'X-ClientTraceId': str(uuid.uuid4())
}

# You can pass more than one object in body.
body = [{
    'text': 'I would really like to drive your car around the block a few times!'
}]

request = requests.post(constructed_url, params=params, headers=headers, json=body)
response = request.json()

print(json.dumps(response, sort_keys=True, ensure_ascii=False, indent=4, separators=(',', ': ')))
Run your Python application
Once you add a code sample to your application, build and run your program:
Navigate to your translator-app.py file.
Type the following command in your console:
python translator-app.py
Translation output:
After a successful call, you should see the following response:
[
  {
    "translations": [
      {
        "text": "J'aimerais vraiment conduire votre voiture autour du pâté de maisons plusieurs fois!",
        "to": "fr"
      },
      {
        "text": "Ngingathanda ngempela ukushayela imoto yakho endaweni evimbelayo izikhathi ezimbalwa!",
        "to": "zu"
      }
    ]
  }
]
That's it, congratulations! You just learned to use the Translator service to translate text.
Explore our how-to documentation and take a deeper dive into Translation service capabilities: