Note
Access to this page requires authorization. You can try signing in or changing directories.
Access to this page requires authorization. You can try changing directories.
Azure Kubernetes Service (AKS) is a managed Kubernetes service that lets you quickly deploy and manage clusters. In this quickstart, you will:
- Deploy an AKS cluster using the Azure portal.
- Run a multi-container application with a web front-end and a Redis instance in the cluster.
- Monitor the health of the cluster and pods that run your application.
This quickstart assumes a basic understanding of Kubernetes concepts. For more information, see Kubernetes core concepts for Azure Kubernetes Service (AKS).
If you don't have an Azure subscription, create a trial subscription before you begin.
Prerequisites
Sign in to the Azure portal at https://portal.azure.cn.
Create an AKS cluster
On the Azure portal menu or from the Home page, select Create a resource.
Type Kubernetes Service in search filter of New page, then select Kubernetes Service item in search results and select the Create.
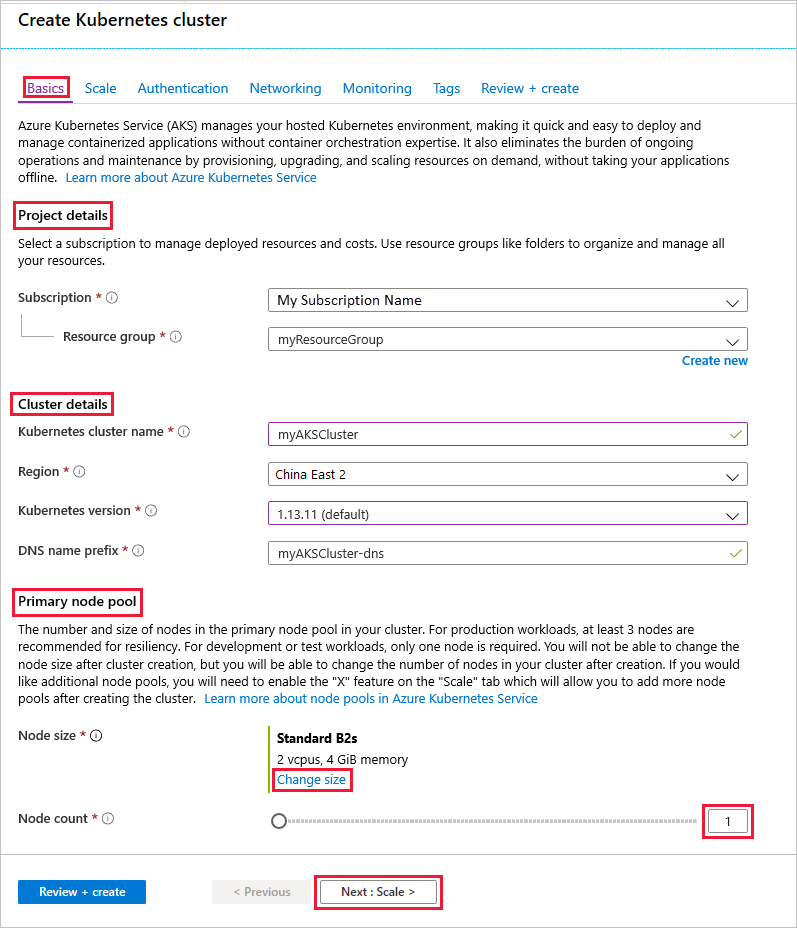
On the Basics page, configure the following options:
Project details:
- Select an Azure Subscription.
- Select or create an Azure Resource group, such as myResourceGroup.
Cluster details:
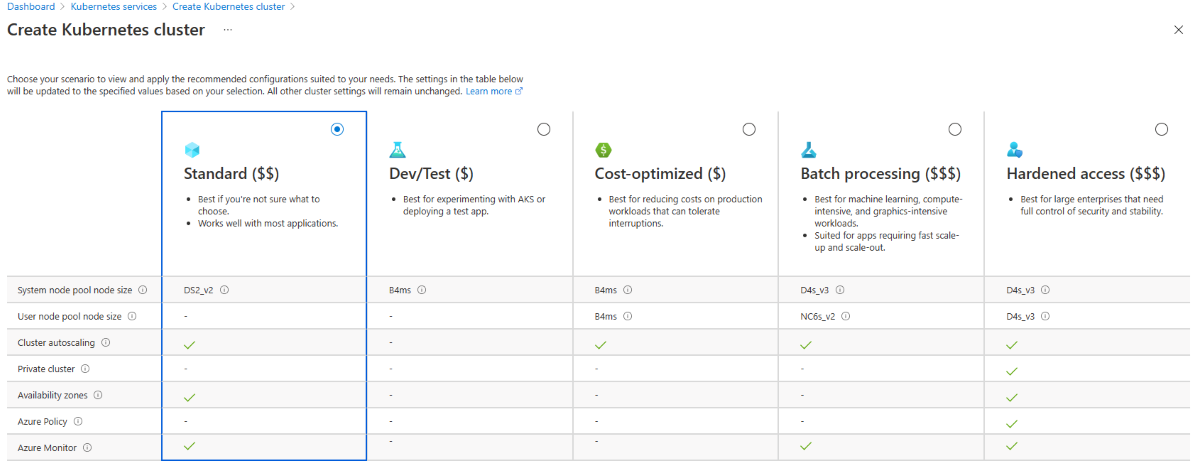
- Ensure the the Preset configuration is Standard ($$). For more details on preset configurations, see Cluster configuration presets in the Azure portal.
- Enter a Kubernetes cluster name, such as myAKSCluster.
- Select a Region and Kubernetes version for the AKS cluster.
Primary node pool:
- Leave the default values selected.
Note
You can change the preset configuration when creating your cluster by selecting View all preset configurations and choosing a different option.
Select Next: Node pools when complete.
Keep the default Node pools options. At the bottom of the screen, click Next: Authentication.
Caution
Newly created Azure AD service principals may take several minutes to propagate and become available, causing "service principal not found" errors and validation failures in Azure portal. If you hit this bump, please visit our troubleshooting article for mitigation.
On the Authentication page, configure the following options:
- Create a new cluster identity by either:
- Leaving the Authentication field with System-assigned managed identity, or
- Choosing Service Principal to use a service principal.
- Select (new) default service principal to create a default service principal, or
- Select Configure service principal to use an existing one. You will need to provide the existing principal's SPN client ID and secret.
- Enable the Kubernetes role-based access control (Kubernetes RBAC) option to provide more fine-grained control over access to the Kubernetes resources deployed in your AKS cluster.
By default, Basic networking is used, and Azure Monitor for containers is enabled.
- Create a new cluster identity by either:
Click Review + create and then Create when validation completes.
It takes a few minutes to create the AKS cluster. When your deployment is complete, navigate to your resource by either:
- Clicking Go to resource, or
- Browsing to the AKS cluster resource group and selecting the AKS resource.
Per example cluster dashboard below: browsing for myResourceGroup and selecting myAKSCluster resource.

Connect to the cluster
To manage a Kubernetes cluster, use the Kubernetes command-line client, kubectl.
In the local Shell, use an editor to create a file named
azure-vote.yaml, such as:code azure-vote.yamlnano azure-vote.yaml, orvi azure-vote.yaml.
Copy in the following YAML definition:
apiVersion: apps/v1
kind: Deployment
metadata:
  name: azure-vote-back
spec:
  replicas: 1
  selector:
    matchLabels:
      app: azure-vote-back
  template:
    metadata:
      labels:
        app: azure-vote-back
    spec:
      nodeSelector:
        "kubernetes.io/os": linux
      containers:
      - name: azure-vote-back
        image: mcr.azk8s.cn/oss/bitnami/redis:6.0.8
        env:
        - name: ALLOW_EMPTY_PASSWORD
          value: "yes"
        resources:
          requests:
            cpu: 100m
            memory: 128Mi
          limits:
            cpu: 250m
            memory: 256Mi
        ports:
        - containerPort: 6379
          name: redis
---
apiVersion: v1
kind: Service
metadata:
  name: azure-vote-back
spec:
  ports:
  - port: 6379
  selector:
    app: azure-vote-back
---
apiVersion: apps/v1
kind: Deployment
metadata:
  name: azure-vote-front
spec:
  replicas: 1
  selector:
    matchLabels:
      app: azure-vote-front
  template:
    metadata:
      labels:
        app: azure-vote-front
    spec:
      nodeSelector:
        "kubernetes.io/os": linux
      containers:
      - name: azure-vote-front
        image: mcr.azk8s.cn/azuredocs/azure-vote-front:v1
        resources:
          requests:
            cpu: 100m
            memory: 128Mi
          limits:
            cpu: 250m
            memory: 256Mi
        ports:
        - containerPort: 80
        env:
        - name: REDIS
          value: "azure-vote-back"
---
apiVersion: v1
kind: Service
metadata:
  name: azure-vote-front
spec:
  type: LoadBalancer
  ports:
  - port: 80
  selector:
    app: azure-vote-front
Deploy the application using the
kubectl applycommand and specify the name of your YAML manifest:kubectl apply -f azure-vote.yamlOutput shows the successfully created deployments and services:
deployment "azure-vote-back" created
service "azure-vote-back" created
deployment "azure-vote-front" created
service "azure-vote-front" created
Test the application
When the application runs, a Kubernetes service exposes the application front end to the internet. This process can take a few minutes to complete.
To monitor progress, use the kubectl get service command with the --watch argument.
kubectl get service azure-vote-front --watch
The EXTERNAL-IP output for the azure-vote-front service will initially show as pending.
NAME               TYPE           CLUSTER-IP   EXTERNAL-IP   PORT(S)        AGE
azure-vote-front   LoadBalancer   10.0.37.27   <pending>     80:30572/TCP   6s
Once the EXTERNAL-IP address changes from pending to an actual public IP address, use CTRL-C to stop the kubectl watch process. The following example output shows a valid public IP address assigned to the service:
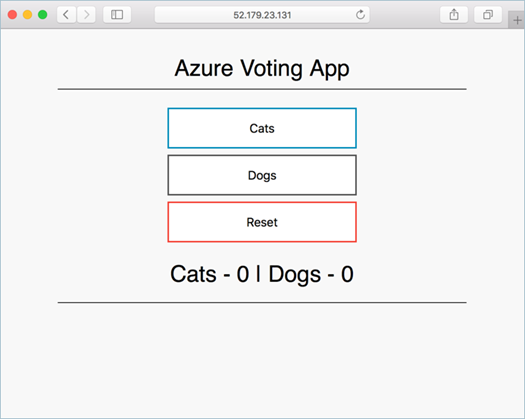
azure-vote-front LoadBalancer 10.0.37.27 52.179.23.131 80:30572/TCP 2m
To see the Azure Vote app in action, open a web browser to the external IP address of your service.
Monitor health and logs
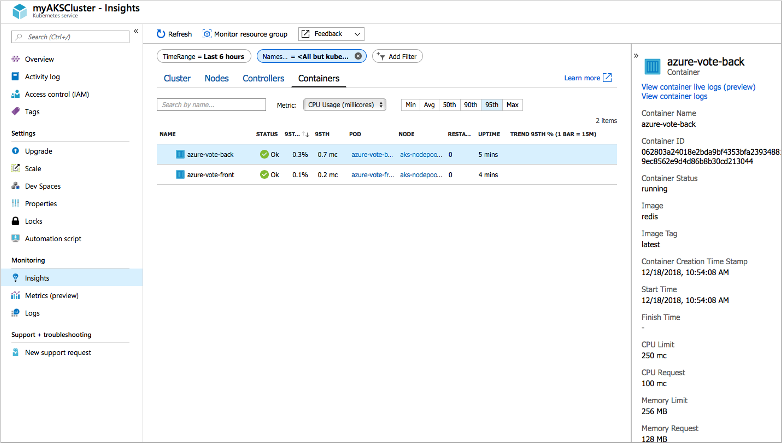
When you created the cluster, Azure Monitor for containers was enabled. Azure Monitor for containers provides health metrics for both the AKS cluster and pods running on the cluster.
Metric data takes a few minutes to populate in the Azure portal. To see current health status, uptime, and resource usage for the Azure Vote pods:
- Browse back to the AKS resource in the Azure portal.
- Under Monitoring on the left-hand side, choose Insights.
- Across the top, choose to + Add Filter.
- Select Namespace as the property, then choose <All but kube-system>.
- Select Containers to view them.
The azure-vote-back and azure-vote-front containers will display, as shown in the following example:
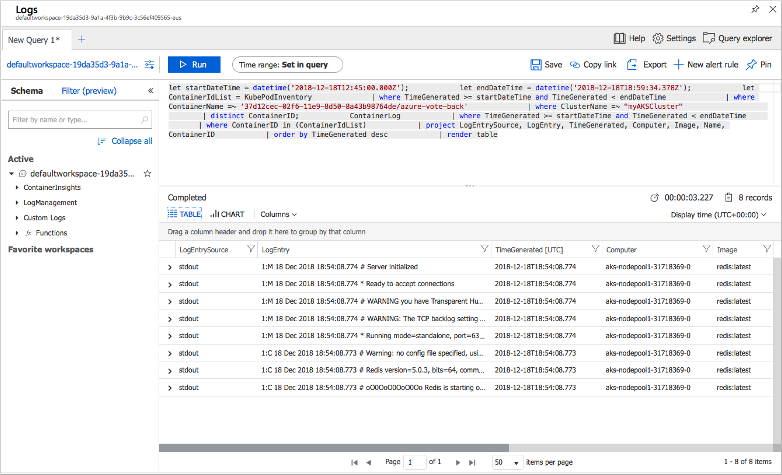
To view logs for the azure-vote-front pod, select View in Log Analytics from the top of the azure-vote-front | Overview area on the right side. These logs include the stdout and stderr streams from the container.
Delete cluster
To avoid Azure charges, clean up your unnecessary resources. Select the Delete button on the AKS cluster dashboard. You can also use the az aks delete command in the local Shell:
az aks delete --resource-group myResourceGroup --name myAKSCluster --yes --no-wait
Note
When you delete the cluster, the Azure Active Directory service principal used by the AKS cluster is not removed. For steps on how to remove the service principal, see AKS service principal considerations and deletion.
If you used a managed identity, the identity is managed by the platform and does not require removal.
Get the code
Pre-existing container images were used in this quickstart to create a Kubernetes deployment. The related application code, Dockerfile, and Kubernetes manifest file are available on GitHub.
Next steps
In this quickstart, you deployed a Kubernetes cluster and then deployed a multi-container application to it. Access the Kubernetes web dashboard for your AKS cluster.
To learn more about AKS by walking through a complete example, including building an application, deploying from Azure Container Registry, updating a running application, and scaling and upgrading your cluster, continue to the Kubernetes cluster tutorial.