Note
Access to this page requires authorization. You can try signing in or changing directories.
Access to this page requires authorization. You can try changing directories.
Azure Kubernetes Service (AKS) is a managed Kubernetes service that lets you quickly deploy and manage clusters. In this quickstart, you will:
- Deploy an AKS cluster using an Azure Resource Manager template.
- Run a multi-container application with a web front-end and a Redis instance in the cluster.
An Azure Resource Manager template is a JavaScript Object Notation (JSON) file that defines the infrastructure and configuration for your project. The template uses declarative syntax. You describe your intended deployment without writing the sequence of programming commands to create the deployment.
This quickstart assumes a basic understanding of Kubernetes concepts. For more information, see Kubernetes core concepts for Azure Kubernetes Service (AKS).
If your environment meets the prerequisites and you're familiar with using ARM templates, select the Deploy to Azure button. The template will open in the Azure portal.

If you don't have an Azure subscription, create a trial account before you begin.
Prerequisites
You can use the local Azure CLI.
If you prefer, install the Azure CLI to run CLI reference commands.
Local Azure CLI, see how to install the Azure CLI. If you're running on Windows or macOS, consider running Azure CLI in a Docker container. For more information, see How to run the Azure CLI in a Docker container.
Sign in to the Azure CLI by using the az login command. To finish the authentication process, follow the steps displayed in your terminal. For other sign-in options, see Sign in with the Azure CLI.
When you're prompted, install the Azure CLI extension on first use. For more information about extensions, see Use extensions with the Azure CLI.
Run az version to find the version and dependent libraries that are installed. To upgrade to the latest version, run az upgrade.
This article requires version 2.0.61 or later of the Azure CLI.
To create an AKS cluster using a Resource Manager template, you provide an SSH public key. If you need this resource, see the following section; otherwise skip to the Review the template section.
Create an SSH key pair
To access AKS nodes, you connect using an SSH key pair (public and private), which you generate using the ssh-keygen command. By default, these files are created in the ~/.ssh directory. Running the ssh-keygen command will overwrite any SSH key pair with the same name already existing in the given location.
Run the
ssh-keygencommand. The following example creates an SSH key pair using RSA encryption and a bit length of 4096:ssh-keygen -t rsa -b 4096
For more information about creating SSH keys, see Create and manage SSH keys for authentication in Azure.
Review the template
The template used in this quickstart is from Azure Quickstart templates.
{
  "$schema": "https://schema.management.azure.com/schemas/2019-04-01/deploymentTemplate.json#",
  "contentVersion": "1.0.0.1",
  "parameters": {
    "clusterName": {
      "type": "string",
      "defaultValue": "aks101cluster",
      "metadata": {
        "description": "The name of the Managed Cluster resource."
      }
    },
    "location": {
      "type": "string",
      "defaultValue": "[resourceGroup().location]",
      "metadata": {
        "description": "The location of the Managed Cluster resource."
      }
    },
    "dnsPrefix": {
      "type": "string",
      "metadata": {
        "description": "Optional DNS prefix to use with hosted Kubernetes API server FQDN."
      }
    },
    "osDiskSizeGB": {
      "type": "int",
      "defaultValue": 0,
      "minValue": 0,
      "maxValue": 1023,
      "metadata": {
        "description": "Disk size (in GB) to provision for each of the agent pool nodes. This value ranges from 0 to 1023. Specifying 0 will apply the default disk size for that agentVMSize."
      }
    },
    "agentCount": {
      "type": "int",
      "defaultValue": 3,
      "minValue": 1,
      "maxValue": 50,
      "metadata": {
        "description": "The number of nodes for the cluster."
      }
    },
    "agentVMSize": {
      "type": "string",
      "defaultValue": "Standard_DS2_v2",
      "metadata": {
        "description": "The size of the Virtual Machine."
      }
    },
    "linuxAdminUsername": {
      "type": "string",
      "metadata": {
        "description": "User name for the Linux Virtual Machines."
      }
    },
    "sshRSAPublicKey": {
      "type": "string",
      "metadata": {
        "description": "Configure all linux machines with the SSH RSA public key string. Your key should include three parts, for example 'ssh-rsa AAAAB...snip...UcyupgH azureuser@linuxvm'"
      }
    },
    "osType": {
      "type": "string",
      "defaultValue": "Linux",
      "allowedValues": [
        "Linux"
      ],
      "metadata": {
        "description": "The type of operating system."
      }
    }
  },
  "resources": [
    {
      "type": "Microsoft.ContainerService/managedClusters",
      "apiVersion": "2020-03-01",
      "name": "[parameters('clusterName')]",
      "location": "[parameters('location')]",
      "properties": {
        "dnsPrefix": "[parameters('dnsPrefix')]",
        "agentPoolProfiles": [
          {
            "name": "agentpool",
            "osDiskSizeGB": "[parameters('osDiskSizeGB')]",
            "count": "[parameters('agentCount')]",
            "vmSize": "[parameters('agentVMSize')]",
            "osType": "[parameters('osType')]",
            "storageProfile": "ManagedDisks"
          }
        ],
        "linuxProfile": {
          "adminUsername": "[parameters('linuxAdminUsername')]",
          "ssh": {
            "publicKeys": [
              {
                "keyData": "[parameters('sshRSAPublicKey')]"
              }
            ]
          }
        }
      },
      "identity": {
          "type": "SystemAssigned"
      }
    }
  ],
  "outputs": {
    "controlPlaneFQDN": {
      "type": "string",
      "value": "[reference(parameters('clusterName')).fqdn]"
    }
  }
}
For more AKS samples, see the AKS quickstart templates site.
Deploy the template
Select the following button to sign in to Azure and open a template.
Select or enter the following values.
For this quickstart, leave the default values for the OS Disk Size GB, Agent Count, Agent VM Size, OS Type, and Kubernetes Version. Provide your own values for the following template parameters:
Subscription: Select an Azure subscription.
Resource group: Select Create new. Enter a unique name for the resource group, such as myResourceGroup, then choose OK.
Location: Select a location, such as China East 2.
Cluster name: Enter a unique name for the AKS cluster, such as myAKSCluster.
DNS prefix: Enter a unique DNS prefix for your cluster, such as myakscluster.
Linux Admin Username: Enter a username to connect using SSH, such as azureuser.
SSH RSA Public Key: Copy and paste the public part of your SSH key pair (by default, the contents of ~/.ssh/id_rsa.pub).
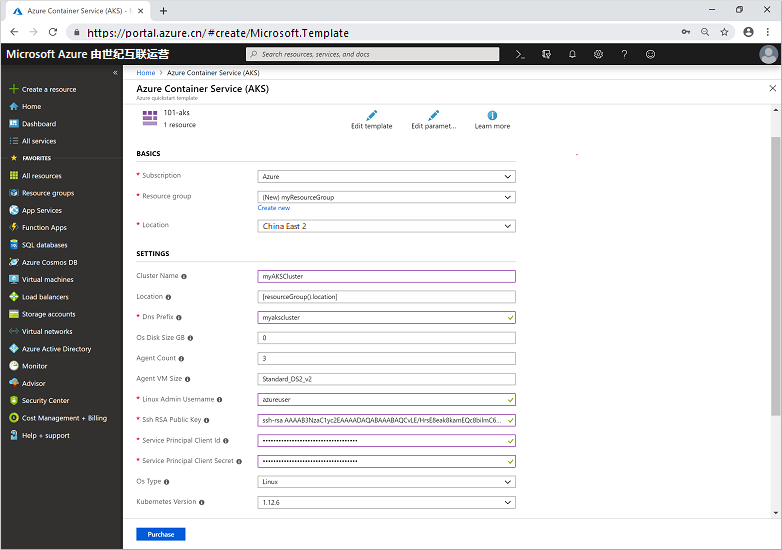
Select Review + Create.
It takes a few minutes to create the AKS cluster. Wait for the cluster to be successfully deployed before you move on to the next step.
Validate the deployment
Connect to the cluster
To manage a Kubernetes cluster, use the Kubernetes command-line client, kubectl.
Install
kubectllocally using the az aks install-cli command:az aks install-cliConfigure
kubectlto connect to your Kubernetes cluster using the az aks get-credentials command. This command downloads credentials and configures the Kubernetes CLI to use them.Note
Before you can use Azure CLI in Microsoft Azure operated by 21Vianet, please run
az cloud set -n AzureChinaCloudfirst to change the cloud environment. If you want to switch back to Azure Public Cloud, runaz cloud set -n AzureCloudagain.az login az aks get-credentials --resource-group myResourceGroup --name myAKSClusterVerify the connection to your cluster using the kubectl get command. This command returns a list of the cluster nodes.
kubectl get nodesOutput shows the nodes created in the previous steps. Make sure that the status for all the nodes is Ready:
NAME                       STATUS   ROLES   AGE     VERSION
aks-agentpool-41324942-0   Ready    agent   6m44s   v1.12.6
aks-agentpool-41324942-1   Ready    agent   6m46s   v1.12.6
aks-agentpool-41324942-2   Ready    agent   6m45s   v1.12.6
Run the application
A Kubernetes manifest file defines a cluster's desired state, such as which container images to run.
In this quickstart, you will use a manifest to create all objects needed to run the Azure Vote application. This manifest includes two Kubernetes deployments:
- The sample Azure Vote Python applications.
- A Redis instance.
Two Kubernetes Services are also created:
- An internal service for the Redis instance.
- An external service to access the Azure Vote application from the internet.
Create a file named
azure-vote.yaml.- This file can be created using
code,vi, ornanoon a virtual or physical system.
- This file can be created using
Copy in the following YAML definition:
apiVersion: apps/v1
kind: Deployment
metadata:
  name: azure-vote-back
spec:
  replicas: 1
  selector:
    matchLabels:
      app: azure-vote-back
  template:
    metadata:
      labels:
        app: azure-vote-back
    spec:
      nodeSelector:
        "kubernetes.io/os": linux
      containers:
      - name: azure-vote-back
        image: mcr.azk8s.cn/oss/bitnami/redis:6.0.8
        env:
        - name: ALLOW_EMPTY_PASSWORD
          value: "yes"
        resources:
          requests:
            cpu: 100m
            memory: 128Mi
          limits:
            cpu: 250m
            memory: 256Mi
        ports:
        - containerPort: 6379
          name: redis
---
apiVersion: v1
kind: Service
metadata:
  name: azure-vote-back
spec:
  ports:
  - port: 6379
  selector:
    app: azure-vote-back
---
apiVersion: apps/v1
kind: Deployment
metadata:
  name: azure-vote-front
spec:
  replicas: 1
  selector:
    matchLabels:
      app: azure-vote-front
  template:
    metadata:
      labels:
        app: azure-vote-front
    spec:
      nodeSelector:
        "kubernetes.io/os": linux
      containers:
      - name: azure-vote-front
        image: mcr.azk8s.cn/azuredocs/azure-vote-front:v1
        resources:
          requests:
            cpu: 100m
            memory: 128Mi
          limits:
            cpu: 250m
            memory: 256Mi
        ports:
        - containerPort: 80
        env:
        - name: REDIS
          value: "azure-vote-back"
---
apiVersion: v1
kind: Service
metadata:
  name: azure-vote-front
spec:
  type: LoadBalancer
  ports:
  - port: 80
  selector:
    app: azure-vote-front
Deploy the application using the kubectl apply command and specify the name of your YAML manifest:
kubectl apply -f azure-vote.yamlOutput shows the successfully created deployments and services:
deployment "azure-vote-back" created
service "azure-vote-back" created
deployment "azure-vote-front" created
service "azure-vote-front" created
Test the application
When the application runs, a Kubernetes service exposes the application front end to the internet. This process can take a few minutes to complete.
Monitor progress using the kubectl get service command with the --watch argument.
kubectl get service azure-vote-front --watch
The EXTERNAL-IP output for the azure-vote-front service will initially show as pending.
NAME               TYPE           CLUSTER-IP   EXTERNAL-IP   PORT(S)        AGE
azure-vote-front   LoadBalancer   10.0.37.27   <pending>     80:30572/TCP   6s
Once the EXTERNAL-IP address changes from pending to an actual public IP address, use CTRL-C to stop the kubectl watch process. The following example output shows a valid public IP address assigned to the service:
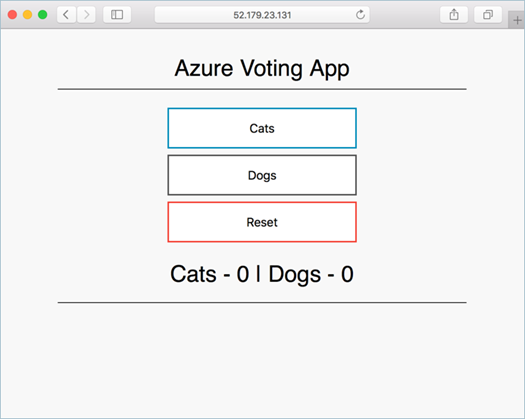
azure-vote-front LoadBalancer 10.0.37.27 52.179.23.131 80:30572/TCP 2m
To see the Azure Vote app in action, open a web browser to the external IP address of your service.
Clean up resources
To avoid Azure charges, clean up your unnecessary resources. Use the az group delete command to remove the resource group, container service, and all related resources.
az group delete --name myResourceGroup --yes --no-wait
Note
When you delete the cluster, the Azure Active Directory service principal used by the AKS cluster is not removed. For steps on how to remove the service principal, see AKS service principal considerations and deletion.
If you used a managed identity, the identity is managed by the platform and does not require removal.
Get the code
Pre-existing container images were used in this quickstart to create a Kubernetes deployment. The related application code, Dockerfile, and Kubernetes manifest file are available on GitHub.
Next steps
In this quickstart, you deployed a Kubernetes cluster and then deployed a multi-container application to it.
To learn more about AKS, and walk through a complete code to deployment example, continue to the Kubernetes cluster tutorial.