Note
Access to this page requires authorization. You can try signing in or changing directories.
Access to this page requires authorization. You can try changing directories.
AKS-managed Azure Active Directory (Azure AD) integration simplifies the Azure AD integration process. Previously, you were required to create a client and server app, and the Azure AD tenant had to grant Directory Read permissions. Now, the AKS resource provider manages the client and server apps for you.
Azure AD authentication overview
Cluster administrators can configure Kubernetes role-based access control (Kubernetes RBAC) based on a user's identity or directory group membership. Azure AD authentication is provided to AKS clusters with OpenID Connect. OpenID Connect is an identity layer built on top of the OAuth 2.0 protocol. For more information on OpenID Connect, see the Open ID connect documentation.
Learn more about the Azure AD integration flow in the Azure AD documentation.
Limitations
- AKS-managed Azure AD integration can't be disabled.
- Changing an AKS-managed Azure AD integrated cluster to legacy Azure AD isn't supported.
- Clusters without Kubernetes RBAC enabled aren't supported with AKS-managed Azure AD integration.
Prerequisites
Before getting started, make sure you have the following prerequisites:
- Azure CLI version 2.29.0 or later.
kubectl, with a minimum version of 1.18.1 orkubelogin.- If you're using helm, you need a minimum version of helm 3.3.
Important
You must use kubectl with a minimum version of 1.18.1 or kubelogin. The difference between the minor versions of Kubernetes and kubectl shouldn't be more than 1 version. You'll experience authentication issues if you don't use the correct version.
Use the following commands to install kubectl and kubelogin:
sudo az aks install-cli
kubectl version --client
kubelogin --version
Use these instructions for other operating systems.
Before you begin
You need an Azure AD group for your cluster. This group will be registered as an admin group on the cluster to grant cluster admin permissions. You can use an existing Azure AD group or create a new one. Make sure to record the object ID of your Azure AD group.
# List existing groups in the directory
az ad group list --filter "displayname eq '<group-name>'" -o table
Use the following command to create a new Azure AD group for your cluster administrators:
# Create an Azure AD group
az ad group create --display-name myAKSAdminGroup --mail-nickname myAKSAdminGroup
Create an AKS cluster with Azure AD enabled
Create an Azure resource group.
az group create --name myResourceGroup --location chinaeast2Create an AKS cluster and enable administration access for your Azure AD group using the
az aks createcommand.az aks create -g myResourceGroup -n myManagedCluster --enable-aad --aad-admin-group-object-ids <id> [--aad-tenant-id <id>]A successful creation of an AKS-managed Azure AD cluster has the following section in the response body:
"AADProfile": {
    "adminGroupObjectIds": [
    "5d24****-****-****-****-****afa27aed"
    ],
    "clientAppId": null,
    "managed": true,
    "serverAppId": null,
    "serverAppSecret": null,
    "tenantId": "72f9****-****-****-****-****d011db47"
}
Access an Azure AD enabled cluster
Before you access the cluster using an Azure AD defined group, you need the Azure Kubernetes Service Cluster User built-in role.
Get the user credentials to access the cluster.
az aks get-credentials --resource-group myResourceGroup --name myManagedClusterFollow the instructions to sign in.
Use the
kubectl get nodescommand to view nodes in the cluster.kubectl get nodesSet up Azure role-based access control (Azure RBAC) to configure other security groups for your clusters.
Troubleshooting access issues with Azure AD
Important
The steps described in this section bypass the normal Azure AD group authentication. Use them only in an emergency.
If you're permanently blocked by not having access to a valid Azure AD group with access to your cluster, you can still obtain the admin credentials to access the cluster directly. You need to have access to the Azure Kubernetes Service Cluster Admin built-in role.
az aks get-credentials --resource-group myResourceGroup --name myManagedCluster --admin
Enable AKS-managed Azure AD integration on your existing cluster
You can enable AKS-managed Azure AD integration on your existing Kubernetes RBAC enabled cluster. Make sure to set your admin group to keep access on your cluster.
az aks update -g MyResourceGroup -n MyManagedCluster --enable-aad --aad-admin-group-object-ids <id-1> [--aad-tenant-id <id>]
A successful activation of an AKS-managed Azure AD cluster has the following section in the response body:
"AADProfile": {
    "adminGroupObjectIds": [
      "5d24****-****-****-****-****afa27aed"
    ],
    "clientAppId": null,
    "managed": true,
    "serverAppId": null,
    "serverAppSecret": null,
    "tenantId": "72f9****-****-****-****-****d011db47"
  }
Download user credentials again to access your cluster by following the steps here.
Upgrade to AKS-managed Azure AD integration
If your cluster uses legacy Azure AD integration, you can upgrade to AKS-managed Azure AD integration by running the following command:
az aks update -g myResourceGroup -n myManagedCluster --enable-aad --aad-admin-group-object-ids <id> [--aad-tenant-id <id>]
A successful migration of an AKS-managed Azure AD cluster has the following section in the response body:
"AADProfile": {
    "adminGroupObjectIds": [
      "5d24****-****-****-****-****afa27aed"
    ],
    "clientAppId": null,
    "managed": true,
    "serverAppId": null,
    "serverAppSecret": null,
    "tenantId": "72f9****-****-****-****-****d011db47"
  }
In order to access the cluster, follow the steps in access an Azure AD enabled cluster to update kubeconfig.
Non-interactive sign in with kubelogin
There are some non-interactive scenarios, such as continuous integration pipelines, that aren't currently available with kubectl. You can use kubelogin to connect to the cluster with a non-interactive service principal credential.
Disable local accounts
When you deploy an AKS cluster, local accounts are enabled by default. Even when enabling RBAC or Azure AD integration, --admin access still exists as a non-auditable backdoor option. You can disable local accounts using the parameter disable-local-accounts. The properties.disableLocalAccounts field has been added to the managed cluster API to indicate whether the feature is enabled or not on the cluster.
Note
On clusters with Azure AD integration enabled, users assigned to an Azure AD administrators group specified by
aad-admin-group-object-idscan still gain access using non-administrator credentials. On clusters without Azure AD integration enabled andproperties.disableLocalAccountsset totrue, any attempt to authenticate with user or admin credentials will fail.After disabling local user accounts on an existing AKS cluster where users might have authenticated with local accounts, the administrator must rotate the cluster certificates to revoke certificates they might have had access to. If this is a new cluster, no action is required.
Create a new cluster without local accounts
To create a new AKS cluster without any local accounts using the az aks create command with the disable-local-accounts flag.
az aks create -g <resource-group> -n <cluster-name> --enable-aad --aad-admin-group-object-ids <aad-group-id> --disable-local-accounts
In the output, confirm local accounts have been disabled by checking the field properties.disableLocalAccounts is set to true.
"properties": {
    ...
    "disableLocalAccounts": true,
    ...
}
Attempting to get admin credentials will fail with an error message indicating the feature is preventing access:
az aks get-credentials --resource-group <resource-group> --name <cluster-name> --admin

Operation failed with status: 'Bad Request'. Details: Getting static credential isn't allowed because this cluster is set to disable local accounts.
Disable local accounts on an existing cluster
To disable local accounts on an existing AKS cluster, use the az aks update command with the disable-local-accounts parameter.
az aks update -g <resource-group> -n <cluster-name> --enable-aad --aad-admin-group-object-ids <aad-group-id> --disable-local-accounts
In the output, confirm local accounts have been disabled by checking the field properties.disableLocalAccounts is set to true.
"properties": {
    ...
    "disableLocalAccounts": true,
    ...
}
Attempting to get admin credentials will fail with an error message indicating the feature is preventing access:
az aks get-credentials --resource-group <resource-group> --name <cluster-name> --admin

Operation failed with status: 'Bad Request'. Details: Getting static credential isn't allowed because this cluster is set to disable local accounts.
Re-enable local accounts on an existing cluster
AKS supports enabling a disabled local account on an existing cluster with the enable-local parameter.
az aks update -g <resource-group> -n <cluster-name> --enable-aad --aad-admin-group-object-ids <aad-group-id> --enable-local
In the output, confirm local accounts have been re-enabled by checking the field properties.disableLocalAccounts is set to false.
"properties": {
    ...
    "disableLocalAccounts": false,
    ...
}
Attempting to get admin credentials will succeed:
az aks get-credentials --resource-group <resource-group> --name <cluster-name> --admin

Merged "<cluster-name>-admin" as current context in C:\Users\<username>\.kube\config
Use Conditional Access with Azure AD and AKS
When integrating Azure AD with your AKS cluster, you can also use Conditional Access to control access to your cluster.
Note
Azure AD Conditional Access is an Azure AD Premium capability.
Create an example Conditional Access policy to use with AKS:
- In the Azure portal, go to the Azure Active Directory page and select Enterprise applications.
- Select Conditional Access > Policies >New policy.

- Enter a name for the policy, for example aks-policy.
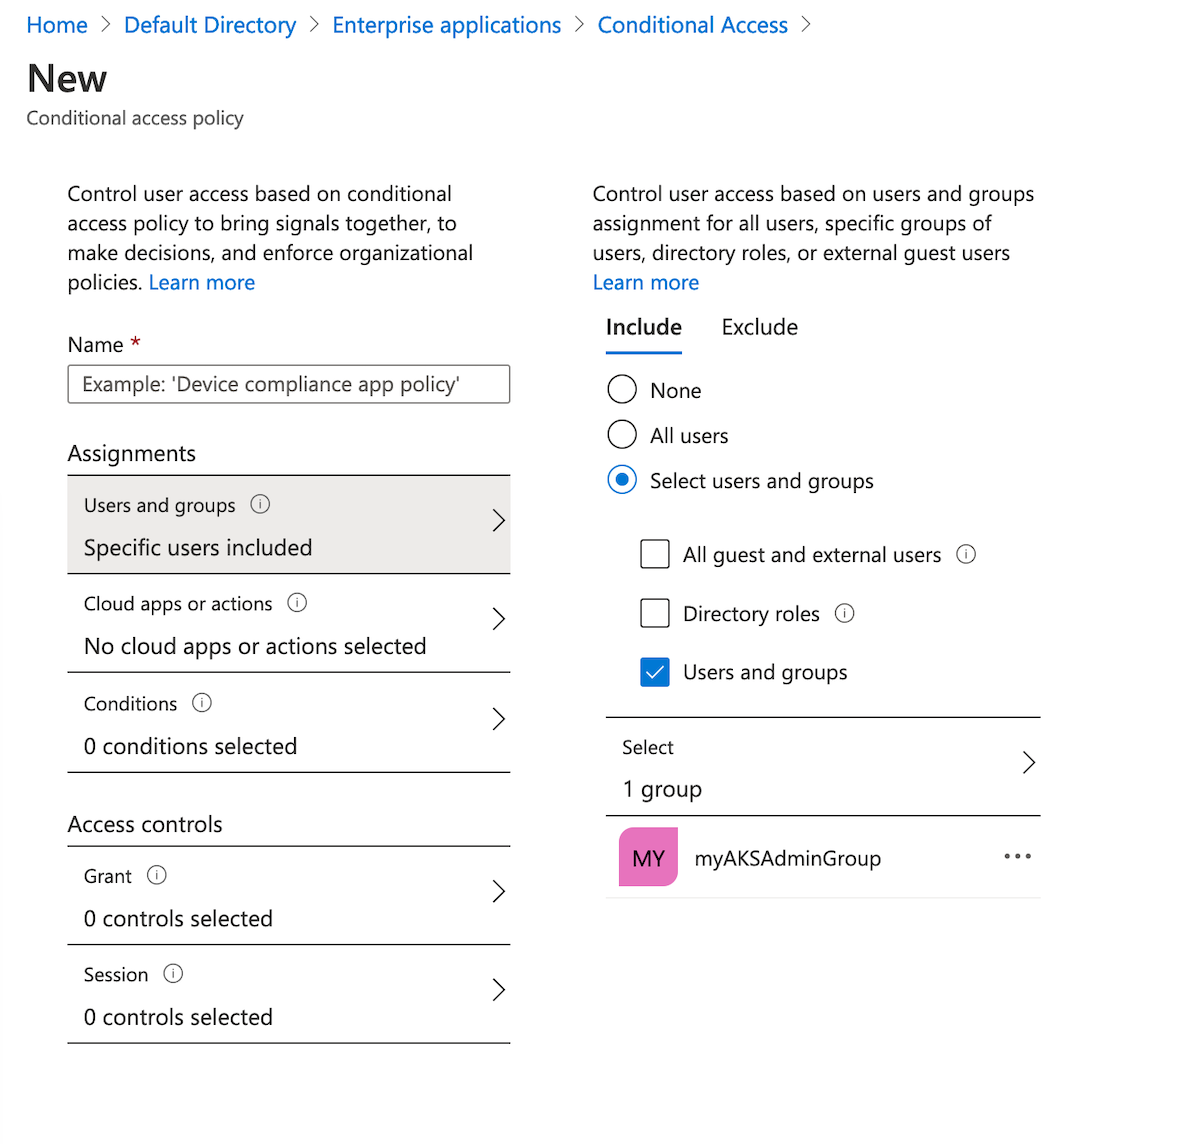
- Under Assignments select Users and groups. Choose the users and groups you want to apply the policy to. In this example, choose the same Azure AD group that has administrator access to your cluster.
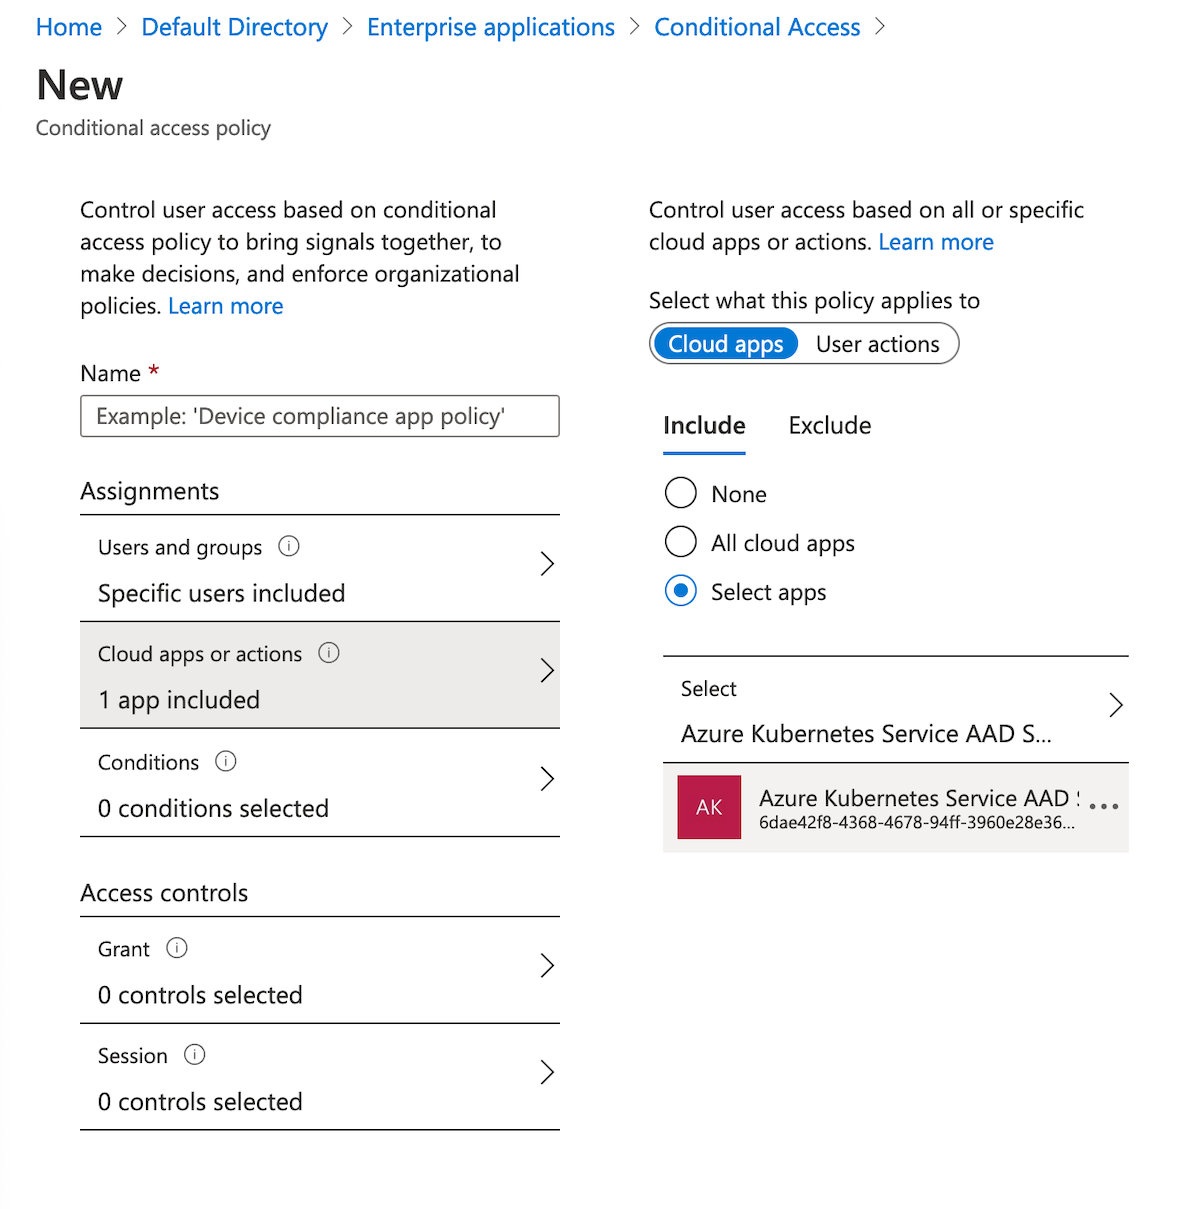
- Under Cloud apps or actions > Include, select Select apps. Search for Azure Kubernetes Service and select Azure Kubernetes Service AAD Server.
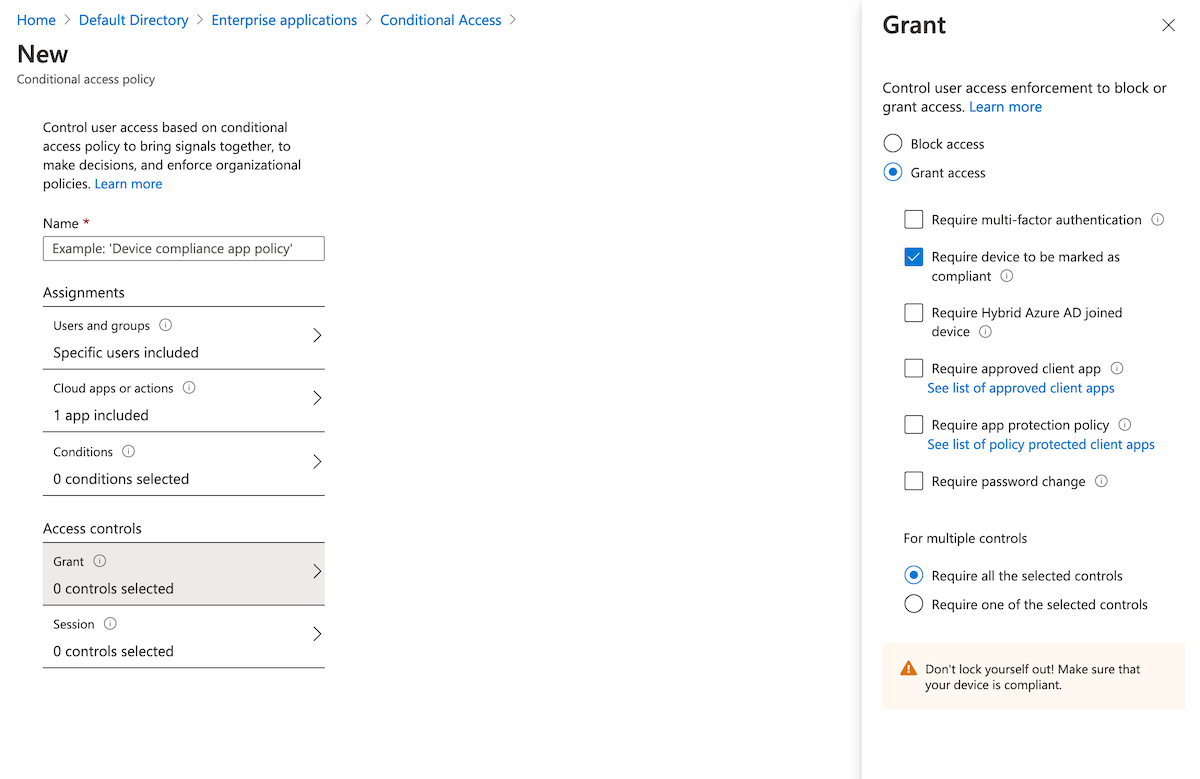
- Under Access controls > Grant, select Grant access, Require device to be marked as compliant, and Require all the selected controls.
- Confirm your settings, set Enable policy to On, and then select Create.

After creating the Conditional Access policy, verify it has been successfully listed:
Get the user credentials to access the cluster using the
az aks get-credentialscommand.az aks get-credentials --resource-group myResourceGroup --name myManagedClusterFollow the instructions to sign in.
View the nodes in the cluster using the
kubectl get nodescommand.kubectl get nodesIn the Azure portal, navigate to Azure Active Directory and select Enterprise applications > Activity > Sign-ins.
Under the Conditional Access column you should see a status of Success. Select the event and then select Conditional Access tab. Your Conditional Access policy will be listed.

Configure just-in-time cluster access with Azure AD and AKS
Another option for cluster access control is to use Privileged Identity Management (PIM) for just-in-time requests.
Note
PIM is an Azure AD Premium capability requiring a Premium P2 SKU. For more on Azure AD SKUs, see the pricing guide.
Integrate just-in-time access requests with an AKS cluster using AKS-managed Azure AD integration:
In the Azure portal, go to Azure Active Directory and select Properties.
Note the value listed under Tenant ID. It will be referenced in a later step as
<tenant-id>.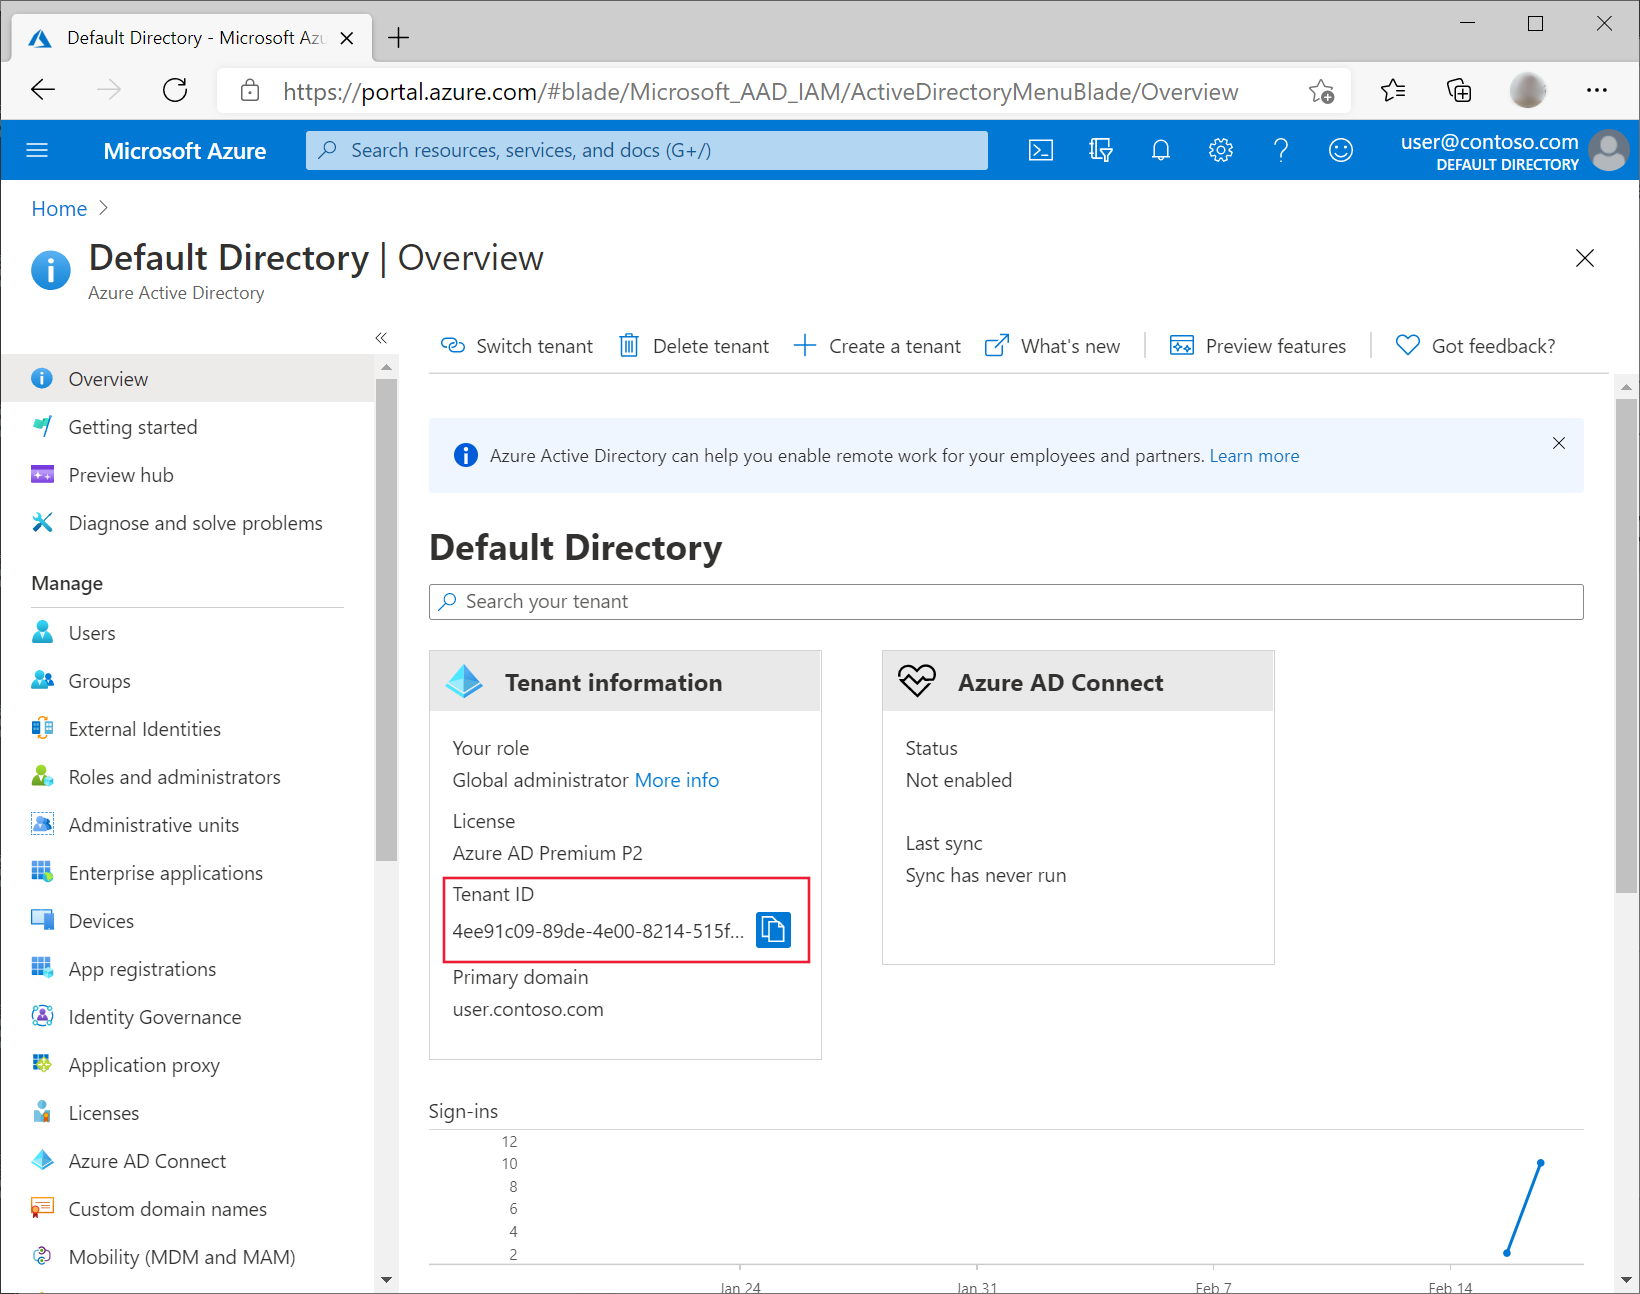
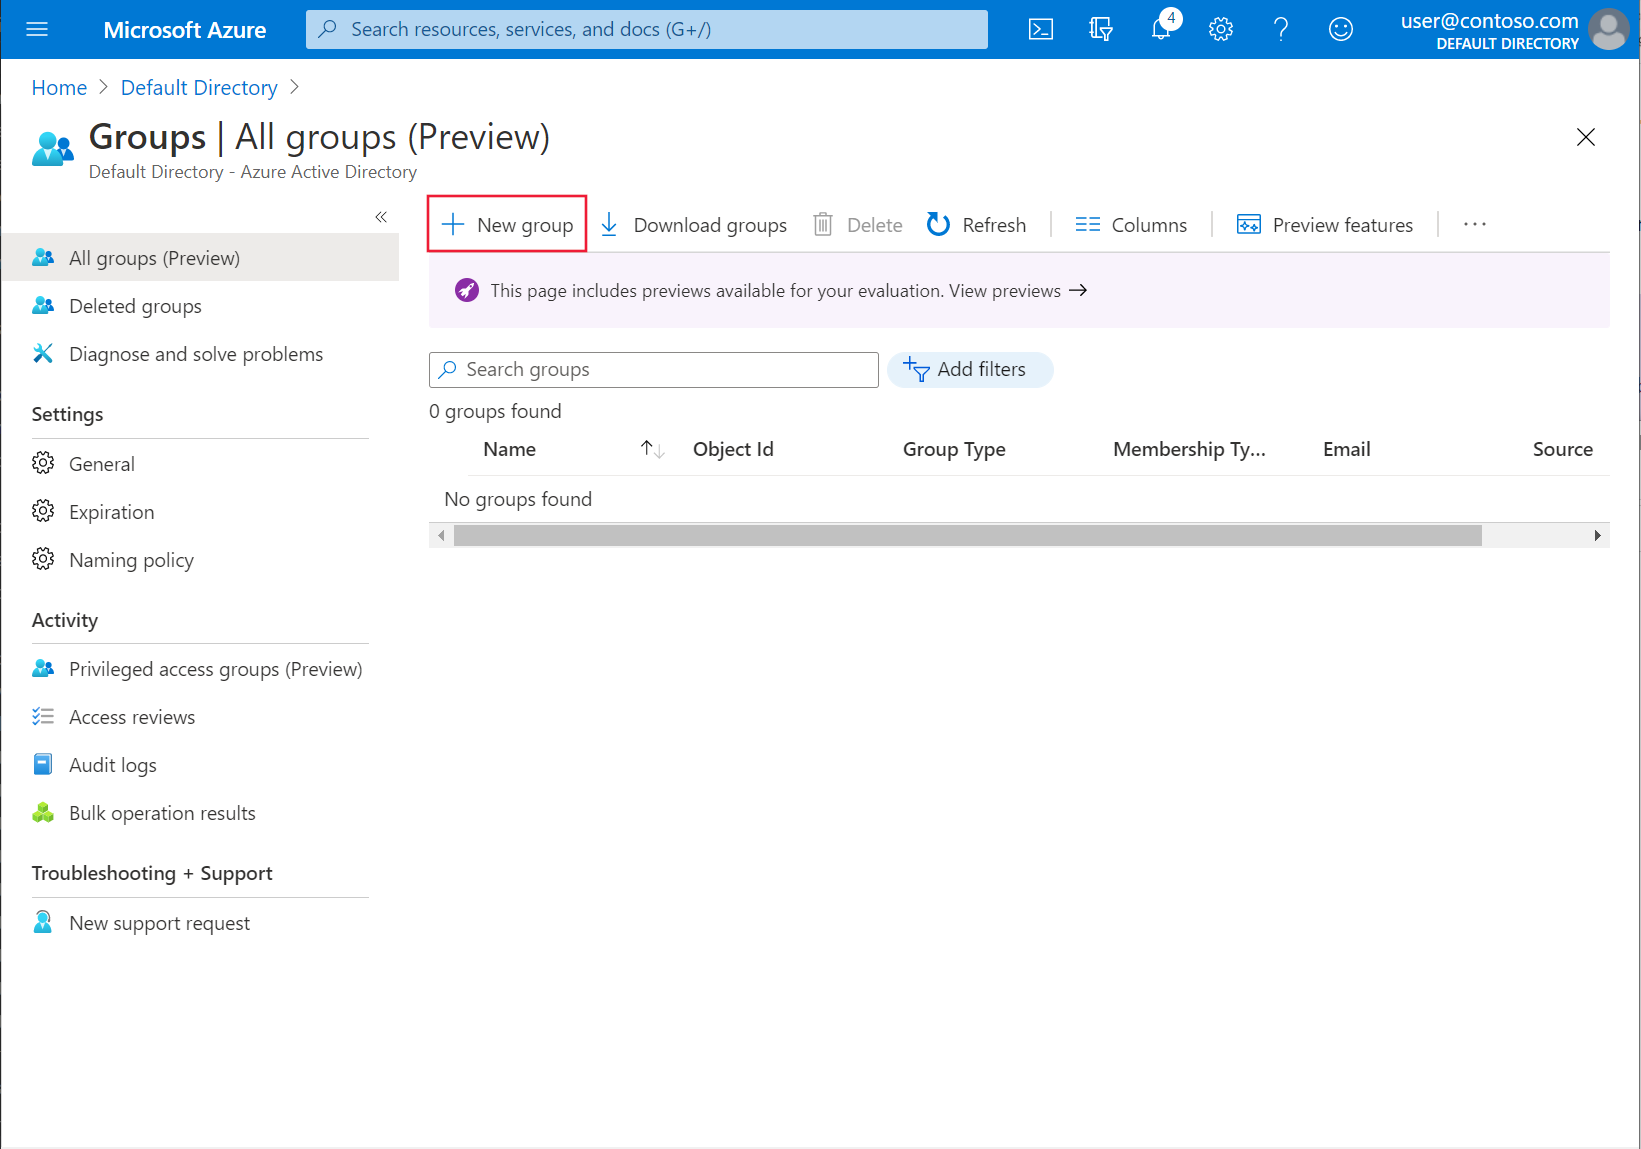
Select Groups > New group.
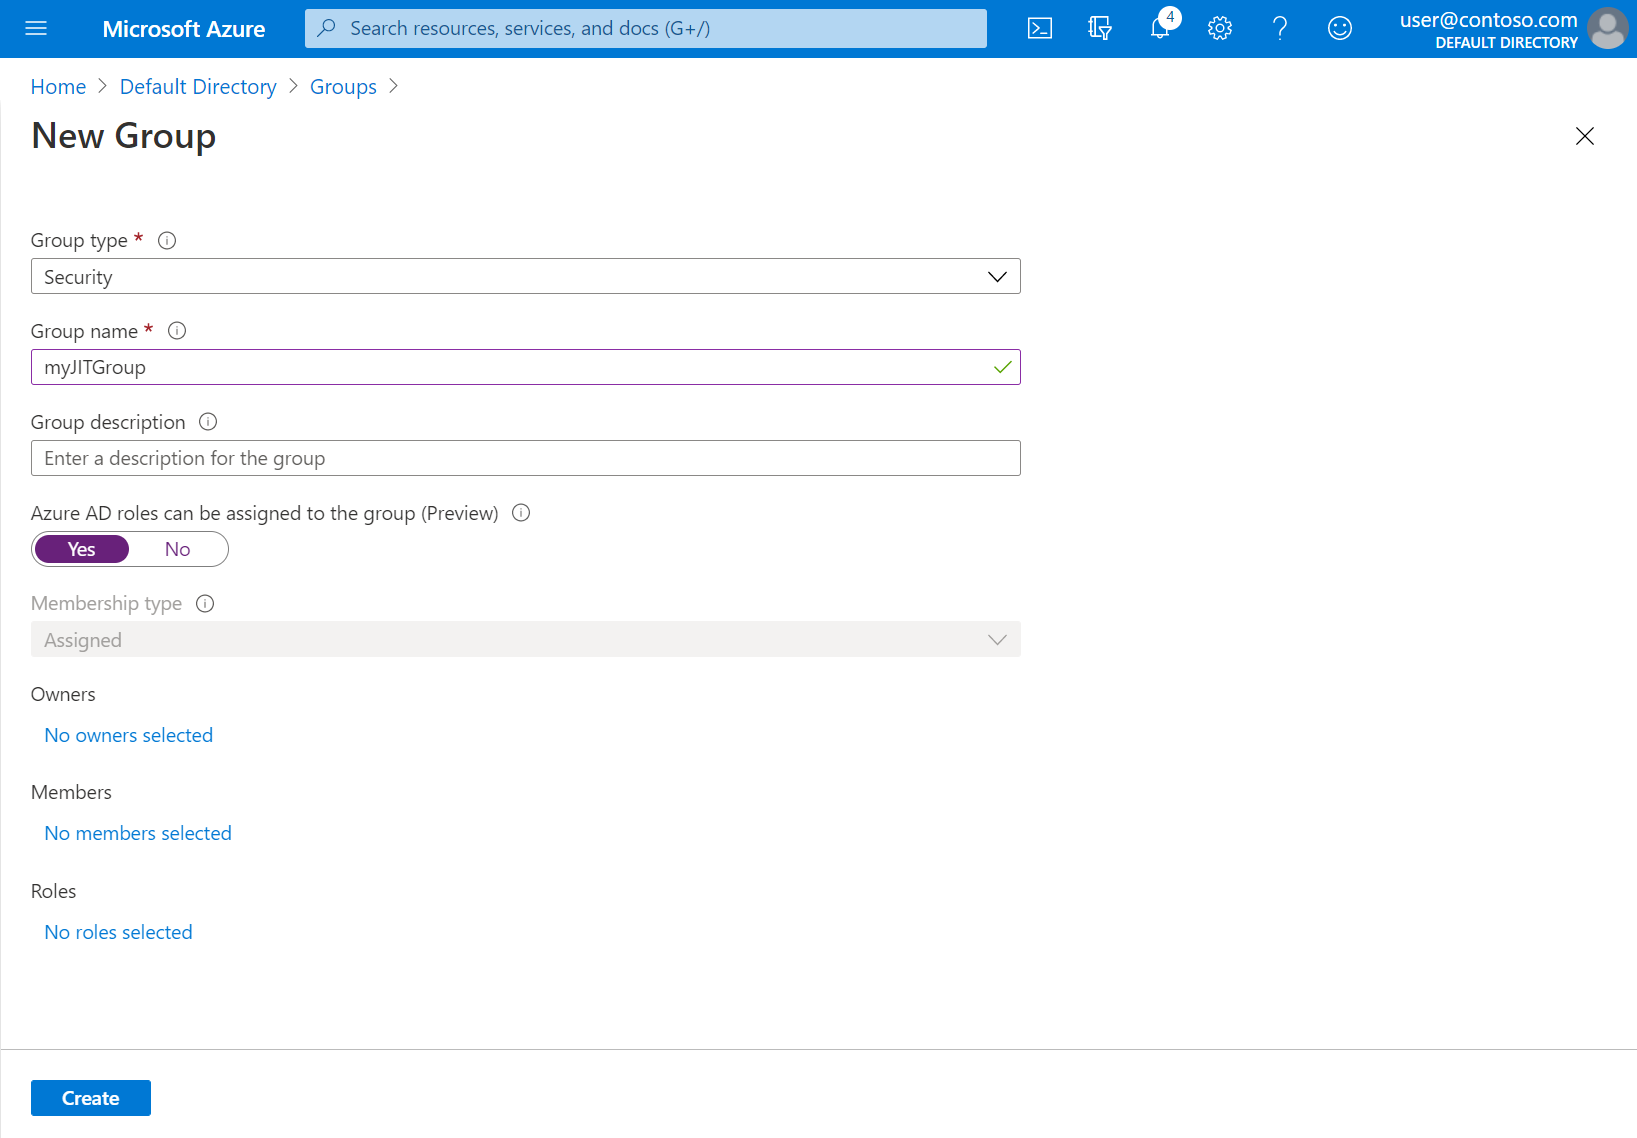
Verify the group type Security is selected and specify a group name, such as myJITGroup. Under the option Azure AD roles can be assigned to this group (Preview), select Yes and then select Create.
On the Groups page, select the group you just created and note the Object ID. It will be referenced in a later step as
<object-id>.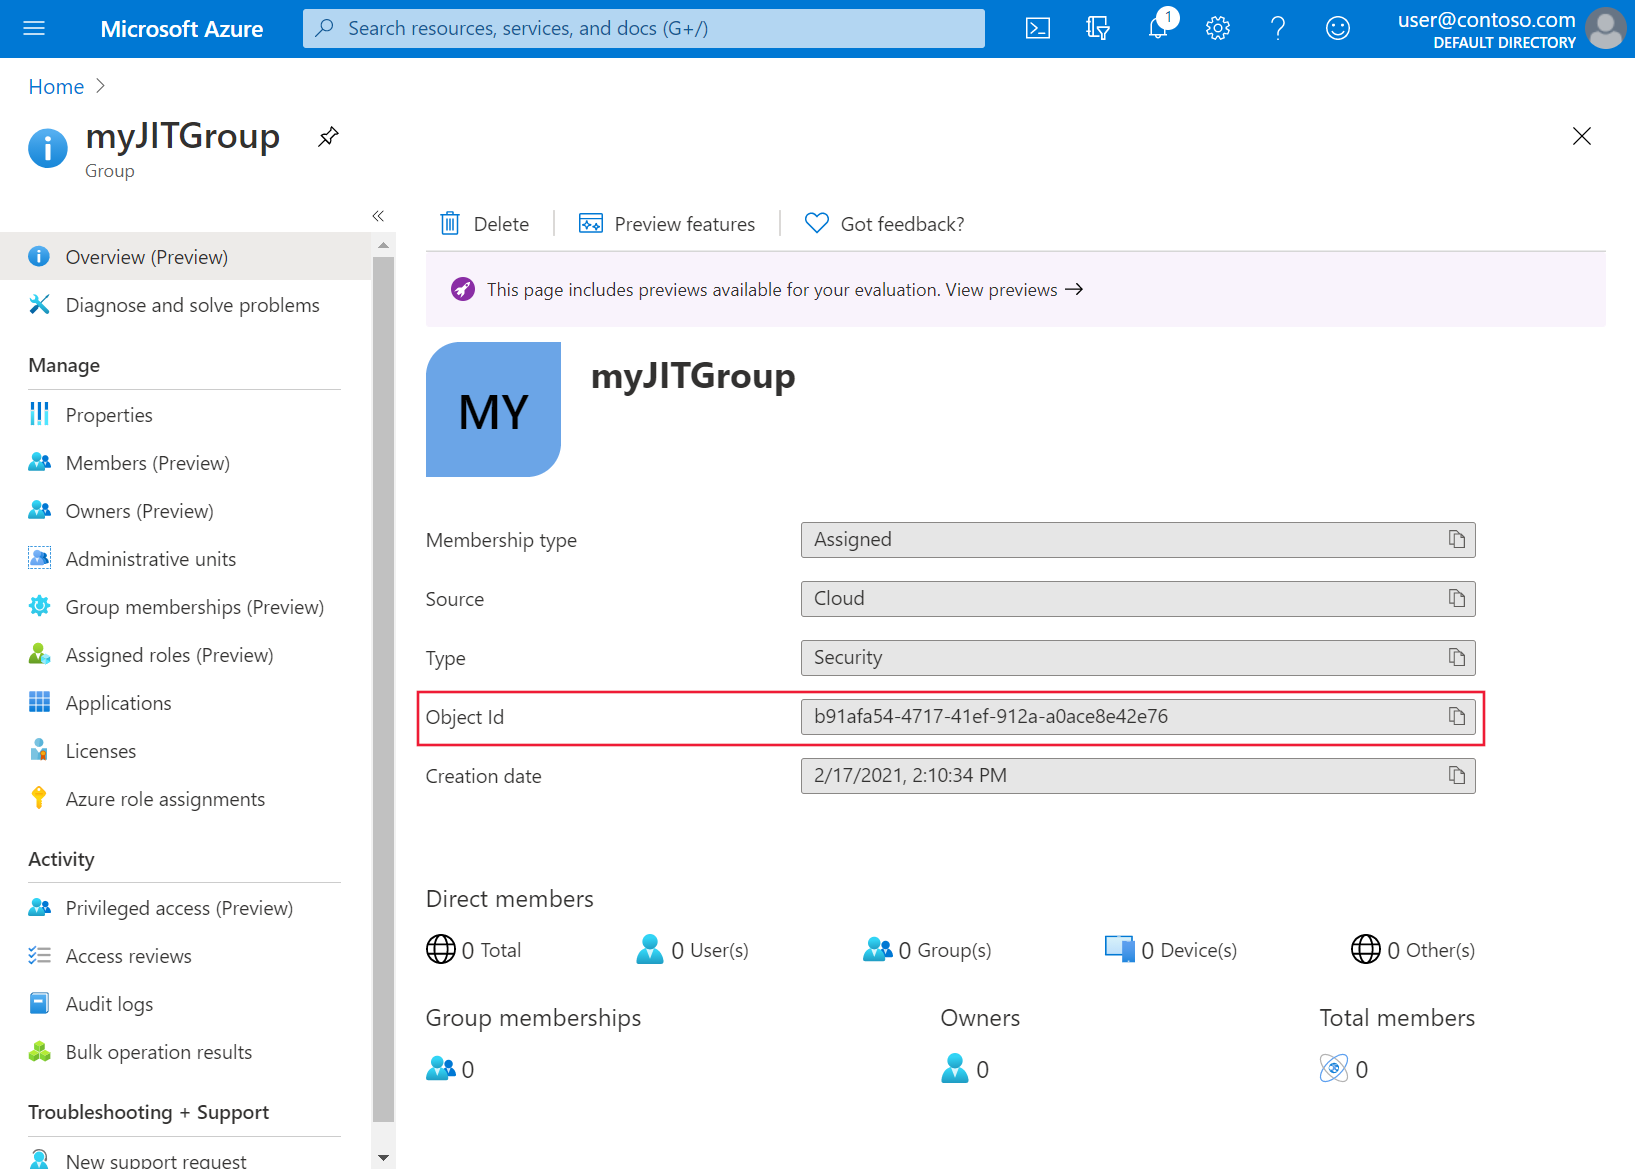
Create the AKS cluster with AKS-managed Azure AD integration using the
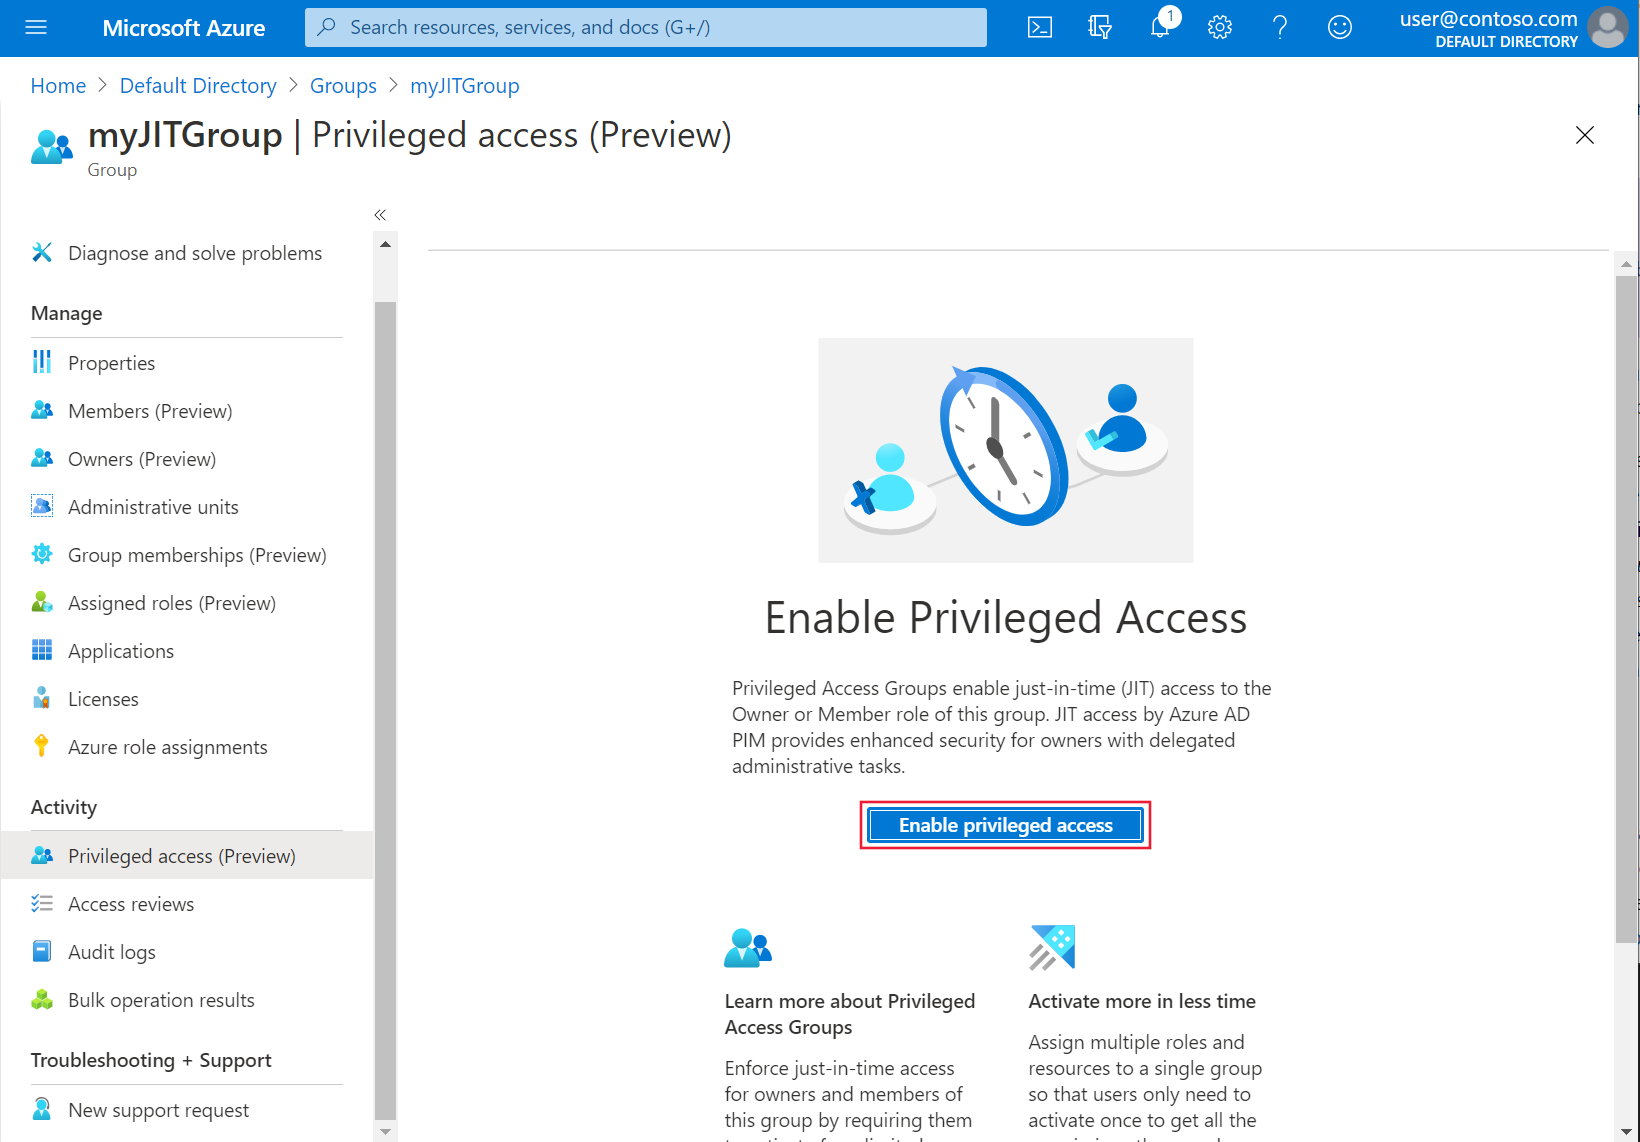
az aks createcommand with the--aad-admin-group-objects-idsand--aad-tenant-id parametersand include the values noted in the steps earlier.az aks create -g myResourceGroup -n myManagedCluster --enable-aad --aad-admin-group-object-ids <object-id> --aad-tenant-id <tenant-id>In the Azure portal, select Activity > Privileged Access (Preview) > Enable Privileged Access.
To grant access, select Add assignments.
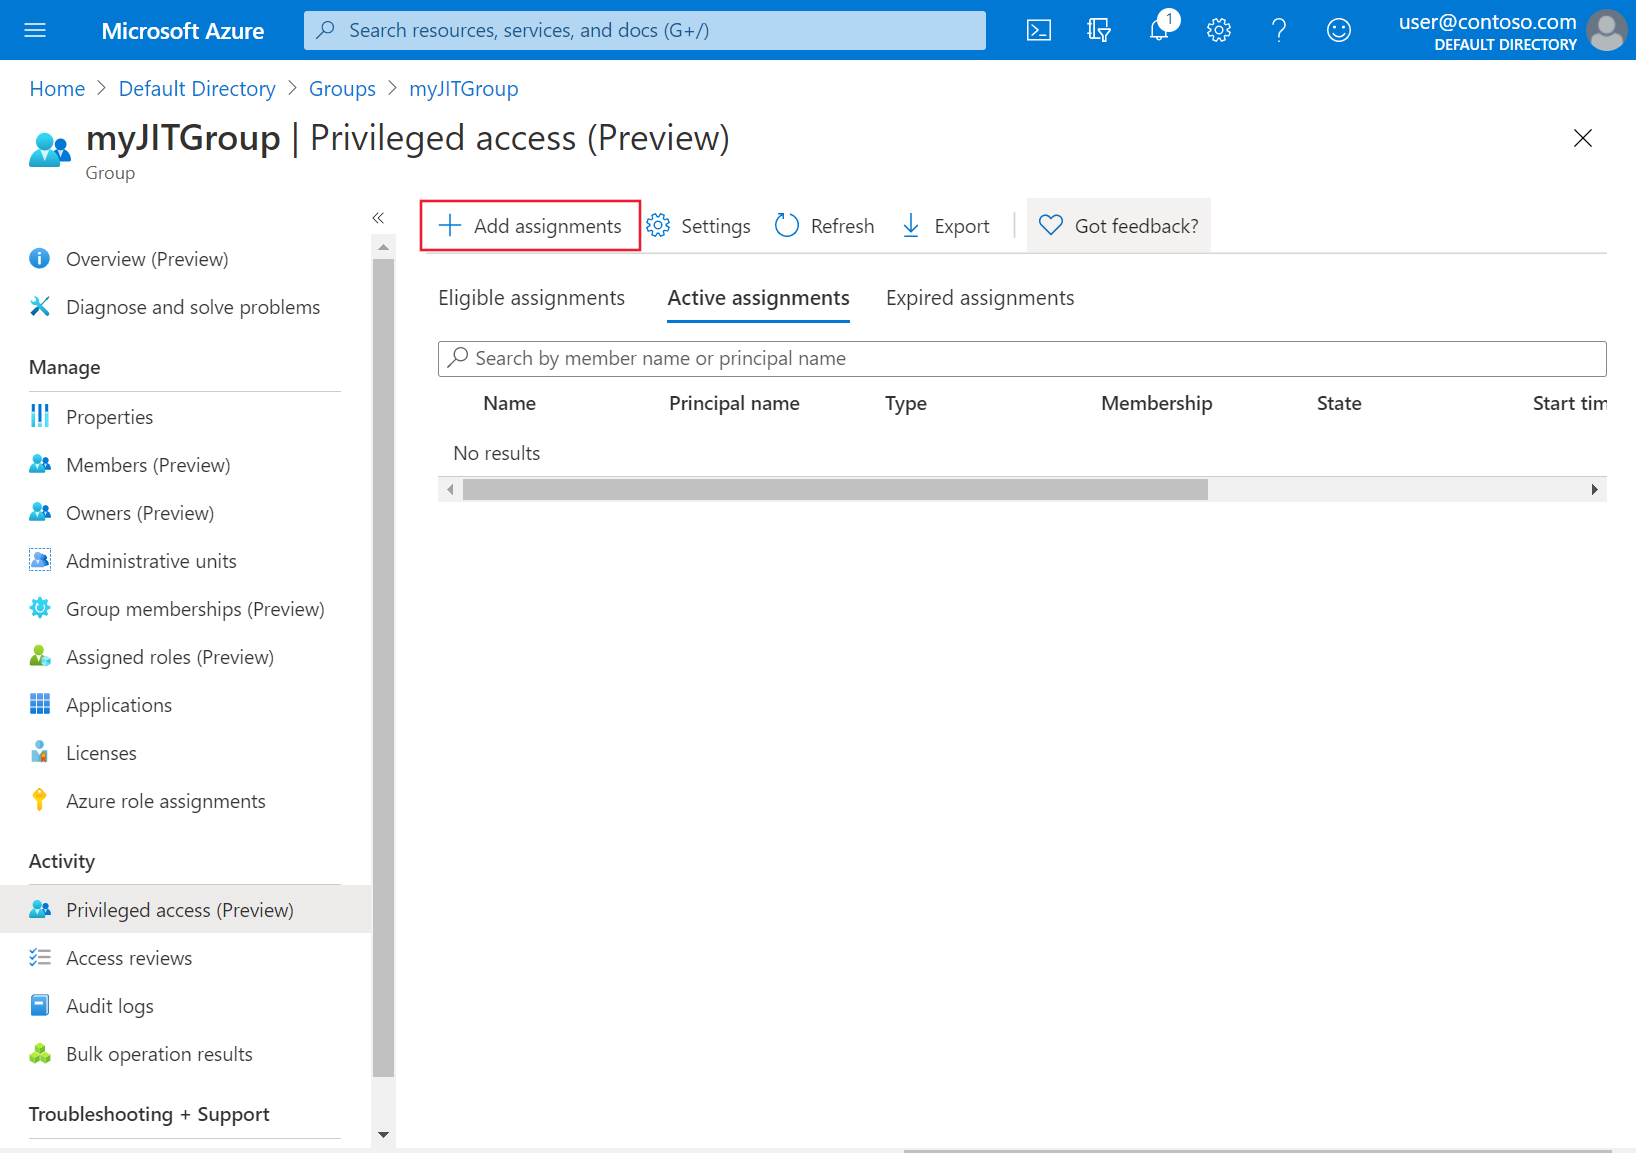
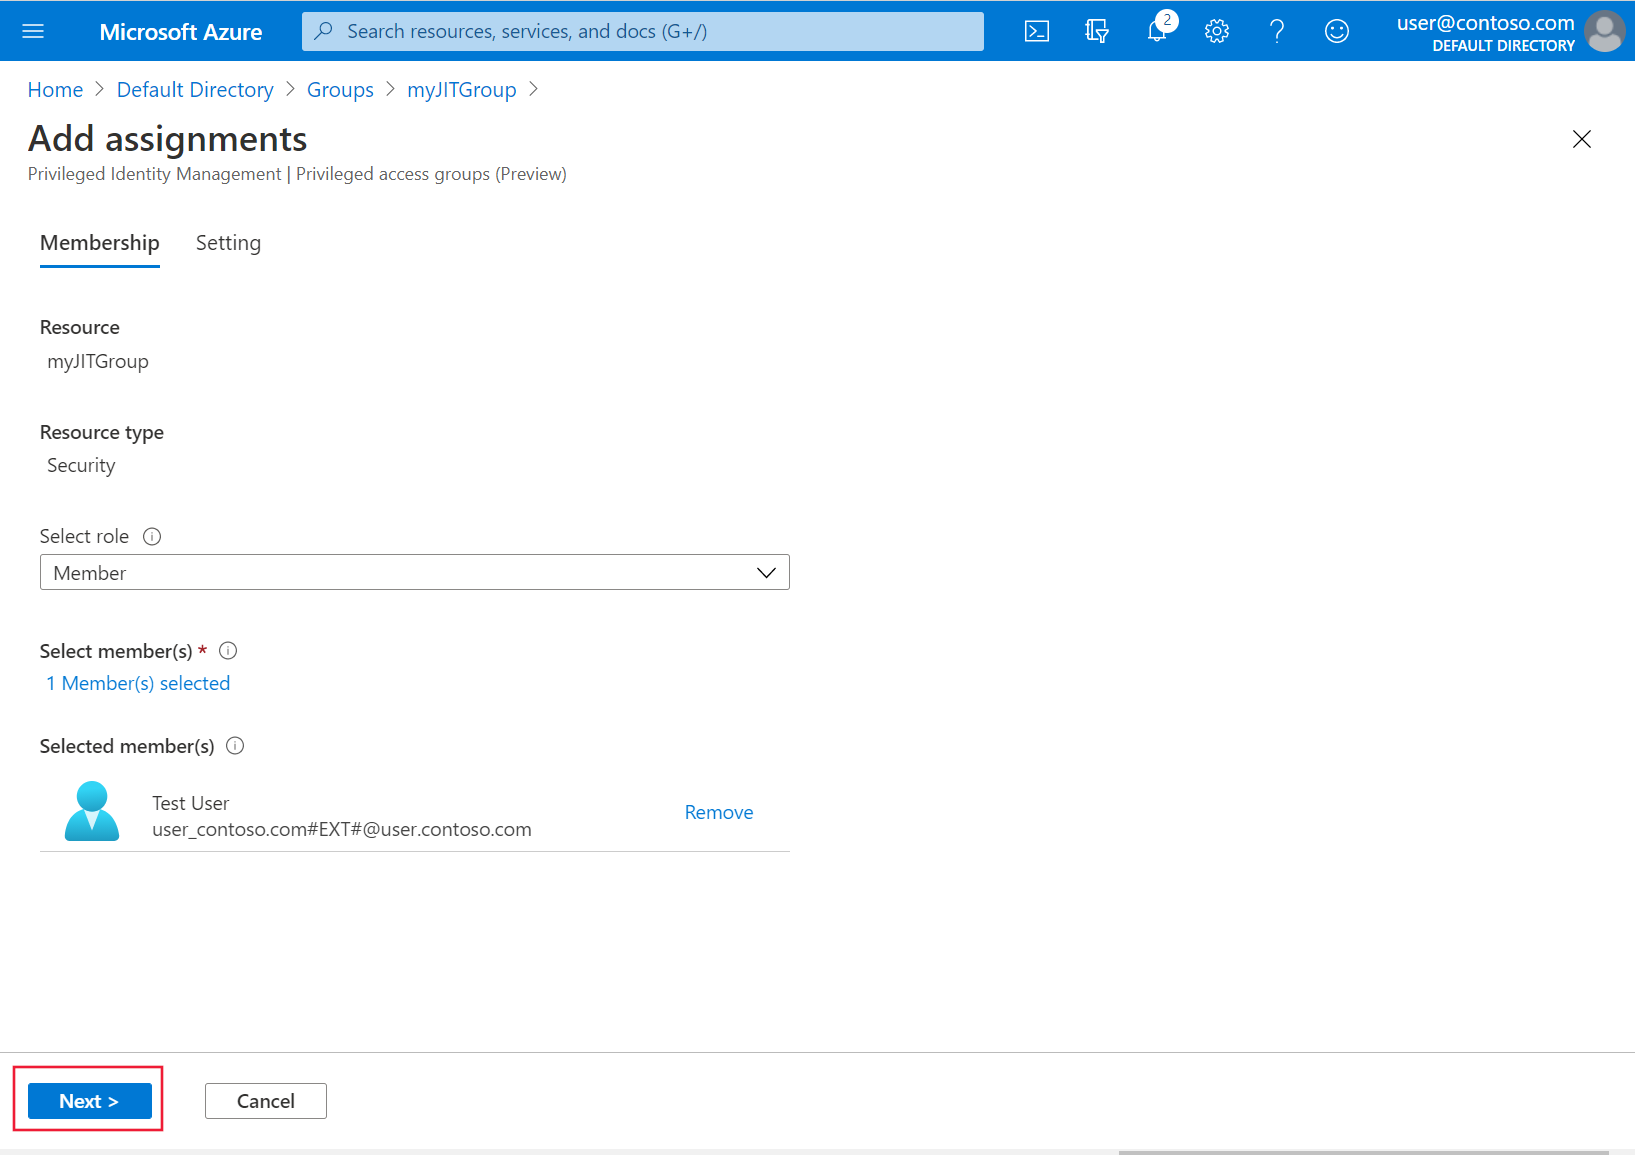
From the Select role drop-down list, select the users and groups you want to grant cluster access. These assignments can be modified at any time by a group administrator. Then select Next.
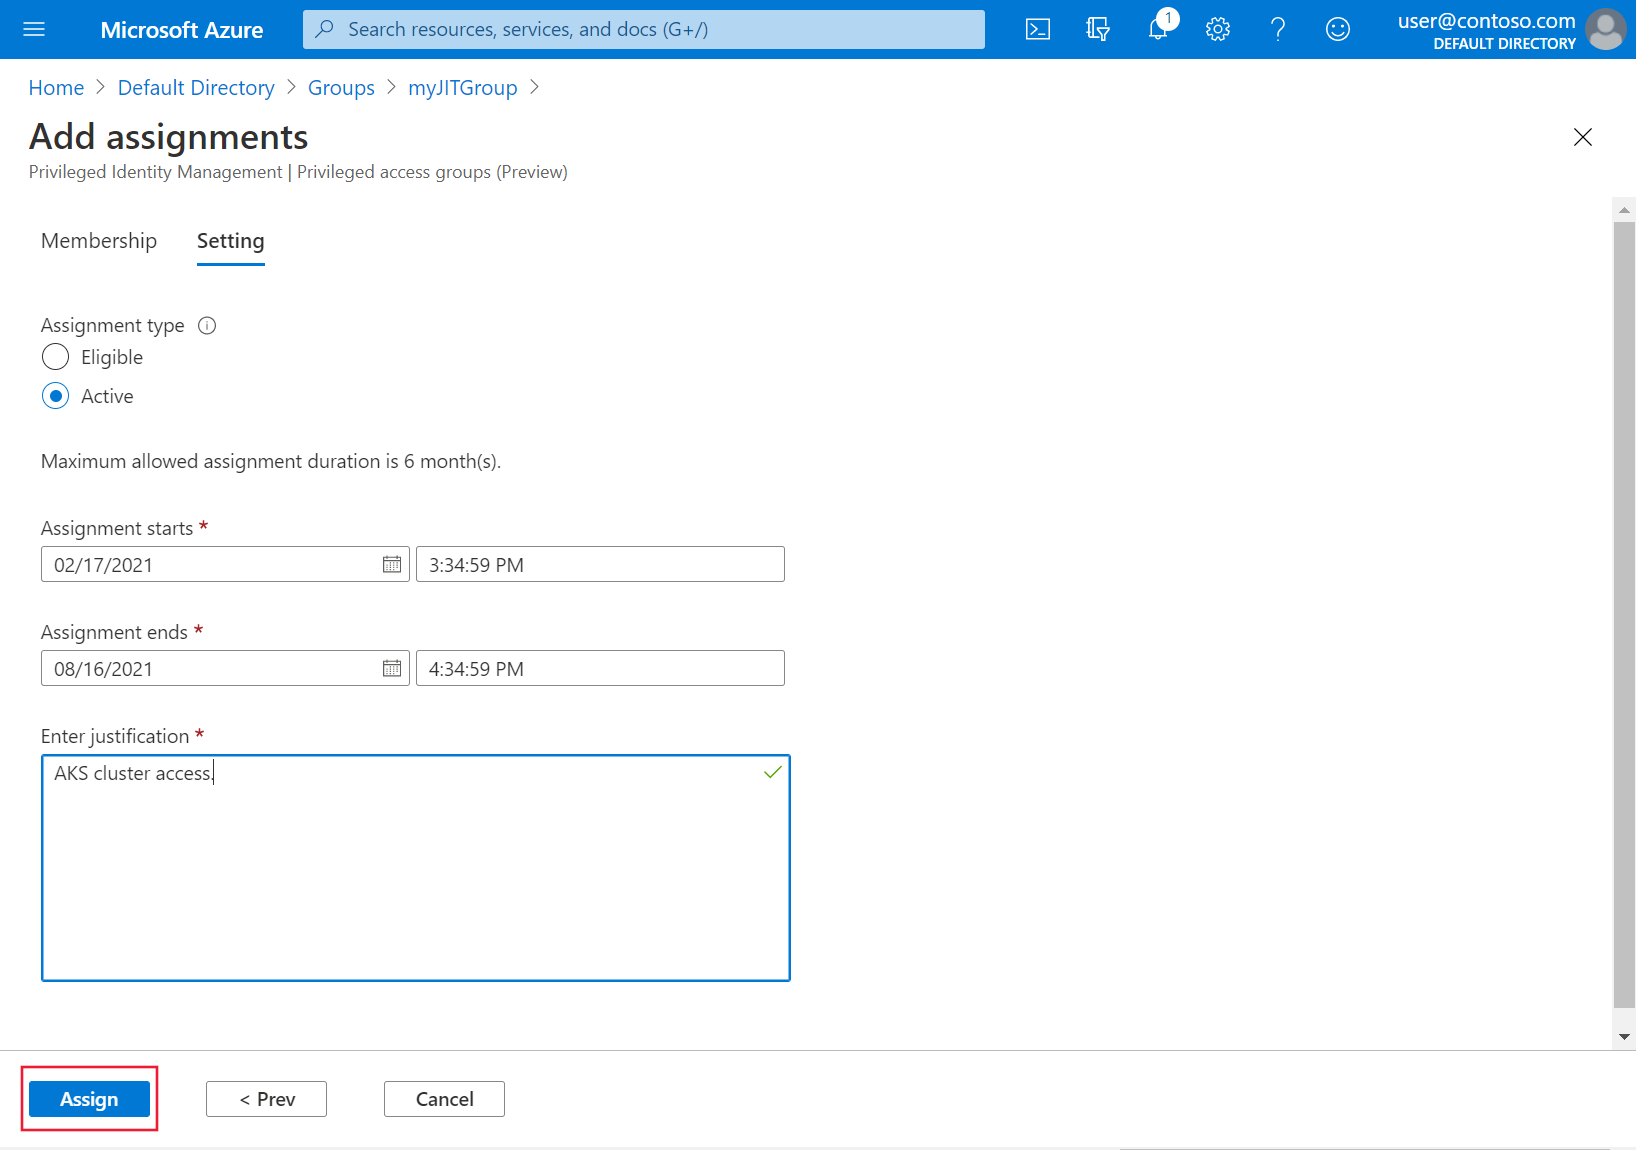
Under Assignment type, select Active and then specify the desired duration. Provide a justification and then select Assign. For more information about assignment types, see Assign eligibility for a privileged access group (preview) in Privileged Identity Management.
Once the assignments have been made, verify just-in-time access is working by accessing the cluster:
Get the user credentials to access the cluster using the
az aks get-credentialscommand.az aks get-credentials --resource-group myResourceGroup --name myManagedClusterFollow the steps to sign in.
Use the
kubectl get nodescommand to view the nodes in the cluster.kubectl get nodesNote the authentication requirement and follow the steps to authenticate. If successful, you should see an output similar to the following example output:
To sign in, use a web browser to open the page https://microsoft.com/deviceloginchina and enter the code AAAAAAAAA to authenticate.
NAME                                STATUS   ROLES   AGE     VERSION
aks-nodepool1-61156405-vmss000000   Ready    agent   6m36s   v1.18.14
aks-nodepool1-61156405-vmss000001   Ready    agent   6m42s   v1.18.14
aks-nodepool1-61156405-vmss000002   Ready    agent   6m33s   v1.18.14
Apply just-in-time access at the namespace level
Integrate your AKS cluster with Azure RBAC.
Associate the group you want to integrate with Just-in-Time access with a namespace in the cluster through role assignment.
az role assignment create --role "Azure Kubernetes Service RBAC Reader" --assignee <AAD-ENTITY-ID> --scope $AKS_ID/namespaces/<namespace-name>Associate the group you configured at the namespace level with PIM to complete the configuration.
Troubleshooting
If kubectl get nodes returns an error similar to the following:
Error from server (Forbidden): nodes is forbidden: User "aaaa11111-11aa-aa11-a1a1-111111aaaaa" cannot list resource "nodes" in API group "" at the cluster scope
Make sure the admin of the security group has given your account an Active assignment.
Next steps
- Learn about Azure RBAC integration for Kubernetes Authorization.
- Learn about Azure AD integration with Kubernetes RBAC.
- Use kubelogin to access features for Azure authentication that aren't available in kubectl.
- Learn more about AKS and Kubernetes identity concepts.