Note
Access to this page requires authorization. You can try signing in or changing directories.
Access to this page requires authorization. You can try changing directories.
An Azure App Service plan provides the resources that an App Service app needs to run. This article describes how to manage an App Service plan.
Create an App Service plan
Tip
If you want to create a plan in an App Service Environment, you can select it in the Region list and follow the rest of the steps as described in this section.
You can create an empty App Service plan, or you can create a plan as part of app creation.
To start creating an App Service plan, go to Create App Service Plan in the Azure portal.
Configure the Project Details section before configuring the App Service plan.
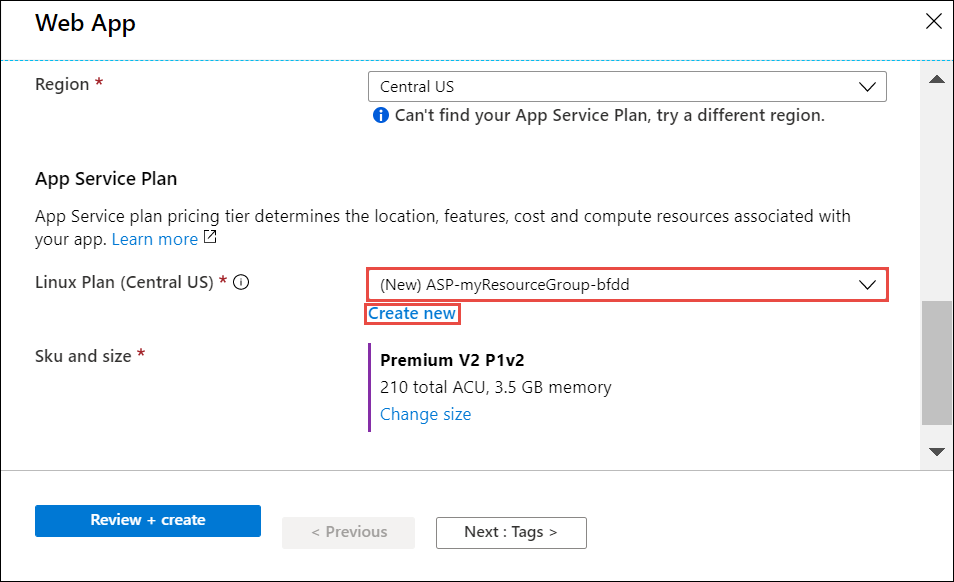
In the App Service Plan details section, name the App Service plan, and then select the Operating System and Region. The region specifies where your App Service plan is created.
When you create a plan, you can select the pricing tier of the new plan. In Pricing Tier, select a Pricing plan, or select Explore pricing plans to view additional details.
In the Zone redundancy section, select Enabled or Disabled, depending on your needs.
Select Review + create, and then select Create.
Important
When you create a new App Service plan in an existing resource group, certain conditions with existing apps can trigger these errors:
The pricing tier is not allowed in this resource group<SKU_NAME> workers are not available in resource group <RESOURCE_GROUP_NAME>
These errors can occur due to incompatibilities with pricing tiers, regions, operating systems, availability zones, existing function apps, or existing web apps. If one of these errors occurs, create your App Service plan in a new resource group.
Move an app to another App Service plan
You can move an app to another App Service plan, as long as the source plan and the target plan are in the same resource group and geographical region and of the same OS type. Any change in type, such as Windows to Linux or any type that's different from the originating type, isn't supported.
You must disable any virtual network integration that's configured on the app before you change App Service plans.
Note
Azure deploys each new App Service plan into a deployment unit, internally called a webspace. Each region can have many webspaces, but your app can only move between plans that are created in the same webspace. An App Service Environment can have multiple webspaces, but your app can only move between plans that are created in the same webspace.
You can't specify the webspace you want when you create a plan, but it's possible to ensure that a plan is created in the same webspace as an existing plan. All plans created with the same resource group, region combination, and operating system are deployed into the same webspace. For example, if you created a plan in resource group A and region B, any plan you subsequently create in resource group A and region B is deployed into the same webspace. Note that plans can't move webspaces after they're created, so you can't move a plan into "the same webspace" as another plan by moving it to another resource group.
In the Azure portal, search for and select App services, and then select the app that you want to move.
In the left pane, under App Service Plan, select App Service plan.
On the App Service plan page, select Change plan.
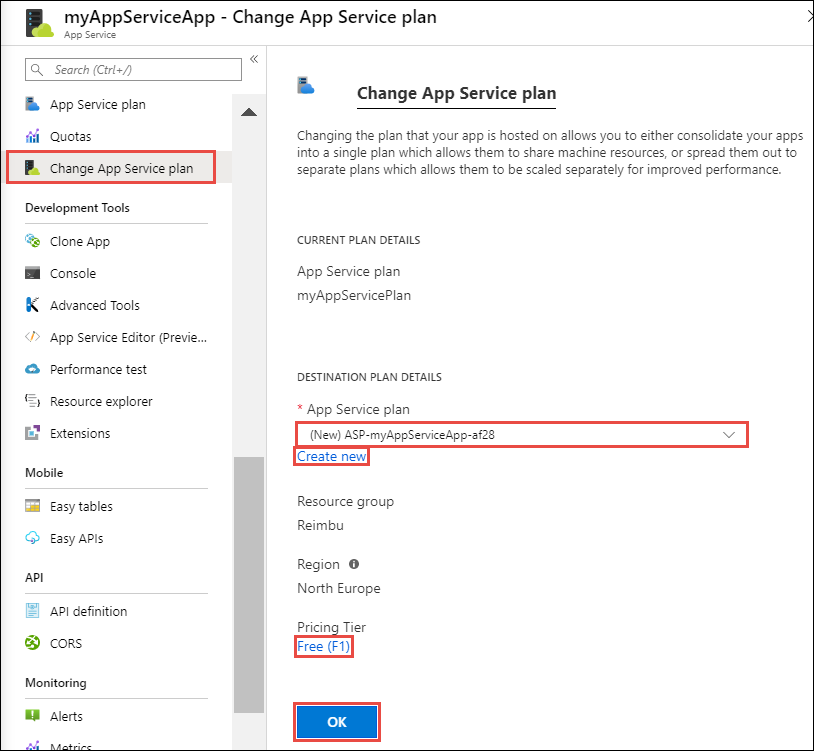
In the Change App Service plan pane, in the App Service plan list, select an existing plan to move the app to. The list shows only plans that are in the same resource group and geographical region as the current App Service plan. If no such plan exists, it lets you create a plan by default. You can also create a new plan manually by selecting New plan and then selecting Create new.
When you're done, select Save.

If you create a new plan, you can change its pricing tier. For more information, see the Scale an App Service plan section later in this article.
Important
If you move an app from a higher-tiered plan to a lower-tiered plan, such as from D1 to F1, the app might lose certain capabilities in the target plan. For example, if your app uses TLS/SSL certificates, you might see this error message:
Cannot update the site with hostname '<app_name>' because its current TLS/SSL configuration 'SNI based SSL enabled' is not allowed in the target compute mode. Allowed TLS/SSL configuration is 'Disabled'.
Move an app to a different region
The region in which your app runs is the region of the App Service plan that it's in. However, you can't change the region of an App Service plan. If you want to run your app in a different region, one alternative is app cloning. Cloning makes a copy of your app in a new or existing App Service plan in any region.
You can find Clone App in the Development Tools section of the left pane.
Important
Cloning has some limitations. You can read about them in Azure App Service App cloning.
Scale an App Service plan
For information about scaling up the pricing tier of an App Service plan, see Scale up an app in Azure.
For information about scaling out an app's instance count, see Scale instance count manually or automatically.
Scale an App Service Plan Asynchronously (Preview)
When creating or manually scaling out an App Service Plan you may experience situations where you're advised to retry with lower instance counts than you originally requested, for example potentially you have asked to scale out to 15 instances but are told only 6 are available, so you must scale to 6 then wait and retry to get to your target 15 instances.
The preview of App Service Plan Asynchronous enables you to request your target number of instances and the platform scales out to the target number, without you having to modify your original request and retrying. The platform scales to the number of available instances and then triggers the underlying platform to make more instances available. You can make use of this functionality during scale-out operations or at plan creation time. This functionality is supported for all Basic, Standard, and Premium pricing plans.
Note
This behavior is NOT configurable for App Service Plans created in App Service Environments. App Service Environments create and scale App Service Plans asynchronously by default.
Scaling up or down App Service Plan SKUs
When using asynchronous scaling, it's possible to scale up or down to a larger or smaller SKU. During this type of operation, no other properties of the App Service Plan can be changed. Scaling up or down to a new SKU may fail if there aren't enough App Service Plan instances available to fully satisfy the request, this is to prevent your App Service Plan having fewer workers than requested.
If a scale up or down operation fails, you can either scale in or out within the current SKU or perform the operation with the minim number of acceptable workers and then scale out asynchronously to the desired target.
Cancelling an asynchronous scaling operation
An in-progress asynchronous scale operation is canceled only when you explicitly change the TargetWorkerCount property. Changes to other App Service Plan properties don't cancel the operation, including changes to the SKU, or App Service Plan instance count. App Service Plan instance count changes that can't be completed synchronously are ignored unless the TargetWorkerCount is also changed. To explicitly cancel the scale operation, set the TargetWorkerCount to 0.
az appservice plan update -g <resourceGroupName> -n <App Service Plan Name> --async-scaling-enabled true --number-of-workers <number of workers to scale out to>
Delete an App Service plan
To avoid unexpected charges, when you delete the last app in an App Service plan, by default, App Service also deletes the plan. If you choose to keep the plan, you should change the plan to the Free tier so that you're not charged.
Important
App Service plans that have no apps associated with them still incur charges because they continue to reserve the configured VM instances.