Note
Access to this page requires authorization. You can try signing in or changing directories.
Access to this page requires authorization. You can try changing directories.
This article describes the Azure App Service VNet Integration feature and how to set it up with apps in Azure App Service. With Azure Virtual Network (VNets), you can place many of your Azure resources in a non-internet-routable network. The VNet Integration feature enables your apps to access resources in or through a VNet. VNet Integration doesn't enable your apps to be accessed privately.
Azure App Service has two variations on the VNet Integration feature:
- The dedicated compute pricing tiers, which include the Basic, Standard, Premium, Premium v2, and Premium v3.
- The App Service Environment, which deploys directly into your virtual network with dedicated supporting infrastructure and is using the Isolated pricing tiers.
The virtual network integration feature is used in Azure App Service dedicated compute pricing tiers. If your app is in an App Service Environment, it's already in a virtual network and doesn't require use of the VNet integration feature to reach resources in the same virtual network. For more information on all the networking features, see App Service networking features.
Virtual network integration gives your app access to resources in your virtual network, but it doesn't grant inbound private access to your app from the virtual network. Private site access refers to making an app accessible only from a private network, such as from within an Azure virtual network. Virtual network integration is used only to make outbound calls from your app into your virtual network. The virtual network integration feature behaves differently when it's used with virtual networks in the same region and with virtual networks in other regions. The virtual network integration feature has two variations:
- Regional virtual network integration: When you connect to virtual networks in the same region, you must have a dedicated subnet in the virtual network you're integrating with.
- Gateway-required virtual network integration: When you connect directly to virtual networks in other regions or to a classic virtual network in the same region, you need an Azure Virtual Network gateway created in the target virtual network.
The virtual network integration feature:
- Requires a supported Standard, Premium, Premium v2, Premium v3, or Elastic Premium App Service pricing tier.
- Supports TCP and UDP.
- Works with App Service apps and function apps.
There are some things that virtual network integration doesn't support, like:
- Mounting a drive.
- Windows Server Active Directory domain join.
- NetBIOS.
Gateway-required virtual network integration provides access to resources only in the target virtual network or in networks connected to the target virtual network with peering or VPNs. Gateway-required virtual network integration doesn't enable access to resources available across Azure ExpressRoute connections or work with service endpoints.
No matter which version is used, virtual network integration gives your app access to resources in your virtual network, but it doesn't grant inbound private access to your app from the virtual network. Private site access refers to making your app accessible only from a private network, such as from within an Azure virtual network. Virtual network integration is only for making outbound calls from your app into your virtual network.
Enable VNet Integration
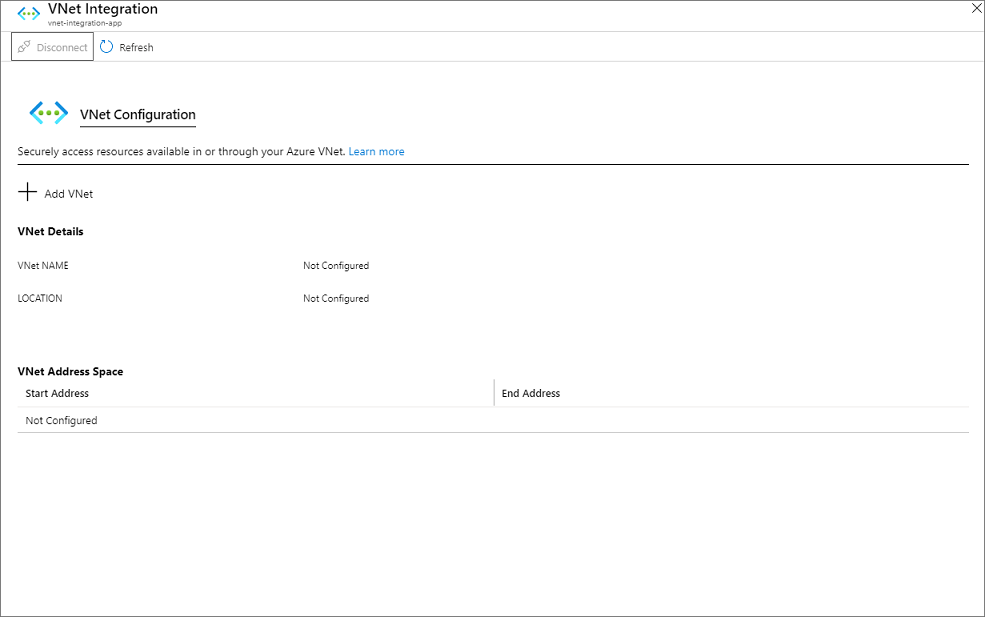
Go to the Networking UI in the App Service portal. Under VNet Integration, select Click here to configure.
Select Add VNet.
The drop-down list contains all of the Azure Resource Manager virtual networks in your subscription in the same region. Underneath that is a list of the Resource Manager virtual networks in all other regions. Select the VNet you want to integrate with.
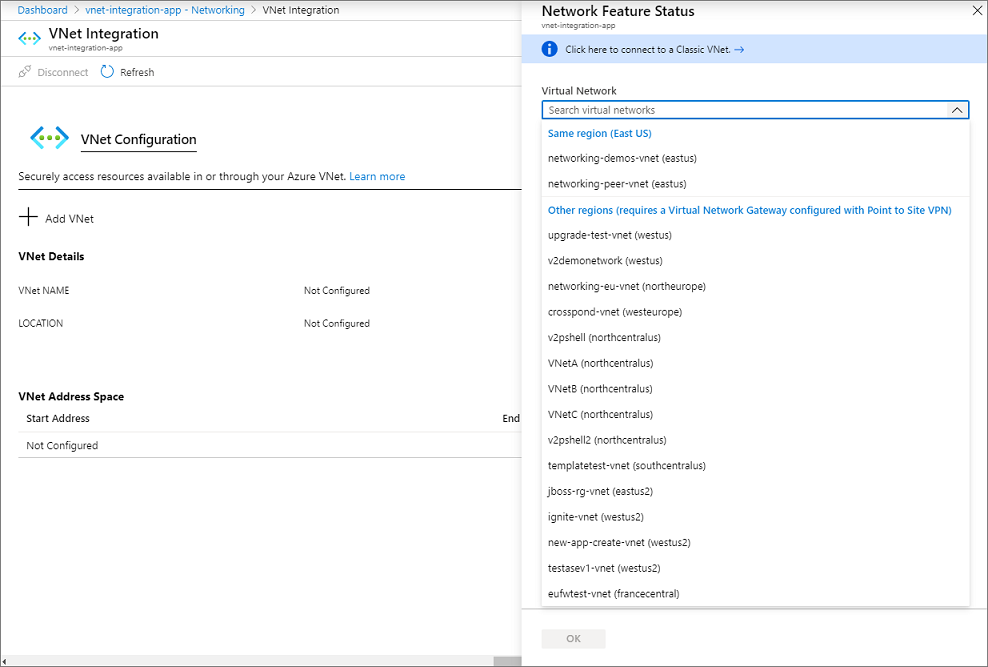
- If the VNet is in the same region, either create a new subnet or select an empty preexisting subnet.
- To select a VNet in another region, you must have a VNet gateway provisioned with point to site enabled.
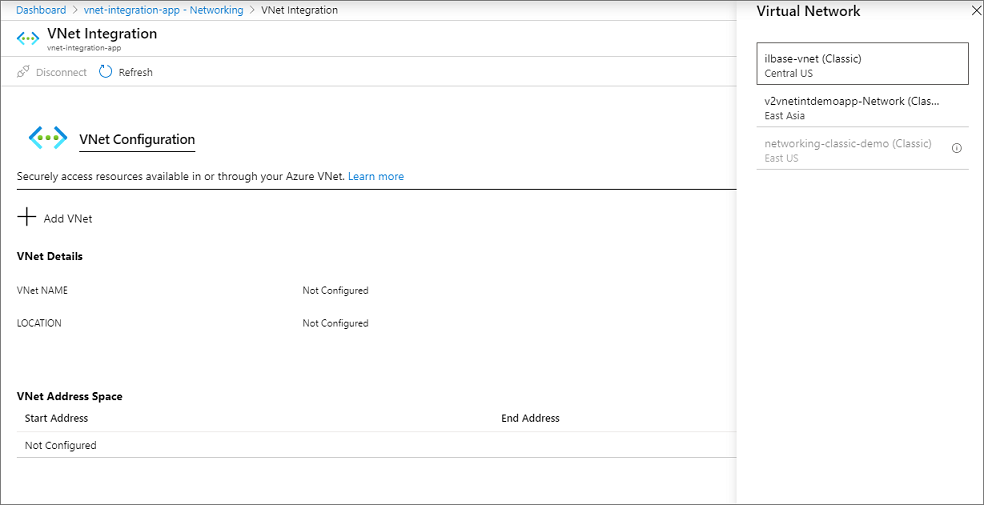
- To integrate with a classic VNet, instead of selecting the Virtual Network drop-down list, select Click here to connect to a Classic VNet. Select the classic virtual network you want. The target VNet must already have a Virtual Network gateway provisioned with point-to-site enabled.
During the integration, your app is restarted. When integration is finished, you'll see details on the VNet you're integrated with.
Regional VNet Integration
Using regional VNet Integration enables your app to access:
- Resources in a VNet in the same region as your app.
- Resources in VNets peered to the VNet your app is integrated with.
- Service endpoint secured services.
- Resources across Azure ExpressRoute connections.
- Resources in the VNet you're integrated with.
- Resources across peered connections, which include Azure ExpressRoute connections.
- Private endpoints
When you use VNet Integration with VNets in the same region, you can use the following Azure networking features:
- Network security groups (NSGs): You can block outbound traffic with an NSG that's placed on your integration subnet. The inbound rules don't apply because you can't use VNet Integration to provide inbound access to your app.
- Route tables (UDRs): You can place a route table on the integration subnet to send outbound traffic where you want.
By default, your app routes only RFC1918 traffic into your VNet. If you want to route all of your outbound traffic into your VNet, use the following steps to add the WEBSITE_VNET_ROUTE_ALL setting in your app:
Go to the Configuration UI in your app portal. Select New application setting.
Enter
WEBSITE_VNET_ROUTE_ALLin the Name box, and enter1in the Value box.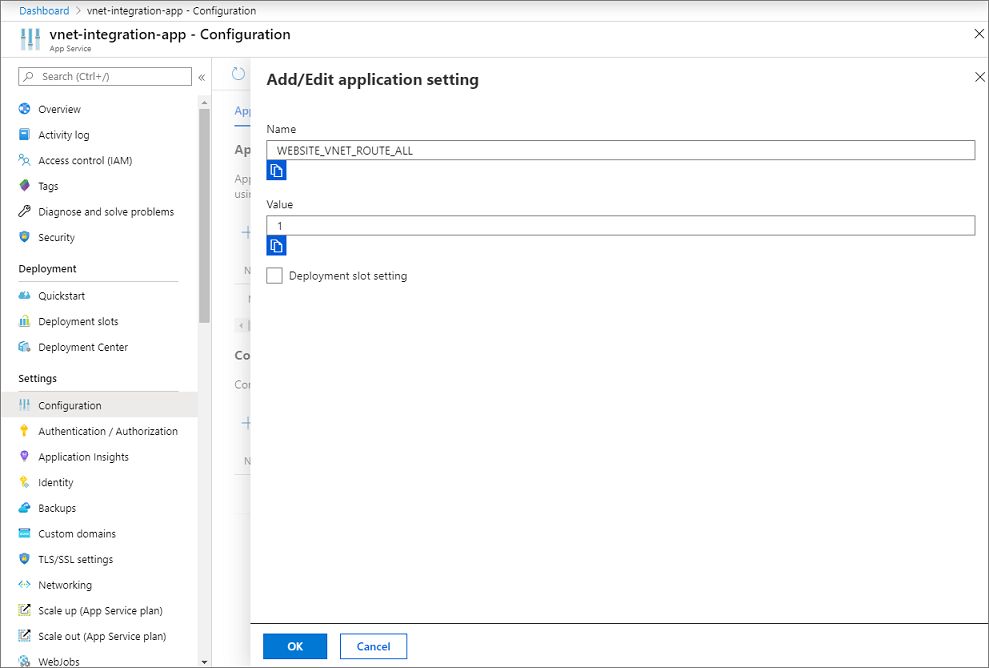
Select OK.
Select Save.
Note
When you route all of your outbound traffic into your VNet, it's subject to the NSGs and UDRs that are applied to your integration subnet. When WEBSITE_VNET_ROUTE_ALL is set to 1, outbound traffic to public IP addresses is still sent from the addresses that are listed in your app properties, unless you provide routes that direct the traffic elsewhere.
Regional VNet integration isn't able to use port 25.
There are some limitations with using VNet Integration with VNets in the same region:
- You can't reach resources across global peering connections.
- The feature is available from all App Service scale units in Premium V2 and Premium V3. It's also available in Standard but only from newer App Service scale units. If you are on an older scale unit, you can only use the feature from a Premium V2 App Service plan. If you want to make sure you can use the feature in a Standard App Service plan, create your app in a Premium V3 App Service plan. Those plans are only supported on our newest scale units. You can scale down if you desire after that.
- The integration subnet can be used by only one App Service plan.
- The feature can't be used by Isolated plan apps that are in an App Service Environment.
- The feature requires an unused subnet that's a /28 or larger in an Azure Resource Manager VNet.
- The app and the VNet must be in the same region.
- You can't delete a VNet with an integrated app. Remove the integration before you delete the VNet.
- You can have only one regional VNet Integration per App Service plan. Multiple apps in the same App Service plan can use the same VNet.
- You can't change the subscription of an app or a plan while there's an app that's using regional VNet Integration.
- Your app can't resolve addresses in Azure DNS private zones without configuration changes.
- VNet Integration isn't supported for Docker Compose scenarios in App Service.
VNet Integration depends on a dedicated subnet. When you provision a subnet, the Azure subnet loses five IPs from the start. One address is used from the integration subnet for each plan instance. When you scale your app to four instances, then four addresses are used.
When you scale up or down in size, the required address space is doubled for a short period of time. This affects the real, available supported instances for a given subnet size. The following table shows both the maximum available addresses per CIDR block and the impact this has on horizontal scale:
| CIDR block size | Max available addresses | Max horizontal scale (instances)* |
|---|---|---|
| /28 | 11 | 5 |
| /27 | 27 | 13 |
| /26 | 59 | 29 |
*Assumes that you'll need to scale up or down in either size or SKU at some point.
Since subnet size can't be changed after assignment, use a subnet that's large enough to accommodate whatever scale your app might reach. To avoid any issues with subnet capacity, you should use a /26 with 64 addresses.
When you want your apps in another plan to reach a VNet that's already connected to by apps in another plan, select a different subnet than the one being used by the pre-existing VNet Integration.
The feature is fully supported for both Windows and Linux apps.
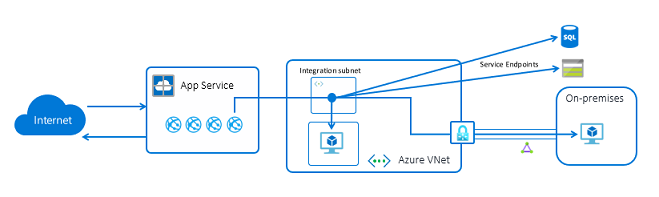
Service endpoints
Regional VNet Integration enables you to reach Azure services that are secured with service endpoints. To access a service endpoint-secured service, you must do the following:
- Configure regional VNet Integration with your web app to connect to a specific subnet for integration.
- Go to the destination service and configure service endpoints against the integration subnet.
Network security groups
You can use network security groups to block inbound and outbound traffic to resources in a VNet. An app that uses regional VNet Integration can use a network security group to block outbound traffic to resources in your VNet or the internet. To block traffic to public addresses, you must have the application setting WEBSITE_VNET_ROUTE_ALL set to 1. The inbound rules in an NSG don't apply to your app because VNet Integration affects only outbound traffic from your app.
To control inbound traffic to your app, use the Access Restrictions feature. An NSG that's applied to your integration subnet is in effect regardless of any routes applied to your integration subnet. If WEBSITE_VNET_ROUTE_ALL is set to 1 and you don't have any routes that affect public address traffic on your integration subnet, all of your outbound traffic is still subject to NSGs assigned to your integration subnet. When WEBSITE_VNET_ROUTE_ALL isn't set, NSGs are only applied to RFC1918 traffic.
Routes
You can use route tables to route outbound traffic from your app to wherever you want. By default, route tables only affect your RFC1918 destination traffic. When you set WEBSITE_VNET_ROUTE_ALL to 1, all of your outbound calls are affected. Routes that are set on your integration subnet won't affect replies to inbound app requests. Common destinations can include firewall devices or gateways.
If you want to route all outbound traffic on-premises, you can use a route table to send all outbound traffic to your ExpressRoute gateway. If you do route traffic to a gateway, be sure to set routes in the external network to send any replies back.
Border Gateway Protocol (BGP) routes also affect your app traffic. If you have BGP routes from something like an ExpressRoute gateway, your app outbound traffic is affected. By default, BGP routes affect only your RFC1918 destination traffic. When WEBSITE_VNET_ROUTE_ALL is set to 1, all outbound traffic can be affected by your BGP routes.
Azure DNS private zones
After your app integrates with your VNet, it uses the same DNS server that your VNet is configured with. By default, your app won't work with Azure DNS private zones. To work with Azure DNS private zones, you need to add the following app settings:
WEBSITE_DNS_SERVERwith value168.63.129.16WEBSITE_VNET_ROUTE_ALLwith value1
These settings send all of your outbound calls from your app into your VNet and enable your app to access an Azure DNS private zone. With these settings, your app can use Azure DNS by querying the DNS private zone at the worker level.
Private Endpoints
If you want to make calls to Private Endpoints, then you must make sure that your DNS lookups resolve to the private endpoint. You can enforce this behavior in one of the following ways:
- Integrate with Azure DNS private zones. When your VNet doesn't have a custom DNS server, this is done automatically.
- Manage the private endpoint in the DNS server used by your app. To do this you must know the private endpoint address and then point the endpoint you are trying to reach to that address using an A record.
- Configure your own DNS server to forward to Azure DNS private zones.
How regional VNet Integration works
Apps in App Service are hosted on worker roles. The Basic and higher pricing plans are dedicated hosting plans where there are no other customers' workloads running on the same workers. Regional VNet Integration works by mounting virtual interfaces with addresses in the delegated subnet. Because the from address is in your VNet, it can access most things in or through your VNet like a VM in your VNet would. The networking implementation is different than running a VM in your VNet. That's why some networking features aren't yet available for this feature.
When regional VNet Integration is enabled, your app makes outbound calls to the internet through the same channels as normal. The outbound addresses that are listed in the app properties portal are the addresses still used by your app. What changes for your app are the calls to service endpoint secured services, or RFC 1918 addresses go into your VNet. If WEBSITE_VNET_ROUTE_ALL is set to 1, all outbound traffic can be sent into your VNet.
Note
WEBSITE_VNET_ROUTE_ALL is currently not supported in Windows containers.
The feature supports only one virtual interface per worker. One virtual interface per worker means one regional VNet Integration per App Service plan. All of the apps in the same App Service plan can use the same VNet Integration. If you need an app to connect to an additional VNet, you need to create another App Service plan. The virtual interface used isn't a resource that customers have direct access to.
Because of the nature of how this technology operates, the traffic that's used with VNet Integration doesn't show up in Azure Network Watcher or NSG flow logs.
Gateway-required VNet Integration
Gateway-required VNet Integration supports connecting to a VNet in another region or to a classic virtual network. Gateway-required VNet Integration:
- Enables an app to connect to only one VNet at a time.
- Enables up to five VNets to be integrated within an App Service plan.
- Allows the same VNet to be used by multiple apps in an App Service plan without affecting the total number that can be used by an App Service plan. If you have six apps using the same VNet in the same App Service plan, that counts as one VNet being used.
- Supports a 99.9% SLA due to the SLA on the gateway.
- Enables your apps to use the DNS that the VNet is configured with.
- Requires a Virtual Network route-based gateway configured with an SSTP point-to-site VPN before it can be connected to an app.
You can't use gateway-required VNet Integration:
With a VNet connected with Azure ExpressRoute.
From a Linux app.
To access service endpoint secured resources.
With a coexistence gateway that supports both ExpressRoute and point-to-site or site-to-site VPNs.
Set up a gateway in your Azure virtual network
To create a gateway:
Create a gateway subnet in your VNet.
Create the VPN gateway. Select a route-based VPN type.
Set the point-to-site addresses. If the gateway isn't in the basic SKU, then IKEV2 must be disabled in the point-to-site configuration and SSTP must be selected. The point-to-site address space must be in the RFC 1918 address blocks 10.0.0.0/8, 172.16.0.0/12, and 192.168.0.0/16.
If you create the gateway for use with App Service VNet Integration, you don't need to upload a certificate. Creating the gateway can take 30 minutes. You won't be able to integrate your app with your VNet until the gateway is provisioned.
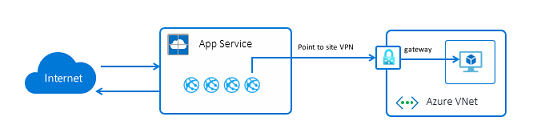
How gateway-required VNet Integration works
Gateway-required VNet Integration is built on top of point-to-site VPN technology. Point-to-site VPNs limit network access to the virtual machine that hosts the app. Apps are restricted to send traffic out to the internet only through Hybrid Connections or through VNet Integration. When your app is configured with the portal to use gateway-required VNet Integration, a complex negotiation is managed on your behalf to create and assign certificates on the gateway and the application side. The result is that the workers used to host your apps are able to directly connect to the virtual network gateway in the selected VNet.
Access on-premises resources
Apps can access on-premises resources by integrating with VNets that have site-to-site connections. If you use gateway-required VNet Integration, update your on-premises VPN gateway routes with your point-to-site address blocks. When the site-to-site VPN is first set up, the scripts used to configure it should set up routes properly. If you add the point-to-site addresses after you create your site-to-site VPN, you need to update the routes manually. Details on how to do that vary per gateway and aren't described here. You can't have BGP configured with a site-to-site VPN connection.
No additional configuration is required for the regional VNet Integration feature to reach through your VNet to on-premises resources. You simply need to connect your VNet to on-premises resources by using ExpressRoute or a site-to-site VPN.
Note
The gateway-required VNet Integration feature doesn't integrate an app with a VNet that has an ExpressRoute gateway. Even if the ExpressRoute gateway is configured in coexistence mode, the VNet Integration doesn't work. If you need to access resources through an ExpressRoute connection, use the regional VNet Integration feature or an App Service Environment, which runs in your VNet.
Peering
If you use peering with the regional VNet Integration, you don't need to do any additional configuration.
If you use gateway-required VNet Integration with peering, you need to configure a few additional items. To configure peering to work with your app:
- Add a peering connection on the VNet your app connects to. When you add the peering connection, enable Allow virtual network access and select Allow forwarded traffic and Allow gateway transit.
- Add a peering connection on the VNet that's being peered to the VNet you're connected to. When you add the peering connection on the destination VNet, enable Allow virtual network access and select Allow forwarded traffic and Allow remote gateways.
- Go to the App Service plan > Networking > VNet Integration UI in the portal. Select the VNet your app connects to. Under the routing section, add the address range of the VNet that's peered with the VNet your app is connected to.
Manage VNet Integration
Connecting and disconnecting with a VNet is at an app level. Operations that can affect VNet Integration across multiple apps are at the App Service plan level. From the app > Networking > VNet Integration portal, you can get details on your VNet. You can see similar information at the App Service plan level in the App Service plan > Networking > VNet Integration portal.
The only operation you can take in the app view of your VNet Integration instance is to disconnect your app from the VNet it's currently connected to. To disconnect your app from a VNet, select Disconnect. Your app is restarted when you disconnect from a VNet. Disconnecting doesn't change your VNet. The subnet or gateway isn't removed. If you then want to delete your VNet, first disconnect your app from the VNet and delete the resources in it, such as gateways.
The App Service plan VNet Integration UI shows you all of the VNet integrations used by the apps in your App Service plan. To see details on each VNet, select the VNet you're interested in. There are two actions you can perform here for gateway-required VNet Integration:
- Sync network: The sync network operation is used only for the gateway-dependent VNet Integration feature. Performing a sync network operation ensures that your certificates and network information are in sync. If you add or change the DNS of your VNet, perform a sync network operation. This operation restarts any apps that use this VNet. This operation will not work if you are using an app and a vnet belonging to different subscriptions.
- Add routes: Adding routes drives outbound traffic into your VNet.
The private IP assigned to the instance is exposed via the environment variable, WEBSITE_PRIVATE_IP. Kudu console UI also shows the list of environment variables available to the Web App. This IP is assigned from the address range of the integrated subnet. For Regional VNet Integration, the value of WEBSITE_PRIVATE_IP is an IP from the address range of the delegated subnet, and for Gateway-required VNet Integration, the value is an IP from the adress range of the Point-to-site address pool configured on the Virtual Network Gateway. This is the IP that will be used by the Web App to connect to the resources through the Virtual Network.
Note
The value of WEBSITE_PRIVATE_IP is bound to change. However, it will be an IP within the address range of the integration subnet or the point-to-site address range, so you will need to allow access from the entire address range.
Gateway-required VNet Integration routing
The routes that are defined in your VNet are used to direct traffic into your VNet from your app. To send additional outbound traffic into the VNet, add those address blocks here. This capability only works with gateway-required VNet Integration. Route tables don't affect your app traffic when you use gateway-required VNet Integration the way that they do with regional VNet Integration.
Gateway-required VNet Integration certificates
When gateway-required VNet Integration is enabled, there's a required exchange of certificates to ensure the security of the connection. Along with the certificates are the DNS configuration, routes, and other similar things that describe the network.
If certificates or network information is changed, select Sync Network. When you select Sync Network, you cause a brief outage in connectivity between your app and your VNet. While your app isn't restarted, the loss of connectivity could cause your site to not function properly.
Pricing details
The regional VNet Integration feature has no additional charge for use beyond the App Service plan pricing tier charges.
Three charges are related to the use of the gateway-required VNet Integration feature:
- App Service plan pricing tier charges: Your apps need to be in a Standard, Premium, or PremiumV2 App Service plan. For more information on those costs, see App Service pricing.
- Data transfer costs: There's a charge for data egress, even if the VNet is in the same datacenter. Those charges are described in Data Transfer pricing details.
- VPN gateway costs: There's a cost to the virtual network gateway that's required for the point-to-site VPN. For more information, see VPN gateway pricing.
Troubleshooting
Note
VNET integration is not supported for Docker Compose scenarios in App Service. Azure Functions Access Restrictions are ignored if their is a private endpoint present.
The feature is easy to set up, but that doesn't mean your experience will be problem free. If you encounter problems accessing your desired endpoint, there are some utilities you can use to test connectivity from the app console. There are two consoles that you can use. One is the Kudu console, and the other is the console in the Azure portal. To reach the Kudu console from your app, go to Tools > Kudu. You can also reach the Kudo console at [sitename].scm.chinacloudsites.cn. After the website loads, go to the Debug console tab. To get to the Azure portal-hosted console from your app, go to Tools > Console.
Tools
In native Windows apps, the tools ping, nslookup, and tracert won't work through the console because of security constraints (they work in custom Windows containers). To fill the void, two separate tools are added. To test DNS functionality, we added a tool named nameresolver.exe. The syntax is:
nameresolver.exe hostname [optional: DNS Server]
You can use nameresolver to check the hostnames that your app depends on. This way you can test if you have anything misconfigured with your DNS or perhaps don't have access to your DNS server. You can see the DNS server that your app uses in the console by looking at the environmental variables WEBSITE_DNS_SERVER and WEBSITE_DNS_ALT_SERVER.
Note
The nameresolver.exe tool currently doesn't work in custom Windows containers.
You can use the next tool to test for TCP connectivity to a host and port combination. This tool is called tcpping and the syntax is:
tcpping.exe hostname [optional: port]
The tcpping utility tells you if you can reach a specific host and port. It can show success only if there's an application listening at the host and port combination, and there's network access from your app to the specified host and port.
Debug access to virtual network-hosted resources
A number of things can prevent your app from reaching a specific host and port. Most of the time it's one of these things:
- A firewall is in the way. If you have a firewall in the way, you hit the TCP timeout. The TCP timeout is 21 seconds in this case. Use the tcpping tool to test connectivity. TCP timeouts can be caused by many things beyond firewalls, but start there.
- DNS isn't accessible. The DNS timeout is 3 seconds per DNS server. If you have two DNS servers, the timeout is 6 seconds. Use nameresolver to see if DNS is working. You can't use nslookup, because that doesn't use the DNS your virtual network is configured with. If inaccessible, you could have a firewall or NSG blocking access to DNS or it could be down.
If those items don't answer your problems, look first for things like:
Regional virtual network integration
- Is your destination a non-RFC1918 address and you don't have Route All enabled?
- Is there an NSG blocking egress from your integration subnet?
- If you're going across Azure ExpressRoute or a VPN, is your on-premises gateway configured to route traffic back up to Azure? If you can reach endpoints in your virtual network but not on-premises, check your routes.
- Do you have enough permissions to set delegation on the integration subnet? During regional virtual network integration configuration, your integration subnet is delegated to Microsoft.Web/serverFarms. The VNet integration UI delegates the subnet to Microsoft.Web/serverFarms automatically. If your account doesn't have sufficient networking permissions to set delegation, you'll need someone who can set attributes on your integration subnet to delegate the subnet. To manually delegate the integration subnet, go to the Azure Virtual Network subnet UI and set the delegation for Microsoft.Web/serverFarms.
Gateway-required virtual network integration
- Is the point-to-site address range in the RFC 1918 ranges (10.0.0.0-10.255.255.255 / 172.16.0.0-172.31.255.255 / 192.168.0.0-192.168.255.255)?
- Does the gateway show as being up in the portal? If your gateway is down, then bring it back up.
- Do certificates show as being in sync, or do you suspect that the network configuration was changed? If your certificates are out of sync or you suspect that a change was made to your virtual network configuration that wasn't synced with your ASPs, select Sync Network.
- If you're going across a VPN, is the on-premises gateway configured to route traffic back up to Azure? If you can reach endpoints in your virtual network but not on-premises, check your routes.
- Are you trying to use a coexistence gateway that supports both point to site and ExpressRoute? Coexistence gateways aren't supported with virtual network integration.
Debugging networking issues is a challenge because you can't see what's blocking access to a specific host:port combination. Some causes include:
- You have a firewall up on your host that prevents access to the application port from your point-to-site IP range. Crossing subnets often requires public access.
- Your target host is down.
- Your application is down.
- You had the wrong IP or hostname.
- Your application is listening on a different port than what you expected. You can match your process ID with the listening port by using "netstat -aon" on the endpoint host.
- Your network security groups are configured in such a manner that they prevent access to your application host and port from your point-to-site IP range.
You don't know what address your app actually uses. It could be any address in the integration subnet or point-to-site address range, so you need to allow access from the entire address range.
More debug steps include:
- Connect to a VM in your virtual network and attempt to reach your resource host:port from there. To test for TCP access, use the PowerShell command Test-NetConnection. The syntax is:
Test-NetConnection hostname [optional: -Port]
- Bring up an application on a VM and test access to that host and port from the console from your app by using tcpping.
On-premises resources
If your app can't reach a resource on-premises, check if you can reach the resource from your virtual network. Use the Test-NetConnection PowerShell command to check for TCP access. If your VM can't reach your on-premises resource, your VPN or ExpressRoute connection might not be configured properly.
If your virtual network-hosted VM can reach your on-premises system but your app can't, the cause is likely one of the following reasons:
- Your routes aren't configured with your subnet or point-to-site address ranges in your on-premises gateway.
- Your network security groups are blocking access for your point-to-site IP range.
- Your on-premises firewalls are blocking traffic from your point-to-site IP range.
- You're trying to reach a non-RFC 1918 address by using the regional virtual network integration feature.
Deleting the App Service plan or web app before disconnecting the VNet integration
If you deleted the web app or the App Service plan without disconnecting the VNet integration first, you will not be able to do any update/delete operations on the virtual network or subnet that was used for the integration with the deleted resource. A subnet delegation 'Microsoft.Web/serverFarms' will remain assigned to your subnet and will prevent the update/delete operations.
In order to do update/delete the subnet or virtual network again you need to re-create the VNet integration and then disconnect it:
- Re-create the App Service plan and web app (it is mandatory to use the exact same web app name as before).
- Navigate to the 'Networking' blade on the web app and configure the VNet integration.
- After the VNet integration is configured, select the 'Disconnect' button.
- Delete the App Service plan or web app.
- Update/Delete the subnet or virtual network.
If you still encounter issues with the VNet integration after following the steps above, please contact Microsoft Support.
Automation
CLI support is available for regional VNet Integration. To access the following commands, install the Azure CLI.
az webapp vnet-integration --help

Group
    az webapp vnet-integration : Methods that list, add, and remove virtual network
    integrations from a webapp.
        This command group is in preview. It may be changed/removed in a future release.
Commands:
    add    : Add a regional virtual network integration to a webapp.
    list   : List the virtual network integrations on a webapp.
    remove : Remove a regional virtual network integration from webapp.

az appservice vnet-integration --help

Group
    az appservice vnet-integration : A method that lists the virtual network
    integrations used in an appservice plan.
        This command group is in preview. It may be changed/removed in a future release.
Commands:
    list : List the virtual network integrations used in an appservice plan.
PowerShell support for regional VNet integration is available too, but you must create generic resource with a property array of the subnet resourceID
# Parameters
$sitename = 'myWebApp'
$resourcegroupname = 'myRG'
$VNetname = 'myVNet'
$location = 'myRegion'
$integrationsubnetname = 'myIntegrationSubnet'
$subscriptionID = 'aaaaaaaa-bbbb-cccc-dddd-eeeeeeeeeeee'

#Property array with the SubnetID
$properties = @{
  subnetResourceId = "/subscriptions/$subscriptionID/resourceGroups/$resourcegroupname/providers/Microsoft.Network/virtualNetworks/$VNetname/subnets/$integrationsubnetname"
}

#Creation of the VNet integration
$vNetParams = @{
  ResourceName = "$sitename/VirtualNetwork"
  Location = $location
  ResourceGroupName = $resourcegroupname
  ResourceType = 'Microsoft.Web/sites/networkConfig'
  PropertyObject = $properties
}
New-AzResource @vNetParams
For gateway-required VNet Integration, you can integrate App Service with an Azure virtual network by using PowerShell. For a ready-to-run script, see Connect an app in Azure App Service to an Azure virtual network.