Note
Access to this page requires authorization. You can try signing in or changing directories.
Access to this page requires authorization. You can try changing directories.
You can use the Azure portal to configure the hosting of multiple web sites when you create an application gateway. In this tutorial, you define backend address pools using virtual machines. You then configure listeners and rules based on two domains to make sure web traffic arrives at the appropriate servers in the pools. This tutorial uses examples of www.contoso.com and www.fabrikam.com.
In this tutorial, you learn how to:
- Create an application gateway
- Create virtual machines for backend servers
- Create backend pools with the backend servers
- Create listeners
- Create routing rules
- Edit hosts file for name resolution

If you don't have an Azure subscription, create a Trial before you begin.
Note
We recommend that you use the Azure Az PowerShell module to interact with Azure. To get started, see Install Azure PowerShell. To learn how to migrate to the Az PowerShell module, see Migrate Azure PowerShell from AzureRM to Az.
Prerequisites
- An Azure subscription
Sign in to Azure
Sign in to the Azure portal.
Create an application gateway
From the Azure portal menu, select + Create a resource > Networking > Application Gateway, or search for Application Gateway in the portal search box.
Select Create.
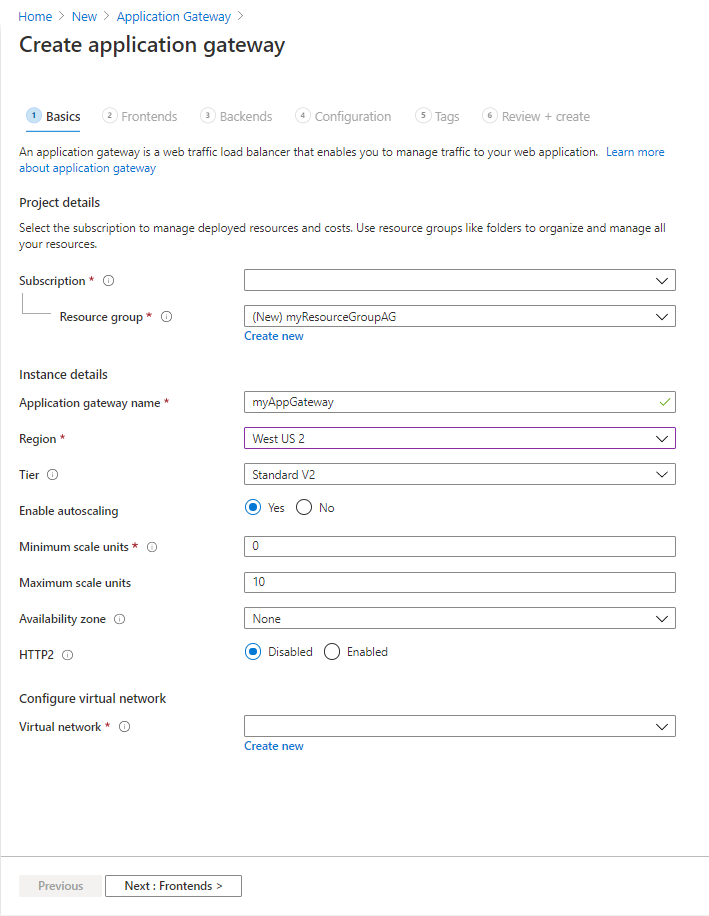
Basics tab
On the Basics tab, enter these values:
Resource group: Select myResourceGroupAG for the resource group. If it doesn't exist, select Create new to create it.
Application gateway name: Enter myAppGateway for the name of the application gateway.
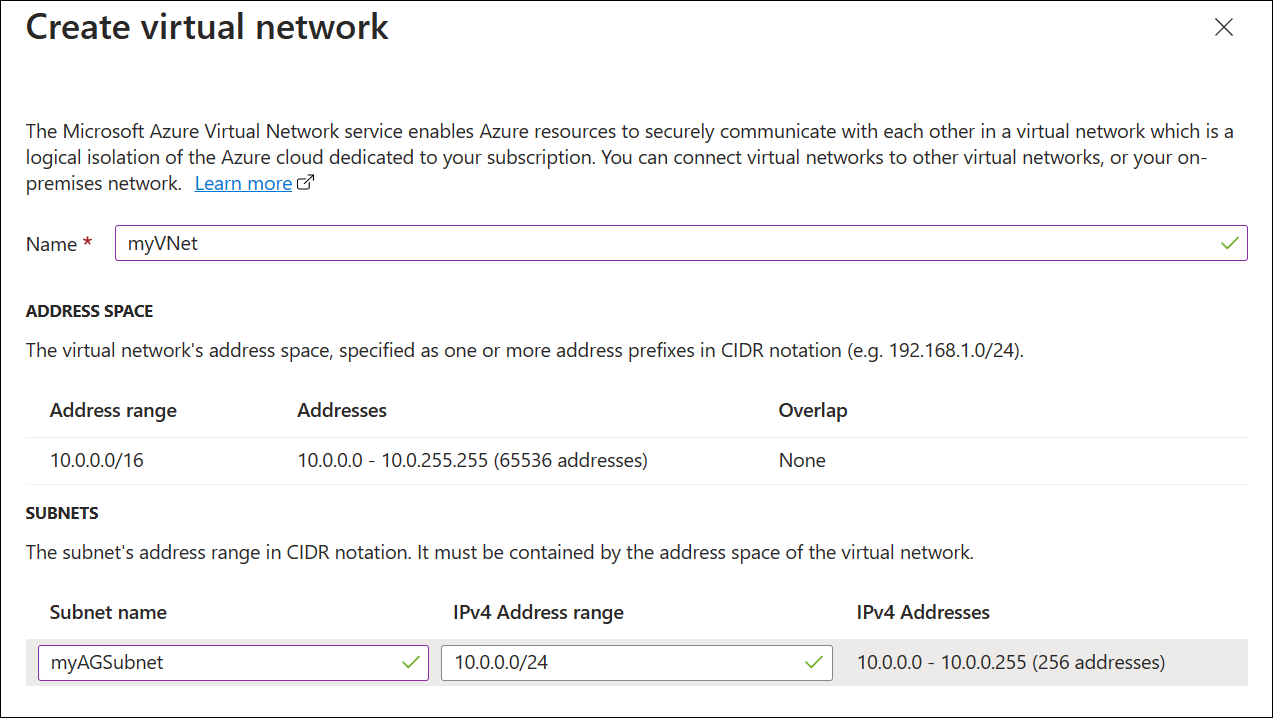
For Azure to communicate between the resources that you create, it needs a virtual network. You can either create a new virtual network or use an existing one. In this example, you'll create a new virtual network at the same time that you create the application gateway. Application gateway instances are created in separate subnets. You create two subnets in this example: one for the application gateway, and another for the backend servers.
Under Configure virtual network, select Create new to create a new virtual network. In the Create virtual network window that opens, enter the following values to create the virtual network and two subnets:
Name: Enter myVNet for the name of the virtual network.
Subnet name (application gateway subnet): The Subnets grid will show a subnet named Default. Change the name of this subnet to myAGSubnet.
The application gateway subnet can contain only application gateways. No other resources are allowed. The default IP address range provided is 10.0.0.0/24.
Select OK to close the Create virtual network window and save the virtual network settings.
On the Basics tab, accept the default values for the other settings and then select Next: Frontends.
Frontends tab
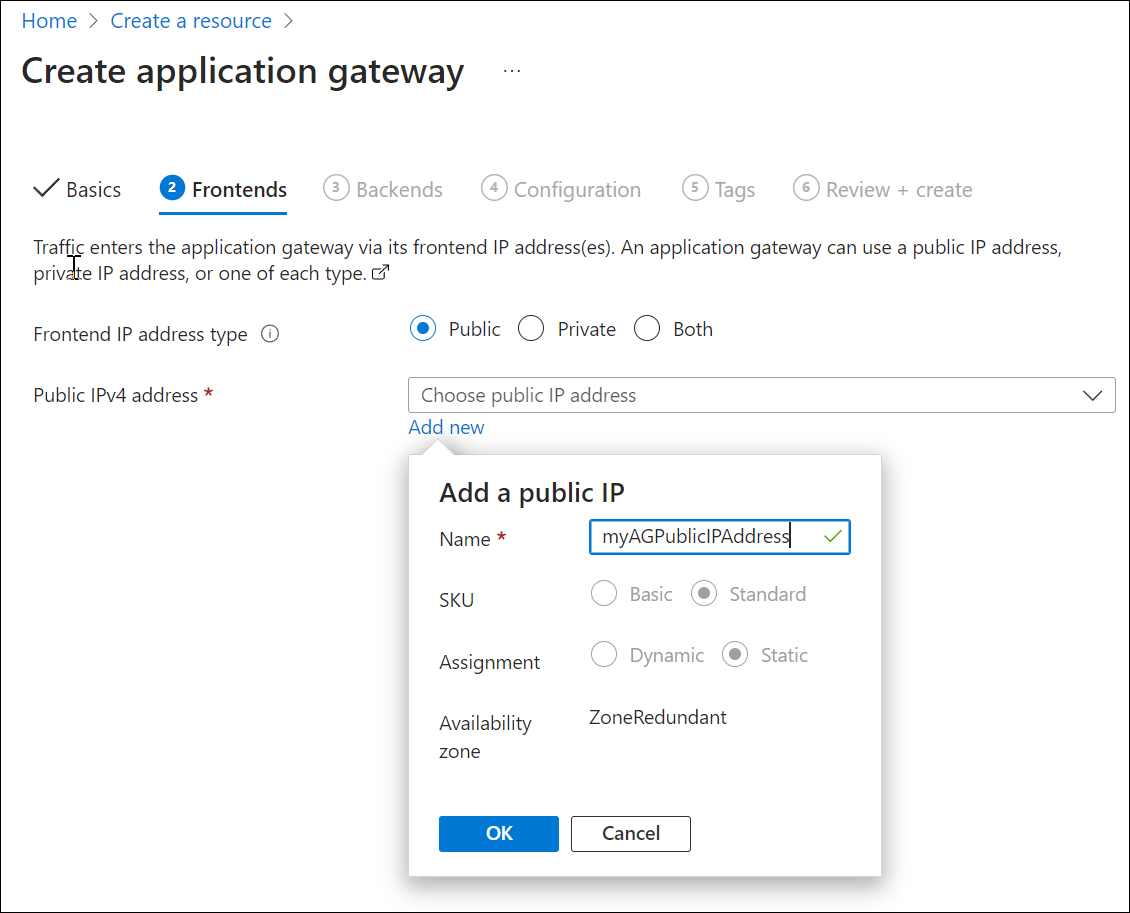
On the Frontends tab, verify Frontend IP address type is set to Public.
You can configure the Frontend IP to be Public or Private as per your use case. In this example, you'll choose a Public Frontend IP.Note
For the application gateway v2 SKU, you can only choose Public frontend IP configuration. Use of a private frontend IP address configuration is currently in public preview. For more information, see Private Application Gateway deployment.
Select Add new for the Public IP address and enter myAGPublicIPAddress for the public IP address name, and then select OK.
Select Next: Backends.
Backends tab
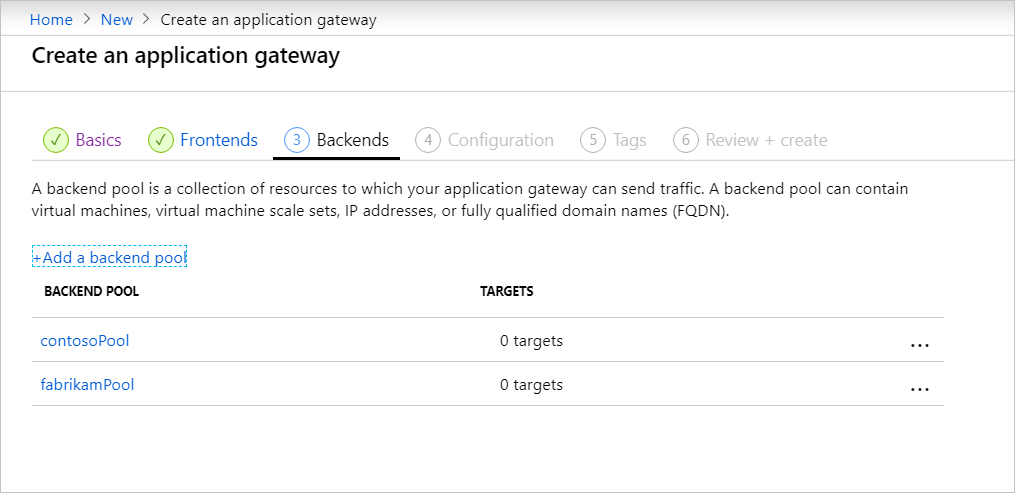
The backend pool is used to route requests to the backend servers that serve the request. Backend pools can be NICs, virtual machine scale sets, public IPs, internal IPs, fully qualified domain names (FQDN), and multi-tenant backends like Azure App Service. In this example, you'll create an empty backend pool with your application gateway and then add backend targets to the backend pool.
On the Backends tab, select Add a backend pool.
In the Add a backend pool window that opens, enter the following values to create an empty backend pool:
- Name: Enter contosoPool for the name of the backend pool.
- Add backend pool without targets: Select Yes to create a backend pool with no targets. You'll add backend targets after creating the application gateway.
In the Add a backend pool window, select Add to save the backend pool configuration and return to the Backends tab.
Now add another backend pool called fabrikamPool the same way that you added the previous pool.
Select Add.
On the Backends tab, select Next: Configuration.
Configuration tab
On the Configuration tab, you'll connect the frontend and backend pools you created using a routing rule.
Select Add a routing rule in the Routing rules column.
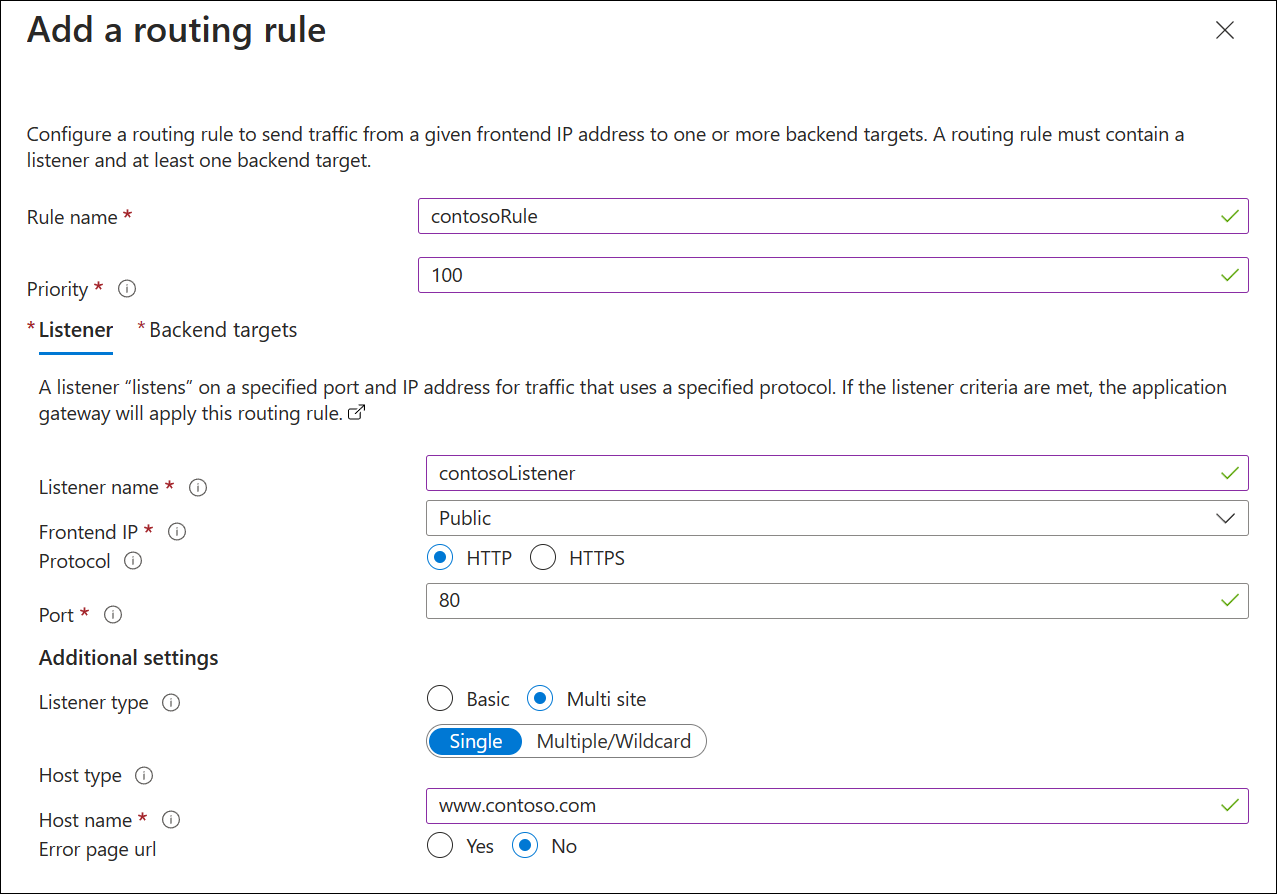
In the Add a routing rule window that opens, enter contosoRule for the Rule name.
A routing rule requires a listener. On the Listener tab within the Add a routing rule window, enter the following values for the listener:
- Rule name: contosoRule.
- Listener name: contosoListener.
- Frontend IP: Select Public to choose the public IP you created for the frontend.
Under Additional settings:
- Listener type: Multiple sites
- Host name:
www.contoso.com
Accept the default values for the other settings on the Listener tab, then select the Backend targets tab to configure the rest of the routing rule.
On the Backend targets tab, select contosoPool for the Backend target.
For the Backend setting, select Add new to add a new Backend setting. The Backend setting will determine the behavior of the routing rule. In the Add Backend setting window that opens, enter contosoSetting for the Backend settings name and 80 for the Backend port. Accept the default values for the other settings in the Add Backend setting window, then select Add to return to the Add a routing rule window.
On the Add a routing rule window, select Add to save the routing rule and return to the Configuration tab.
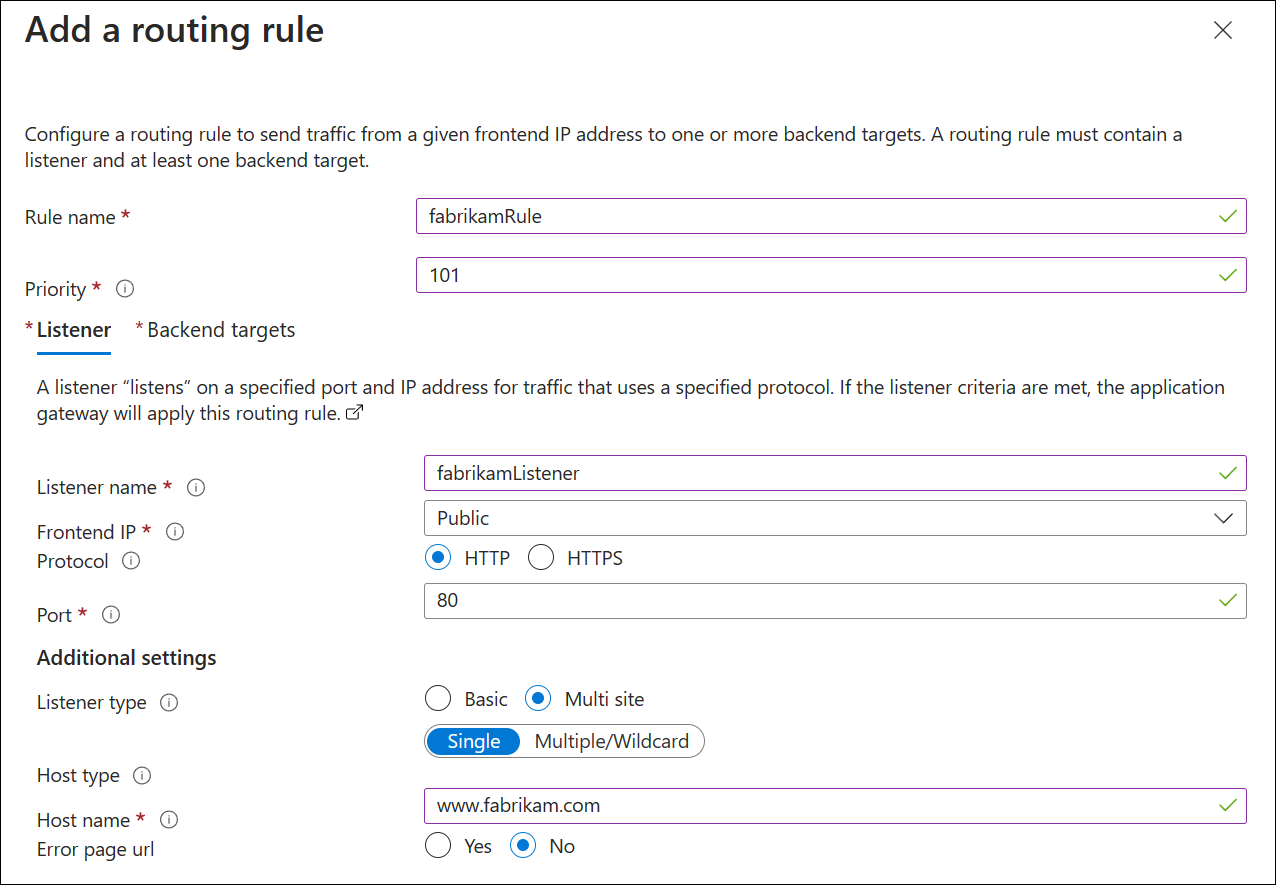
Select Add a routing rule and add a similar rule, listener, backend target, and backend setting for Fabrikam.
Select Next: Tags and then Next: Review + create.
Review + create tab
Review the settings on the Review + create tab, and then select Create to create the virtual network, the public IP address, and the application gateway. It may take several minutes for Azure to create the application gateway.
Wait until the deployment finishes successfully before moving on to the next section.
Add backend targets
In this example, you'll use virtual machines as the target backend. You can either use existing virtual machines or create new ones. You'll create two virtual machines that Azure uses as backend servers for the application gateway.
To add backend targets, you'll:
- Add a backend subnet.
- Create two new VMs, contosoVM and fabrikamVM, to be used as backend servers.
- Install IIS on the virtual machines to verify that the application gateway was created successfully.
- Add the backend servers to the backend pools.
Add a backend subnet
- On the Azure portal, search for virtual networks and select *myVNet.
- Under Settings, select Subnets.
- Select + Subnet and in the Add subnet pane, enter myBackendSubnet for Name and accept 10.0.1.0/24 as the Subnet address range.
- Accept all other default settings and select Save.
Create a virtual machine
On the Azure portal, select Create a resource. The New window appears.
Select Windows Server 2016 Datacenter in the Popular list. The Create a virtual machine page appears.
Application Gateway can route traffic to any type of virtual machine used in its backend pool. In this example, you use a Windows Server 2016 Datacenter.Enter these values in the Basics tab for the following virtual machine settings:
- Subscription: Select your subscription.
- Resource group: Select myResourceGroupAG for the resource group name.
- Virtual machine name: Enter contosoVM for the name of the virtual machine.
- Region: Select the same region that you used before.
- Username: Enter a name for the administrator user name.
- Password: Enter a password for the administrator.
- Public inbound ports: Select None.
Accept the other defaults and then select Next: Disks.
Accept the Disks tab defaults and then select Next: Networking.
On the Networking tab, verify that myVNet is selected for the Virtual network and the Subnet is set to myBackendSubnet. Set Public IP to None. Accept the other defaults and then select Next: Management.
Application Gateway can communicate with instances outside of the virtual network that it is in, but you need to ensure there's IP connectivity.On the Management tab, set Boot diagnostics to Disable. Accept the other defaults and then select Review + create.
On the Review + create tab, review the settings, correct any validation errors, and then select Create.
Wait for the virtual machine creation to complete before continuing.
Note
The default rules of the network security group block all inbound access from the internet, including RDP. To connect to the virtual machine, use Azure Bastion. For more information, see Quickstart: Deploy Azure Bastion with default settings.
Install IIS for testing
In this example, you install IIS on the virtual machines only to verify Azure created the application gateway successfully.
Login the Azure portal in powershell with command below:
Connect-AzAccount -Environment AzureChinaCloudRun the following command to install IIS on the virtual machine, substituting your resource group region for <location>:
Set-AzVMExtension `
  -ResourceGroupName myResourceGroupAG `
  -ExtensionName IIS `
  -VMName contosoVM `
  -Publisher Microsoft.Compute `
  -ExtensionType CustomScriptExtension `
  -TypeHandlerVersion 1.4 `
  -SettingString '{"commandToExecute":"powershell Add-WindowsFeature Web-Server; powershell Add-Content -Path \"C:\\inetpub\\wwwroot\\Default.htm\" -Value $($env:computername)"}' `
  -Location <location>
Create a second virtual machine and install IIS using the steps that you previously completed. Use fabrikamVM for the virtual machine name and for the VMName setting of the Set-AzVMExtension cmdlet.
Add backend servers to backend pools
Select All resources, and then select myAppGateway.
Select Backend pools from the left menu.
Select contosoPool.
Under Target type, select Virtual machine from the drop-down list.
Under Target, select the contosoVM virtual machine's network interface from the drop-down list.
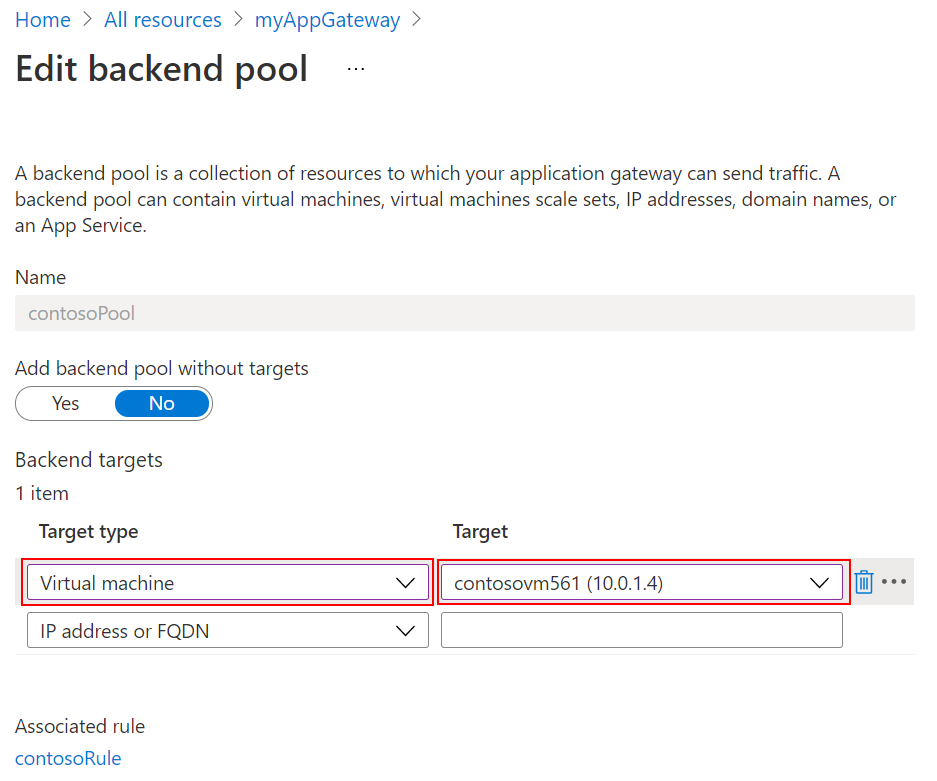
Select Save.
Repeat to add the fabrikamVM and interface to the fabrikamPool.
Wait for the deployment to complete before proceeding to the next step.
Edit your hosts file for name resolution
After the application gateway is created with its public IP address, you can get the IP address, and use it to edit your hosts file to resolve www.contoso.com and www.fabrikam.com. In a production environment, you could create a CNAME in DNS for name resolution.
Select All resources, and then select myAGPublicIPAddress.
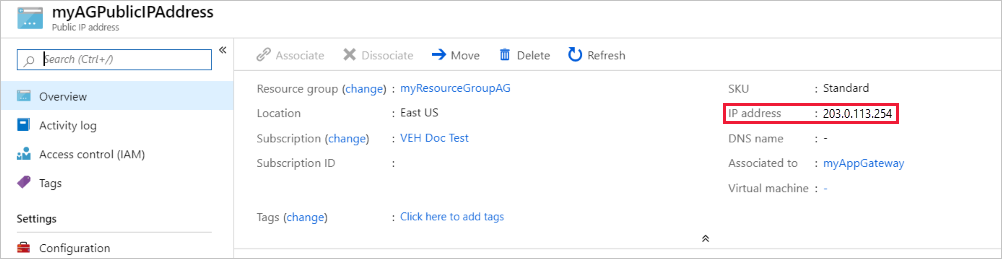
Copy the IP address and use it as the value for new entries your
hostsfile.On your local machine, open an administrative command prompt, and navigate to
c:\Windows\System32\drivers\etc.Open the
hostsfile, and add the following entries, wherex.x.x.xis the application gateway's public IP address:# Copyright (c) 1993-2009 Microsoft Corp. # # This is a sample HOSTS file used by Microsoft TCP/IP for Windows. # # This file contains the mappings of IP addresses to host names. Each # entry should be kept on an individual line. The IP address should # be placed in the first column followed by the corresponding host name. # The IP address and the host name should be separated by at least one # space. # # Additionally, comments (such as these) may be inserted on individual # lines or following the machine name denoted by a '#' symbol. # # For example: # # 102.54.94.97 rhino.acme.com # source server # 38.25.63.10 x.acme.com # x client host # localhost name resolution is handled within DNS itself. # 127.0.0.1 localhost # ::1 localhost x.x.x.x www.contoso.com x.x.x.x www.fabrikam.comSave the file.
Run the following commands to load and display the changes to your hosts file:
 ipconfig/registerdns
 ipconfig/displaydns
Test the application gateway
Type a domain name into the address bar of your browser. For example,
http://www.contoso.com.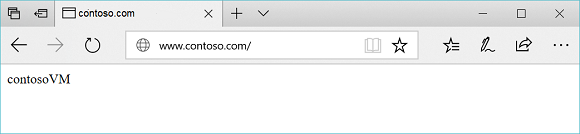
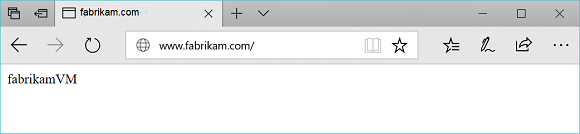
Change the address to the other domain and you should see something like the following example:
Clean up resources
When you no longer need the resources that you created with the application gateway, delete the resource group. When you delete the resource group, you also delete the application gateway and all its related resources.
To remove the resource group:
- On the left menu of the Azure portal, select Resource groups.
- On the Resource groups page, search for myResourceGroupAG in the list, then select it.
- On the myResourceGroupAG page, select Delete resource group.
- Enter myResourceGroupAG for TYPE THE RESOURCE GROUP NAME and then select Delete.
To restore the hosts file:
- Delete the
www.contoso.comandwww.fabrikam.comlines from thehostsfile. - Run
ipconfig/registerdnsandipconfig/flushdnsfrom the command prompt.
Next steps
In this tutorial, you:
- Created an application gateway with listeners and rules based on two domains
- Tested the application gateway after editing the host files of backend servers
To learn more about hosting multiple sites, see application gateway multiple site hosting.
To learn how to create and configure an application gateway with path-based routing rules using the Azure portal, advance to the next tutorial.