Note
Access to this page requires authorization. You can try signing in or changing directories.
Access to this page requires authorization. You can try changing directories.
The App Configuration Java Spring client library supports updating configuration on demand without causing an application to restart. An application can be configured to detect changes in App Configuration using one or both of the following two approaches.
Poll Model: The Poll Model is the default behavior that uses polling to detect changes in configuration. Once the cached value of a setting expires, the next call to
AppConfigurationRefresh'srefreshConfigurationssends a request to the server to check if the configuration changed, and pulls the updated configuration if needed.Push Model: This uses App Configuration events to detect changes in configuration. Once App Configuration is set up to send key value change events with Event Grid, with a Web Hook, the application can use these events to optimize the total number of requests needed to keep the configuration updated.
This tutorial shows how you can implement dynamic configuration updates in your code using push refresh. It builds on the app introduced in the quickstarts. Before you continue, finish Create a Java Spring app with App Configuration first.
You can use any code editor to do the steps in this tutorial. Visual Studio Code is an excellent option that's available on the Windows, macOS, and Linux platforms.
In this tutorial, you learn how to:
- Set up a subscription to send configuration change events from App Configuration to a Web Hook
- Deploy a Spring Boot application to App Service
- Set up your Java Spring app to update its configuration in response to changes in App Configuration.
- Consume the latest configuration in your application.
Prerequisites
- Azure subscription - Create a trial subscription
- A supported Java Development Kit (JDK) with version 17.
- Apache Maven version 3.0 or above.
- An existing Azure App Configuration Store.
Setup Push Refresh
- Open pom.xml and update the file with the following dependencies.
<dependency>
    <groupId>com.azure.spring</groupId>
    <artifactId>spring-cloud-azure-appconfiguration-config-web</artifactId>
</dependency>

<!-- Adds the Ability to Push Refresh -->
<dependency>
    <groupId>org.springframework.boot</groupId>
    <artifactId>spring-boot-starter-actuator</artifactId>
</dependency>

<dependencyManagement>
    <dependencies>
        <dependency>
        <groupId>com.azure.spring</groupId>
        <artifactId>spring-cloud-azure-dependencies</artifactId>
        <version>7.0.0</version>
        <type>pom</type>
        <scope>import</scope>
        </dependency>
    </dependencies>
</dependencyManagement>
Set up Maven App Service Deployment so the application can be deployed to Azure App Service via Maven.
mvn com.microsoft.azure:azure-webapp-maven-plugin:2.5.0:configNavigate to the
resourcesdirectory of your app and openapplication.propertiesand configure Azure App Configuration Push Refresh. If the file doesn't exist, create it. Add the following line to the file.You use the
DefaultAzureCredentialto authenticate to your App Configuration store. Follow the instructions to assign your credential the App Configuration Data Reader role. Be sure to allow sufficient time for the permission to propagate before running your application. Create a new file named AppConfigCredential.java and add the following lines:spring.config.import=azureAppConfiguration spring.cloud.azure.appconfiguration.stores[0].endpoint= ${APP_CONFIGURATION_ENDPOINT} spring.cloud.azure.appconfiguration.stores[0].monitoring.enabled= true spring.cloud.azure.appconfiguration.stores[0].monitoring.refresh-interval= 30d spring.cloud.azure.appconfiguration.stores[0].monitoring.triggers[0].key= sentinel spring.cloud.azure.appconfiguration.stores[0].monitoring.push-notification.primary-token.name= myToken spring.cloud.azure.appconfiguration.stores[0].monitoring.push-notification.primary-token.secret= myTokenSecret management.endpoints.web.exposure.include= appconfiguration-refreshAdditionally, you need to add the following code to your project, unless you want to use Managed Identity:
import org.springframework.stereotype.Component;

import com.azure.data.appconfiguration.ConfigurationClientBuilder;
import com.azure.identity.DefaultAzureCredentialBuilder;
import com.azure.spring.cloud.appconfiguration.config.ConfigurationClientCustomizer;

@Component
public class AppConfigCredential implements ConfigurationClientCustomizer {

    @Override
    public void customize(ConfigurationClientBuilder builder, String endpoint) {
        builder.credential(new DefaultAzureCredentialBuilder().build());
    }
}
And add configuration Bootstrap Configuration, by creating
spring.factoriesfile underresources/META-INFdirectory and add the following lines and updatingcom.example.MyApplicationwith your application name and package:org.springframework.cloud.bootstrap.BootstrapConfiguration=\ com.example.MyApplication
A random delay is added before the cached value is marked as dirty to reduce potential throttling. The default maximum delay before the cached value is marked as dirty is 30 seconds.
Note
The Primary token name should be stored in App Configuration as a key, and then the Primary token secret should be stores as an App Configuration Key Vault Reference for added security.
Build and run the app in app service
Event Grid Web Hooks require validation on creation. You can validate by following this guide or by starting your application with Azure App Configuration Spring Web Library already configured, which registers your application for you. To use an event subscription, follow the steps in the next two sections.
Set an environment variable.
Set the environment variable named APP_CONFIGURATION_ENDPOINT to the endpoint of your App Configuration store found under the Overview of your store in the Azure portal.
If you use the Windows command prompt, run the following command and restart the command prompt to allow the change to take effect:
setx APP_CONFIGURATION_ENDPOINT "endpoint-of-your-app-configuration-store"If you use PowerShell, run the following command:
$Env:APP_CONFIGURATION_ENDPOINT = "endpoint-of-your-app-configuration-store"If you use macOS or Linux, run the following command:
export APP_CONFIGURATION_ENDPOINT='<endpoint-of-your-app-configuration-store>'Restart the command prompt to allow the change to take effect. Print the value of the environment variable to validate that it's set properly.
Update your
pom.xmlunder theazure-webapp-maven-plugin'sconfigurationadd<appSettings> <AppConfigurationConnectionString>${AppConfigurationConnectionString}</AppConfigurationConnectionString> </appSettings>Run the following command to build the console app:
mvn packageAfter the build successfully completes, run the following command to run the app locally:
mvn azure-webapp:deploy
Set up an event subscription
Open the App Configuration resource in the Azure portal, then select
+ Event Subscriptionin theEventspane.
Enter a name for the
Event Subscriptionand theSystem Topic. By default the Event Types Key-Value modified and Key-Value deleted are set, the reason can be changed along with using the Filters tab to choose the exact reasons a Push Event is sent.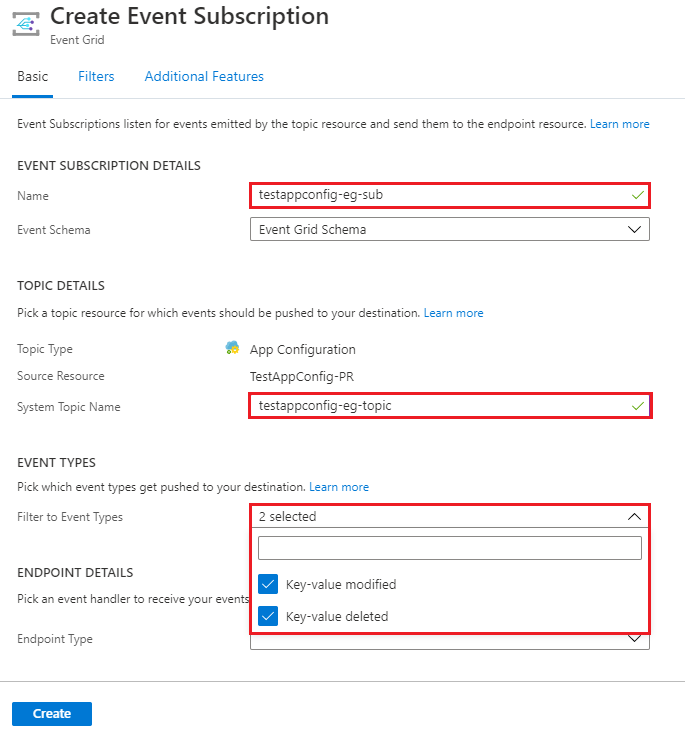
Select the
Endpoint TypeasWeb Hook, selectSelect an endpoint.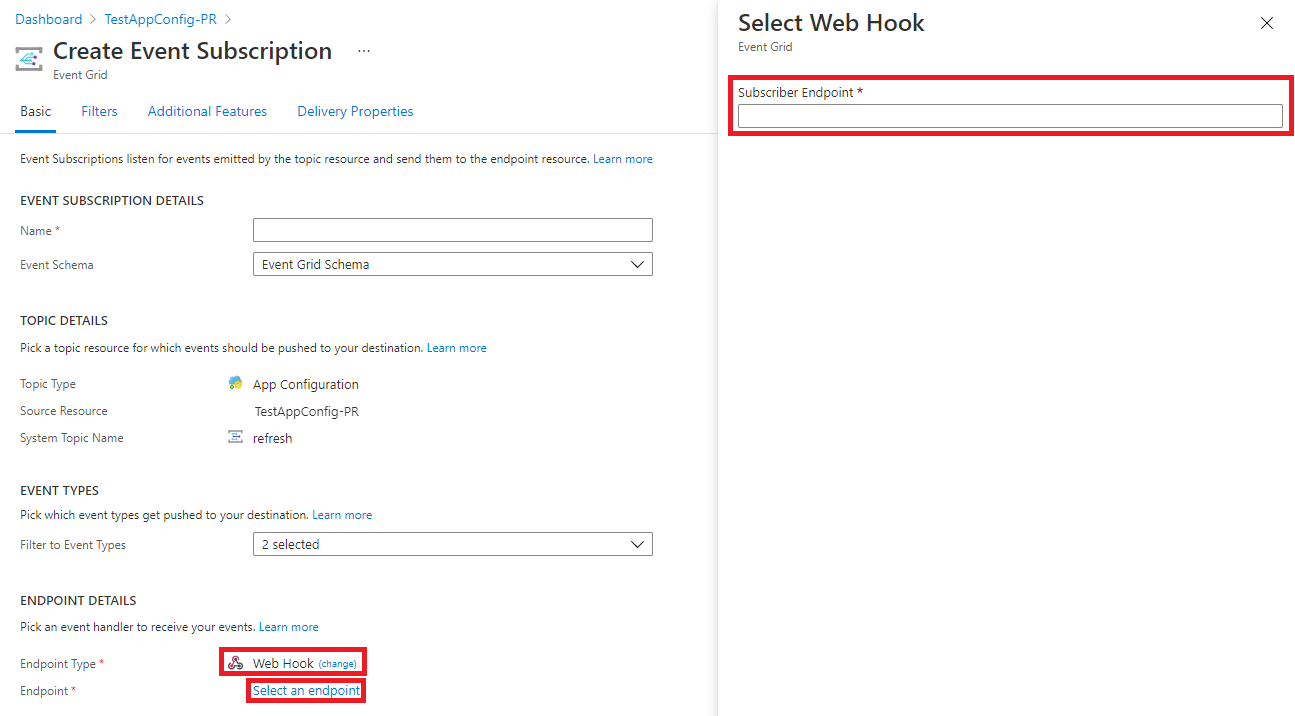
The endpoint is the URI of the application + "/actuator/appconfiguration-refresh?{your-token-name}={your-token-secret}". For example,
https://my-azure-webapp.chinacloudsites.cn/actuator/appconfiguration-refresh?myToken=myTokenSecretSelect
Createto create the event subscription. WhenCreateis selected, a registration request for the Web Hook is sent to your application. The request is received by the Azure App Configuration client library, verified, and returns a valid response.Select
Event Subscriptionsin theEventspane to validate that the subscription was created successfully.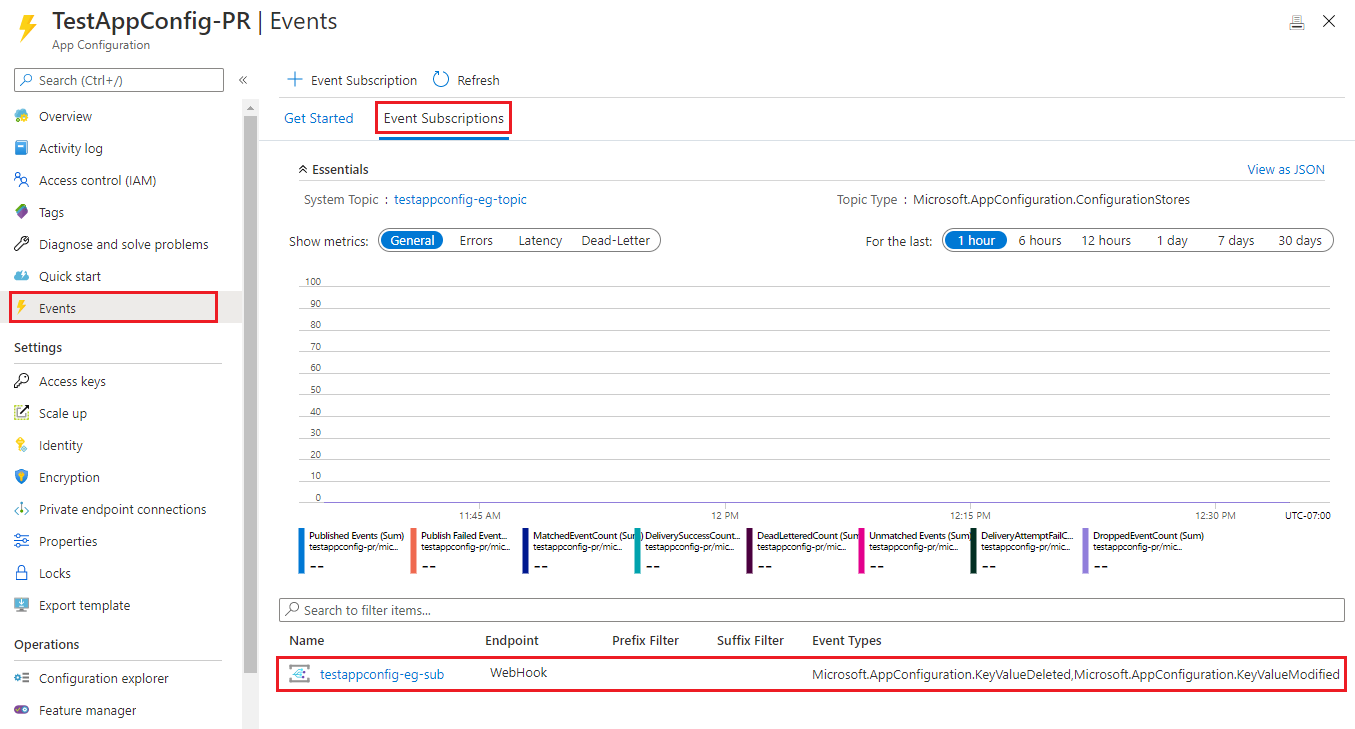
Note
When subscribing for configuration changes, one or more filters can be used to reduce the number of events sent to your application. These can be configured either as Event Grid subscription filters. For example, a subscription filter can be used to only subscribe to events for changes in a key that starts with a specific string.
Note
If you have multiple instances of your application running, you can use the appconfiguration-refresh-bus endpoint which requires setting up Azure Service Bus, which is used to send a message to all instances of your application to refresh their configuration. This is useful if you have multiple instances of your application running and want to ensure that all instances are updated with the latest configuration. This endpoint isn't available unless you have spring-cloud-bus as a dependency with it configured. For more information, see Azure Service Bus Spring Cloud Bus documentation. The service bus connection only needs to be set up and the Azure App Configuration library will handle sending and receiving the messages.
Verify and test application
After your application is running, use curl to test your application, for example:
curl -X GET https://my-azure-webapp.chinacloudsites.cnOpen the Azure portal and navigate to your App Configuration resource associated with your application. Select Configuration Explorer under Operations and update the values of the following keys:
Key Value application/config.message Hello - Updated Refresh the browser page to see the new message displayed.
Clean up resources
If you don't want to continue using the resources created in this article, delete the resource group you created here to avoid charges.
Important
Deleting a resource group is irreversible. The resource group and all the resources in it are permanently deleted. Ensure that you don't accidentally delete the wrong resource group or resources. If you created the resources for this article inside a resource group that contains other resources you want to keep, delete each resource individually from its respective pane instead of deleting the resource group.
- Sign in to the Azure portal, and select Resource groups.
- In the Filter by name box, enter the name of your resource group.
- In the result list, select the resource group name to see an overview.
- Select Delete resource group.
- You're asked to confirm the deletion of the resource group. Enter the name of your resource group to confirm, and select Delete.
After a few moments, the resource group and all its resources are deleted.
Next steps
In this tutorial, you enabled your Java app to dynamically refresh configuration settings from App Configuration. For further questions see the reference documentation, it has all of the details on how the Spring Cloud Azure App Configuration library works. To learn how to use an Azure managed identity to streamline the access to App Configuration, continue to the next tutorial.