Note
Access to this page requires authorization. You can try signing in or changing directories.
Access to this page requires authorization. You can try changing directories.
In this article, you'll learn how to use the Rust programming language to interact with Azure Cache for Redis. You'll also learn about commonly used Redis data structures:
You'll use the redis-rs library for Redis in this sample. This client exposes both high-level and low-level APIs, and you'll see both these styles in action.
If you want to skip straight to the code, see the Rust quickstart on GitHub.
- Azure subscription - create one
- Rust (version 1.39 or above)
- Git
To create a cache, sign in to the Azure portal and select Create a resource.

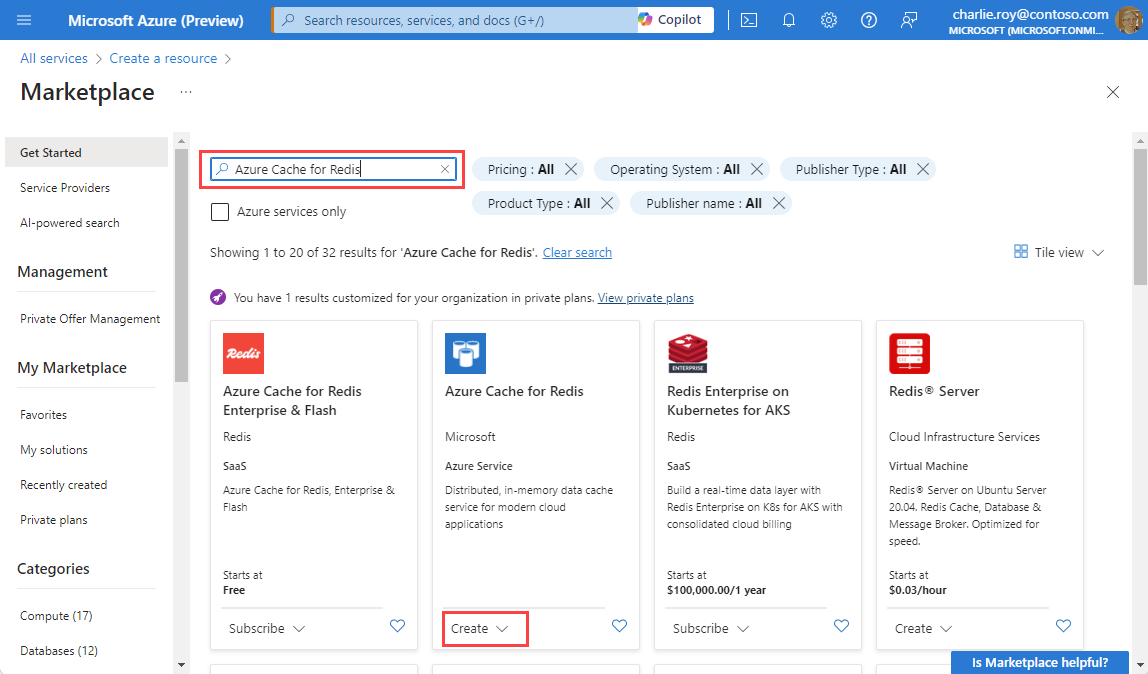
On the Get Started page, type Azure Cache for Redis in the search box. Then, select Create.
On the New Redis Cache page, configure the settings for your cache.
Setting Choose a value Description Subscription Drop down and select your subscription. The subscription under which to create this new Azure Cache for Redis instance. Resource group Drop down and select a resource group, or select Create new and enter a new resource group name. Name for the resource group in which to create your cache and other resources. By putting all your app resources in one resource group, you can easily manage or delete them together. DNS name Enter a unique name. The cache name must be a string between 1 and 63 characters that contain only numbers, letters, or hyphens. The name must start and end with a number or letter, and can't contain consecutive hyphens. Your cache instance's host name is <DNS name>.redis.cache.chinacloudapi.cn. Location Drop down and select a location. Select a region near other services that use your cache. Cache SKU Drop down and select a SKU. The SKU determines the size, performance, and features parameters that are available for the cache. For more information, see Azure Cache for Redis Overview. Cache size Drop down and select a size of your cache For more information, see Azure Cache for Redis Overview. Select the Networking tab or select the Networking button at the bottom of the page.
In the Networking tab, select your connectivity method.
Select the Next: Advanced tab or select the Next: Advanced button on the bottom of the page to see the Advanced tab.
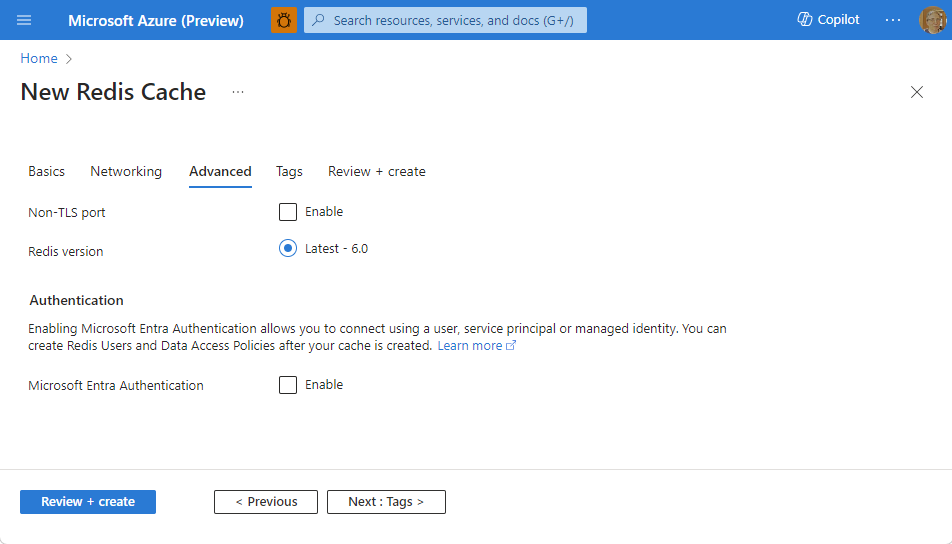
- For Basic or Standard caches, toggle the selection for a non-TLS port. You can also select if you want to enable Microsoft Entra Authentication.
- For a Premium cache, configure the settings for non-TLS port, clustering, managed identity, and data persistence. You can also select if you want to enable Microsoft Entra Authentication.
Select the Next: Tags tab or select the Next: Tags button at the bottom of the page.
Optionally, in the Tags tab, enter the name and value if you wish to categorize the resource.
Select Review + create. You're taken to the Review + create tab where Azure validates your configuration.
After the green Validation passed message appears, select Create.
It takes a while for a cache to create. You can monitor progress on the Azure Cache for Redis Overview page. When Status shows as Running, the cache is ready to use.
To connect your Azure Cache for Redis server, the cache client needs the host name, ports, and a key for the cache. Some clients might refer to these items by slightly different names. You can get the host name, ports, and keys from the Azure portal.
To get the host name and ports for your cache, select Overview from the Resource menu. The host name is of the form
<DNS name>.redis.cache.chinacloudapi.cn.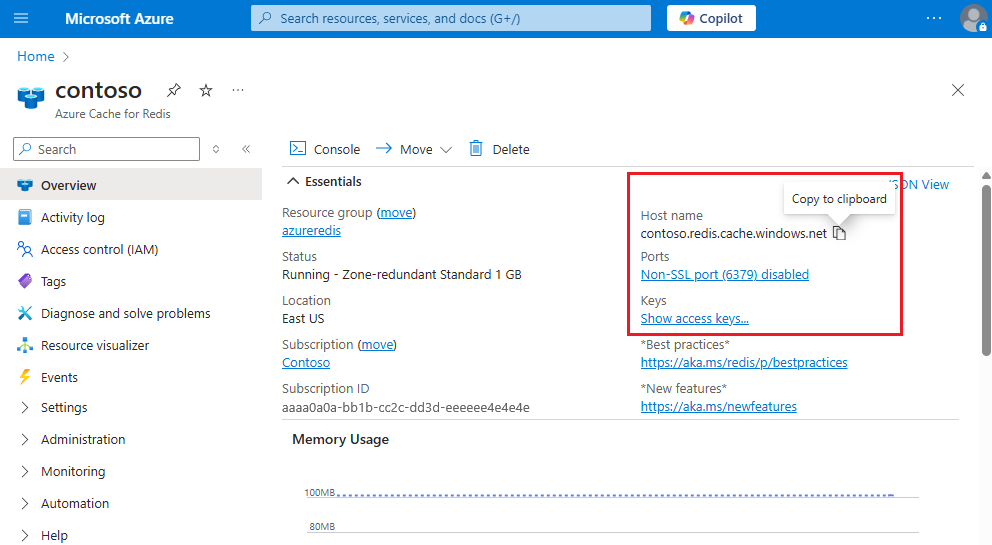
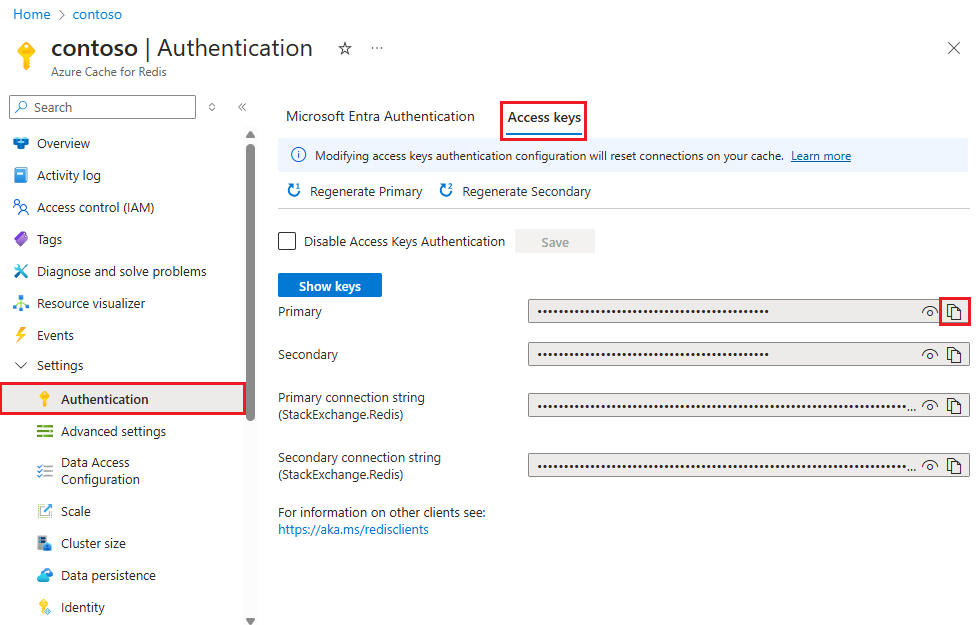
To get the access keys, select Authentication from the Resource menu. Then, select the Access keys tab.
If you're interested in learning how the code works, you can review the following snippets. Otherwise, feel free to skip ahead to Run the application.
The connect function is used to establish a connection to Azure Cache for Redis. It expects host name and the password (Access Key) to be passed in via environment variables REDIS_HOSTNAME and REDIS_PASSWORD respectively. The format for the connection URL is rediss://<username>:<password>@<hostname> - Azure Cache for Redis only accepts secure connections with TLS 1.2 as the minimum required version.
The call to redis::Client::open does basic validation while get_connection() actually starts the connection. The program stops if the connectivity fails for any reason. For example, one reason might be an incorrect password.
fn connect() -> redis::Connection {
    let redis_host_name =
        env::var("REDIS_HOSTNAME").expect("missing environment variable REDIS_HOSTNAME");
    let redis_password =
        env::var("REDIS_PASSWORD").expect("missing environment variable REDIS_PASSWORD");
    let redis_conn_url = format!("rediss://:{}@{}", redis_password, redis_host_name);

    redis::Client::open(redis_conn_url)
        .expect("invalid connection URL")
        .get_connection()
        .expect("failed to connect to redis")
}
The function basics covers the SET, GET, and INCR commands.
The low-level API is used for SET and GET, which sets and retrieves the value for a key named foo.
The INCRBY command is executed using a high-level API that is, incr increments the value of a key (named counter) by 2 followed by a call to get to retrieve it.
fn basics() {
    let mut conn = connect();
    let _: () = redis::cmd("SET")
        .arg("foo")
        .arg("bar")
        .query(&mut conn)
        .expect("failed to execute SET for 'foo'");

    let bar: String = redis::cmd("GET")
        .arg("foo")
        .query(&mut conn)
        .expect("failed to execute GET for 'foo'");
    println!("value for 'foo' = {}", bar);

    let _: () = conn
        .incr("counter", 2)
        .expect("failed to execute INCR for 'counter'");
    let val: i32 = conn
        .get("counter")
        .expect("failed to execute GET for 'counter'");
    println!("counter = {}", val);
}
The below code snippet demonstrates the functionality of a Redis HASH data structure. HSET is invoked using the low-level API to store information (name, version, repo) about Redis drivers (clients). For example, details for the Rust driver (one being used in this sample code!) is captured in form of a BTreeMap and then passed on to the low-level API. It's then retrieved using HGETALL.
HSET can also be executed using a high-level API using hset_multiple that accepts an array of tuples. hget is then executed to fetch the value for a single attribute (the repo in this case).
fn hash() {
    let mut conn = connect();

    let mut driver: BTreeMap<String, String> = BTreeMap::new();
    let prefix = "redis-driver";
    driver.insert(String::from("name"), String::from("redis-rs"));
    driver.insert(String::from("version"), String::from("0.19.0"));
    driver.insert(
        String::from("repo"),
        String::from("https://github.com/mitsuhiko/redis-rs"),
    );

    let _: () = redis::cmd("HSET")
        .arg(format!("{}:{}", prefix, "rust"))
        .arg(driver)
        .query(&mut conn)
        .expect("failed to execute HSET");

    let info: BTreeMap<String, String> = redis::cmd("HGETALL")
        .arg(format!("{}:{}", prefix, "rust"))
        .query(&mut conn)
        .expect("failed to execute HGETALL");
    println!("info for rust redis driver: {:?}", info);

    let _: () = conn
        .hset_multiple(
            format!("{}:{}", prefix, "go"),
            &[
                ("name", "go-redis"),
                ("version", "8.4.6"),
                ("repo", "https://github.com/go-redis/redis"),
            ],
        )
        .expect("failed to execute HSET");

    let repo_name: String = conn
        .hget(format!("{}:{}", prefix, "go"), "repo")
        .expect("HGET failed");
    println!("go redis driver repo name: {:?}", repo_name);
}
In the function below, you can see how to use a LIST data structure. LPUSH is executed (with the low-level API) to add an entry to the list and the high-level lpop method is used to retrieve that from the list. Then, the rpush method is used to add a couple of entries to the list, which are then fetched using the low-level lrange method.
fn list() {
    let mut conn = connect();
    let list_name = "items";

    let _: () = redis::cmd("LPUSH")
        .arg(list_name)
        .arg("item-1")
        .query(&mut conn)
        .expect("failed to execute LPUSH for 'items'");

    let item: String = conn
        .lpop(list_name)
        .expect("failed to execute LPOP for 'items'");
    println!("first item: {}", item);

    let _: () = conn.rpush(list_name, "item-2").expect("RPUSH failed");
    let _: () = conn.rpush(list_name, "item-3").expect("RPUSH failed");

    let len: isize = conn
        .llen(list_name)
        .expect("failed to execute LLEN for 'items'");
    println!("no. of items in list = {}", len);

    let items: Vec<String> = conn
        .lrange(list_name, 0, len - 1)
        .expect("failed to execute LRANGE for 'items'");

    println!("listing items in list");
    for item in items {
        println!("item: {}", item)
    }
}
Here you can see some of the SET operations. The sadd (high-level API) method is used to add couple of entries to a SET named users. SISMEMBER is then executed (low-level API) to check whether user1 exists. Finally, smembers is used to fetch and iterate over all the set entries in the form of a Vector (Vec<String>).
fn set() {
    let mut conn = connect();
    let set_name = "users";

    let _: () = conn
        .sadd(set_name, "user1")
        .expect("failed to execute SADD for 'users'");
    let _: () = conn
        .sadd(set_name, "user2")
        .expect("failed to execute SADD for 'users'");

    let ismember: bool = redis::cmd("SISMEMBER")
        .arg(set_name)
        .arg("user1")
        .query(&mut conn)
        .expect("failed to execute SISMEMBER for 'users'");
    println!("does user1 exist in the set? {}", ismember);

    let users: Vec<String> = conn.smembers(set_name).expect("failed to execute SMEMBERS");
    println!("listing users in set");

    for user in users {
        println!("user: {}", user)
    }
}
sorted_set function below demonstrates the Sorted Set data structure. ZADD is invoked with the low-level API to add a random integer score for a player (player-1). Next, the zadd method (high-level API) is used to add more players (player-2 to player-5) and their respective (randomly generated) scores. The number of entries in the sorted set is determined using ZCARD. That's used as the limit to the ZRANGE command (invoked with the low-level API) to list out the players with their scores in ascending order.
fn sorted_set() {
    let mut conn = connect();
    let sorted_set = "leaderboard";

    let _: () = redis::cmd("ZADD")
        .arg(sorted_set)
        .arg(rand::thread_rng().gen_range(1..10))
        .arg("player-1")
        .query(&mut conn)
        .expect("failed to execute ZADD for 'leaderboard'");

    for num in 2..=5 {
        let _: () = conn
            .zadd(
                sorted_set,
                String::from("player-") + &num.to_string(),
                rand::thread_rng().gen_range(1..10),
            )
            .expect("failed to execute ZADD for 'leaderboard'");
    }

    let count: isize = conn
        .zcard(sorted_set)
        .expect("failed to execute ZCARD for 'leaderboard'");

    let leaderboard: Vec<(String, isize)> = conn
        .zrange_withscores(sorted_set, 0, count - 1)
        .expect("ZRANGE failed");

    println!("listing players and scores in ascending order");

    for item in leaderboard {
        println!("{} = {}", item.0, item.1)
    }
}
Start by cloning the application from GitHub.
Open a command prompt and create a new folder named
git-samples.md "C:\git-samples"Open a git terminal window, such as git bash. Use the
cdto change into the new folder where you'll be cloning the sample app.cd "C:\git-samples"Run the following command to clone the sample repository. This command creates a copy of the sample app on your computer.
git clone https://github.com/Azure-Samples/azure-redis-cache-rust-quickstart.git
The application accepts connectivity and credentials in the form of environment variables.
Fetch the Host name and Access Keys (available via Access Keys) for Azure Cache for Redis instance in the Azure portal.
Set them to the respective environment variables:
set REDIS_HOSTNAME=<Host name>:<port> (e.g. <name of cache>.redis.cache.chinacloudapi.cn:6380)
set REDIS_PASSWORD=<Primary Access Key>
In the terminal window, change to the correct folder. For example:
cd "C:\git-samples\azure-redis-cache-rust-quickstart"In the terminal, run the following command to start the application.
cargo runYou'll see this output:
******* Running SET, GET, INCR commands *******
value for 'foo' = bar
counter = 2
******* Running HASH commands *******
info for rust redis driver: {"name": "redis-rs", "repo": "https://github.com/mitsuhiko/redis-rs", "version": "0.19.0"}
go redis driver repo name: "https://github.com/go-redis/redis"
******* Running LIST commands *******
first item: item-1
no. of items in list = 2
listing items in list
item: item-2
item: item-3
******* Running SET commands *******
does user1 exist in the set? true
listing users in set
user: user2
user: user1
user: user3
******* Running SORTED SET commands *******
listing players and scores
player-2 = 2
player-4 = 4
player-1 = 7
player-5 = 6
player-3 = 8
If you want to run a specific function, comment out other functions in the
mainfunction:fn main() { basics(); hash(); list(); set(); sorted_set(); }
If you want to continue to use the resources you created in this article, keep the resource group.
Otherwise, if you're finished with the resources, you can delete the Azure resource group that you created to avoid charges.
Important
Deleting a resource group is irreversible. When you delete a resource group, all the resources in it are permanently deleted. Make sure that you do not accidentally delete the wrong resource group or resources. If you created the resources inside an existing resource group that contains resources you want to keep, you can delete each resource individually instead of deleting the resource group.
Sign in to the Azure portal, and then select Resource groups.
Select the resource group you want to delete.
If there are many resource groups, use the Filter for any field... box, type the name of your resource group you created for this article. Select the resource group in the results list.
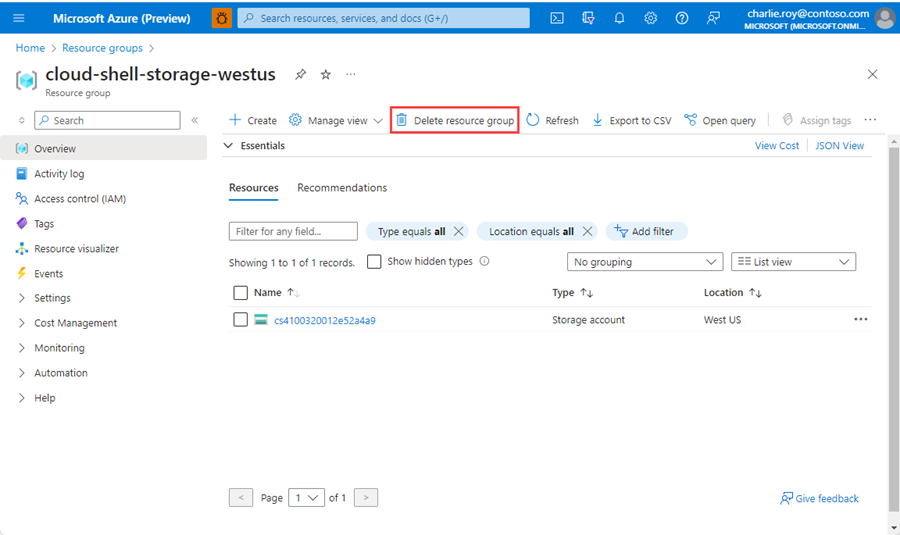
Select Delete resource group.
You're asked to confirm the deletion of the resource group. Type the name of your resource group to confirm, and then select Delete.
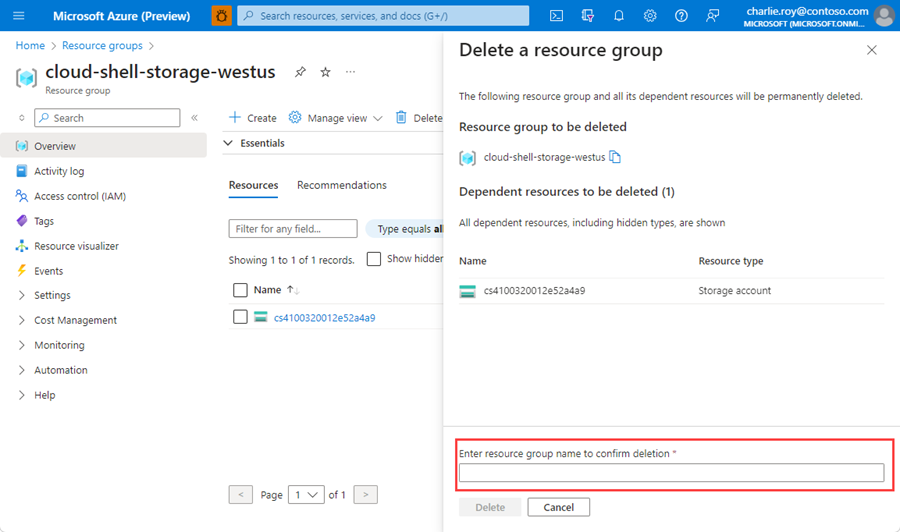
After a few moments, the resource group and all of its resources are deleted.
In this quickstart, you learned how to use the Rust driver for Redis to connect and execute operations in Azure Cache for Redis.