Note
Access to this page requires authorization. You can try signing in or changing directories.
Access to this page requires authorization. You can try changing directories.
In this article, you learn how to use SignalR Service and Azure Functions to build a serverless application with C# to broadcast messages to clients.
Note
You can get the code mentioned in this article from GitHub.
Important
Raw connection strings appear in this article for demonstration purposes only.
A connection string includes the authorization information required for your application to access Azure SignalR Service. The access key inside the connection string is similar to a root password for your service. In production environments, always protect your access keys. Use Azure Key Vault to manage and rotate your keys securely and secure your connection string using Microsoft Entra ID and authorize access with Microsoft Entra ID.
Avoid distributing access keys to other users, hard-coding them, or saving them anywhere in plain text that is accessible to others. Rotate your keys if you believe they may have been compromised.
Prerequisites
The following prerequisites are needed for this quickstart:
- Visual Studio Code, or other code editor. If you don't already have Visual Studio Code installed, download Visual Studio Code here.
- An Azure subscription. If you don't have an Azure subscription, create one for trial before you begin.
- Azure Functions Core Tools
- .NET Core SDK
Create an Azure SignalR Service instance
In this section, you create a basic Azure SignalR instance to use for your app. The following steps use the Azure portal to create a new instance, but you can also use the Azure CLI. For more information, see the az signalr create command in the Azure SignalR Service CLI Reference.
- Sign in to the Azure portal.
- In the upper-left side of the page, select + Create a resource.
- On the Create a resource page, in the Search services and marketplace text box, enter signalr and then select SignalR Service from the list.
- On the SignalR Service page, select Create.
- On the Basics tab, you enter the essential information for your new SignalR Service instance. Enter the following values:
| Field | Suggested Value | Description |
|---|---|---|
| Subscription | Choose your subscription | Select the subscription you want to use to create a new SignalR Service instance. |
| Resource group | Create a resource group named SignalRTestResources | Select or create a resource group for your SignalR resource. It's useful to create a new resource group for this tutorial instead of using an existing resource group. To free resources after completing the tutorial, delete the resource group. Deleting a resource group also deletes all of the resources that belong to the group. This action can't be undone. Before you delete a resource group, make certain that it doesn't contain resources you want to keep. For more information, see Using resource groups to manage your Azure resources. |
| Resource name | testsignalr | Enter a unique resource name to use for the SignalR resource. If testsignalr is already taken in your region, add a digit or character until the name is unique. The name must be a string of 1 to 63 characters and contain only numbers, letters, and the hyphen ( -) character. The name can't start or end with the hyphen character, and consecutive hyphen characters aren't valid. |
| Region | Choose your region | Select the appropriate region for your new SignalR Service instance. Azure SignalR Service isn't currently available in all regions. For more information, see Azure SignalR Service region availability |
| Pricing tier | Select Change and then choose Free (Dev/Test Only). Choose Select to confirm your choice of pricing tier. | Azure SignalR Service has three pricing tiers: Free, Standard, and Premium. Tutorials use the Free tier, unless noted otherwise in the prerequisites. For more information about the functionality differences between tiers and pricing, see Azure SignalR Service pricing |
| Service mode | Choose the appropriate service mode | Use Default when you host the SignalR hub logic in your web apps and use SignalR service as a proxy. Use Serverless when you use Serverless technologies such as Azure Functions to host the SignalR hub logic. Classic mode is only for backward compatibility and isn't recommended to use. For more information, see Service mode in Azure SignalR Service. |
You don't need to change the settings on the Networking and Tags tabs for the SignalR tutorials.
- Select the Review + create button at the bottom of the Basics tab.
- On the Review + create tab, review the values and then select Create. It takes a few moments for deployment to complete.
- When the deployment is complete, select the Go to resource button.
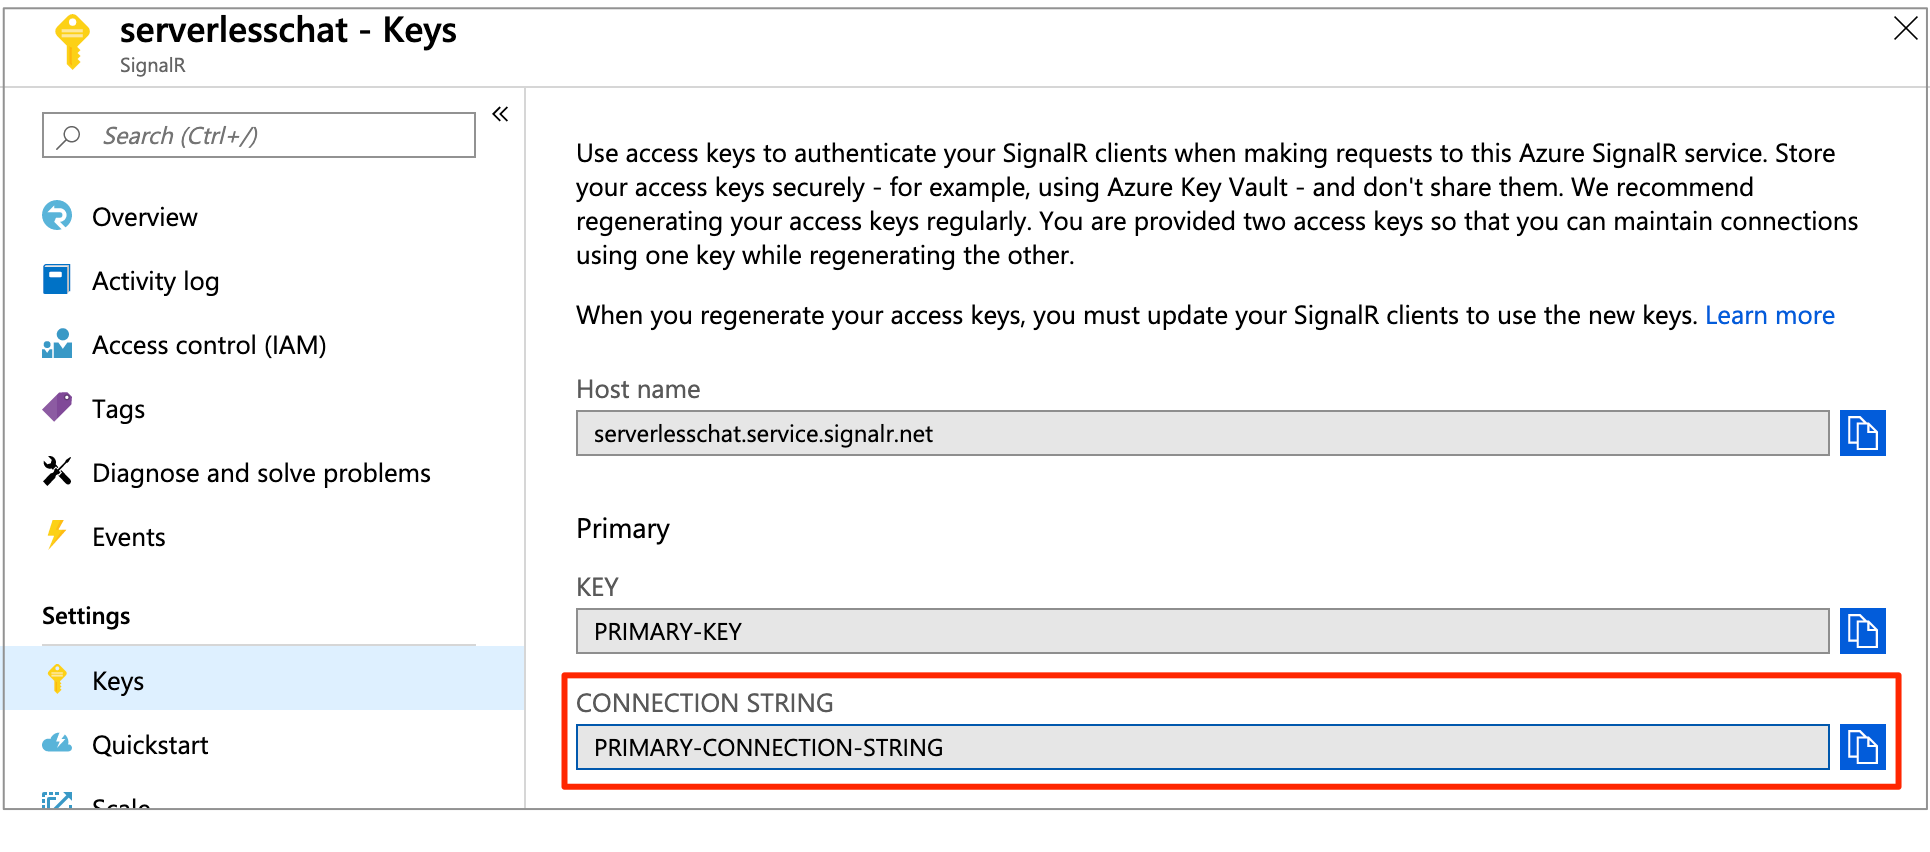
- On the SignalR resource page, select Keys from the menu on the left, under Settings.
- Copy the Connection string for the primary key. You need this connection string to configure your app later in this tutorial.
Setup and run the Azure Function locally
You need the Azure Functions Core Tools for this step.
Create an empty directory and change to the directory with the command line.
Initialize a new project.
# Initialize a function project func init --worker-runtime dotnet # Add SignalR Service package reference to the project dotnet add package Microsoft.Azure.WebJobs.Extensions.SignalRServiceUsing your code editor, create a new file with the name Function.cs. Add the following code to Function.cs:
using System; using System.IO; using System.Linq; using System.Net.Http; using System.Threading.Tasks; using Microsoft.AspNetCore.Http; using Microsoft.AspNetCore.Mvc; using Microsoft.Azure.WebJobs; using Microsoft.Azure.WebJobs.Extensions.Http; using Microsoft.Azure.WebJobs.Extensions.SignalRService; using Newtonsoft.Json; namespace CSharp { public static class Function { private static HttpClient httpClient = new HttpClient(); private static string Etag = string.Empty; private static string StarCount = "0"; [FunctionName("index")] public static IActionResult GetHomePage([HttpTrigger(AuthorizationLevel.Anonymous)]HttpRequest req, ExecutionContext context) { var path = Path.Combine(context.FunctionAppDirectory, "content", "index.html"); return new ContentResult { Content = File.ReadAllText(path), ContentType = "text/html", }; } [FunctionName("negotiate")] public static SignalRConnectionInfo Negotiate( [HttpTrigger(AuthorizationLevel.Anonymous)] HttpRequest req, [SignalRConnectionInfo(HubName = "serverless")] SignalRConnectionInfo connectionInfo) { return connectionInfo; } [FunctionName("broadcast")] public static async Task Broadcast([TimerTrigger("*/5 * * * * *")] TimerInfo myTimer, [SignalR(HubName = "serverless")] IAsyncCollector<SignalRMessage> signalRMessages) { var request = new HttpRequestMessage(HttpMethod.Get, "https://api.github.com/repos/azure/azure-signalr"); request.Headers.UserAgent.ParseAdd("Serverless"); request.Headers.Add("If-None-Match", Etag); var response = await httpClient.SendAsync(request); if (response.Headers.Contains("Etag")) { Etag = response.Headers.GetValues("Etag").First(); } if (response.StatusCode == System.Net.HttpStatusCode.OK) { var result = JsonConvert.DeserializeObject<GitResult>(await response.Content.ReadAsStringAsync()); StarCount = result.StarCount; } await signalRMessages.AddAsync( new SignalRMessage { Target = "newMessage", Arguments = new[] { $"Current star count of https://github.com/Azure/azure-signalr is: {StarCount}" } }); } private class GitResult { [JsonRequired] [JsonProperty("stargazers_count")] public string StarCount { get; set; } } } }The code in Function.cs has three functions:
GetHomePageis used to get a website as client.Negotiateis used by the client to get an access token.Broadcastis periodically called to get the star count from GitHub and then broadcast messages to all clients.
The client interface for this sample is a web page. We render the web page using the
GetHomePagefunction by reading HTML content from file content/index.html. Now let's create this index.html under thecontentsubdirectory with the following content:<html> <body> <h1>Azure SignalR Serverless Sample</h1> <div id="messages"></div> <script src="https://cdnjs.cloudflare.com/ajax/libs/microsoft-signalr/3.1.7/signalr.min.js"></script> <script> let messages = document.querySelector('#messages'); const apiBaseUrl = window.location.origin; const connection = new signalR.HubConnectionBuilder() .withUrl(apiBaseUrl + '/api') .configureLogging(signalR.LogLevel.Information) .build(); connection.on('newMessage', (message) => { document.getElementById("messages").innerHTML = message; }); connection.start() .catch(console.error); </script> </body> </html>Update your
*.csprojto make the content page in the build output folder.<ItemGroup> <None Update="content/index.html"> <CopyToOutputDirectory>PreserveNewest</CopyToOutputDirectory> </None> </ItemGroup>Azure Functions requires a storage account to work. You can install and run the Azure Storage Emulator. Or you can update the setting to use your real storage account with the following command:
func settings add AzureWebJobsStorage "<storage-connection-string>"It's almost done now. The last step is to set a connection string of the SignalR Service to Azure Function settings.
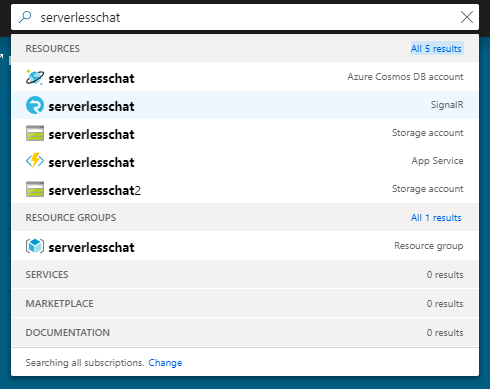
Confirm the SignalR Service instance was successfully created by searching for its name in the search box at the top of the portal. Select the instance to open it.

Select Keys to view the connection strings for the SignalR Service instance.

Copy the primary connection string, and then run the following command.
Raw connection strings appear in this article for demonstration purposes only. In production environments, always protect your access keys. Use Azure Key Vault to manage and rotate your keys securely and secure your connection string using Microsoft Entra ID and authorize access with Microsoft Entra ID.
func settings add AzureSignalRConnectionString "<signalr-connection-string>"
Run the Azure function locally:
func startAfter the Azure function is running locally, open
http://localhost:7071/api/index, and you can see the current star count. If you star or unstar in the GitHub, you get a star count refreshing every few seconds.
Clean up resources
If you're not going to continue to use this app, delete all resources created by this quickstart with the following steps so you don't incur any charges:
In the Azure portal, select Resource groups on the far left, and then select the resource group you created. Alternatively, you may use the search box to find the resource group by its name.
In the window that opens, select the resource group, and then click Delete resource group.
In the new window, type the name of the resource group to delete, and then click Delete.
Having issues? Try the troubleshooting guide.
Next steps
In this quickstart, you built and ran a real-time serverless application locally. Next, learn more about bi-directional communication between clients and Azure Functions with Azure SignalR Service.