Note
Access to this page requires authorization. You can try signing in or changing directories.
Access to this page requires authorization. You can try changing directories.
适用于:![]() Azure SQL 数据库
Azure SQL 数据库
本文介绍如何使用 Azure 门户、PowerShell 或 Azure CLI 为 Azure SQL 数据库配置活动异地复制以及启动故障转移。
活动异地复制按数据库进行配置。 若要故障转移一组数据库,或者如果应用程序需要稳定的连接终结点,请考虑改用故障转移组。
先决条件
若要完成本教程,需要单一 Azure SQL 数据库。 若要了解如何使用 Azure 门户、Azure CLI 或 PowerShell 创建单一数据库,请参阅快速入门:创建单一数据库 - Azure SQL 数据库。
添加辅助数据库
以下步骤在异地复制合作关系中创建新的辅助数据库。
只有订阅所有者或共有者才能添加辅助数据库。
辅助数据库具有与主数据库相同的名称,并默认使用相同的服务层级和计算大小。 辅助数据库可以是单一数据库,也可以是共用数据库。 有关详细信息,请参阅基于 DTU 的购买模型概述和基于 vCore 的购买模型。 创建辅助数据库并设定种子后,会开始将数据从主数据库复制到新的辅助数据库。
如果次要副本仅用于灾难恢复 (DR),并且没有任何读取或写入工作负荷,则可以通过在配置新的活动异地复制关系时指定备用数据库来节省许可成本。 有关更多信息,请参阅无许可证备用副本。
注意
如果合作伙伴数据库已存在(例如,在终止之前的异地复制关系的情况下),命令会失败。
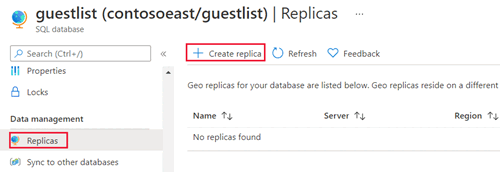
在 Azure 门户中,浏览到需要设置以便进行异地复制的数据库。
在 SQL 数据库页上,选择数据库,滚动到数据管理,选择副本,然后选择创建副本。
为辅助数据库选择或创建服务器,并根据需要配置计算 + 存储选项。 你可以为辅助服务器选择任何区域,但我们建议使用配对区域。
可以选择性地将辅助数据库添加到弹性池。 若要在池中创建辅助数据库,请选择想要使用 SQL 弹性池?旁边的是 ,并在目标服务器上选择一个池。 池必须已在目标服务器上存在。 此工作流不会创建池。
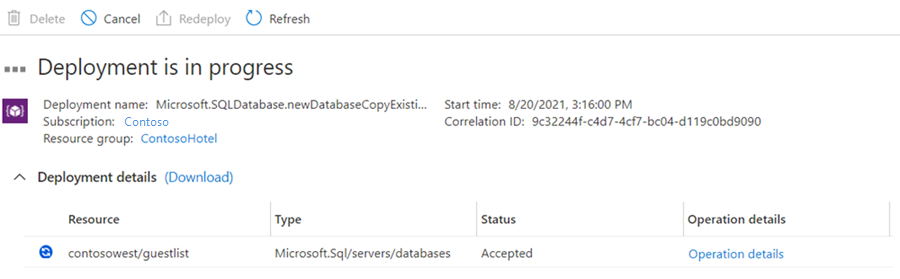
选择“查看 + 创建”查看信息,然后选择“创建”。
此时会创建辅助数据库,部署过程开始。
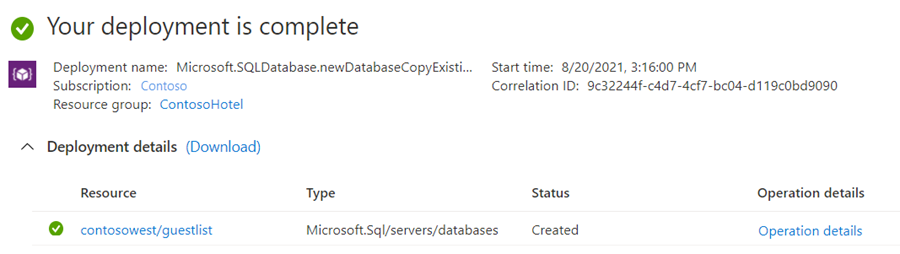
完成部署时,辅助数据库会显示其状态。
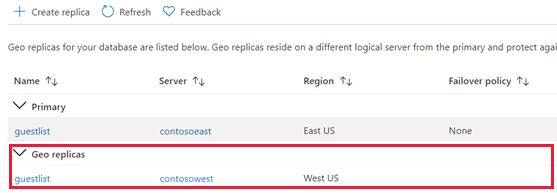
返回主数据库页,然后选择“副本”。 你的辅助数据库列于“异地副本”下。


启动故障转移
辅助数据库可以通过切换变为主数据库。
在 Azure 门户中,浏览到异地复制合作关系中的主数据库。
滚动到数据管理,然后选择副本。
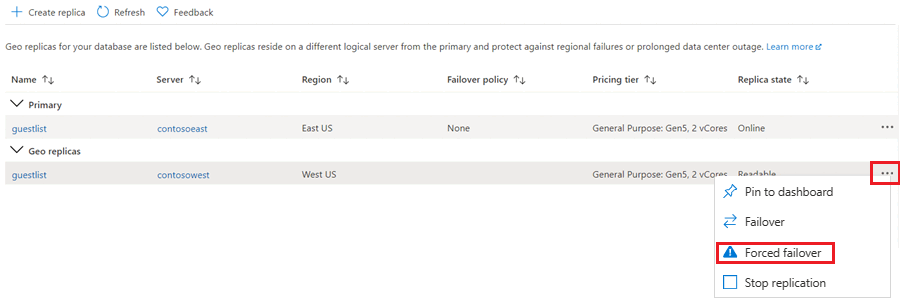
在“异地副本”列表中,选择要成为新主数据库的数据库,选择省略号,然后选择“强制故障转移”。
选择“是”开始故障转移。

该命令会立即将辅助数据库切换为主数据库角色。 此过程通常会在 30 秒或更短的时间内完成。
角色切换时,两个数据库都不可用,时间最长可达 25 秒。 如果主数据库具有多个辅助数据库,则该命令自动重新配置其他辅助数据库以连接到新的主数据库。 在正常情况下,完成整个操作所需的时间应该少于一分钟。
删除辅助数据库
此操作会永久停止到辅助数据库的复制,并将辅助数据库的角色更改为常规的读写数据库。 如果与辅助数据库的连接断开,命令会成功,但辅助数据库必须等到连接恢复后才会变为可读写。
- 在 Azure 门户中,浏览到异地复制合作关系中的主数据库。
- 选择副本。
- 在异地副本列表中,选择要从异地复制伙伴关系中删除的数据库,选择省略号,然后选择停止复制。
- 确认窗口随即打开。 选择是,将数据库从异地复制合作关系中移除。 (将其设置为不属于任何复制的读写数据库。)
跨订阅异地复制
将执行以下示例中的 T-SQL 命令的客户端计算机的 IP 地址添加到主服务器和辅助服务器的服务器防火墙。 可以通过在从同一客户端计算机连接到主服务器时执行以下查询来确认 IP 地址。
SELECT client_net_address
FROM sys.dm_exec_connections
WHERE session_id = @@SPID;
有关详细信息,请参阅 Azure SQL 数据库和 Azure Synapse IP 防火墙规则。
在主服务器上的
master数据库中,创建一个专用于活动异地复制设置的 SQL 身份验证登录名。 根据需要调整登录名和密码。CREATE LOGIN geodrsetup WITH PASSWORD = 'ComplexPassword01';在同一数据库中,为该登录名创建一个用户,并将其添加到
dbmanager角色:CREATE USER geodrsetup FOR LOGIN geodrsetup; ALTER ROLE dbmanager ADD MEMBER geodrsetup;记下新登录名的 SID 值。 使用以下查询获取 SID 值。
SELECT sid FROM sys.sql_logins WHERE name = 'geodrsetup';连接到主数据库(不是
master数据库),并为同一登录名创建一个用户。CREATE USER geodrsetup FOR LOGIN geodrsetup;在同一数据库中,将用户添加到
db_owner角色。ALTER ROLE db_owner ADD MEMBER geodrsetup;在辅助服务器上的
master数据库中,使用相同的名称、密码和 SID 在主服务器上创建相同登录名。 将下面的示例命令中的十六进制 SID 值替换为在步骤 4 中获得的 SID。CREATE LOGIN geodrsetup WITH PASSWORD = 'ComplexPassword01', SID = 0x010600000000006400000000000000001C98F52B95D9C84BBBA8578FACE37C3E;在同一数据库中,为该登录名创建一个用户,并将其添加到
dbmanager角色。CREATE USER geodrsetup FOR LOGIN geodrsetup; ALTER ROLE dbmanager ADD MEMBER geodrsetup;使用新的
geodrsetup登录名连接到主服务器上的master数据库,并在辅助服务器上启动异地辅助数据库创建。 根据需要调整数据库名称和辅助服务器名称。 执行命令后,可以通过查询主数据库中的 sys.dm_geo_replication_link_status 视图和主服务器上master数据库中的 sys.dm_operation_status 视图来监视异地辅助数据库创建。 创建异地辅助数据库所需的时间取决于主数据库的大小。alter database [dbrep] add secondary on server [servername];成功创建异地辅助数据库后,可以删除此过程创建的用户、登录名和防火墙规则。