Note
Access to this page requires authorization. You can try signing in or changing directories.
Access to this page requires authorization. You can try changing directories.
Applies to:
Azure SQL Database
Easily manage your existing scaled-out sharded databases using tools (such as the Building scalable cloud databases). First convert an existing set of databases to use the shard map manager.
Overview
To migrate an existing sharded database:
- Prepare the shard map manager database.
- Create the shard map.
- Prepare the individual shards.
- Add mappings to the shard map.
These techniques can be implemented using either the .NET Framework client library, or the PowerShell scripts found at Azure SQL Database - Elastic Database tools scripts. The examples here use the PowerShell scripts.
For more information about the ShardMapManager, see Shard map management. For an overview of the Elastic Database tools, see Elastic Database features overview.
Prepare the shard map manager database
The shard map manager is a special database that contains the data to manage scaled-out databases. You can use an existing database, or create a new database. A database acting as shard map manager should not be the same database as a shard. The PowerShell script does not create the database for you.
Step 1: Create a shard map manager
# Create a shard map manager
New-ShardMapManager -UserName '<user_name>' -Password '<password>' -SqlServerName '<server_name>' -SqlDatabaseName '<smm_db_name>'
#<server_name> and <smm_db_name> are the server name and database name
# for the new or existing database that should be used for storing
# tenant-database mapping information.
Retrieve the shard map manager
After creation, you can retrieve the shard map manager with this cmdlet. This step is needed every time you need to use the ShardMapManager object.
# Try to get a reference to the Shard Map Manager
$ShardMapManager = Get-ShardMapManager -UserName '<user_name>' -Password '<password>' -SqlServerName '<server_name>' -SqlDatabaseName '<smm_db_name>'
Step 2: Create the shard map
Select the type of shard map to create. The choice depends on the database architecture:
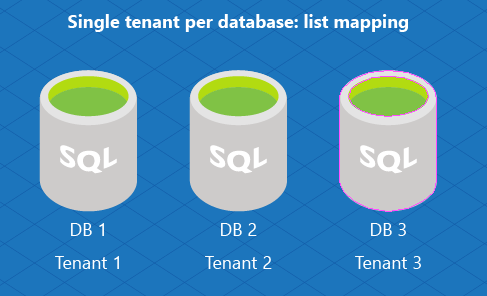
- Single tenant per database (For terms, see the glossary.)
- Multiple tenants per database (two types):
- List mapping
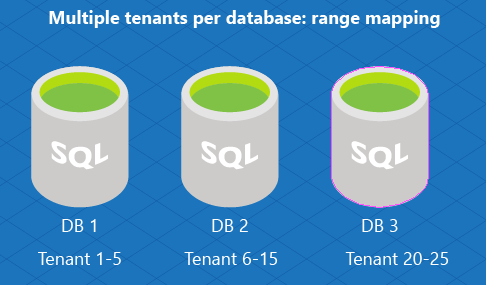
- Range mapping
For a single-tenant model, create a list mapping shard map. The single-tenant model assigns one database per tenant. This is an effective model for SaaS developers as it simplifies management.

The multitenant model assigns several tenants to an individual database (and you can distribute groups of tenants across multiple databases). Use this model when you expect each tenant to have small data needs. In this model, assign a range of tenants to a database using range mapping.

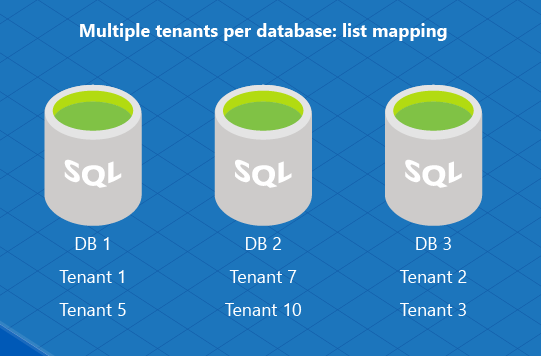
Or you can implement a multitenant database model using a list mapping to assign multiple tenants to an individual database. For example, DB1 is used to store information about tenant ID 1 and 5, and DB2 stores data for tenant 7 and tenant 10.

Based on your choice, choose one of these options:
Option 1: Create a shard map for a list mapping
Create a shard map using the ShardMapManager object.
# $ShardMapManager is the shard map manager object
$ShardMap = New-ListShardMap -KeyType $([int]) -ListShardMapName 'ListShardMap' -ShardMapManager $ShardMapManager
Option 2: Create a shard map for a range mapping
To utilize this mapping pattern, tenant ID values need to be continuous ranges, and it is acceptable to have gap in the ranges by skipping the range when creating the databases.
# $ShardMapManager is the shard map manager object
# 'RangeShardMap' is the unique identifier for the range shard map.
$ShardMap = New-RangeShardMap -KeyType $([int]) -RangeShardMapName 'RangeShardMap' -ShardMapManager $ShardMapManager
Option 3: List mappings on an individual database
Setting up this pattern also requires creation of a list map as shown in step 2, option 1.
Step 3: Prepare individual shards
Add each shard (database) to the shard map manager. This prepares the individual databases for storing mapping information. Execute this method on each shard. The $ShardMap is the shard map created in step 2.
Add-Shard -ShardMap $ShardMap -SqlServerName '<shard_server_name>' -SqlDatabaseName '<shard_database_name>'
# The $ShardMap is the shard map created in step 2.
Step 4: Add mappings
The addition of mappings depends on the kind of shard map you created. If you created a list map, you add list mappings. If you created a range map, you add range mappings.
Option 1: Map the data for a list mapping
Map the data by adding a list mapping for each tenant. Use the following sample PowerShell script to create the mappings and associate them with the new shards.
# Create the mapping and associate it with the new shards
Add-ListMapping -KeyType $([int]) -ListPoint '<tenant_id>' -ListShardMap $ShardMap -SqlServerName '<shard_server_name>' -SqlDatabaseName '<shard_database_name>'
Option 2: Map the data for a range mapping
Add the range mappings for all the tenant ID range - database associations. Use the following sample PowerShell script to create the mappings and associate them with the new shards.
# Create the mapping and associate it with the new shards
Add-RangeMapping -KeyType $([int]) -RangeHigh '5' -RangeLow '1' -RangeShardMap $ShardMap -SqlServerName '<shard_server_name>' -SqlDatabaseName '<shard_database_name>'
Step 4 option 3: Map the data for multiple tenants on an individual database
For each tenant, run the Add-ListMapping (option 1) cmdlet.
Check the mappings
Information about the existing shards and the mappings associated with them can be queried using following PowerShell sample script:
# List the shards and mappings
Get-Shards -ShardMap $ShardMap
Get-Mappings -ShardMap $ShardMap
Summary
Once you have completed the setup, you can begin to use the Elastic Database client library. You can also use data-dependent routing and multi-shard query.