Note
Access to this page requires authorization. You can try signing in or changing directories.
Access to this page requires authorization. You can try changing directories.
Applies to: ![]() Azure SQL Database
Azure SQL Database
This quickstart describes how to create a server-level firewall rule in Azure SQL Database. Firewall rules can give access to logical SQL servers, single databases, and elastic pools and their databases. Firewall rules are also needed to connect on-premises and other Azure resources to databases.
Prerequisites
We will use the resources developed in Create a single database using the Azure portal as a starting point for this tutorial.
Sign in to Azure portal
Sign in to Azure portal.
Create a server-level IP-based firewall rule
Azure SQL Database creates a firewall at the server level for single and pooled databases. This firewall blocks connections from IP addresses that do not have permission. To connect to an Azure SQL database from an IP address outside of Azure, you need to create a firewall rule. You can use rules to open a firewall for a specific IP address or for a range of IP addresses. For more information about server-level and database-level firewall rules, see Server-level and database-level IP-based firewall rules.
Note
Azure SQL Database communicates over port 1433. When you connect from within a corporate network, outbound traffic over port 1433 might not be permitted by your network firewall. This means your IT department needs to open port 1433 for you to connect to your server.
Important
A firewall rule of 0.0.0.0 enables all Azure services to pass through the server-level firewall rule and attempt to connect to a database through the server.
We'll use the following steps to create a server-level IP-based, firewall rule for a specific, client IP address. This enables external connectivity for that IP address through the Azure SQL Database firewall.
After the database deployment completes, select SQL databases from the left-hand menu and then select mySampleDatabase on the SQL databases page. The overview page for your database opens. It displays the fully qualified server name (such as sampleserver.database.chinacloudapi.cn) and provides options for further configuration. You can also find the firewall settings by navigating directly to your server, and selecting Networking under Security.
Copy the fully qualified server name. You will use it when you connect to your server and its databases in other quickstarts. Select Set server firewall on the toolbar.

Set Public network access to Selected networks to reveal the virtual networks and firewall rules. When set to Disabled, virtual networks and firewall rule settings are hidden.
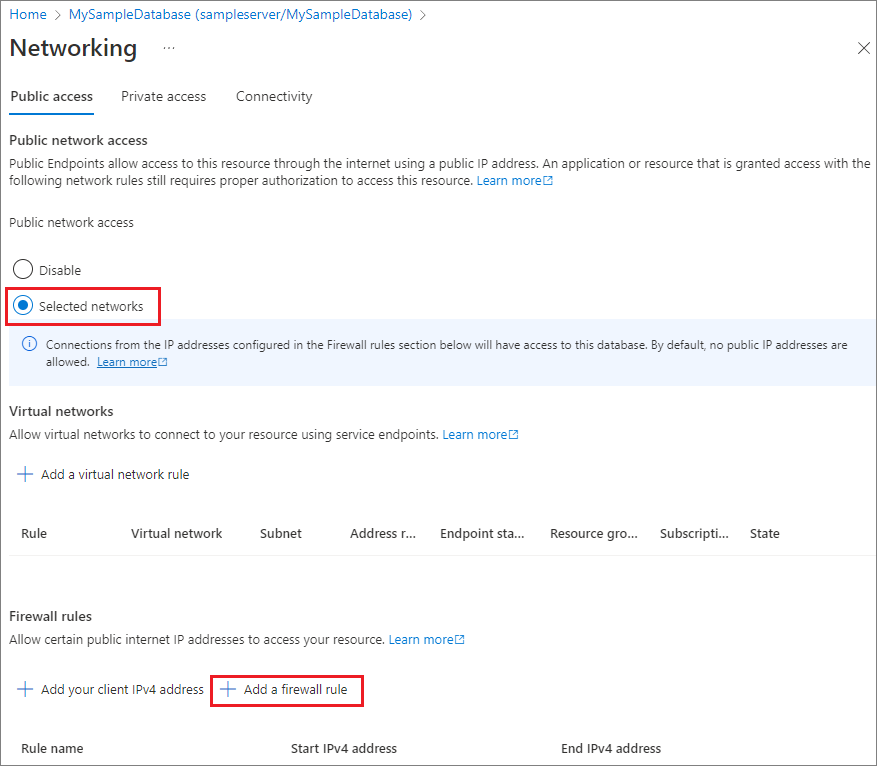
Choose Add your client IP to add your current IP address to a new, server-level, firewall rule. This rule can open Port 1433 for a single IP address or for a range of IP addresses. You can also configure firewall settings by choosing Add a firewall rule.
Important
By default, access through the Azure SQL Database firewall is disabled for all Azure services. Choose ON on this page to enable access for all Azure services.
Select Save. Port 1433 is now open on the server and a server-level IP-based, firewall rule is created for your current IP address.
Close the Networking page.
Open SQL Server Management Studio or another tool of your choice. Use the server admin account you created earlier to connect to the server and its databases from your IP address.
Save the resources from this quickstart to complete additional SQL database tutorials.


Clean up resources
Use the following steps to delete the resources that you created during this quickstart:
- From the left-hand menu in Azure portal, select Resource groups and then select myResourceGroup.
- On your resource group page, select Delete, type myResourceGroup in the text box, and then select Delete.
Related content
- Learn how to connect and query your database using your favorite tools or languages, including:
- Learn how to design your first database, create tables, and insert data, see one of these tutorials: