In this quickstart, you create a single database in Azure SQL Database using either the Azure portal, a PowerShell script, or an Azure CLI script. You then query the database using Query editor in the Azure portal.
Prerequisites
Permissions
To create databases via Transact-SQL: CREATE DATABASE permissions are necessary. To create a database a login must be either the server admin login (created when the Azure SQL Database logical server was provisioned), the Microsoft Entra admin of the server, a member of the dbmanager database role in master. For more information, see CREATE DATABASE.
To create databases via the Azure portal, PowerShell, Azure CLI, or REST API: Azure RBAC permissions are needed, specifically the Contributor, SQL DB Contributor, or SQL Server Contributor Azure RBAC role. For more information, see Azure RBAC built-in roles.
Create a single database
This quickstart creates a single database in the serverless compute tier.
To create a single database in the Azure portal:
Go to Azure SQL hub. In the pane for Azure SQL Database, select Show options.
In the Azure SQL Database options window, select Create SQL Database.
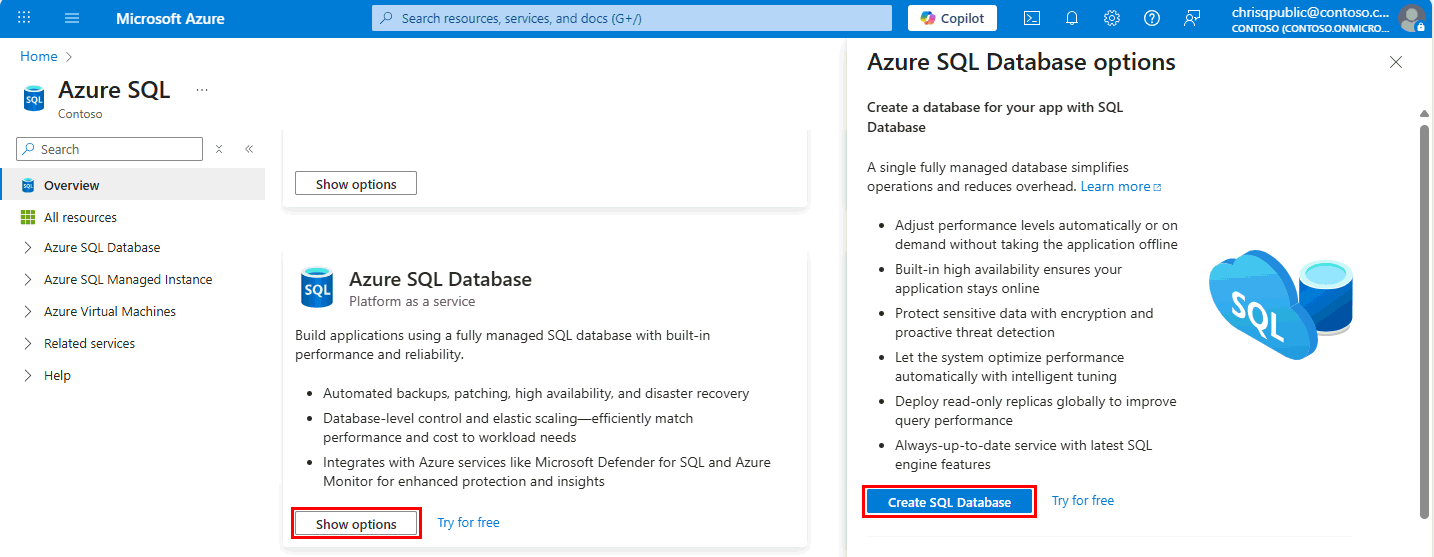
On the Basics tab of the Create SQL Database form, under Project details, select the desired Azure Subscription.
For Resource group, select Create new, enter myResourceGroup, and select OK.
For Database name, enter mySampleDatabase.
For Server, select Create new, and fill out the New server form with the following values:
- Server name: Enter mysqlserver, and add some characters for uniqueness. We can't provide an exact server name to use because server names must be globally unique for all servers in Azure, not just unique within a subscription. The Azure portal lets you know if the name you type is available or not.
- Location: Select a location from the dropdown list.
- Authentication method: Select Use SQL authentication.
- Server admin login: Enter azureuser.
- Password: Enter a password that meets requirements, and enter it again in the Confirm password field.
Select OK.
Leave Want to use SQL elastic pool set to No.
Under Compute + storage, select Configure database.
This quickstart uses a serverless database, so leave Service tier set to General Purpose (Most budget-friendly, serverless compute) and set Compute tier to Serverless. Select Apply.
Under Backup storage redundancy, choose a redundancy option for the storage account where your backups will be saved. To learn more, see backup storage redundancy.
Select Next: Networking.
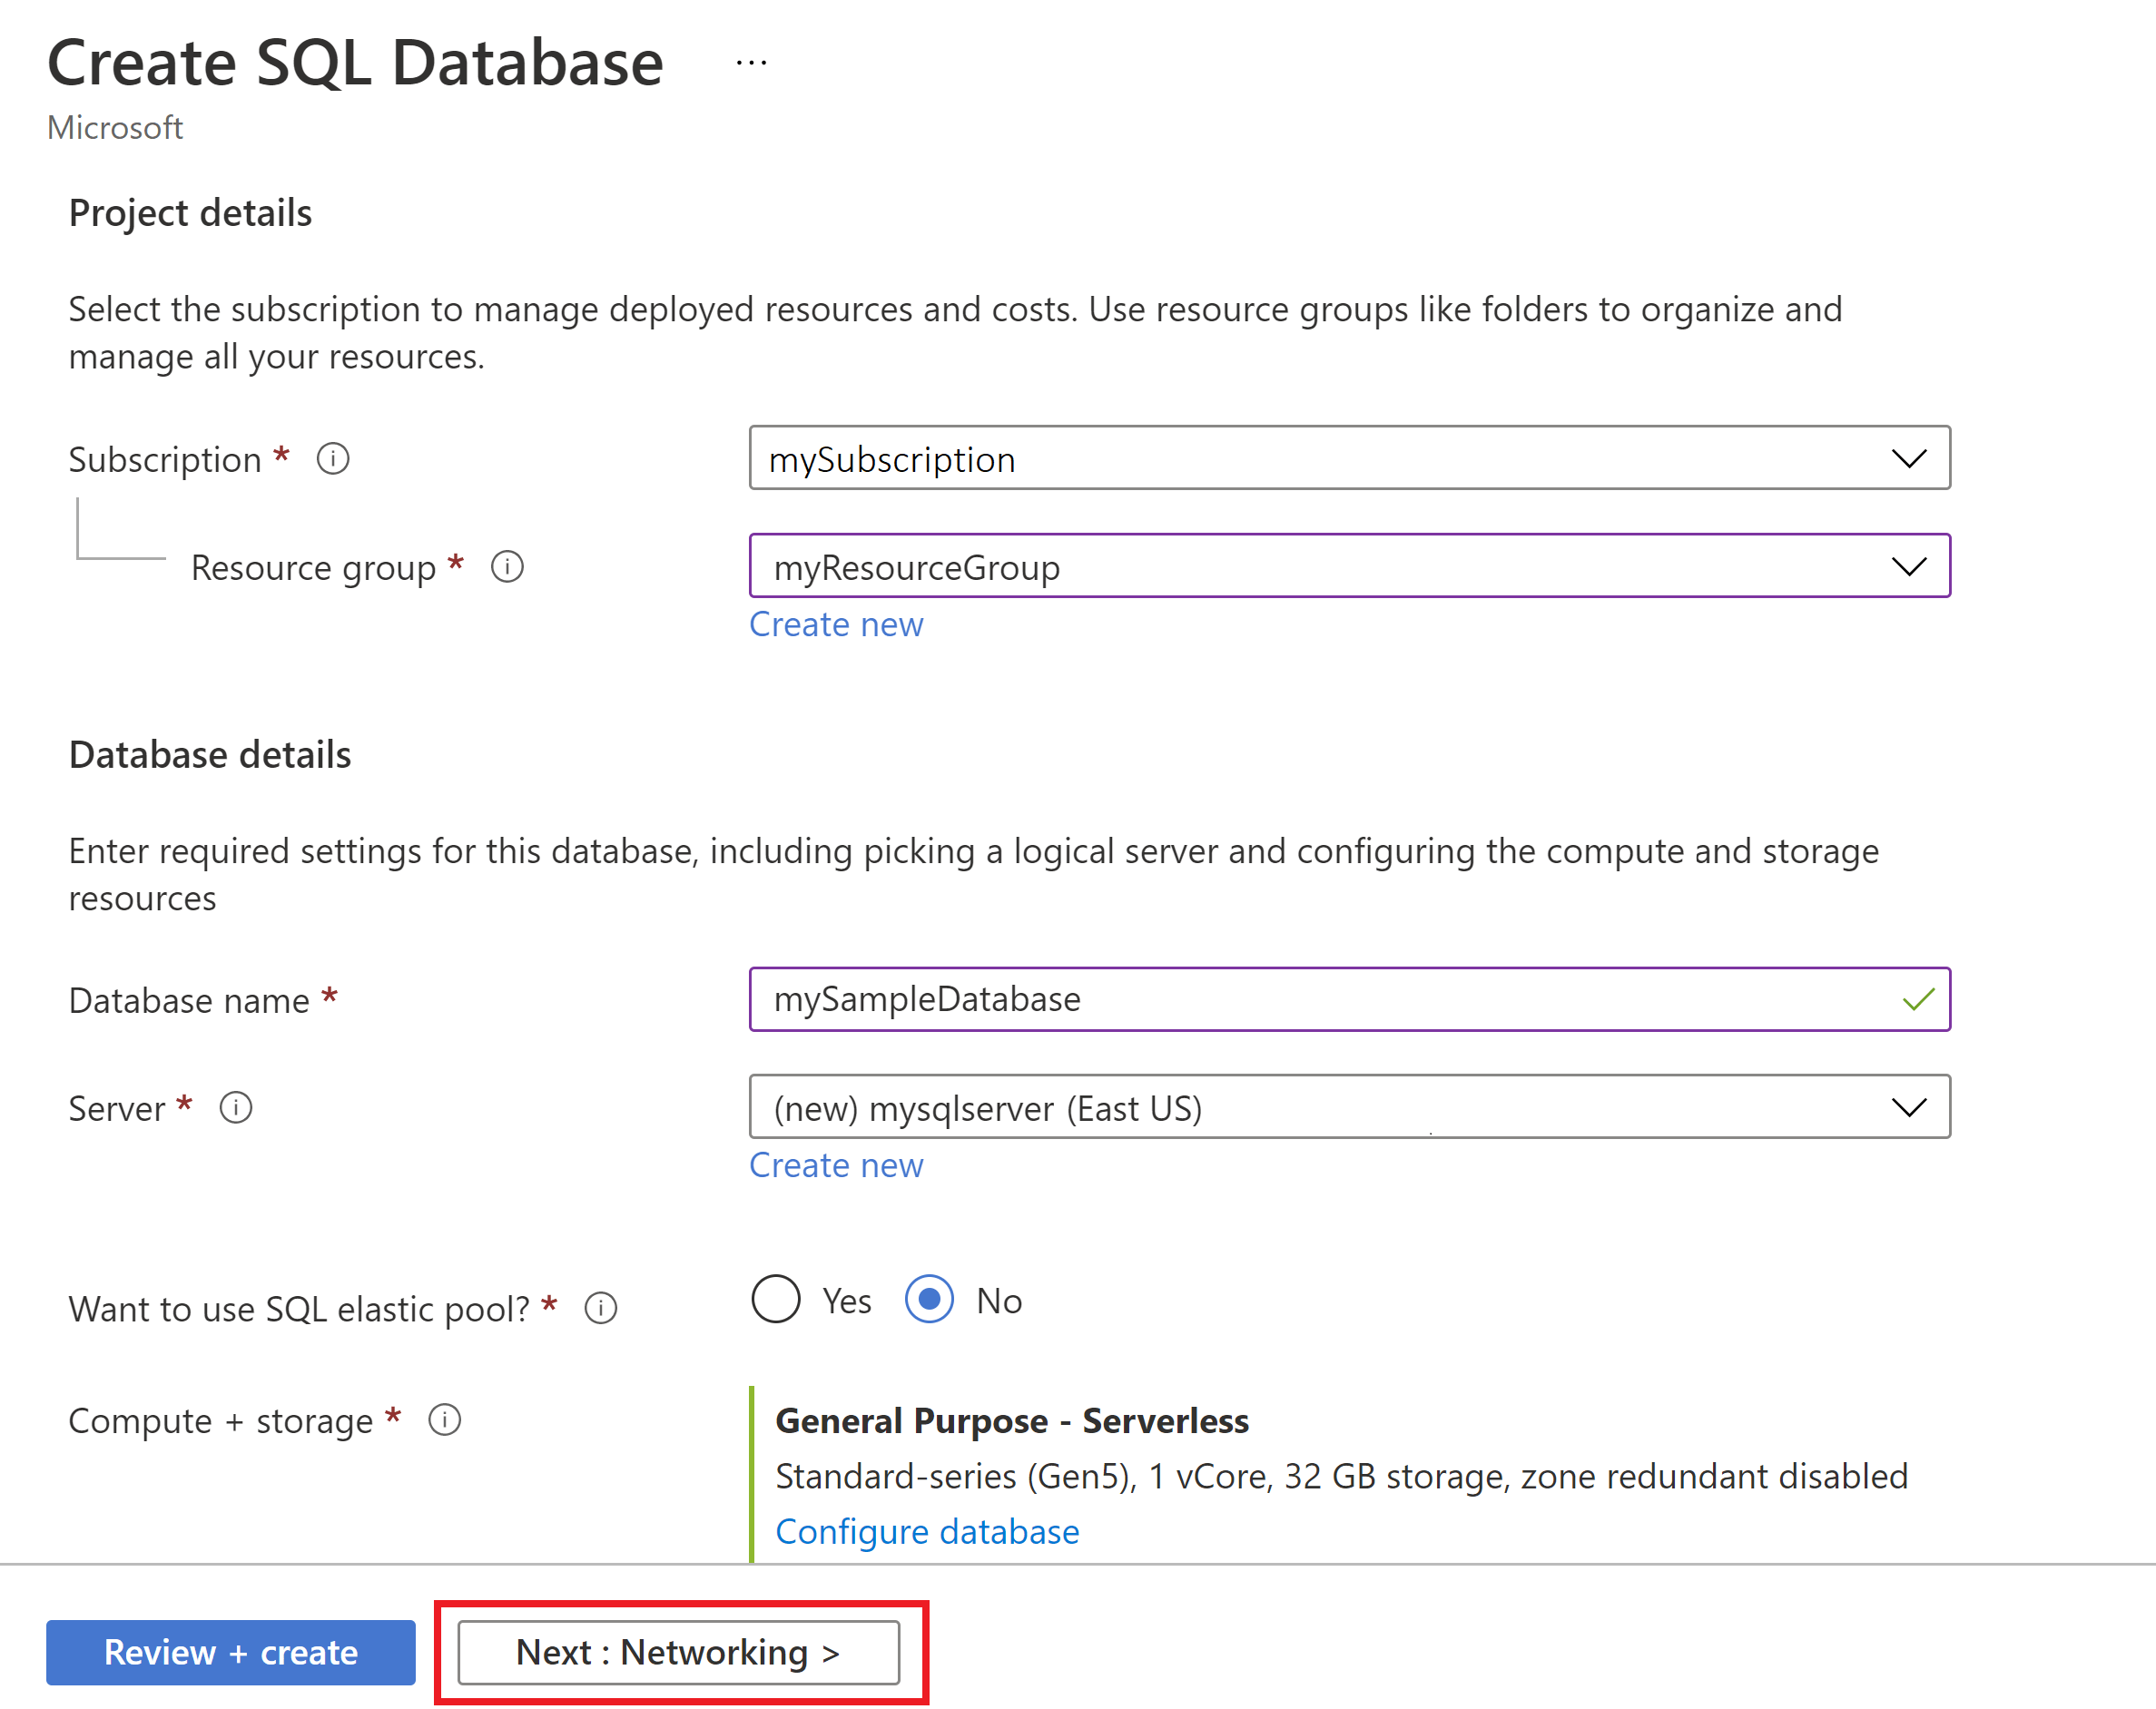
On the Networking tab, for Connectivity method, select Public endpoint.
For Firewall rules, set Add current client IP address to Yes. Leave Allow Azure services and resources to access this server set to No.
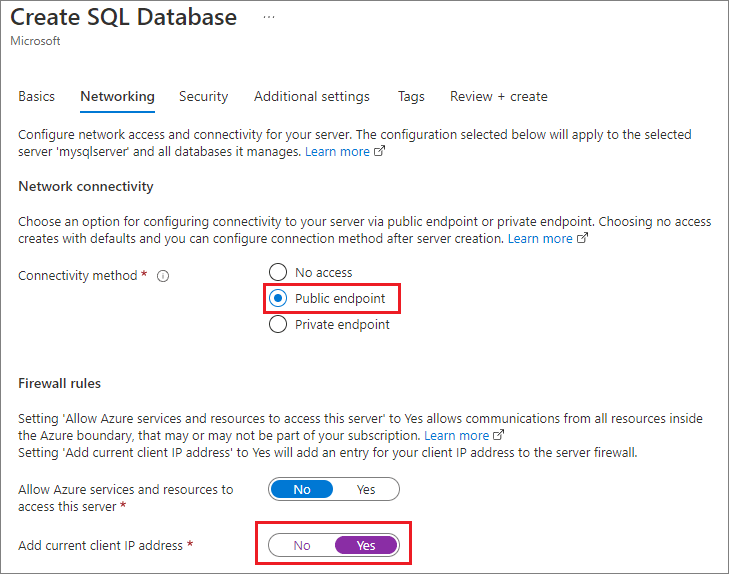
Under Connection policy, choose the Default connection policy, and leave the Minimum TLS version at the default of TLS 1.2.
Select Next: Security.
On the Security page, you can choose to start a free trial of Microsoft Defender for SQL, as well as configure Ledger, Managed identities and Azure SQL transparent data encryption with customer-managed key if you desire. Select Next: Additional settings.
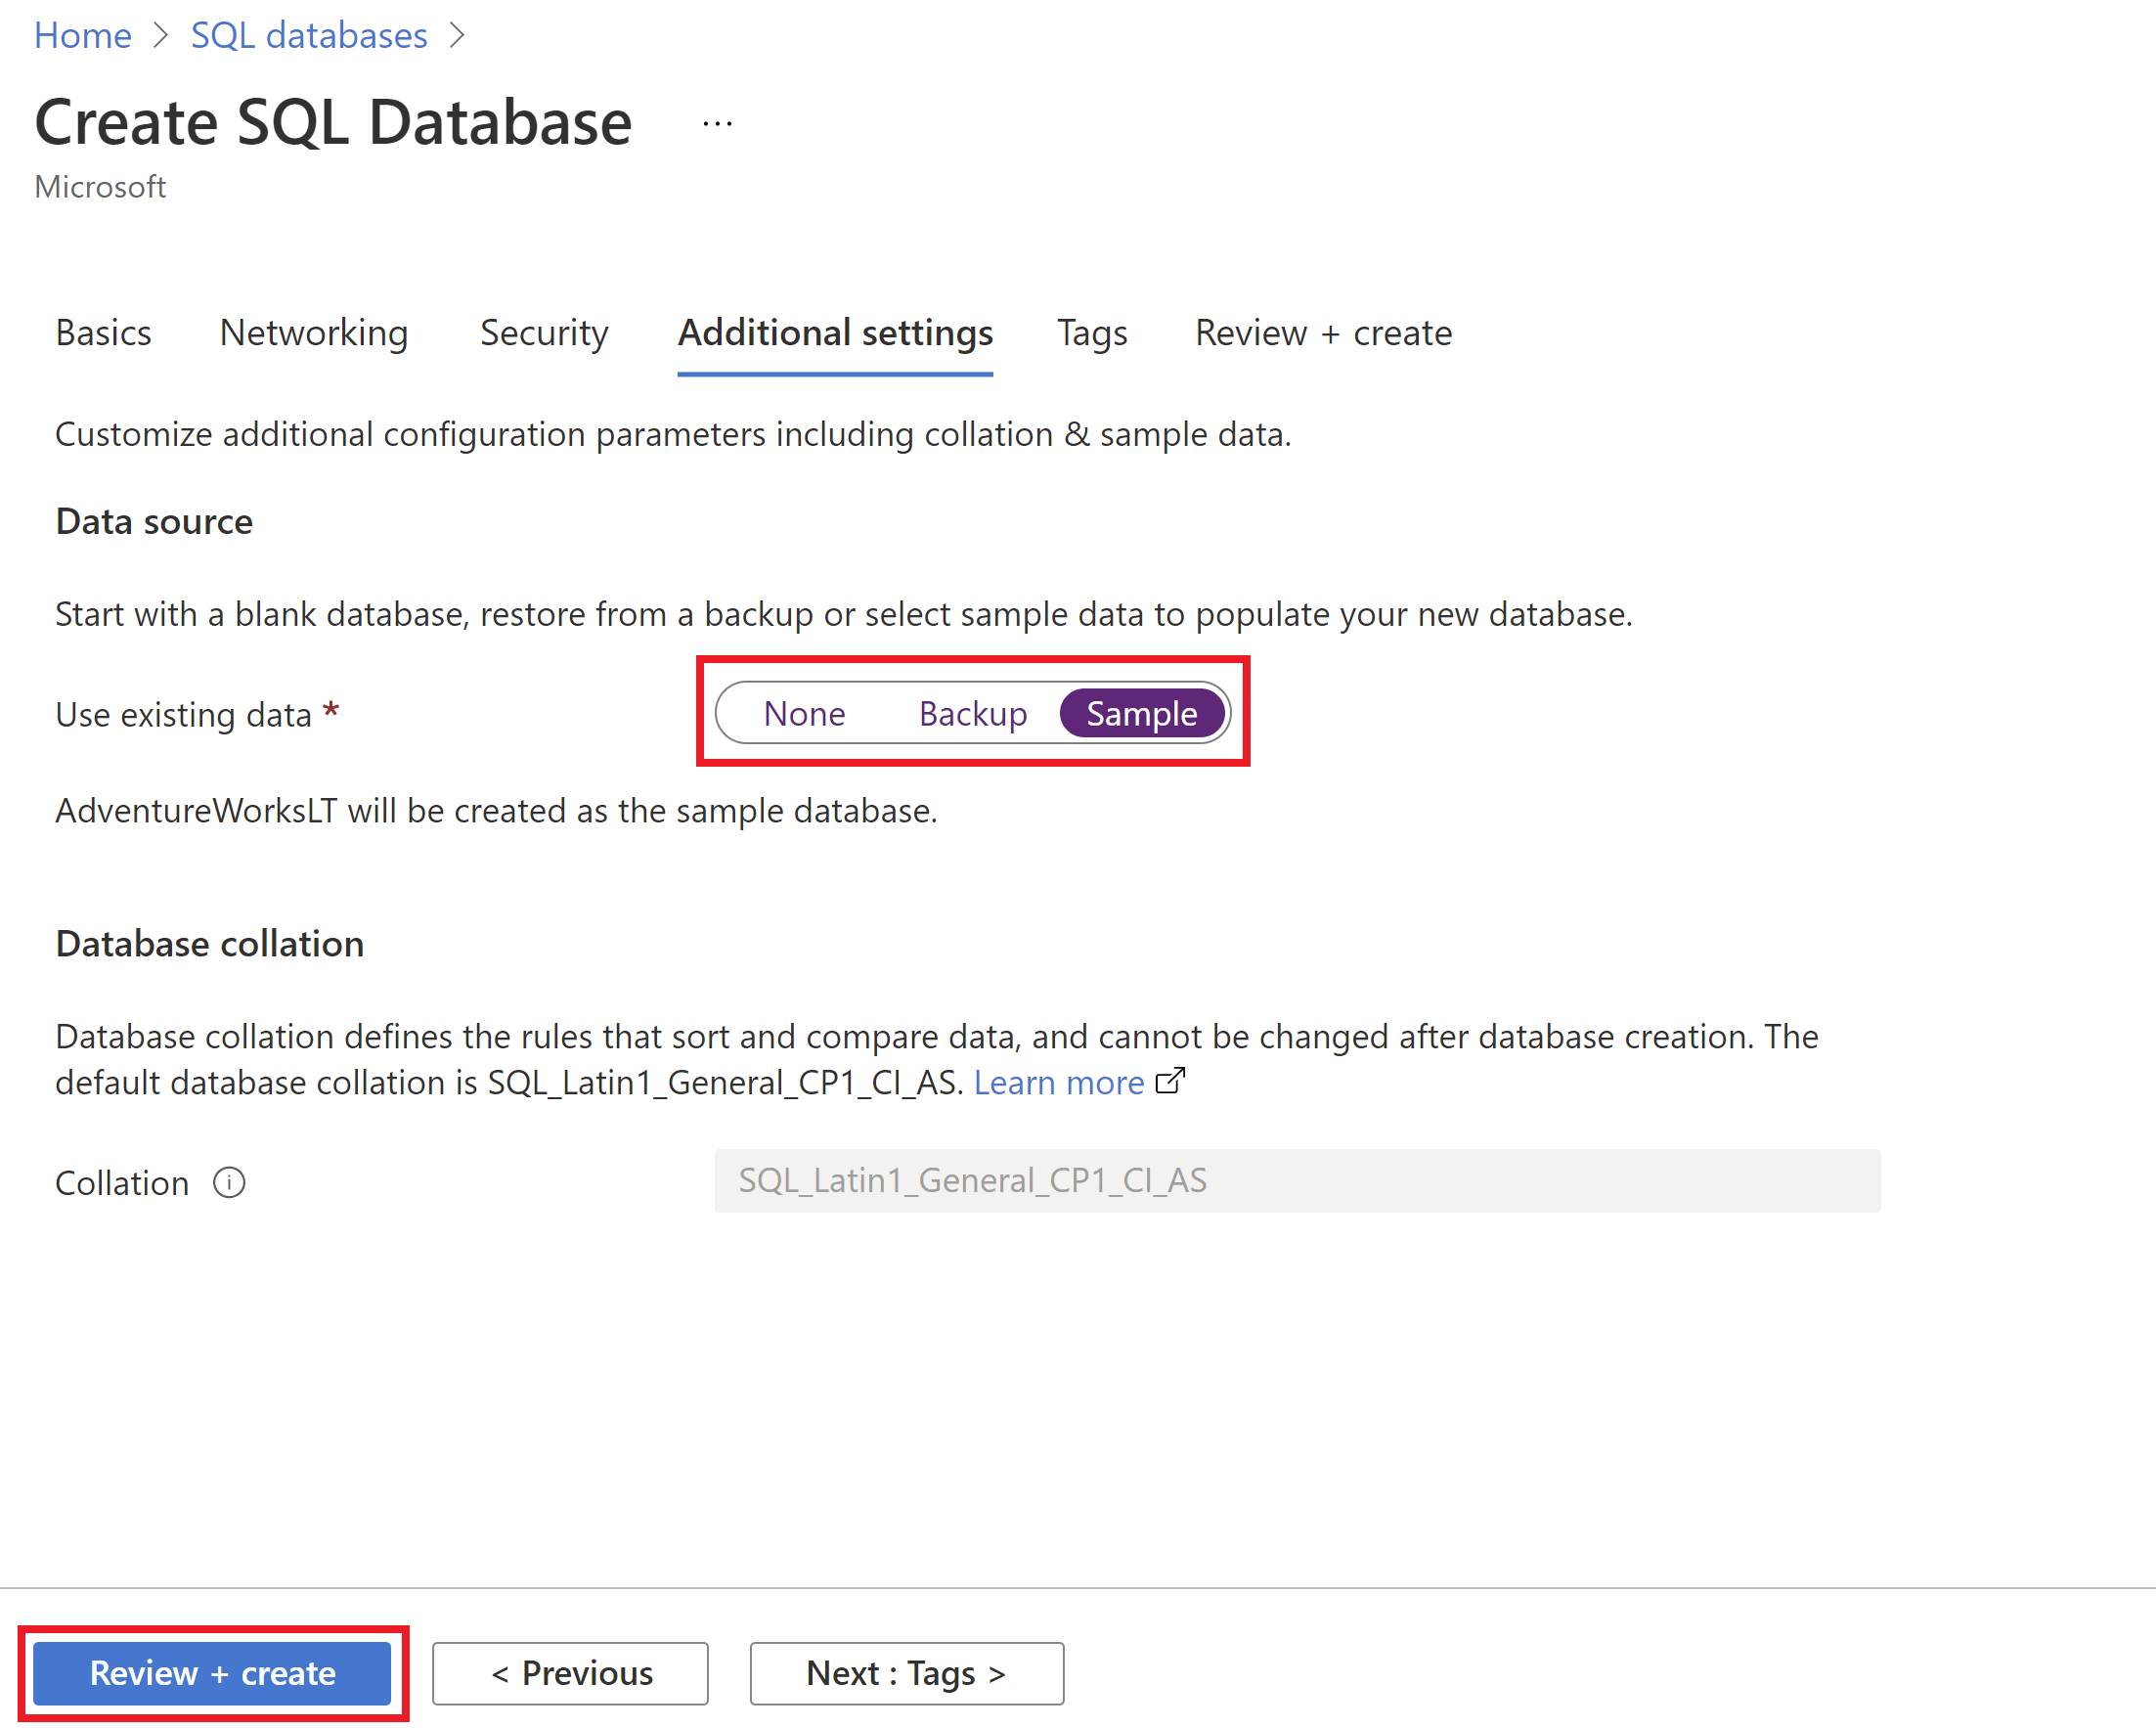
On the Additional settings tab, in the Data source section, for Use existing data, select Sample. This creates an AdventureWorksLT sample database so there's some tables and data to query and experiment with, as opposed to an empty blank database. You can also configure database collation and a maintenance window.
Select Review + create.
On the Review + create page, after reviewing, select Create.
The Azure CLI code blocks in this section create a resource group, server, single database, and server-level IP firewall rule for access to the server. Make sure to record the generated resource group and server names, so you can manage these resources later.
First, install the latest Azure CLI.
If you don't have an Azure trail subscription, create a trial subscription before you begin.
Prepare your environment for the Azure CLI
If you prefer to run CLI reference commands locally, install the Azure CLI. If you're running on Windows or macOS, consider running Azure CLI in a Docker container. For more information, see How to run the Azure CLI in a Docker container.
If you're using a local installation, sign in to the Azure CLI by using the az login command. To finish the authentication process, follow the steps displayed in your terminal. For other sign-in options, see Sign in with the Azure CLI.
When you're prompted, install the Azure CLI extension on first use. For more information about extensions, see Use extensions with the Azure CLI.
Run az version to find the version and dependent libraries that are installed. To upgrade to the latest version, run az upgrade.
Sign in to Azure
Use the following script to sign in using a different subscription, replacing <Subscription ID> with your Azure Subscription ID. If you don't have an Azure trail subscription, create a trial subscription before you begin.
subscription="<subscriptionId>" # add subscription here

az account set -s $subscription # ...or use 'az login'
For more information, see set active subscription or log in interactively.
Set parameter values
The following values are used in subsequent commands to create the database and required resources. Server names need to be globally unique across all of Azure so the $RANDOM function is used to create the server name.
Change the location as appropriate for your environment. Replace 0.0.0.0 with the IP address range that matches your specific environment. Use the public IP address of the computer you're using to restrict access to the server to only your IP address.
# Variable block
let "randomIdentifier=$RANDOM*$RANDOM"
location="China East 2"
resourceGroup="msdocs-azuresql-rg-$randomIdentifier"
tag="create-and-configure-database"
server="msdocs-azuresql-server-$randomIdentifier"
database="msdocsazuresqldb$randomIdentifier"
login="azureuser"
password="Pa$$w0rD-$randomIdentifier"
# Specify appropriate IP address values for your environment
# to limit access to the SQL Database server
startIp=0.0.0.0
endIp=0.0.0.0

echo "Using resource group $resourceGroup with login: $login, password: $password..."
Create a resource group
Create a resource group with the az group create command. An Azure resource group is a logical container into which Azure resources are deployed and managed. The following example creates a resource group named myResourceGroup in the chinaeast2 location:
echo "Creating $resourceGroup in $location..."
az group create --name $resourceGroup --location "$location" --tags $tag
Create a server
Create a server with the az sql server create command.
echo "Creating $server in $location..."
az sql server create --name $server --resource-group $resourceGroup --location "$location" --admin-user $login --admin-password $password
Create a firewall rule with the az sql server firewall-rule create command.
echo "Configuring firewall..."
az sql server firewall-rule create --resource-group $resourceGroup --server $server -n AllowYourIp --start-ip-address $startIp --end-ip-address $endIp
Create a single database
Create a database with the az sql db create command in the serverless compute tier.
echo "Creating $database in serverless tier"
az sql db create \
    --resource-group $resourceGroup \
    --server $server \
    --name $database \
    --sample-name AdventureWorksLT \
    --edition GeneralPurpose \
    --compute-model Serverless \
    --family Gen5 \
    --capacity 2
You can create a resource group, server, and single database using Azure PowerShell.
First, install the latest Azure PowerShell.
Set parameter values
The following values are used in subsequent commands to create the database and required resources. Server names need to be globally unique across all of Azure so the Get-Random cmdlet is used to create the server name.
In the following code snippet:
- Replace
0.0.0.0 in the ip address range to match your specific environment.
- Replace
<strong password here> with a strong password for your adminLogin.
   # Set variables for your server and database
   $resourceGroupName = "myResourceGroup"
   $location = "chinaeast2"
   $adminLogin = "azureuser"
   $password = "<strong password here>"
   $serverName = "mysqlserver-$(Get-Random)"
   $databaseName = "mySampleDatabase"

   # The ip address range that you want to allow to access your server
   $startIp = "0.0.0.0"
   $endIp = "0.0.0.0"

   # Show randomized variables
   Write-host "Resource group name is" $resourceGroupName
   Write-host "Server name is" $serverName
Create resource group
Create an Azure resource group with New-AzResourceGroup. A resource group is a logical container into which Azure resources are deployed and managed.
   Write-host "Creating resource group..."
   $resourceGroup = New-AzResourceGroup -Name $resourceGroupName -Location $location -Tag @{Owner="SQLDB-Samples"}
   $resourceGroup
Create a server
Create a server with the New-AzSqlServer cmdlet.
  Write-host "Creating primary server..."
   $server = New-AzSqlServer -ResourceGroupName $resourceGroupName `
      -ServerName $serverName `
      -Location $location `
      -SqlAdministratorCredentials $(New-Object -TypeName System.Management.Automation.PSCredential `
      -ArgumentList $adminLogin, $(ConvertTo-SecureString -String $password -AsPlainText -Force))
   $server
Create a firewall rule
Create a server firewall rule with the New-AzSqlServerFirewallRule cmdlet.
   Write-host "Configuring server firewall rule..."
   $serverFirewallRule = New-AzSqlServerFirewallRule -ResourceGroupName $resourceGroupName `
      -ServerName $serverName `
      -FirewallRuleName "AllowedIPs" -StartIpAddress $startIp -EndIpAddress $endIp
   $serverFirewallRule
Create a single database with PowerShell
Create a single database with the New-AzSqlDatabase cmdlet.
   Write-host "Creating a gen5 2 vCore serverless database..."
   $database = New-AzSqlDatabase  -ResourceGroupName $resourceGroupName `
      -ServerName $serverName `
      -DatabaseName $databaseName `
      -Edition GeneralPurpose `
      -ComputeModel Serverless `
      -ComputeGeneration Gen5 `
      -VCore 2 `
      -MinimumCapacity 2 `
      -SampleName "AdventureWorksLT"
   $database
Query the database
Once your database is created, you can use the Query editor (preview) in the Azure portal to connect to the database and query data. For more information, see Azure portal query editor for Azure SQL Database.
In the portal, search for and select SQL databases, and then select your database from the list.
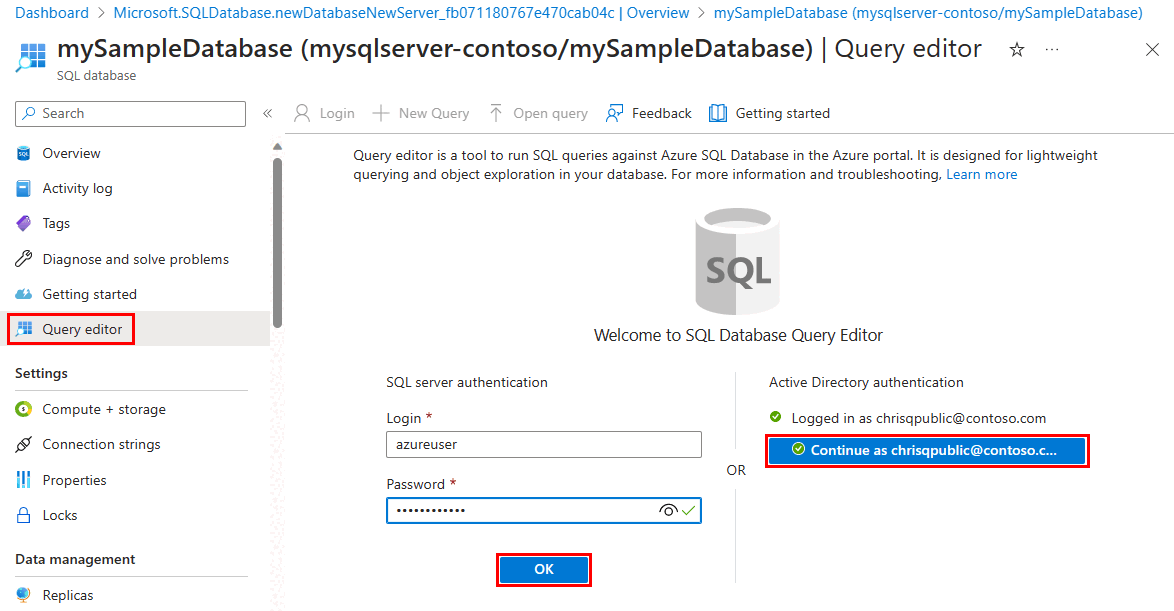
On the page for your database, select Query editor (preview) in the left menu.
Enter your SQL authentication server admin login information or use Microsoft Entra authentication.
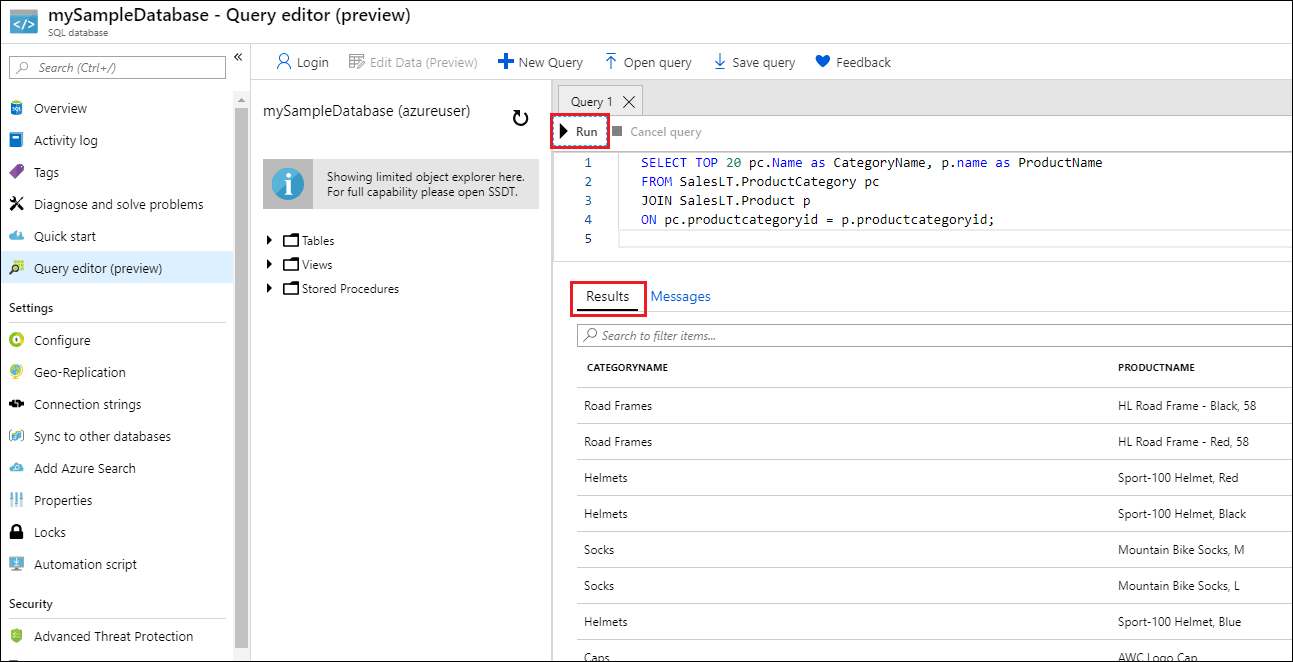
Enter the following query in the Query editor pane.
SELECT TOP 20 pc.Name as CategoryName, p.name as ProductName
FROM SalesLT.ProductCategory pc
JOIN SalesLT.Product p
ON pc.productcategoryid = p.productcategoryid;
Select Run, and then review the query results in the Results pane.
Close the Query editor page, and select OK when prompted to discard your unsaved edits.
Clean up resources
Keep the resource group, server, and single database to go on to the next steps, and learn how to connect and query your database with different methods.
When you're finished using these resources, you can delete the resource group you created, which will also delete the server and single database within it.
To delete myResourceGroup and all its resources using the Azure portal:
- In the portal, search for and select Resource groups, and then select myResourceGroup from the list.
- On the resource group page, select Delete resource group.
- Under Type the resource group name, enter myResourceGroup, and then select Delete.
Use the following command to remove the resource group and all resources associated with it using the az group delete command - unless you have an ongoing need for these resources. Some of these resources might take a while to create, as well as to delete.
az group delete --name $resourceGroup
To delete the resource group and all its resources, run the following PowerShell cmdlet, using the name of your resource group:
Remove-AzResourceGroup -Name $resourceGroupName
Next step
Want to optimize and save on your cloud spending?
Related content


