Note
Access to this page requires authorization. You can try signing in or changing directories.
Access to this page requires authorization. You can try changing directories.
Applies to:
SQL Server on Azure VM
Register your SQL Server VM with the SQL IaaS Agent extension to unlock a wealth of feature benefits for your SQL Server on Azure Windows VM.
This article teaches you to register a single SQL Server VM with the SQL IaaS Agent extension. Alternatively, you can register all SQL Server VMs in a subscription automatically or multiple VMs in bulk using a script.
Note
SQL Server VMs deployed via the Azure marketplace after October 2022 have the least privileged model enabled by default. Management modes for the SQL IaaS Agent extension were removed in March 2023.
Overview
Registering with the SQL Server IaaS Agent extension creates the SQL virtual machine resource within your subscription, which is a separate resource from the virtual machine resource. Deleting the extension from your SQL Server VM removes the SQL virtual machine resource but doesn't drop the actual virtual machine.
Deploying a SQL Server VM Azure Marketplace image through the Azure portal automatically registers the SQL Server VM with the extension, which includes registering the subscription with the Microsoft.SqlVirtualMachine resource provider (RP), if it's not already registered. However, if you choose to self-install SQL Server on an Azure virtual machine or provision an Azure virtual machine from a custom VHD, then you must register your SQL Server VM with the SQL IaaS Agent extension to unlock full feature benefits and manageability. By default, Azure VMs that have SQL Server 2016 or later installed will be automatically registered with the SQL IaaS Agent extension when detected by the CEIP service. See the SQL Server privacy supplement for more information. For information about privacy, see the SQL IaaS Agent extension privacy statements.
To utilize the SQL IaaS Agent extension, you must first register your subscription with the Microsoft.SqlVirtualMachine provider, which gives the SQL IaaS Agent extension the ability to create resources within that specific subscription. Then you can register your SQL Server VM with the extension.
Prerequisites
To register your SQL Server VM with the extension, you'll need the following:
- An Azure subscription.
- An Azure Resource Model supported Windows Server virtual machine with a supported SQL Server version deployed.
- Ensure the Azure VM is running.
- The client credentials used to register the virtual machine exists in any of the following Azure roles: Virtual Machine contributor, Contributor, or Owner.
- The latest version of Azure CLI or Azure PowerShell (5.0 minimum).
- A minimum of .NET Framework 4.5.1 or later.
- To verify that none of the limitations apply to you.
Register subscription with RP
To register your SQL Server VM with the SQL IaaS Agent extension, you must first register your subscription with the Microsoft.SqlVirtualMachine resource provider (RP). This gives the SQL IaaS Agent extension the ability to create resources within your subscription. You can do so by using the Azure portal, the Azure CLI, or Azure PowerShell.
Register your subscription with the resource provider by using the Azure portal:
Open the Azure portal and go to All Services.
Go to Subscriptions and select the subscription of interest.
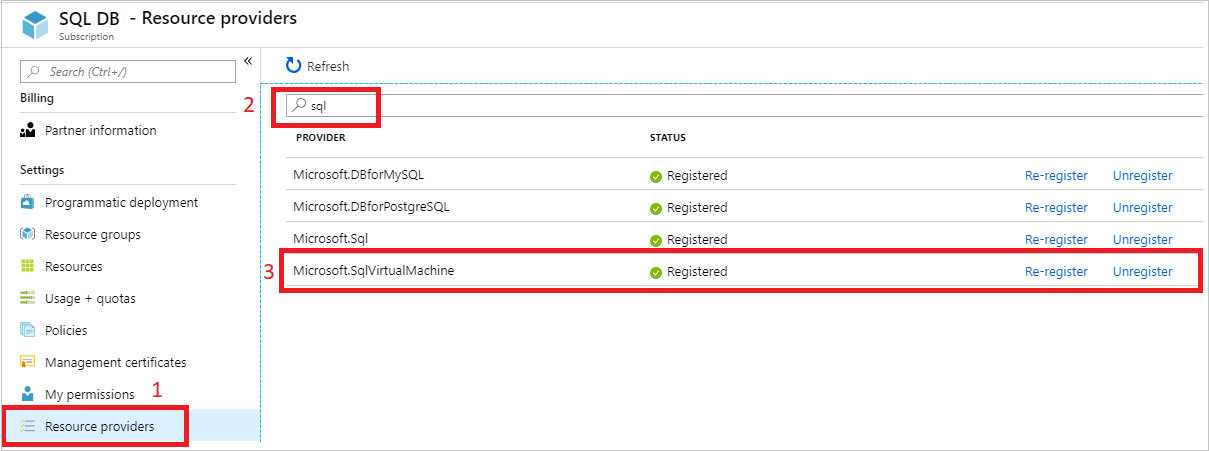
On the Subscriptions page, select Resource providers under Settings.
Enter sql in the filter to bring up the SQL-related resource providers.
Select Register, Re-register, or Unregister for the Microsoft.SqlVirtualMachine provider, depending on your desired action.

Register with extension
You can manually register your SQL Server VM with the SQL IaaS Agent extension by using Azure PowerShell or the Azure CLI.
Provide the SQL Server license type as either pay-as-you-go (PAYG) to pay per usage, Azure Hybrid Benefit (AHUB) to use your own license, or disaster recovery (DR) to activate the free DR replica license.
It's not currently possible to register your SQL Server VM with the SQL IaaS Agent extension by using the Azure portal.
Verify registration status
You can verify if your SQL Server VM has already been registered with the SQL IaaS Agent extension by using the Azure portal, the Azure CLI, or Azure PowerShell.
Verify the registration status with the Azure portal:
Sign in to the Azure portal.
Go to your SQL Server VMs.
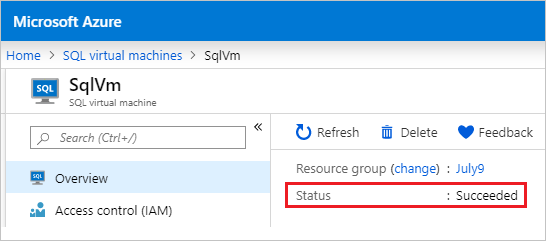
Select your SQL Server VM from the list. If your SQL Server VM isn't listed here, it likely hasn't been registered with the SQL IaaS Agent extension.
View the value under Status. If Status is Succeeded, then the SQL Server VM has been registered with the SQL IaaS Agent extension successfully.

Alternatively, you can check the status by choosing Repair under the Support + troubleshooting pane in the SQL virtual machine resource. The provisioning state for the SQL IaaS Agent extension can be Succeeded or Failed.
An error indicates that the SQL Server VM hasn't been registered with the extension.
Delete the extension
To unregister your SQL Server VM with the SQL IaaS Agent extension, delete the SQL virtual machine resource by using the Azure portal, PowerShell, or the Azure CLI. Deleting the SQL virtual machine resource doesn't delete the SQL Server VM.
Warning
Use extreme caution when deleting the extension from your SQL Server VM. Follow the steps carefully because it is possible to inadvertently delete the virtual machine when attempting to remove the resource.
To delete the extension from your SQL Server VM by using the Azure portal, follow these steps:
Sign into the Azure portal.
Navigate to the SQL VM resource.

Select Delete.

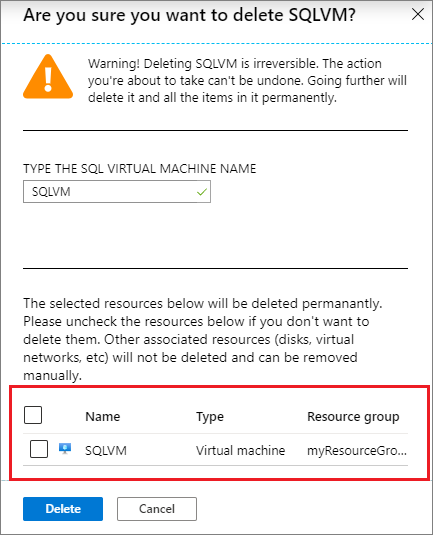
Type the name of the SQL virtual machine and clear the check box next to the virtual machine.

Warning
Failure to clear the checkbox next to the virtual machine name will delete the virtual machine entirely. Clear the checkbox to delete the extension from the SQL Server VM but not delete the actual virtual machine.
Select Delete to confirm the deletion of the SQL virtual machine resource, and not the SQL Server VM.
Related content
- Automate management with the Windows SQL Server IaaS Agent extension
- Automatic registration with SQL IaaS Agent extension
- Known issues and troubleshooting the SQL Server IaaS Agent extension
- SQL IaaS Agent extension privacy statements
- Checklist: Best practices for SQL Server on Azure VMs
- What is SQL Server on Azure Windows Virtual Machines?
- FAQ for SQL Server on Windows VMs
- Pricing guidance for SQL Server on Azure VMs
- What's new with SQL Server on Azure Virtual Machines?