Configure network security groups with Windows Admin Center
Applies to: Azure Stack HCI, versions 22H2; Windows Server 2022, Windows Server 2019, Windows Server 2016
This topic provides step-by-step instructions on how to use Windows Admin Center to create and configure network security groups (NSGs) to manage data traffic flow using Datacenter Firewall. It also provides instructions on managing network security groups on Software Defined Network (SDN) virtual and logical networks. You enable and configure Datacenter Firewall by creating network security groups and applying them to either a subnet or a network interface. To learn more, see What is Datacenter Firewall? To use PowerShell scripts to do this, see Configure network security groups with PowerShell.
Before you configure network security groups, you need to deploy Network Controller. To learn about Network Controller, see What is Network Controller? To deploy Network Controller using PowerShell scripts, see Deploy an SDN infrastructure.
Additionally, if you want to apply network security groups to an SDN logical network, you need to first create a logical network. Likewise, if you want to apply network security groups to an SDN virtual network, you need to first create a virtual network. To learn more, see:
Create a network security group
You can create a network security group in Windows Admin Center.
On the Windows Admin Center home screen, under All connections, select the cluster that you want to create the network security group on.
Under Tools, scroll down to the Networking area, and select Network security groups.
Under Network security groups, select the Inventory tab, and then select New.
In the Network Security Group pane, type a name for the network security group, and then select Submit.

Under Network security groups, verify that the Provisioning state of the new network security group shows Succeeded.

Create network security group rules
After you create a network security group, you’re ready to create network security groups rules. If you want to apply network security group rules to both inbound and outbound traffic, you need to create two rules.
On the Windows Admin Center home screen, under All connections, select the cluster that you want to create the network security group on.
Under Tools, scroll down to the Networking area, and select Network security groups.
Under Network security groups, select the Inventory tab, and then select the network security group that you just created.
Under Network security rule, select New.
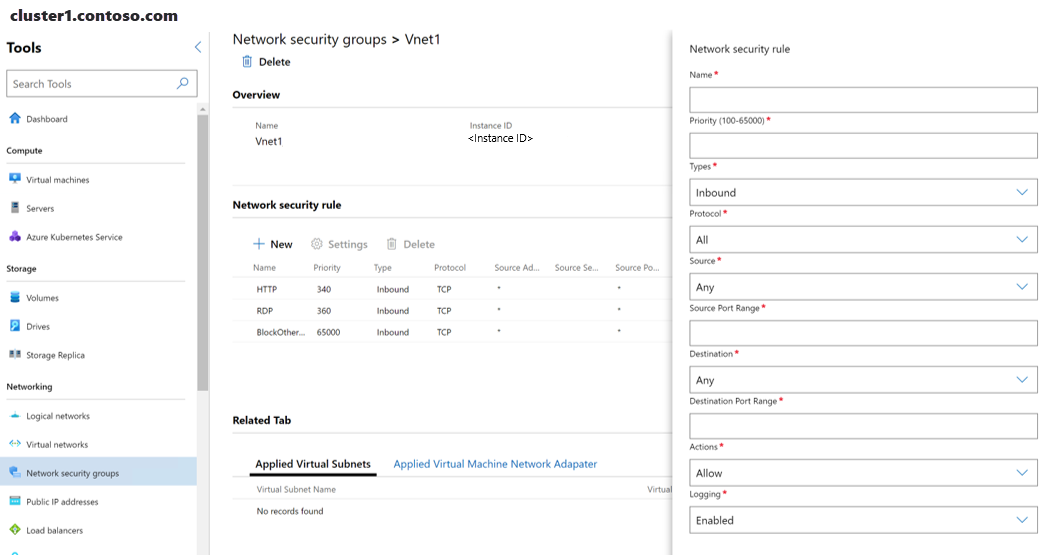
In the Network security rule pane, provide the following information:
- Name of the rule.
- Priority of the rule – Acceptable values are 101 to 65000. A lower value denotes a higher priority.
- Types – This can be inbound or outbound.
- Protocol – Specify the protocol to match either an incoming or outgoing packet. Acceptable values are All, TCP and UDP.
- Source Address Prefix – Specify the source address prefix to match either an incoming or outgoing packet. If you provide *, that denotes all source addresses.
- Source Port Range – Specify the source port range to match either an incoming or outgoing packet. If you provide *, that denotes all source ports.
- Destination Address Prefix – Specify the destination address prefix to match either an incoming or outgoing packet. If you provide *, that denotes all destination addresses.
- Destination Port Range – Specify the destination port range to match either an incoming or outgoing packet. If you provide *, that denotes all destination ports.
- Actions – If the above conditions are matched, specify either to allow or block the packet. Acceptable values are Allow and Deny.
- Logging – Specify either to enable or disable logging for the rule. If logging is enabled, all traffic matched by this rule is logged on the host computers.
Select Submit.

Apply a network security group to a virtual network
After you create a network security group and rules for it, you need to apply the network security group to either a virtual network subnet, a logical network subnet, or a network interface.
Under Tools, scroll down to the Networking area, and select Virtual networks.
Select the Inventory tab, and then select a virtual network. On the subsequent page, select a virtual network subnet, and then select Settings.

Select a network security group from the drop-down list and then select Submit.
Completing the last step associates the network security group with the virtual network subnet and applies it to all computers attached to the virtual network subnet.

Apply a network security group to a logical network
You can apply a network security group to a logical network subnet.
Under Tools, scroll down to the Networking area, and select Logical networks.
Select the Inventory tab, and then select a logical network. On the subsequent page, select a logical subnet, and then select Settings.
Select a network security group from the drop-down list and then select Add.
Completing the last step associates the network security group with the logical network subnet and applies it to all computers attached to the logical network subnet.
Apply a network security group to a network interface
You can apply a network security group to a network interface, either while creating a virtual machine (VM) or later.
Under Tools, scroll down to the Networking area, and select Virtual machines.
Select the Inventory tab, select a VM, and then select Settings.
On the Settings page, select Networks.
Scroll down to Network security group, expand the drop-down list, select a network security group, and select Save network settings.

Completing the last step associates the network security group with the network interface and applies it to all incoming and outgoing traffic for the network interface.

Get a list of network security groups
You can easily view all the network security groups in your cluster in a list.
- On the Windows Admin Center home screen, under All connections, select the cluster that you want to view a list of network security groups on.
- Under Tools, scroll down to the Networking area, and select Network security groups.
- The Inventory tab displays the list of the network security groups available on the cluster and provides commands that you can use to manage individual network security groups in the list. You can:
View the network security groups list.
View the number of rules for each network security group, and the number of applied subnets and NICs applied to each network security group.
View the Provisioning State of each network security group (Succeeded, Failed).
Delete a network security group.
If you select a network security group in the list, you can view its rules. You can then add, delete, or modify network security group rule settings.


Delete a network security group
You can delete a network security group if you no longer need it.
Note
After you delete a network security group from the list of network security groups, ensure that it is not associated with either a subnet or a network interface.
Under Tools, scroll down to the Networking area, and select Network security groups.
Select the Inventory tab, select a network security group in the list, and then select Delete.
On the Delete Confirmation prompt select Yes.
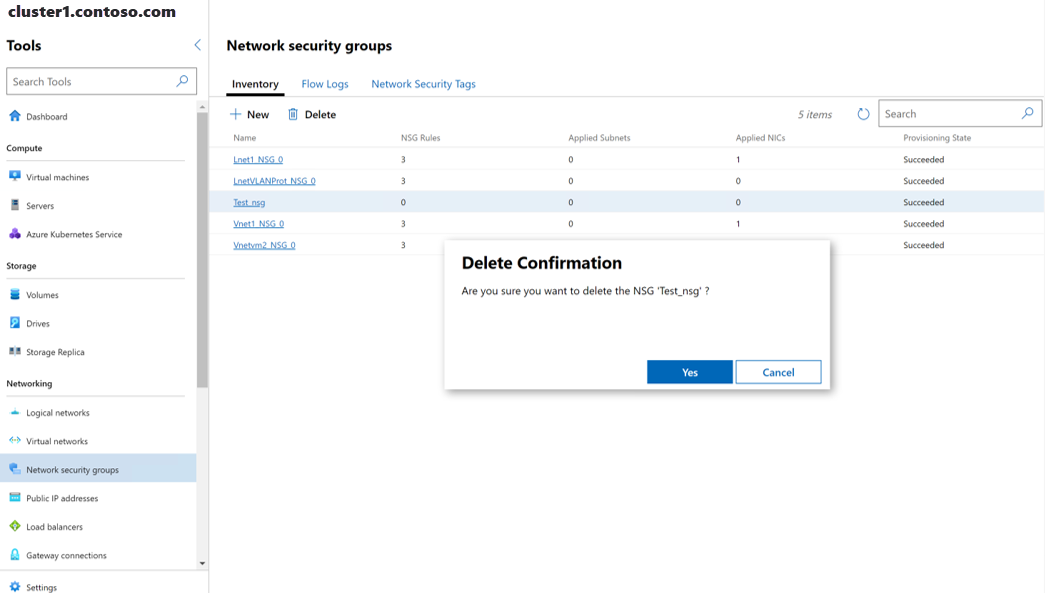
Next to the search box, select Refresh to ensure that the network security group has been deleted.

Next steps
For more information, see also: