Note
Access to this page requires authorization. You can try signing in or changing directories.
Access to this page requires authorization. You can try changing directories.
In this tutorial, you learn how to trigger a Batch job using Azure Functions. This article walks through an example that takes documents added to an Azure Storage blob container and applies optical character recognition (OCR) to them by using Azure Batch. To streamline the OCR processing, this example configures an Azure function that runs a Batch OCR job each time a file is added to the blob container. You learn how to:
- Use the Azure portal to create pools and jobs.
- Create blob containers and a shared access signature (SAS).
- Create a blob-triggered Azure Function.
- Upload input files to Storage.
- Monitor task execution.
- Retrieve output files.
Prerequisites
- An Azure account with an active subscription. Create a trial subscription.
- An Azure Batch account and a linked Azure Storage account. For more information on how to create and link accounts, see Create a Batch account.
Sign in to Azure
Sign in to the Azure portal.
Create a Batch pool and Batch job using the Azure portal
In this section, you use the Azure portal to create the Batch pool and Batch job that runs OCR tasks.
Create a pool
Sign in to the Azure portal using your Azure credentials.
Create a pool by selecting Pools on the left side navigation, and then select the Add button above the search form.
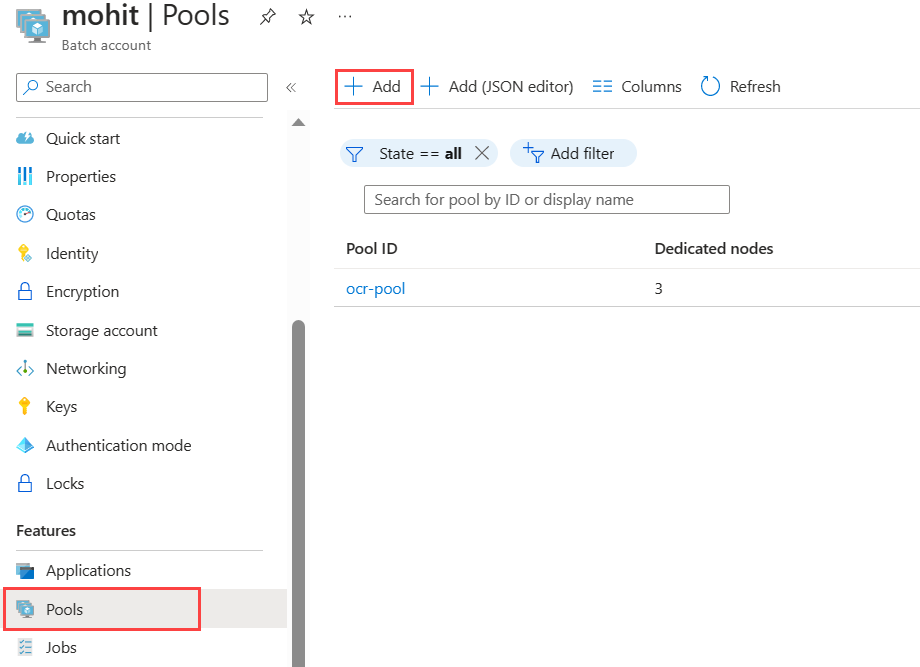
- Enter a Pool ID. This example names the pool
ocr-pool. - Select canonical as the Publisher.
- Select 0001-com-ubuntu-server-jammy as the Offer.
- Select 22_04-lts as the Sku.
- Choose
Standard_F2s_v2 - 2 vCPUs, 2 GB Memoryas the VM size in the Node Size section. - Set the Mode in the Scale section to Fixed, and enter 3 for the Target dedicated nodes.
- Set Start task to Enabled the start task, and enter the command
/bin/bash -c "sudo update-locale LC_ALL=C.UTF-8 LANG=C.UTF-8; sudo apt-get update; sudo apt-get -y install ocrmypdf"in Command line. Be sure to set the Elevation level as Pool autouser, Admin, which allows start tasks to include commands withsudo. - Select OK.
- Enter a Pool ID. This example names the pool
Create a job
- Create a job on the pool by selecting Jobs in the left side navigation, and then choose the Add button above the search form.
- Enter a Job ID. This example uses
ocr-job. - Select
ocr-poolfor Current pool, or whatever name you chose for your pool. - Select OK.
- Enter a Job ID. This example uses
Create blob containers
Here you create blob containers that store your input and output files for the OCR Batch job. In this example, the input container is named input and is where all documents without OCR are initially uploaded for processing. The output container is named output and is where the Batch job writes processed documents with OCR.
Search for and select Storage accounts in the Azure portal.
Choose your storage account linked to your Batch account.
Select Containers from the left side navigation, and create two blob containers (one for input files, one for output files) by following the steps at Create a blob container.
Create a shared access signature for your output container by selecting the output container, and on the Shared access tokens page, select Write in the Permissions drop down. No other permissions are necessary.
Select Generate SAS token and URL, and copy the Blob SAS URL to use later for your function.

Create an Azure Function
In this section, you create the Azure Function that triggers the OCR Batch job whenever a file is uploaded to your input container.
Follow the steps in Create a function triggered by Azure Blob storage to create a function.
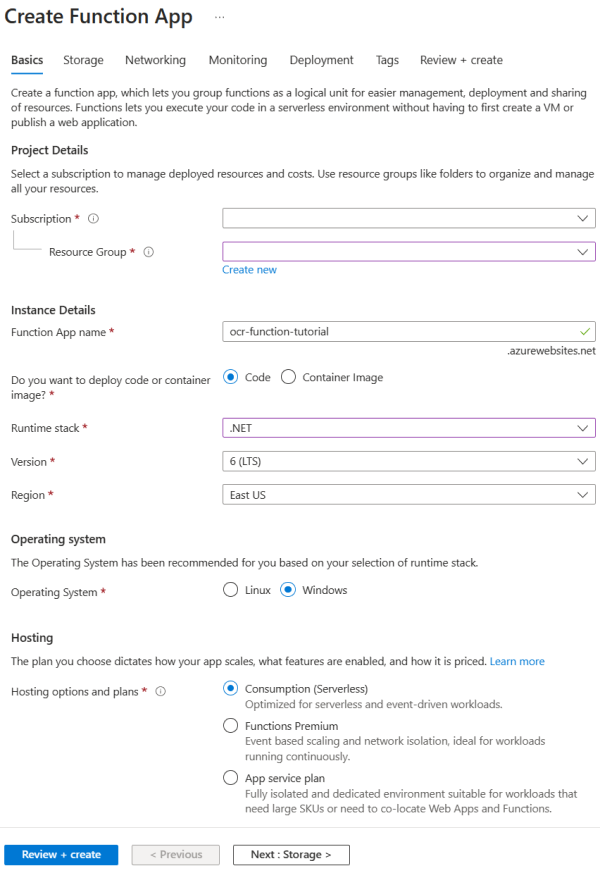
- For runtime stack, choose .NET. This example function uses C# to take advantage of the Batch .NET SDK.
- On the Storage page, use the same storage account that you linked to your Batch account.
- Select Review + Create > Create.
The following screenshot the Create Function App page on the Basics tab using example information.
In your function, select Functions from the left side navigation and select Create.
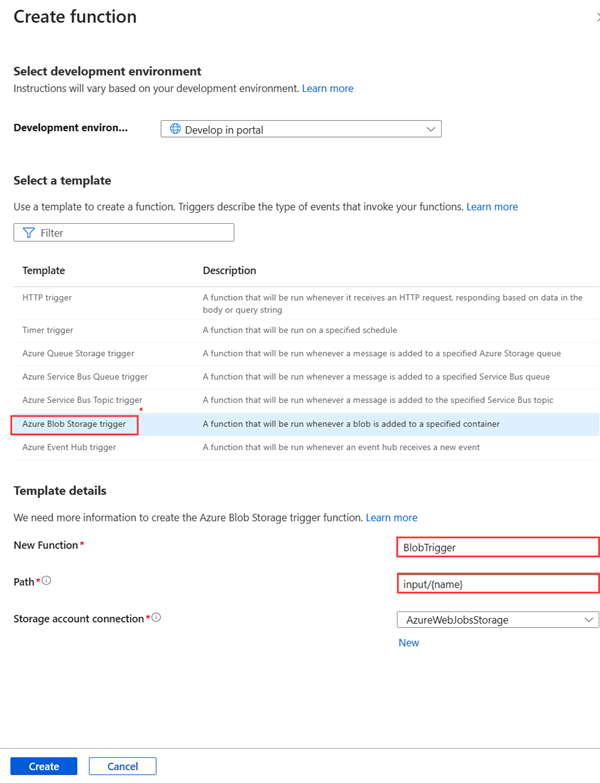
In the Create function pane, select Azure Blob Storage trigger.
Enter a name for your function in New Function. In this example, the name is OcrTrigger. Enter the path as
input/{name}, where input in the name of your Blob container.Select Create.
Once the blob-triggered function is created, select Code + Test. Use the
run.csxandfunction.projfrom GitHub in the Function.function.projdoesn't exist by default, so select the Upload button to upload it into your development workspace.run.csxis run when a new blob is added to your input blob container.function.projlists the external libraries in your Function code, for example, the Batch .NET SDK.
Change the placeholder values of the variables in the
Run()function of therun.csxfile to reflect your Batch and storage credentials. You can find your Batch and storage account credentials in the Azure portal in the Keys section of your Batch and storage account.


Trigger the function and retrieve results
Upload any or all of the scanned files from the input_files directory on GitHub to your input container.
You can test your function from Azure portal on the Code + Test page of your function.
- Select Test/run on the Code + Test page.
- Enter the path for your input container in Body on the Input tab.
- Select Run.
After a few seconds, the file with OCR applied is added to the output container. Log information outputs to the bottom window. The file is then visible and retrievable on Storage Explorer.
Alternatively, you can find the log information on the Monitor page:
2019-05-29T19:45:25.846 [Information] Creating job...
2019-05-29T19:45:25.847 [Information] Accessing input container <inputContainer>...
2019-05-29T19:45:25.847 [Information] Adding <fileName> as a resource file...
2019-05-29T19:45:25.848 [Information] Name of output text file: <outputTxtFile>
2019-05-29T19:45:25.848 [Information] Name of output PDF file: <outputPdfFile>
2019-05-29T19:45:26.200 [Information] Adding OCR task <taskID> for <fileName> <size of fileName>...
To download the output files to your local machine, go to the output container in your storage account. Select more options on the file you want, and then select Download.
Tip
The downloaded files are searchable if opened in a PDF reader.
Clean up resources
You're charged for the pool while the nodes are running, even if no jobs are scheduled. When you no longer need the pool, delete it with the following steps:
- From the Pools page of your Batch account, select more options on your pool.
- Select Delete.
When you delete the pool, all task output on the nodes is deleted. However, the output files remain in the storage account. When no longer needed, you can also delete the Batch account and the storage account.
Next steps
For more examples of using the .NET API to schedule and process Batch workloads, see the samples on GitHub.