Note
Access to this page requires authorization. You can try signing in or changing directories.
Access to this page requires authorization. You can try changing directories.
Applies to: Azure Logic Apps (Consumption + Standard)
This article shows how to access your File Transfer Protocol (FTP) server from a workflow in Azure Logic Apps with the FTP connector. You can create automated workflows that run when triggered by events in your FTP server or in other systems and run actions to manage files on your FTP server.
For example, your workflow can start with an FTP trigger that monitors and responds to events on your FTP server. The trigger makes the outputs available to actions in your workflow. Your workflow can run FTP actions that create, send, receive, and manage files through your FTP server account using the following specific tasks:
- Monitor when files are added or changed.
- Create, copy, delete, list, and update files.
- Get file metadata and content.
- Manage folders.
If you're new to Azure Logic Apps, see the following documentation:
Connector technical reference
The FTP connector has different versions, based on logic app type and host environment.
| Logic app type (plan) | Environment | Connector version |
|---|---|---|
| Consumption | Multitenant Azure Logic Apps | Managed connector, which appears in the connector gallery with the Shared filter. For more information, see: - FTP managed connector reference - Managed connectors in Azure Logic Apps |
| Standard | Single-tenant Azure Logic Apps and App Service Environment v3 (Windows plans only) | - Managed connector, which appears in the connector gallery with the Shared filter. - Built-in connector, which appears in the connector gallery with the Built-in filter and is service provider based. The built-in connector can directly access Azure virtual networks with a connection string. For more information, see: - FTP managed connector reference - FTP built-in connector operations - Managed connectors in Azure Logic Apps - Built-in connectors in Azure Logic Apps |
Note
When we use Office 365 Outlook connector to sign in Office 365 Outlook application in Azure China 21Vianet.
It is mandatory to sign in with China Office 365 account which operated by 21Vianet. This account is similar to the format of <your-account>@<your-organization>.partner.onmschina.cn.
The administrator of your organization can manage the users with the Administrator site.
Limitations
Capacity and throughput
Built-in connector for Standard workflows:
By default, FTP actions can read or write files that are 200 MB or smaller. Currently, the FTP built-in connector doesn't support chunking.
Managed connector for Consumption and Standard workflows
By default, FTP actions can read or write files that are 50 MB or smaller. To handle files larger than 50 MB, FTP actions support message chunking. The Get file content action implicitly uses chunking.
Triggers for the FTP managed or Azure-hosted connector might experience missing, incomplete, or delayed results when the last modified timestamp is preserved. On the other hand, the FTP built-in connector trigger in Standard logic app workflows doesn't have this limitation. For more information, see the FTP connector's Limitations.
The FTP managed connector can create a limited number of connections to the FTP server. The limit is based on the connection capacity in the Azure region where your logic app resource exists. If this limit poses a problem in a Consumption logic app workflow, create a Standard logic app workflow that uses the FTP built-in connector.
Both the built-in and managed FTP connector support only explicit FTP over FTPS, which is an extension of TLS. Neither connector version supports implicit FTPS.
Prerequisites
An Azure account and subscription. If you don't have an Azure subscription, sign up for a trial Azure subscription.
The logic app workflow where you want to access your FTP account. To start your workflow with an FTP trigger, you have to start with a blank workflow. To use an FTP action, start your workflow with another trigger, such as the Recurrence trigger.
For more requirements that apply to both the FTP managed connector and built-in connector, see the FTP managed connector reference - Requirements.
Known issues
By default, triggers that accept and return arrays usually have a Split on setting that's already enabled. The trigger automatically debatches an array by internally creating a separate workflow instance to process each array item. All the workflow instances run in parallel so that the array items are processed at the same time.
With the Split on setting enabled, managed connector triggers return the outputs for all the array items as lists. Any subsequent actions that reference these outputs must first handle these outputs as lists. To handle each array item individually, you can add extra actions. For example, to iterate through these array items, you can use a For each loop. For triggers that return only metadata or properties, use an action that gets the array item's metadata first, and then use an action to get the items contents.
You must apply this approach only for managed connector triggers, not built-in connector triggers that return outputs for one array item at a time with the Split on setting enabled.
For example, suppose you have managed connector trigger named When a file is added or modified (properties only) that returns the metadata or properties for the new or updated files as arrays. To get the metadata separately for each file, you might use a For each loop that iterates through the array. In this loop, use the following managed connector actions in the specified order:
Get file metadata to get each file's metadata.
Get file content action to get each file's content.
Add an FTP trigger
A Consumption logic app workflow can use only the FTP managed connector. However, a Standard logic app workflow can use the FTP managed connector and the FTP built-in connector.
The FTP managed connector and built-in connector each have only one trigger available:
Managed connector trigger: The FTP trigger named When a file is added or modified (properties only) runs a Consumption or Standard logic app workflow when one or more files are added or changed in a folder on the FTP server. This trigger gets only the file properties or metadata, not the file content. To get the file content, your workflow can follow this trigger with other FTP actions.
For more information, see When a file is added or modified (properties only).
Built-in connector trigger: The FTP trigger named When a file is added or updated runs a Standard logic app workflow when one or more files are added or changed in a folder on the FTP server. This trigger gets only the file properties or metadata, not the file content. To get the content, your workflow can follow this trigger with other FTP actions. For more information, see When a file is added or updated.
The following procedures use the Azure portal. With the corresponding Azure Logic Apps extension for Consumption or Standard logic apps, you can use the following tools instead to create and edit logic app workflows:
Consumption logic app workflows: Visual Studio Code
Standard logic app workflows: Visual Studio Code
This section shows the steps for the following FTP connector triggers:
Built-in trigger named When a file is added or updated
If you use this FTP built-in trigger, you can get the file content by using the FTP built-in action named Get file content without using the Get file metadata action first, unlike when you use the FTP managed trigger. For more information about FTP built-in connector operations, see FTP built-in connector operations.
This built-in FTP trigger isn't available for Consumption logic app workflows.
Managed trigger named When a file is added or modified (properties only)
If you use this FTP managed trigger, you must use the Get file metadata action to get a single array item before you use any other action on the file that was added or modified. This workaround results from the known issue around the Split On setting described earlier in this article.
Add built-in connector trigger
To add a built-in connector trigger to a Standard workflow:
In the Azure portal, open your logic app resource.
On the resource sidebar menu, under Workflows, select Workflows, and then select your empty workflow, which opens in the designer.
On the designer, select Add a trigger.
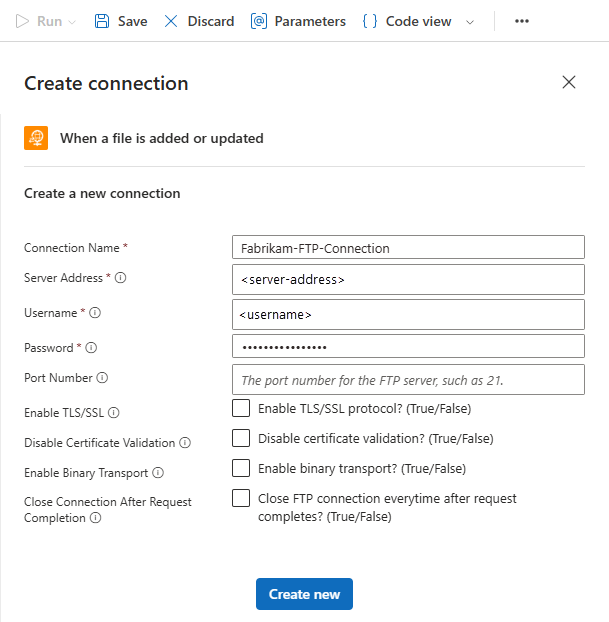
Follow the general steps to add the FTP trigger When a file is added or updated (preview).
Provide the information for your connection. When you're done, select Create new.
Note
By default, this connector transfers files in text format. To transfer files in binary format, for example, where and when encoding is used, select the binary transport option.
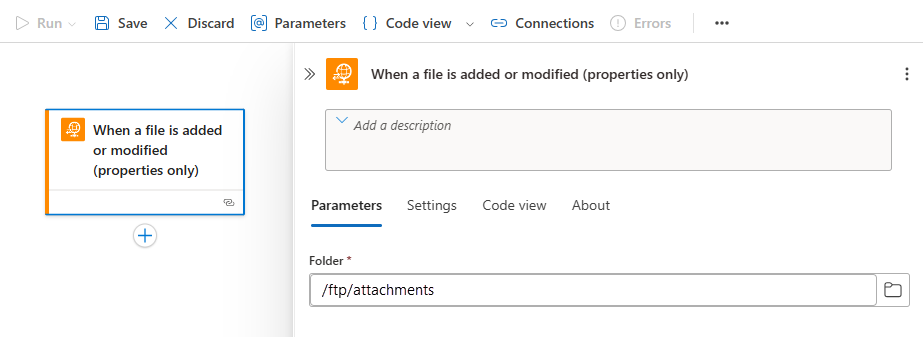
After the trigger information pane appears, in the Folder Path box, specify the path to the folder that you want to monitor.
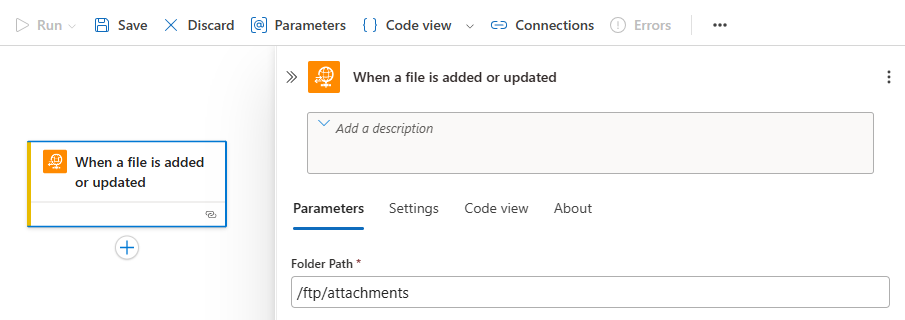
When you're done, save your workflow.
When you save your workflow, Azure publishes your updates to your deployed and live logic app in Azure. With only a trigger, your workflow just checks the FTP server based on your specified schedule. You have to add an action that responds to the trigger and does something with the trigger outputs, as described in later sections.
Add managed connector trigger
To add a managed connector trigger to a Consumption or Standard workflow:
In the Azure portal, find and open your logic app resource.
Based on whether you have a Consumption or Standard logic app:
Consumption: On the resource sidebar menu, under Development Tools, select the designer to open the workflow.
Standard: On the resource sidebar menu, under Workflows, select Workflows. Select the blank workflow, which opens in the designer.
On the workflow designer, select Add a trigger.
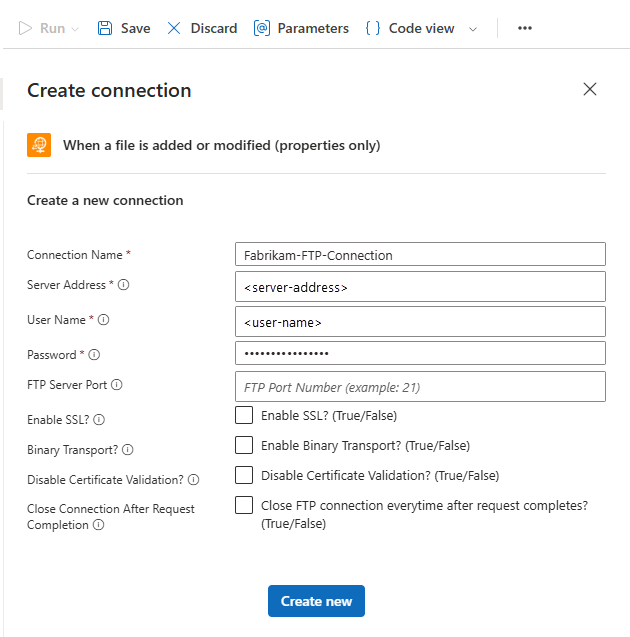
Follow the general steps to add the FTP trigger When a filed is added or modified (properties only).
Provide the information for your connection. When you're done, select Create new.
Note
By default, this connector transfers files in text format. To transfer files in binary format, for example, where and when encoding is used, select the binary transport option.
When the trigger information pane opens, find the folder that you want to monitor for new or edited files.
In the Folder box, select the folder icon to view the folder directory.
Select the right arrow (>). Browse to the folder that you want, and then select the folder.
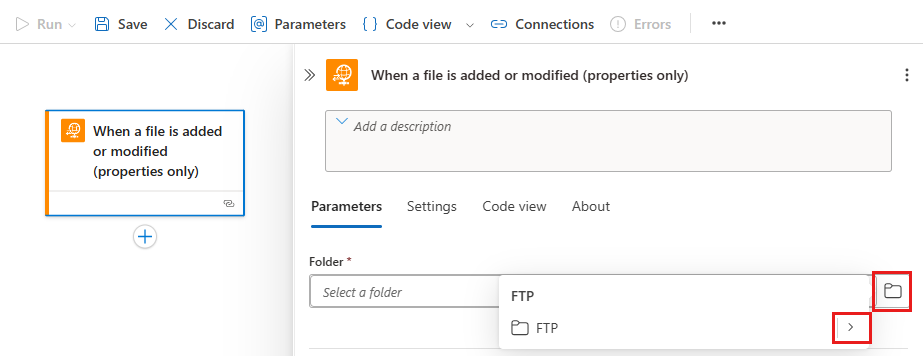
Your selected folder appears in the Folder box.
When you're done, save your workflow.
When you save your workflow, Azure publishes your updates to your deployed and live logic app. With only a trigger, your workflow just checks the FTP server based on your specified schedule. You must add an action that responds to the trigger and does something with the trigger outputs, as described in later sections.
Add an FTP action
A Consumption logic app workflow can use only the FTP managed connector. A Standard logic app workflow can use the FTP managed connector and the FTP built-in connector. Each version has multiple actions. For example, both managed and built-in connector versions have their own actions to get file metadata and get file content.
- Built-in connector actions: These actions run only in a Standard logic app workflow.
- Managed connector actions: These actions run in a Consumption or Standard logic app workflow.
The following procedures use the Azure portal. With the corresponding Azure Logic Apps extension for Consumption or Standard, you can use the following tools instead to create and edit logic app workflows:
- Consumption workflows: Visual Studio Code
- Standard workflows: Visual Studio Code
Before you can use an FTP action, your workflow must already start with a trigger, which can be any kind that you choose. For example, you can use the generic Recurrence built-in trigger to start your workflow on specific schedule.
The steps to add and use an FTP action differ based on whether your workflow uses the built-in connector or the managed connector.
Built-in trigger workflows: Describes the steps to add a built-in action to a workflow that starts with a built-in trigger.
If you used the FTP built-in trigger, and you want the content from a newly added or updated file, you can use a For each loop to iterate through the array returned by the trigger. You can then use just the Get file content action without any other intermediary actions. For more information about FTP built-in connector operations, see FTP built-in connector operations.
Managed trigger workflows: Describes the steps to add a managed action to a workflow that starts with a managed trigger.
If you used the FTP managed connector trigger, and want the content from a newly added or modified file, you can use a For each loop to iterate through the array returned by the trigger. You then have to use intermediary actions such as the FTP action named Get file metadata before you use the Get file content action.
Workflows with a built-in trigger
To add actions to a Standard workflow that starts with a built-in connector trigger:
In the Azure portal, find and open your logic app resource.
On the resource sidebar menu, under Workflows, select Workflows. Select the workflow with the FTP built-in trigger.
On the designer, follow these general steps to add the FTP action named Get file content to your workflow.
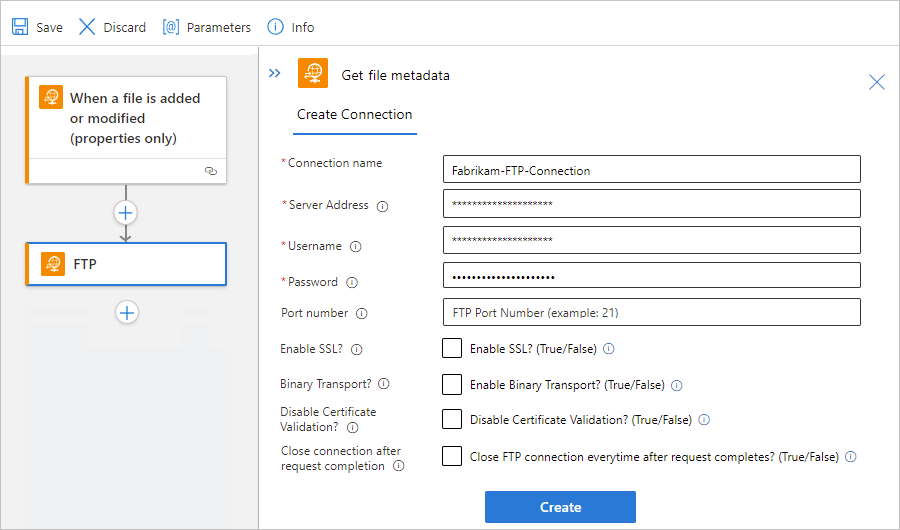
If necessary, provide the information for your connection. When you're done, select Create new.

Note
By default, this connector transfers files in text format. To transfer files in binary format, for example, where and when encoding is used, select the binary transport option.
In the action information pane that opens, select inside the File Path to show the input options. Select the lightning icon to open the dynamic content list.
You can now select outputs from the preceding trigger.
In the dynamic content list, under When a file is added or updated, select File path.
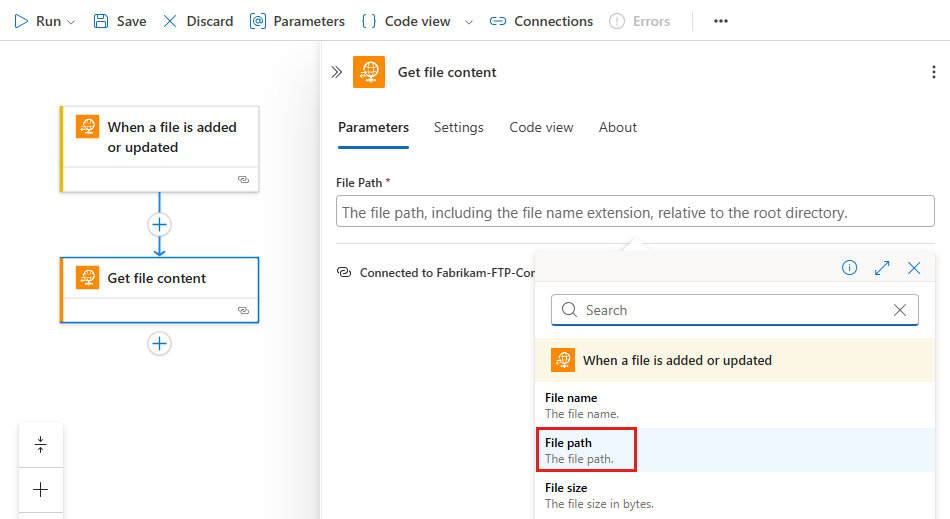
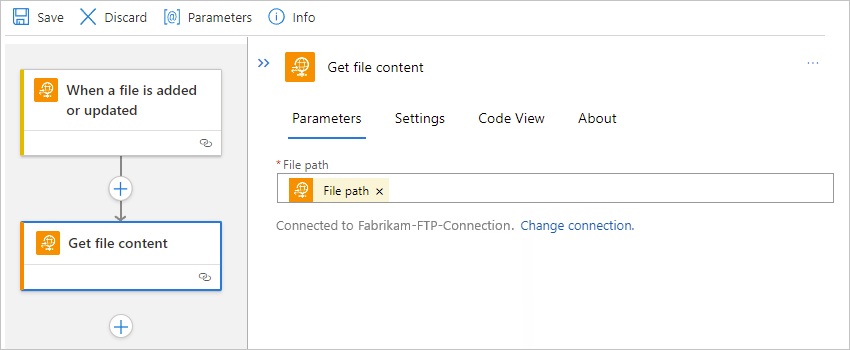
The File path property now references the File path trigger output.
Add any other actions that your workflow needs.
When you're done, save your workflow. On the designer toolbar, select Save.
Workflows with a managed trigger
To add actions to a Consumption or Standard workflow that starts with a managed connector trigger:
In the Azure portal, find and open your logic app resource.
Based on whether you have a Consumption or Standard logic app:
Consumption: On the resource sidebar menu, under Development Tools, select the designer to open the workflow.
Standard: On the resource sidebar menu, under Workflows, select Workflows. Select the workflow that starts with the FTP managed connector trigger. In the workflow sidebar menu, select the designer to open the workflow.
On the designer, follow these general steps to add the FTP action named Get file metadata to your workflow.
If necessary, provide the information for your connection. When you're done, select Create new.
Note
By default, this connector transfers files in text format. To transfer files in binary format, for example, where and when encoding is used, select the binary transport option.
In the action information pane that opens, select inside File to show the input options. Select the lightning icon to open the dynamic content list.
You can now select outputs from the preceding trigger.
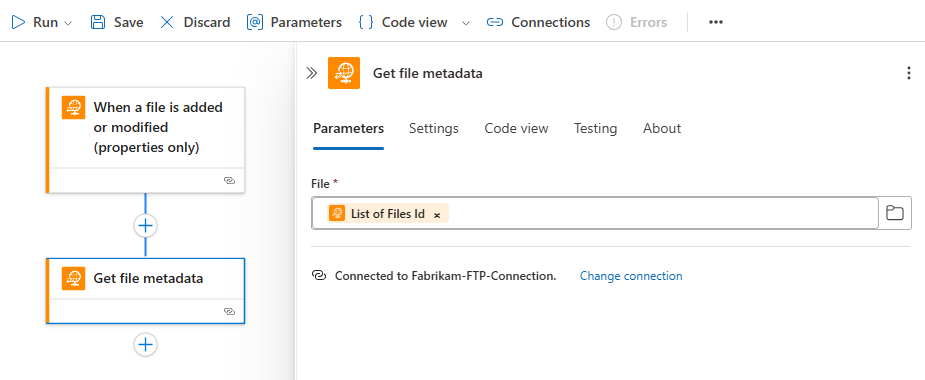
In the dynamic content list, under When a file is added or modified (properties only), select List of Files Id.
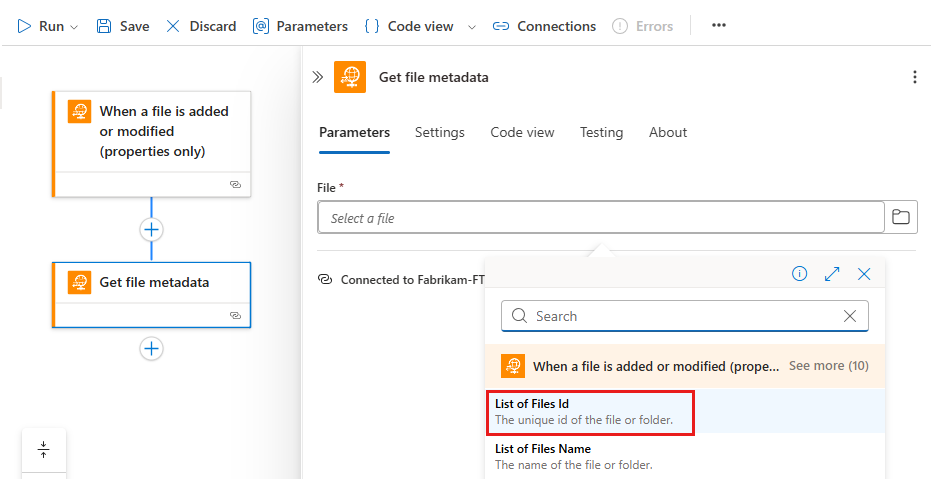
The File property now references the List of Files Id trigger output.
On the designer, follow these general steps to add the FTP action named Get file content to your workflow.
In the action information pane that appears, select inside File to show the input options. Select the lightning icon to open the dynamic content list.
You can now select outputs from the preceding trigger or actions.
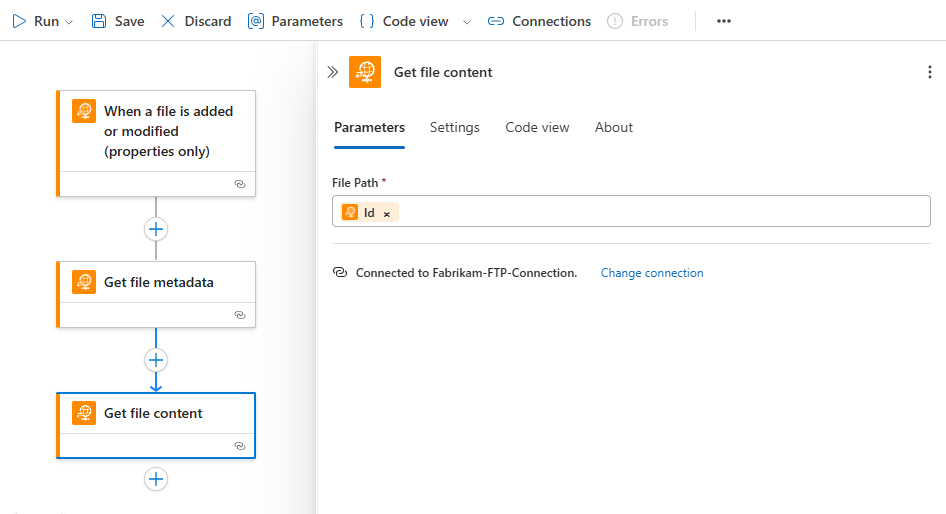
In the dynamic content list, under Get file metadata, select Id.
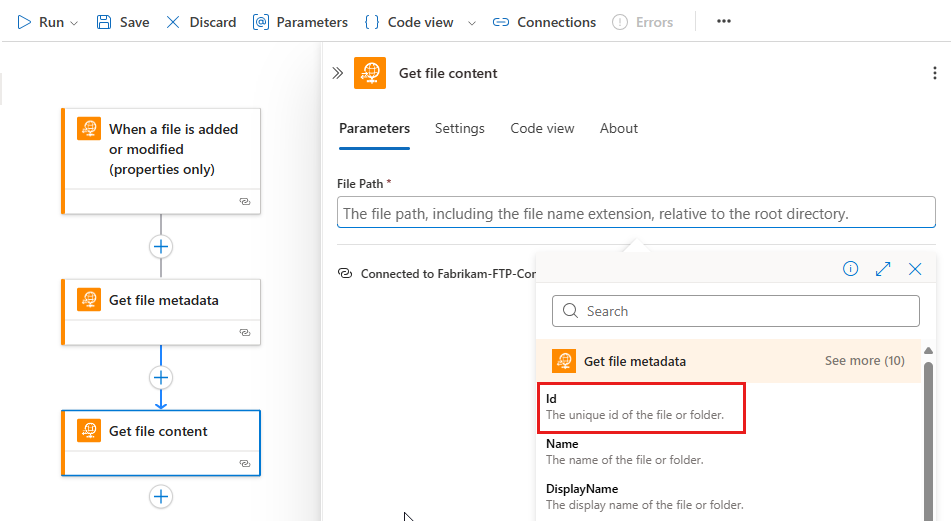
The File property now references the Id action output.
Add any other actions that your workflow needs.
When you're done, save your workflow. On the designer toolbar, select Save.
Test your workflow
To check that your workflow returns the content that you expect, add another action that sends you the content from the added or updated file. This example uses the Office 365 Outlook action named Send an email.
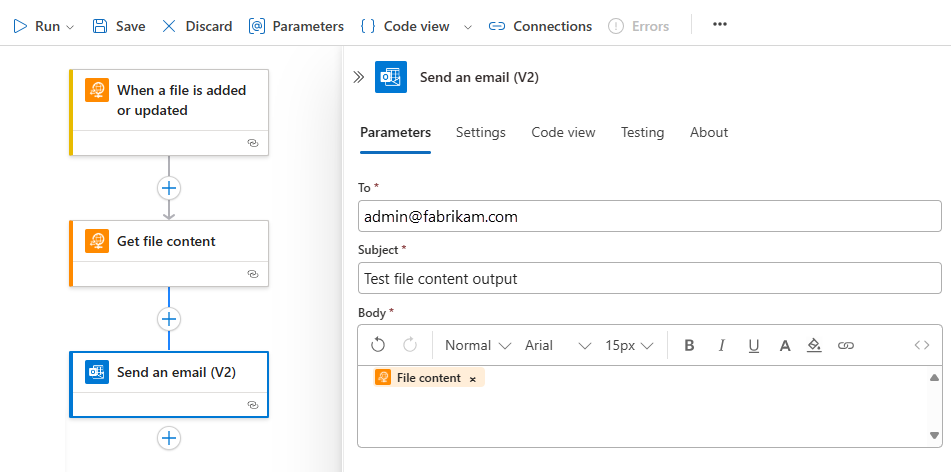
Workflow with built-in trigger and actions
To add an Office 365 Outlook action to your Standard workflow:
On the designer, under the Get file content action, follow these general steps to add the action named Send an email to your workflow.
If you have an Outlook.com account instead, add the Outlook.com Send an email action.
If necessary, sign in to your email account.
In the action information pane, provide the required values and include any other parameters or properties that you want to test.
For example, you can include the File content output from the Get file content action. To find this output, follow these steps:
In the Get file content action, select inside the Body to show the input options. Select the lightning icon to open the dynamic content list. From this list, under Get file content, select File content.
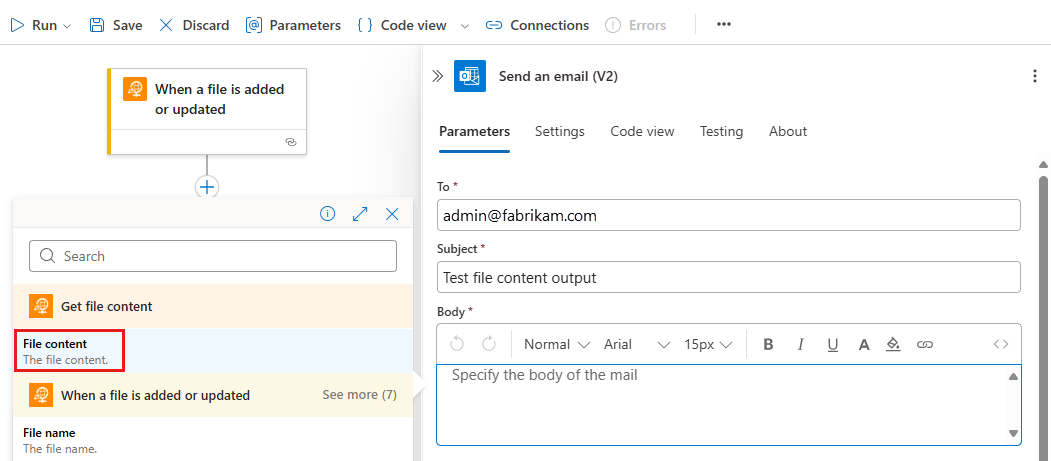
In the dynamic content list, under Get file content, select File content.
The Body property now contains the File content action output.
Save your workflow.
To run and trigger the workflow, follow these steps:
On designer toolbar, select Run > Run.
Add a file to the FTP folder that your workflow monitors.
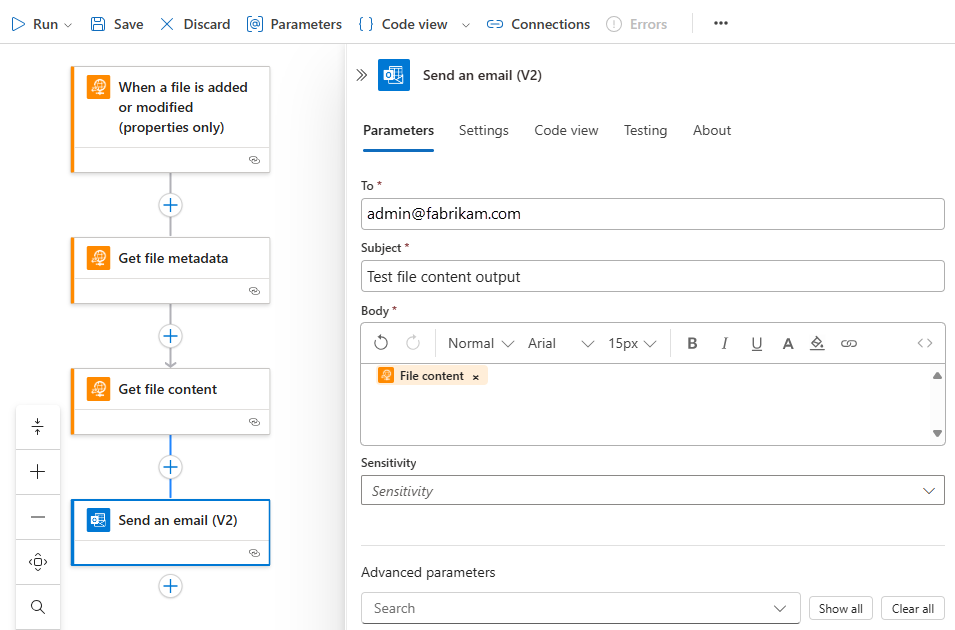
Workflow with managed trigger and actions
To add an Office 365 Outlook action to your Consumption or Standard workflow:
On the designer, under the Get file content action, follow these general steps to add the action named Send an email to your workflow.
If you have an Outlook.com account instead, add the Outlook.com Send an email action.
If necessary, sign in to your email account.
In the action information box, provide the required values and include any other parameters or properties that you want to test.
For example, you can include the File content output from the Get file content action. To find this output, follow these steps:
In the Get file content action, select inside the Body box to show the input options. Select the lightning icon to open the dynamic content list. From this list, under Get file content, select File content.
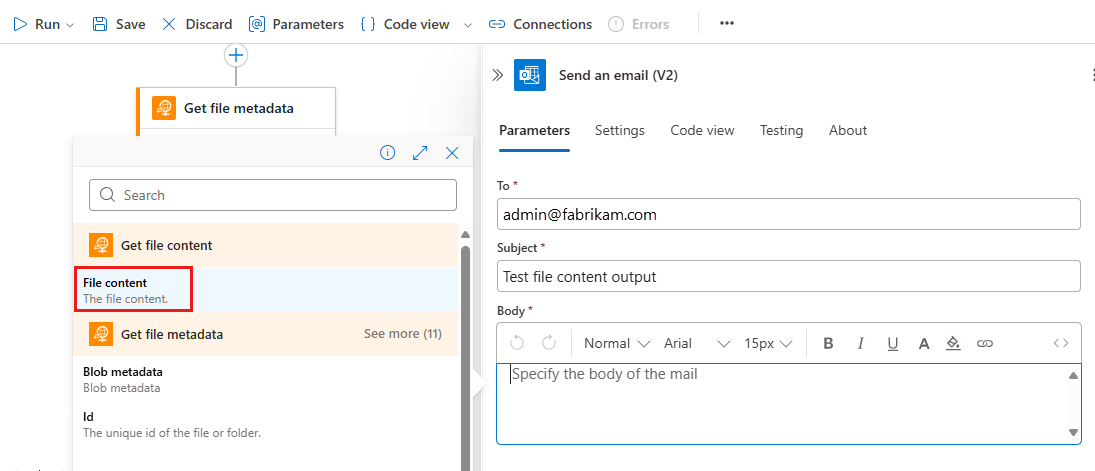
In the dynamic content list, under Get file content, select File content.
The Body property now contains the File content action output.
Save your logic app workflow.
To run and trigger the workflow, follow these steps:
On designer toolbar, select Run > Run.
Add a file to the FTP folder that your workflow monitors.