Quickstart: Migrate an existing MongoDB Node.js web app to Azure Cosmos DB
APPLIES TO:
![]() MongoDB
MongoDB
In this quickstart, you create and manage an Azure Cosmos DB for Mongo DB API account by using the Azure local Shell, and with a MEAN (MongoDB, Express, Angular, and Node.js) app cloned from GitHub. Azure Cosmos DB is a multi-model database service that lets you quickly create and query document, table, key-value, and graph databases with multiple-region distribution and horizontal scale capabilities.
Prerequisites
An Azure account with an active subscription. If you don't have an Azure subscription, create a trial account before you begin.. You can also use the Azure Cosmos DB Emulator with the connection string
.mongodb://localhost:C2y6yDjf5/R+ob0N8A7Cgv30VRDJIWEHLM+4QDU5DE2nQ9nDuVTqobD4b8mGGyPMbIZnqyMsEcaGQy67XIw/Jw==@localhost:10255/admin?ssl=true.Node.js, and a working knowledge of Node.js.
Git.
You can use the local Azure CLI.
If you prefer, install the Azure CLI to run CLI reference commands.
Local Azure CLI, see how to install the Azure CLI. If you're running on Windows or macOS, consider running Azure CLI in a Docker container. For more information, see How to run the Azure CLI in a Docker container.
Sign in to the Azure CLI by using the az login command. To finish the authentication process, follow the steps displayed in your terminal. For other sign-in options, see Sign in with the Azure CLI.
When you're prompted, install the Azure CLI extension on first use. For more information about extensions, see Use extensions with the Azure CLI.
Run az version to find the version and dependent libraries that are installed. To upgrade to the latest version, run az upgrade.
This article requires version 2.0 or later of the Azure CLI.
Clone the sample application
Run the following commands to clone the sample repository. This sample repository contains the default MEAN.js application.
Open a command prompt, create a new folder named git-samples, then close the command prompt.
mkdir "C:\git-samples"Open a git terminal window, such as git bash, and use the
cdcommand to change to the new folder to install the sample app.cd "C:\git-samples"Run the following command to clone the sample repository. This command creates a copy of the sample app on your computer.
git clone https://github.com/prashanthmadi/mean
Run the application
This MongoDB app written in Node.js connects to your Azure Cosmos DB database, which supports MongoDB client. In other words, it is transparent to the application that the data is stored in an Azure Cosmos DB database.
Install the required packages and start the application.
cd mean
npm install
npm start
The application will try to connect to a MongoDB source and fail, go ahead and exit the application when the output returns "[MongoError: connect ECONNREFUSED 127.0.0.1:27017]".
Sign in to Azure
If you are using an installed Azure CLI, sign in to your Azure subscription with the az login command and follow the on-screen directions.
Note
Before you can use Azure CLI in Microsoft Azure operated by 21Vianet, please run az cloud set -n AzureChinaCloud first to change the cloud environment. If you want to switch back to Azure Public Cloud, run az cloud set -n AzureCloud again.
az cloud set -n AzureChinaCloud
az login
Add the Azure Cosmos DB module
If you are using an installed Azure CLI, check to see if the cosmosdb component is already installed by running the az command. If cosmosdb is in the list of base commands, proceed to the next command.
If cosmosdb is not in the list of base commands, reinstall Azure CLI.
Create a resource group
Create a resource group with the az group create. An Azure resource group is a logical container into which Azure resources like web apps, databases and storage accounts are deployed and managed.
The following example creates a resource group in the China North region. Choose a unique name for the resource group.
az group create --name myResourceGroup --location "China North"
Create an Azure Cosmos DB account
Create a Cosmos account with the az cosmosdb create command.
In the following command, please substitute your own unique Cosmos account name where you see the <cosmosdb-name> placeholder. This unique name will be used as part of your Cosmos DB endpoint (https://<cosmosdb-name>.documents.azure.cn/), so the name needs to be unique across all Cosmos accounts in Azure.
az cosmosdb create --name <cosmosdb-name> --resource-group myResourceGroup --kind MongoDB
The --kind MongoDB parameter enables MongoDB client connections.
When the Azure Cosmos DB account is created, the Azure CLI shows information similar to the following example.
Note
This example uses JSON as the Azure CLI output format, which is the default. To use another output format, see Output formats for Azure CLI commands.
{
  "databaseAccountOfferType": "Standard",
  "documentEndpoint": "https://<cosmosdb-name>.documents.azure.cn:443/",
  "id": "/subscriptions/00000000-0000-0000-0000-000000000000/resourceGroups/myResourceGroup/providers/Microsoft.Document
DB/databaseAccounts/<cosmosdb-name>",
  "kind": "MongoDB",
  "location": "China North",
  "name": "<cosmosdb-name>",
  "readLocations": [
    {
      "documentEndpoint": "https://<cosmosdb-name>-chinanorth.documents.azure.cn:443/",
      "failoverPriority": 0,
      "id": "<cosmosdb-name>-chinanorth",
      "locationName": "China North",
      "provisioningState": "Succeeded"
    }
  ],
  "resourceGroup": "myResourceGroup",
  "type": "Microsoft.DocumentDB/databaseAccounts",
  "writeLocations": [
    {
      "documentEndpoint": "https://<cosmosdb-name>-chinanorth.documents.azure.cn:443/",
      "failoverPriority": 0,
      "id": "<cosmosdb-name>-chinanorth",
      "locationName": "China North",
      "provisioningState": "Succeeded"
    }
  ]
}
Connect your Node.js application to the database
In this step, you connect your MEAN.js sample application to the Azure Cosmos DB database account you just created.
Configure the connection string in your Node.js application
In your MEAN.js repository, open config/env/local-development.js.
Replace the content of this file with the following code. Be sure to also replace the two <cosmosdb-name> placeholders with your Cosmos account name.
'use strict';

module.exports = {
  db: {
    uri: 'mongodb://<cosmosdb-name>:<primary_master_key>@<cosmosdb-name>.documents.azure.cn:10255/mean-dev?ssl=true&sslverifycertificate=false'
  }
};
Retrieve the key
In order to connect to a Cosmos database, you need the database key. Use the az cosmosdb keys list command to retrieve the primary key.
az cosmosdb keys list --name <cosmosdb-name> --resource-group myResourceGroup --query "primaryMasterKey"
The Azure CLI outputs information similar to the following example.
"RUayjYjixJDWG5xTqIiXjC..."
Copy the value of primaryMasterKey. Paste this over the <primary_master_key> in local-development.js.
Save your changes.
Run the application again.
Run npm start again.
npm start
A console message should now tell you that the development environment is up and running.
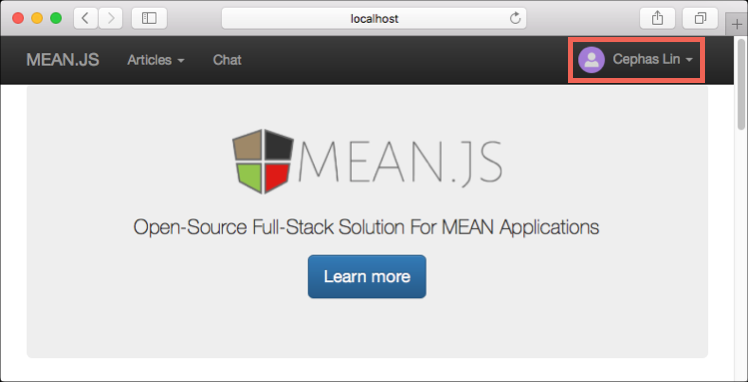
Go to http://localhost:3000 in a browser. Select Sign Up in the top menu and try to create two dummy users.
The MEAN.js sample application stores user data in the database. If you are successful and MEAN.js automatically signs into the created user, then your Azure Cosmos DB connection is working.
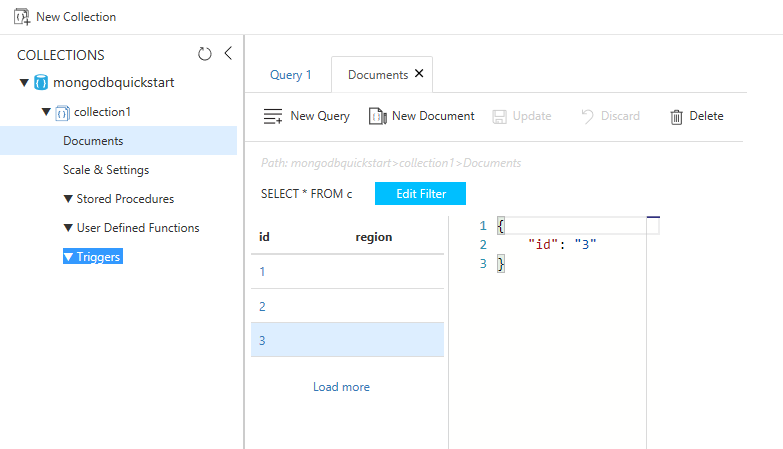
View data in Data Explorer
Data stored in a Cosmos database is available to view and query in the Azure portal.
To view, query, and work with the user data created in the previous step, login to the Azure portal in your web browser.
In the top Search box, enter Azure Cosmos DB. When your Cosmos account blade opens, select your Cosmos account. In the left navigation, select Data Explorer. Expand your collection in the Collections pane, and then you can view the documents in the collection, query the data, and even create and run stored procedures, triggers, and UDFs.
Deploy the Node.js application to Azure
In this step, you deploy your Node.js application to Cosmos DB.
You may have noticed that the configuration file that you changed earlier is for the development environment (/config/env/local-development.js). When you deploy your application to App Service, it will run in the production environment by default. So now, you need to make the same change to the respective configuration file.
In your MEAN.js repository, open config/env/production.js.
In the db object, replace the value of uri as show in the following example. Be sure to replace the placeholders as before.
'mongodb://<cosmosdb-name>:<primary_master_key>@<cosmosdb-name>.documents.azure.cn:10255/mean?ssl=true&sslverifycertificate=false',
Note
The ssl=true option is important because of Cosmos DB requirements. For more information, see Connection string requirements.
In the terminal, commit all your changes into Git. You can copy both commands to run them together.
git add .
git commit -m "configured MongoDB connection string"
Clean up resources
When you're done with your app and Azure Cosmos DB account, you can delete the Azure resources you created so you don't incur more charges. To delete the resources:
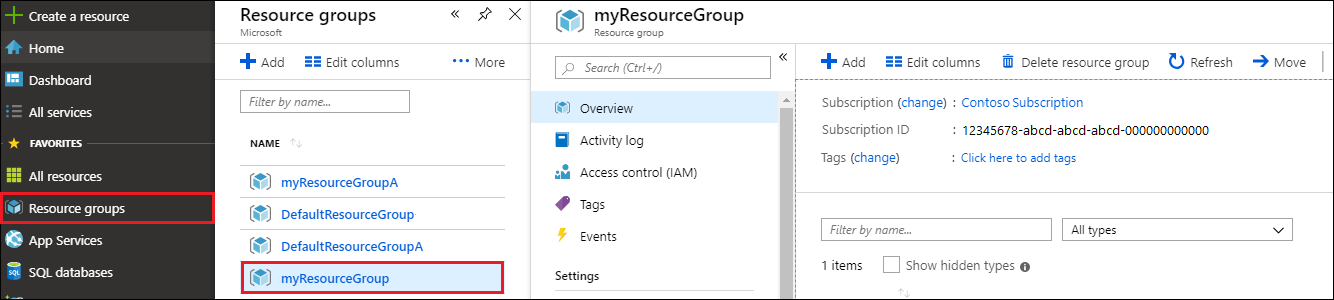
In the Azure portal Search bar, search for and select Resource groups.
From the list, select the resource group you created for this quickstart.
On the resource group Overview page, select Delete resource group.
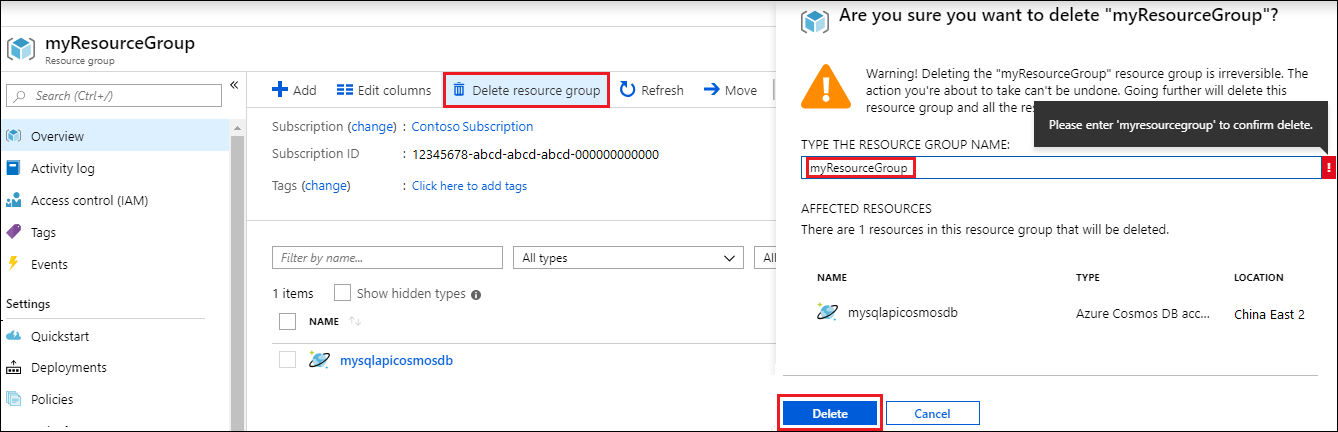
In the next window, enter the name of the resource group to delete, and then select Delete.
Next steps
In this quickstart, you learned how to create an Azure Cosmos DB MongoDB API account using the Azure CLI, and create and run a MEAN.js app to add users to the account. You can now import additional data to your Azure Cosmos DB account.
Trying to do capacity planning for a migration to Azure Cosmos DB? You can use information about your existing database cluster for capacity planning.
- If all you know is the number of vcores and servers in your existing database cluster, read about estimating request units using vCores or vCPUs
- If you know typical request rates for your current database workload, read about estimating request units using Azure Cosmos DB capacity planner