Note
Access to this page requires authorization. You can try signing in or changing directories.
Access to this page requires authorization. You can try changing directories.
APPLIES TO:
![]() MongoDB
MongoDB
Azure Cosmos DB is 21Vianet's multiple-regionally distributed multi-model database service. You can quickly create and query document, key/value, and graph databases, all of which benefit from the multiple-region distribution and horizontal scale capabilities at the core of Azure Cosmos DB.
This quickstart demonstrates how to create a Cosmos account configured with Azure Cosmos DB's API for MongoDB, document database, and collection using the Azure portal. You'll then build a todo app Xamarin.Forms app by using the MongoDB .NET driver.
Prerequisites to run the sample app
To run the sample, you'll need Visual Studio or Visual Studio for Mac and a valid Azure CosmosDB account.
If you don't already have Visual Studio, download Visual Studio 2019 Community Edition with the Mobile development with .NET workload installed with setup.
If you prefer to work on a Mac, download Visual Studio for Mac and run the setup.
If you don't have an Azure subscription, create a trial account before you begin.
Create a database account
In a new browser window, sign in to the Azure portal.
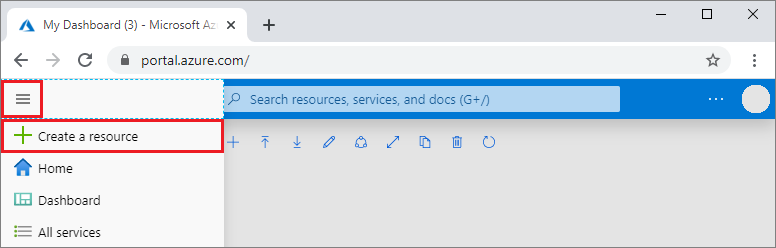
In the left menu, select Create a resource.
On the New page, select Databases > Azure Cosmos DB.
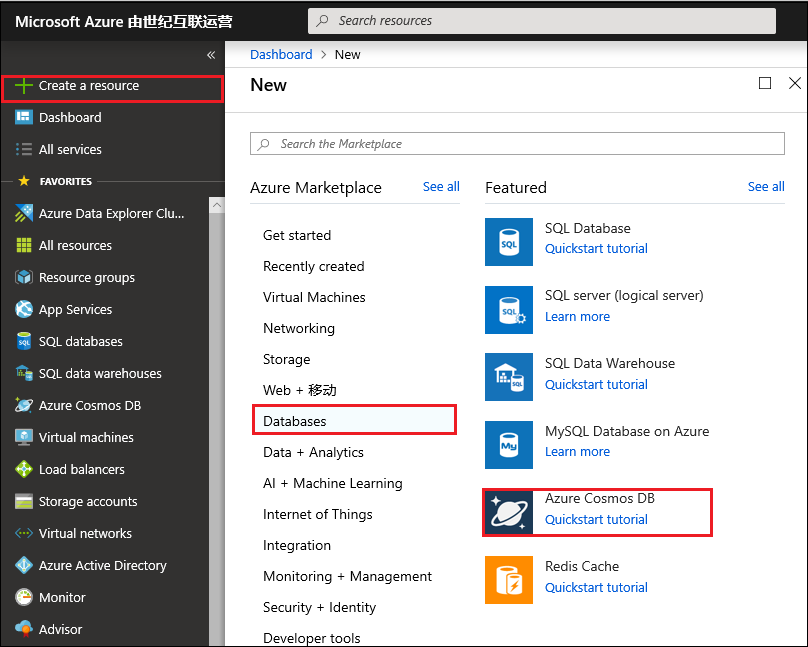
On the Azure Cosmos DB page, select Create.
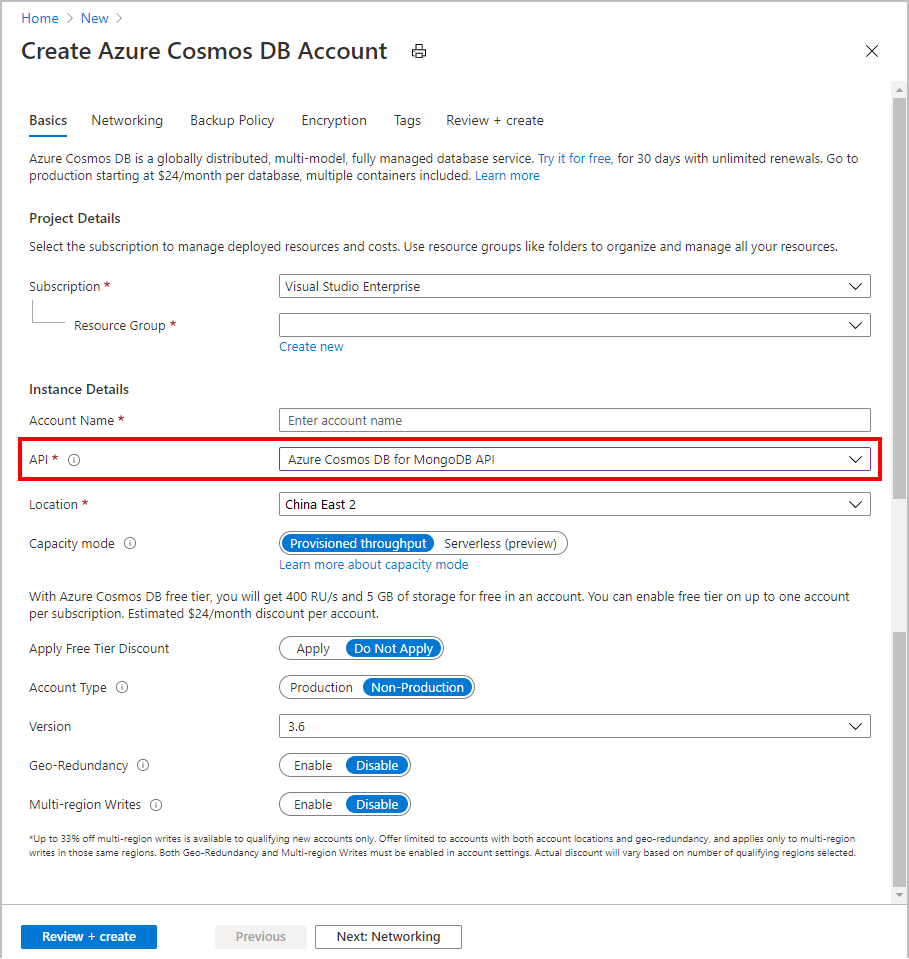
On the Create Azure Cosmos DB Account page, enter the settings for the new Azure Cosmos DB account.
Setting Value Description Subscription Subscription name Select the Azure subscription that you want to use for this Azure Cosmos DB account. Resource Group Resource group name Select a resource group, or select Create new, then enter a unique name for the new resource group. Account Name Enter a unique name Enter a unique name to identify your Azure Cosmos DB account. Your account URI will be mongo.cosmos.azure.cn appended to your unique account name.
The account name can use only lowercase letters, numbers, and hyphens (-), and must be between 3 and 44 characters long.Location The region closest to your users Select a geographic location to host your Azure Cosmos DB account. Use the location that's closest to your users to give them the fastest access to the data. Capacity mode Provisioned throughput or Serverless Select Provisioned throughput to create an account in provisioned throughput mode. Select Serverless to create an account in serverless mode.
Note: Only API for MongoDB versions 4.2, 4.0, and 3.6 are supported by serverless accounts. Choosing 3.2 as the version will force the account in provisioned throughput mode.Apply Azure Cosmos DB free tier discount Apply or Do not apply With Azure Cosmos DB free tier, you'll get the first 1000 RU/s and 25 GB of storage for free in an account. Learn more about free tier. Version Choose the required server version Azure Cosmos DB for MongoDB is compatible with the server version 4.2, 4.0, 3.6, and 3.2. You can upgrade or downgrade an account after it's created. Note
You can have up to one free tier Azure Cosmos DB account per Azure subscription and must opt-in when creating the account. If you don't see the option to apply the free tier discount, this means another account in the subscription has already been enabled with free tier.
In the Global Distribution tab, configure the following details. You can leave the default values for the purpose of this quickstart:
Setting Value Description Geo-Redundancy Disable Enable or disable multiple-region distribution on your account by pairing your region with a pair region. You can add more regions to your account later. Multi-region Writes Disable Multi-region writes capability allows you to take advantage of the provisioned throughput for your databases and containers across China. Note
The following options aren't available if you select Serverless as the Capacity mode:
- Apply Free Tier Discount
- Geo-redundancy
- Multi-region Writes
Optionally you can configure additional details in the following tabs:
- Networking - Configure access from a virtual network.
- Backup Policy - Configure either periodic or continuous backup policy.
- Encryption - Use either service-managed key or a customer-managed key.
- Tags - Tags are name/value pairs that enable you to categorize resources and view consolidated billing by applying the same tag to multiple resources and resource groups.
Select Review + create.
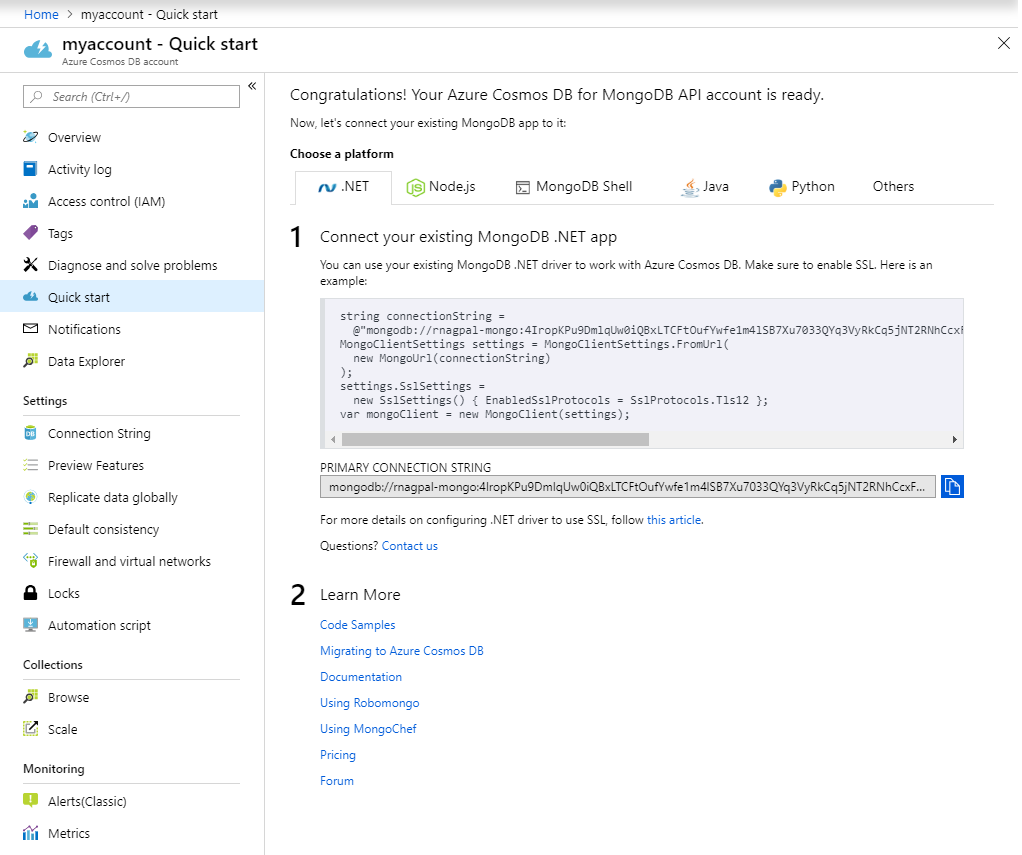
The account creation takes a few minutes. Wait for the portal to display the Congratulations! Your Azure Cosmos DB for MongoDB account is ready page.
The sample described in this article is compatible with MongoDB.Driver version 2.6.1.
Clone the sample app
First, download the sample app from GitHub. It implements a todo app with MongoDB's document storage model.
On Windows open a command prompt or on Mac open the terminal, create a new folder named git-samples, then close the window.
md "C:\git-samples"mkdir '$home\git-samples\Open a git terminal window, such as git bash, and use the
cdcommand to change to the new folder to install the sample app.cd "C:\git-samples"Run the following command to clone the sample repository. This command creates a copy of the sample app on your computer.
git clone https://github.com/Azure-Samples/azure-cosmos-db-mongodb-xamarin-getting-started.git
If you don't wish to use git, you can also download the project as a ZIP file
Review the code
This step is optional. If you're interested in learning how the database resources are created in the code, you can review the following snippets. Otherwise, you can skip ahead to Update your connection string.
The following snippets are all taken from the MongoService class, found at the following path: src/TaskList.Core/Services/MongoService.cs.
Initialize the Mongo Client.
MongoClientSettings settings = MongoClientSettings.FromUrl(new MongoUrl(APIKeys.ConnectionString));

settings.SslSettings = new SslSettings() { EnabledSslProtocols = SslProtocols.Tls12 };

settings.RetryWrites = false;

MongoClient mongoClient = new MongoClient(settings);
Retrieve a reference to the database and collection. The MongoDB .NET SDK will automatically create both the database and collection if they do not already exist.
string dbName = "MyTasks";
string collectionName = "TaskList";

var db = mongoClient.GetDatabase(dbName);

var collectionSettings = new MongoCollectionSettings
{
    ReadPreference = ReadPreference.Nearest
};

tasksCollection = db.GetCollection<MyTask>(collectionName, collectionSettings);
Retrieve all documents as a List.
var allTasks = await TasksCollection
                .Find(new BsonDocument())
                .ToListAsync();
Query for particular documents.
public async Task<List<MyTask>> GetIncompleteTasksDueBefore(DateTime date)
{
    var tasks = await TasksCollection
                    .AsQueryable()
                    .Where(t => t.Complete == false)
                    .Where(t => t.DueDate < date)
                    .ToListAsync();

    return tasks;
}
Create a task and insert it into the collection.
public async Task CreateTask(MyTask task)
{
    await TasksCollection.InsertOneAsync(task);
}
Update a task in a collection.
public async Task UpdateTask(MyTask task)
{
    await TasksCollection.ReplaceOneAsync(t => t.Id.Equals(task.Id), task);
}
Delete a task from a collection.
public async Task DeleteTask(MyTask task)
{
    await TasksCollection.DeleteOneAsync(t => t.Id.Equals(task.Id));
}
Update your connection string
Now go back to the Azure portal to get your connection string information and copy it into the app.
In the Azure portal, in your Azure Cosmos DB account, in the left navigation click Connection String, and then click Read-write Keys. You'll use the copy buttons on the right side of the screen to copy the Primary Connection String in the next steps.
Open the APIKeys.cs file in the Helpers directory of the TaskList.Core project.
Copy your primary connection string value from the portal (using the copy button) and make it the value of the ConnectionString field in your APIKeys.cs file.
Remove
&replicaSet=globaldbfrom the connection string. You will get a runtime error if you do not remove that value from the query string.Important
You must remove the
&replicaSet=globaldbkey/value pair from the connection string's query string in order to avoid a runtime error.You've now updated your app with all the info it needs to communicate with Azure Cosmos DB.
Run the app
Visual Studio 2019
- In Visual Studio, right-click on each project in Solution Explorer and then click Manage NuGet Packages.
- Click Restore all NuGet packages.
- Right click on the TaskList.Android and select Set as startup project.
- Press F5 to start debugging the application.
- If you want to run on iOS, first your machine is connected to a Mac (here are instructions on how to do so).
- Right click on TaskList.iOS project and select Set as startup project.
- Click F5 to start debugging the application.
Visual Studio for Mac
- In the platform dropdown list, select either TaskList.iOS or TaskList.Android, depending which platform you want to run on.
- Press cmd+Enter to start debugging the application.
Review SLAs in the Azure portal
The Azure portal monitors your Azure Cosmos DB account throughput, storage, availability, latency, and consistency. Charts for metrics associated with an Azure Cosmos DB Service Level Agreement (SLA) show the SLA value compared to actual performance. This suite of metrics makes monitoring your SLAs transparent.
To review metrics and SLAs:
Select Metrics in your Azure Cosmos DB account's navigation menu.
Select a tab such as Latency, and select a timeframe on the right. Compare the Actual and SLA lines on the charts.
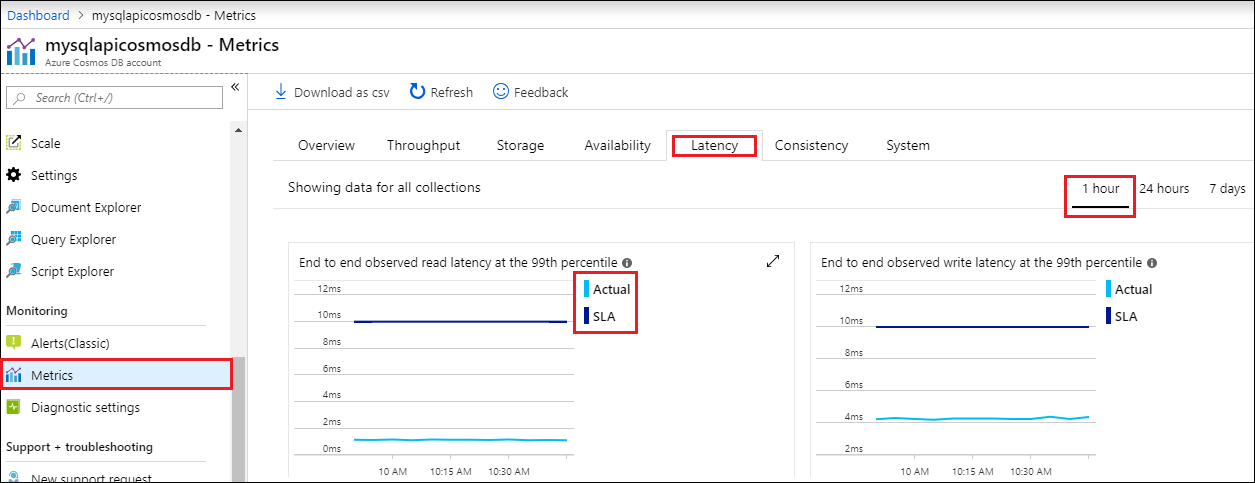
Review the metrics on the other tabs.
Clean up resources
When you're done with your app and Azure Cosmos DB account, you can delete the Azure resources you created so you don't incur more charges. To delete the resources:
In the Azure portal Search bar, search for and select Resource groups.
From the list, select the resource group you created for this quickstart.
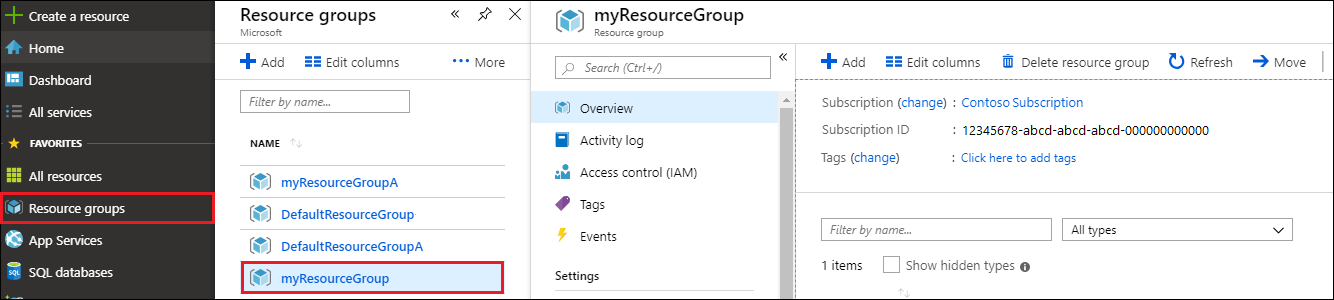
On the resource group Overview page, select Delete resource group.
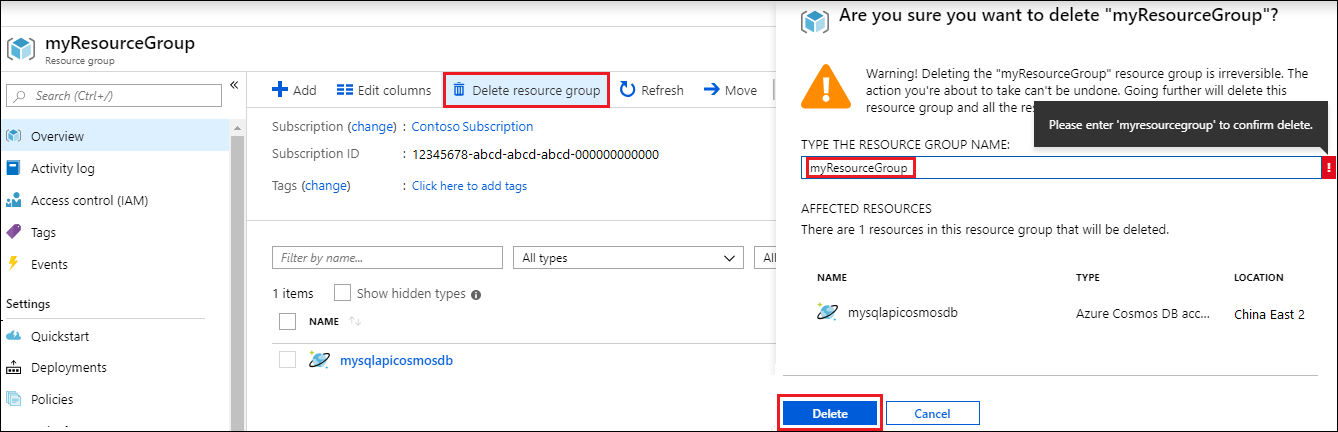
In the next window, enter the name of the resource group to delete, and then select Delete.
Next steps
In this quickstart, you've learned how to create an Azure Cosmos DB account and run a Xamarin.Forms app using the API for MongoDB. You can now import additional data to your Cosmos DB account.
Trying to do capacity planning for a migration to Azure Cosmos DB? You can use information about your existing database cluster for capacity planning.
- If all you know is the number of vcores and servers in your existing database cluster, read about estimating request units using vCores or vCPUs
- If you know typical request rates for your current database workload, read about estimating request units using Azure Cosmos DB capacity planner