Note
Access to this page requires authorization. You can try signing in or changing directories.
Access to this page requires authorization. You can try changing directories.
By offering provisioned throughput model, Azure Cosmos DB offers predictable performance at any scale. Reserving or provisioning throughput ahead of time eliminates the “noisy neighbor effect” on your performance. You specify the exact amount of throughput you need and Azure Cosmos DB guarantees the configured throughput, backed by SLA.
You can start with a minimum throughput of 400 RU/sec and scale up to tens of millions of requests per second or even more. Each request you issue against your Azure Cosmos DB container or database, such as a read request, write request, query request, stored procedures have a corresponding cost that is deducted from your provisioned throughput. If you provision 400 RU/s and issue a query that costs 40 RUs, you'll be able to issue 10 such queries per second. Any request beyond that get rate-limited and you should retry the request. If you're using client drivers, they support the automatic retry logic.
You can provision throughput on databases or containers and each strategy can help you save on costs depending on the scenario.
Optimize by provisioning throughput at different levels
If you provision throughput on a database, all the containers, for example collections/tables/graphs within that database can share the throughput based on the load. Throughput reserved at the database level is shared unevenly, depending on the workload on a specific set of containers.
If you provision throughput on a container, the throughput is guaranteed for that container, backed by the SLA. The choice of a logical partition key is crucial for even distribution of load across all the logical partitions of a container. See Partitioning and horizontal scaling articles for more details.
The following are some guidelines to decide on a provisioned throughput strategy:
Consider provisioning throughput on an Azure Cosmos DB database (containing a set of containers) if:
You have a few dozen Azure Cosmos DB containers and want to share throughput across some or all of them.
You're migrating from a single-tenant database designed to run on IaaS-hosted VMs or on-premises, for example, NoSQL or relational databases to Azure Cosmos DB. And if you have many collections/tables/graphs and you don't want to make any changes to your data model. Note, you might have to compromise some of the benefits offered by Azure Cosmos DB if you aren't updating your data model when migrating from an on-premises database. It's recommended that you always reassess your data model to get the most in terms of performance and also to optimize for costs.
You want to absorb unplanned spikes in workloads by virtue of pooled throughput at the database level subjected to unexpected spike in workload.
Instead of setting specific throughput on individual containers, you care about getting the aggregate throughput across a set of containers within the database.
Consider provisioning throughput on an individual container if:
You have a few Azure Cosmos DB containers. Because Azure Cosmos DB is schema-agnostic, a container can contain items that have heterogeneous schemas and doesn't require customers to create multiple container types, one for each entity. It's always an option to consider if grouping separate say 10-20 containers into a single container makes sense. With a 400 RUs minimum for containers, pooling all 10-20 containers into one could be more cost effective.
You want to control the throughput on a specific container and get the guaranteed throughput on a given container backed by SLA.
Consider a hybrid of the above two strategies:
As mentioned earlier, Azure Cosmos DB allows you to mix and match the above two strategies, so you can now have some containers within Azure Cosmos DB database, which might share the throughput provisioned on the database as well as, some containers within the same database, which might have dedicated amounts of provisioned throughput.
You can apply the above strategies to come up with a hybrid configuration, where you have both database level provisioned throughput with some containers having dedicated throughput.
As shown in the following table, depending on the choice of API, you can provision throughput at different granularities.
| API | For shared throughput, configure | For dedicated throughput, configure |
|---|---|---|
| API for NoSQL | Database | Container |
| Azure Cosmos DB's API for MongoDB | Database | Collection |
| API for Cassandra | Keyspace | Table |
| API for Gremlin | Database account | Graph |
| API for Table | Database account | Table |
By provisioning throughput at different levels, you can optimize your costs based on the characteristics of your workload. As mentioned earlier, you can programmatically and at any time increase or decrease your provisioned throughput for either individual container(s) or collectively across a set of containers. By elastically scaling throughput as your workload changes, you only pay for the throughput that you have configured. If your container or a set of containers is distributed across multiple regions, then the throughput you configure on the container or a set of containers is guaranteed to be made available across all regions.
Optimize with rate-limiting your requests
For workloads that aren't sensitive to latency, you can provision less throughput and let the application handle rate-limiting when the actual throughput exceeds the provisioned throughput. The server will preemptively end the request with RequestRateTooLarge (HTTP status code 429) and return the x-ms-retry-after-ms header indicating the amount of time, in milliseconds, that the user must wait before retrying the request.
HTTP Status 429,
 Status Line: RequestRateTooLarge
 x-ms-retry-after-ms :100
Retry logic in SDKs
The native SDKs (.NET/.NET Core, Java, Node.js and Python) implicitly catch this response, respect the server-specified retry-after header, and retry the request. Unless your account is accessed concurrently by multiple clients, the next retry will succeed.
If you have more than one client cumulatively operating consistently above the request rate, the default retry count, which is currently set to 9, might not be sufficient. In such cases, the client throws a RequestRateTooLargeException with status code 429 to the application. The default retry count can be changed by setting the RetryOptions on the ConnectionPolicy instance. By default, the RequestRateTooLargeException with status code 429 is returned after a cumulative wait time of 30 seconds if the request continues to operate above the request rate. This occurs even when the current retry count is less than the max retry count, be it the default of 9 or a user-defined value.
MaxRetryAttemptsOnThrottledRequests is set to 3, so in this case, if a request operation is rate limited by exceeding the reserved throughput for the container, the request operation retries three times before throwing the exception to the application. MaxRetryWaitTimeInSeconds is set to 60, so in this case if the cumulative retry wait time in seconds since the first request exceeds 60 seconds, the exception is thrown.
ConnectionPolicy connectionPolicy = new ConnectionPolicy();
connectionPolicy.RetryOptions.MaxRetryAttemptsOnThrottledRequests = 3;
connectionPolicy.RetryOptions.MaxRetryWaitTimeInSeconds = 60;
Partitioning strategy and provisioned throughput costs
Good partitioning strategy is important to optimize costs in Azure Cosmos DB. Ensure that there is no skew of partitions, which are exposed through storage metrics. Ensure that there is no skew of throughput for a partition, which is exposed with throughput metrics. Ensure that there's no skew towards particular partition keys. Dominant keys in storage are exposed through metrics but the key is dependent on your application access pattern. It's best to think about the right logical partition key. A good partition key is expected to have the following characteristics:
Choose a partition key that spreads workload evenly across all partitions and evenly over time. In other words, you shouldn't have some keys to with majority of the data and some keys with less or no data.
Choose a partition key that enables access patterns to be evenly spread across logical partitions. The workload is reasonably even across all the keys. In other words, the majority of the workload shouldn't be focused on a few specific keys.
Choose a partition key that has a wide range of values.
The basic idea is to spread the data and the activity in your container across the set of logical partitions, so that resources for data storage and throughput can be distributed across the logical partitions. Candidates for partition keys might include the properties that appear frequently as a filter in your queries. Queries can be efficiently routed by including the partition key in the filter predicate. With such a partitioning strategy, optimizing provisioned throughput is a lot easier.
Design smaller items for higher throughput
The request charge or the request processing cost of a given operation is directly correlated to the size of the item. Operations on large items cost more than operations on smaller items.
Data access patterns
It's always a good practice to logically separate your data into logical categories based on how frequently you access the data. By categorizing it as hot, medium, or cold data you can fine-tune the storage consumed and the throughput required. Depending on the frequency of access, you can place the data into separate containers (for example, tables, graphs, and collections) and fine-tune the provisioned throughput on them to accommodate to the needs of that segment of data.
Furthermore, if you're using Azure Cosmos DB, and you know you aren't going to search by certain data values or will rarely access them, you should store the compressed values of these attributes. With this method you save on storage space, index space, and provisioned throughput and result in lower costs.
Optimize by changing indexing policy
By default, Azure Cosmos DB automatically indexes every property of every record. This is intended to ease development and ensure excellent performance across many different types of ad hoc queries. If you have large records with thousands of properties, paying the throughput cost for indexing every property might not be useful, especially if you only query against 10 or 20 of those properties. As you get closer to getting a handle on your specific workload, our guidance is to tune your index policy. Full details on Azure Cosmos DB indexing policy can be found here.
Monitor provisioned and consumed throughput
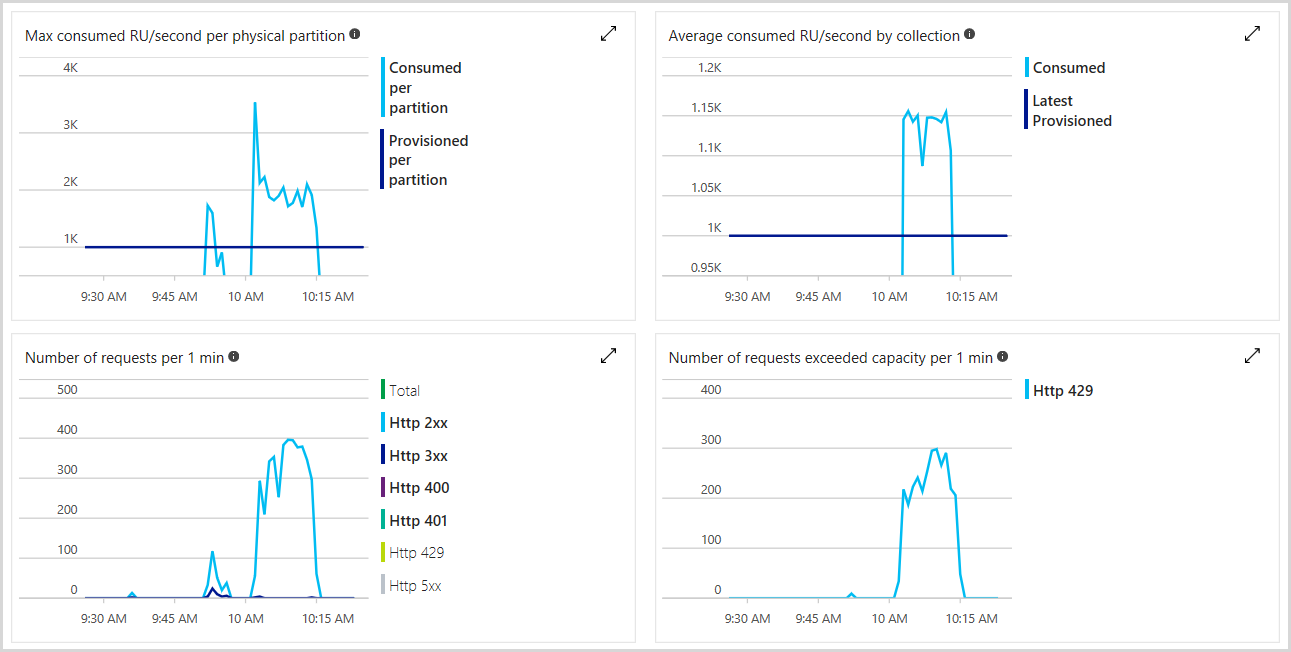
You can monitor the total number of request units provisioned, number of rate-limited requests, and the number of RUs you’ve consumed in the Azure portal. To learn more, see Analyze Azure Cosmos DB metrics. The following image shows an example usage metric:
You can also set alerts to check if the number of rate-limited requests exceeds a specific threshold. To learn more about alerts, see Azure Monitor alerts.
Scale your throughput elastically and on-demand
Since you're billed for the throughput provisioned, matching the provisioned throughput to your needs can help you avoid the charges for the unused throughput. You can scale your provisioned throughput up or down any time, as needed. If your throughput needs are very predictable you can use Azure Functions and use a Timer Trigger to increase or decrease throughput on a schedule.
Monitoring the consumption of your RUs and the ratio of rate-limited requests might reveal that you don't need to keep provisioned throughout constant throughout the day or the week. You might receive less traffic at night or during the weekend. By using either Azure portal or Azure Cosmos DB native SDKs or REST API, you can scale your provisioned throughput at any time. Azure Cosmos DB’s REST API provides endpoints to programmatically update the performance level of your containers making it straightforward to adjust the throughput from your code depending on the time of the day or the day of the week. The operation is performed without any downtime, and typically takes effect in less than a minute.
One of the areas you should scale throughput is when you ingest data into Azure Cosmos DB, for example, during data migration. Once you have completed the migration, you can scale provisioned throughput down to handle the solution’s steady state.
Remember, the billing is at the granularity of one hour, so you don't save any money if you change your provisioned throughput more often than one hour at a time.
Determine the throughput needed for a new workload
To determine the provisioned throughput for a new workload, you can use the following steps:
Perform an initial, rough evaluation using the capacity planner and adjust your estimates with the help of the Azure Cosmos DB Explorer in the Azure portal.
It's recommended to create the containers with higher throughput than expected and then scaling down as needed.
It's recommended to use one of the native Azure Cosmos DB SDKs to benefit from automatic retries when requests get rate-limited. If you’re working on a platform that isn't supported and use Azure Cosmos DB’s REST API, implement your own retry policy using the
x-ms-retry-after-msheader.Make sure that your application code gracefully supports the case when all retries fail.
You can configure alerts from the Azure portal to get notifications for rate-limiting. You can start with conservative limits like 10 rate-limited requests over the last 15 minutes and switch to more eager rules once you figure out your actual consumption. Occasional rate-limits are fine, they show that you’re playing with the limits you’ve set and that’s exactly what you want to do.
Use monitoring to understand your traffic pattern, so you can consider the need to dynamically adjust your throughput provisioning over the day or a week.
Monitor your provisioned vs. consumed throughput ratio regularly to make sure you haven't provisioned more than required number of containers and databases. Having a little over provisioned throughput is a good safety check.
Best practices to optimize provisioned throughput
The following steps help you to make your solutions highly scalable and cost-effective when using Azure Cosmos DB.
If you have significantly over provisioned throughput across containers and databases, you should review RUs provisioned Vs consumed RUs and fine-tune the workloads.
One method for estimating the amount of reserved throughput required by your application is to record the request unit RU charge associated with running typical operations against a representative Azure Cosmos DB container or database used by your application and then estimate the number of operations you anticipate performing each second. Be sure to measure and include typical queries and their usage as well. To learn how to estimate RU costs of queries programmatically or using portal see Optimizing the cost of queries.
Another way to get operations and their costs in RUs is by enabling Azure Monitor logs, which will give you the breakdown of operation/duration and the request charge. Azure Cosmos DB provides request charge for every operation, so every operation charge can be stored back from the response and then used for analysis.
You can elastically scale up and down provisioned throughput as you need to accommodate your workload needs.
You can add and remove regions associated with your Azure Cosmos DB account as you need and control costs.
Make sure you have even distribution of data and workloads across logical partitions of your containers. If you have uneven partition distribution, this might cause to provision higher amount of throughput than the value that is needed. If you identify that you have a skewed distribution, we recommend redistributing the workload evenly across the partitions or repartition the data.
If you have many containers and these containers do not require SLAs, you can use the database-based offer for the cases where the per container throughput SLAs don't apply. You should identify which of the Azure Cosmos DB containers you want to migrate to the database level throughput offer and then migrate them by using a change feed-based solution.
Consider using the downloadable Cosmos DB emulator for dev/test scenarios. By using these options for test-dev, you can substantially lower your costs.
You can further perform workload-specific cost optimizations – for example, increasing batch-size, load-balancing reads across multiple regions, and de-duplicating data, if applicable.
Next steps
Next you can proceed to learn more about cost optimization in Azure Cosmos DB with the following articles:
- Trying to do capacity planning for a migration to Azure Cosmos DB? You can use information about your existing database cluster for capacity planning.
- If all you know is the number of vcores and servers in your existing database cluster, read about estimating request units using vCores or vCPUs
- If you know typical request rates for your current database workload, read about estimating request units using Azure Cosmos DB capacity planner
- Learn more about Optimizing for development and testing
- Learn more about Understanding your Azure Cosmos DB bill
- Learn more about Optimizing storage cost
- Learn more about Optimizing the cost of reads and writes
- Learn more about Optimizing the cost of queries
- Learn more about Optimizing the cost of multi-region Azure Cosmos DB accounts