Note
Access to this page requires authorization. You can try signing in or changing directories.
Access to this page requires authorization. You can try changing directories.
Cost control is a critical component to maximizing the value of your investment in the cloud. There are several scenarios where cost visibility, reporting, and cost-based orchestration are critical to continued business operations. Cost Management APIs provide a set of APIs to support each of these scenarios. The APIs provide usage details, allowing you to view granular instance level costs.
Budgets are commonly used as part of cost control. Budgets can be scoped in Azure. For instance, you could narrow your budget view based on subscription, resource groups, or a collection of resources. Besides using the budgets API to send email notifications when a budget threshold is reached, you can also use Azure Monitor action groups. Action groups trigger a coordinated set of actions in response to a budget event.
A typical budget scenario for a customer running a noncritical workload is to manage spending against a budget and achieve predictable costs when reviewing the monthly invoice. This scenario requires some cost-based orchestration of resources that are part of the Azure environment. In this scenario, a monthly budget of $1,000 for the subscription is set. Also, notification thresholds are set to trigger a few orchestrations. This scenario starts with an 80% cost threshold, which stops all virtual machines (VM) in the resource group Optional. Then, at the 100% cost threshold, all VM instances are stopped.
To configure this scenario, you complete the following actions by using the steps provided in each section of this tutorial.
These actions included in this tutorial allow you to:
- Create an Azure Automation Runbook to stop VMs by using webhooks.
- Create an Azure Logic App to be triggered based on the budget threshold value and call the runbook with the right parameters.
- Create an Azure Monitor Action Group that is configured to trigger the Azure Logic App when the budget threshold is met.
- Create the budget with the wanted thresholds and wire it to the action group.
Create an Azure Automation Runbook
Azure Automation is a service that enables you to script most of your resource management tasks and run those tasks as either scheduled or on-demand. As part of this scenario, you create an Azure Automation runbook that stops VMs. You use the Stop Azure V2 VMs graphical runbook from the Azure Automation gallery to build this scenario. By importing this runbook into your Azure account and publishing it, you can stop VMs when a budget threshold is reached.
Note
You can create a budget in Azure Cost Management and link it to an Azure Automation runbook to automatically stop resources when a specified threshold is reached.
Create an Azure Automation account
- Sign in to the Azure portal with your Azure account credentials.
- Select the Create a resource button found on the upper left corner of Azure.
- Select Management Tools > Automation.
Note
If you don't have an Azure account, you can create a Trial.
- Enter your account information. For Create Azure Run As account, choose Yes to automatically enable the settings needed to simplify authentication to Azure.
- When complete, select Create, to start the Automation account deployment.
Import the Stop Azure V2 VMs runbook
Using an Azure Automation runbook, import the Stop Azure V2 VMs graphical runbook from the gallery.
- Sign in to the Azure portal with your Azure account credentials.
- Open your Automation account by selecting All services > Automation Accounts. Then, select your Automation Account.
- Select Runbooks gallery from the Process Automation section.
- Set the Gallery Source to Script Center and select OK.
- Locate and select the Stop Azure V2 VMs gallery item within the Azure portal.
- Select Import to display the Import area and select OK. The runbook overview area gets displayed.
- Once the runbook completes the import process, select Edit to display the graphical runbook editor and publishing option.
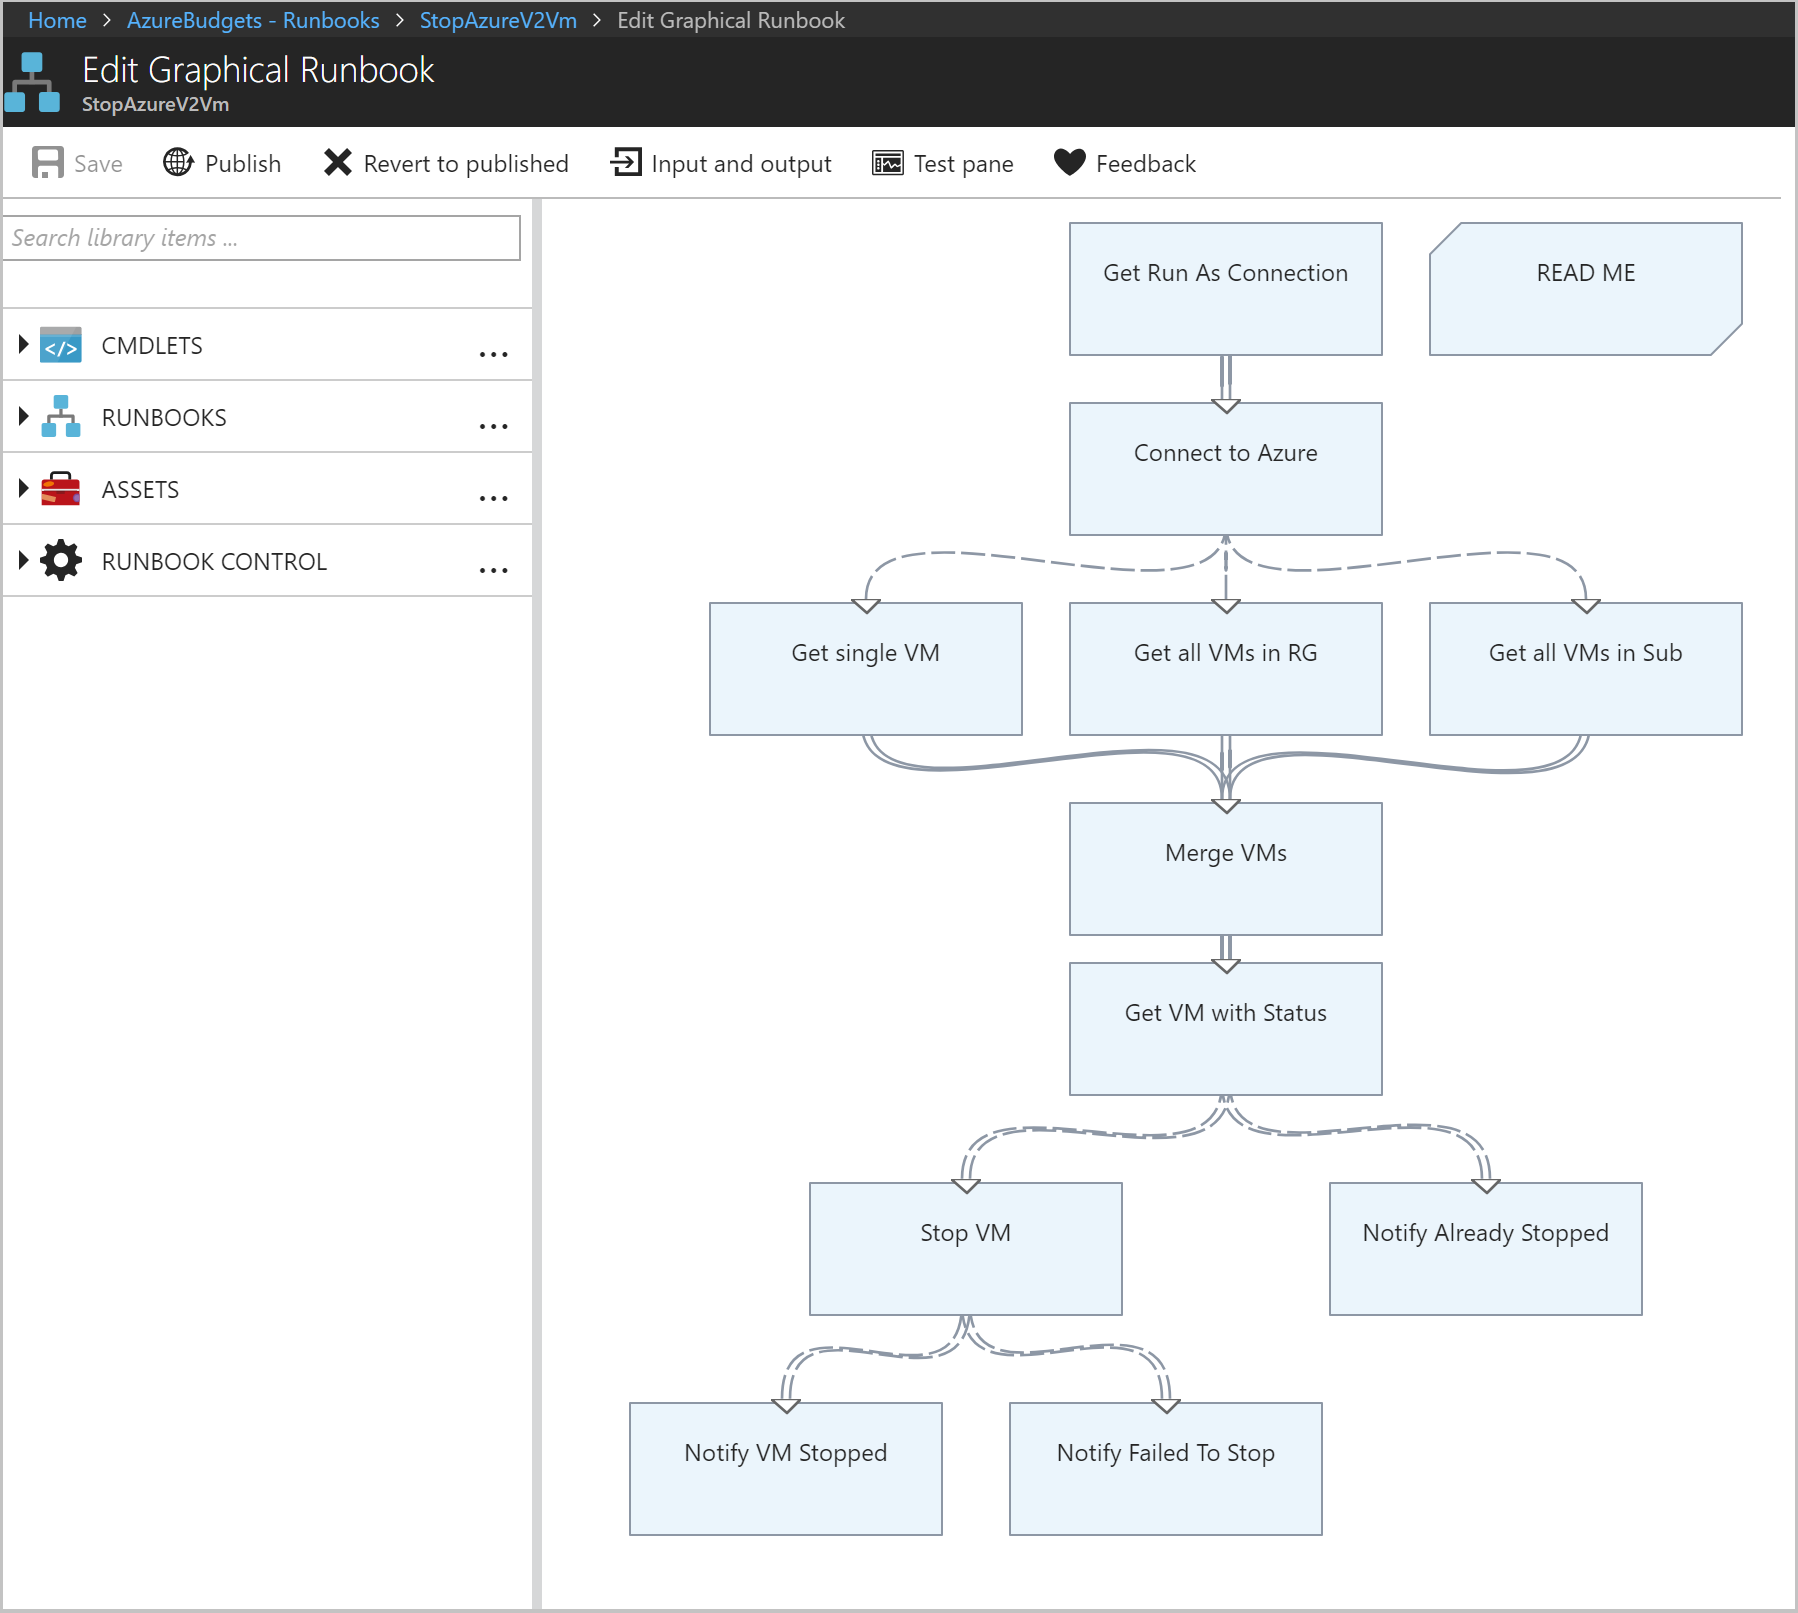
- Select Publish to publish the runbook and then select Yes when prompted. When you publish a runbook, you override any existing published version with the draft version. In this case, you have no published version because you created the runbook. For more information about publishing a runbook, see Create a graphical runbook.
Create webhooks for the runbook
Using the Stop Azure V2 VMs graphical runbook, you create two Webhooks to start the runbook in Azure Automation through a single HTTP request. The first webhook invokes the runbook at an 80% budget threshold with the resource group name as a parameter, allowing the optional VMs to be stopped. Then, the second webhook invokes the runbook with no parameters (at 100%), which stops all remaining VM instances.
- From the Runbooks page in the Azure portal, select the StopAzureV2Vm runbook that displays the runbook's overview area.
- Select Webhook at the top of the page to open the Add Webhook area.
- Select Create new webhook to open the Create a new webhook area.
- Set the Name of the Webhook to Optional. The Enabled property must be Yes. You don't need to change the Expires value. For more information about Webhook properties, see Webhook properties.
- Next to the URL value, select the copy icon to copy the URL of the webhook.
Important
Save the URL of the webhook named Optional in a safe place. You'll use the URL later in this tutorial. For security reasons, once you create the webhook, you cannot view or retrieve the URL again.
- Select OK to create the new webhook.
- Select Configure parameters and run settings to view parameter values for the runbook.
Note
If the runbook has mandatory parameters, then you are not able to create the webhook unless values are provided.
- Select OK to accept the webhook parameter values.
- Select Create to create the webhook.
- Next, follow the preceding steps to create a second webhook named Complete.
Important
Be sure to save both webhook URLs to use later in this tutorial. For security reasons, once you create the webhook, you cannot view or retrieve the URL again.
You should now have two configured webhooks that are each available using the URLs that you saved.
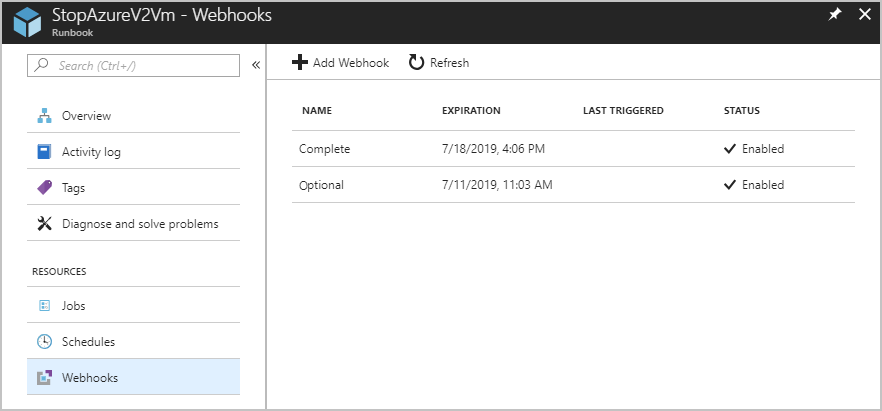
You completed the Azure Automation setup. You can test the webhooks with a simple API test to validate that the webhook works. Some popular ways to query the API are:
- Visual Studio
- Insomnia
- Bruno
- PowerShell’s Invoke-RestMethod
- Curl
Next, you must create the Logic App for orchestration.
Create an Azure Logic App for orchestration
Logic Apps helps you build, schedule, and automate processes as workflows so you can integrate apps, data, systems, and services across enterprises or organizations. In this scenario, the Logic App you create does a little more than just call the automation webhook you created.
Budgets can be set up to trigger a notification when a specified threshold is met. You can provide multiple thresholds to be notified at and the Logic App demonstrates the ability for you to perform different actions based on the threshold met. In this example, you set up a scenario where you get a couple of notifications. The first notification is for when 80% of the budget is reached. The second notification is when 100% of the budget is reached. The logic app is used to shut down all VMs in the resource group. First, the Optional threshold is reached at 80%, then the second threshold is reached where all VMs in the subscription get shutdown.
Logic apps allow you to provide a sample schema for the HTTP trigger, but require you to set the Content-Type header. Because the action group doesn't have custom headers for the webhook, you must parse out the payload in a separate step. You use the Parse action and provide it with a sample payload.
Create the logic app
The logic app performs several actions. The following list provides a high-level set of actions that the logic app performs:
- Recognizes when an HTTP request is received
- Parse the passed in JSON data to determine the threshold value that is reached
- Use a conditional statement to check whether the threshold amount reached 80% or more of the budget range, but not greater than or equal to 100%.
- If this threshold amount is reached, send an HTTP POST using the webhook named Optional. This action shuts down the VMs in the "Optional" group.
- Use a conditional statement to check whether the threshold amount reached or exceeded 100% of the budget value.
- If the threshold amount is reached, send an HTTP POST using the webhook named Complete. This action shuts down all remaining VMs.
The following steps are needed to create the logic app that performs the preceding steps:
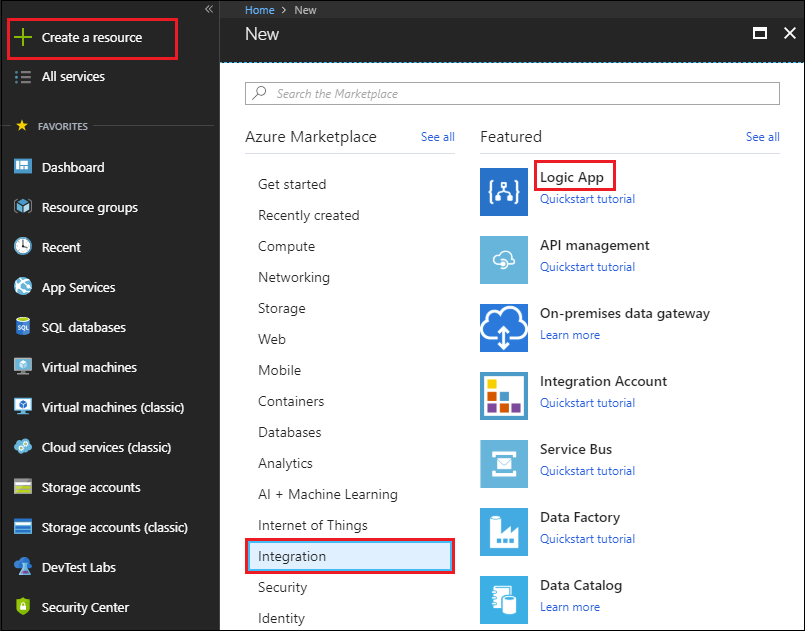
- In the Azure portal, select Create a resource > Integration > Logic App.
- In the Create logic app area, provide the details need to create your logic app, select Pin to dashboard, and select Create.
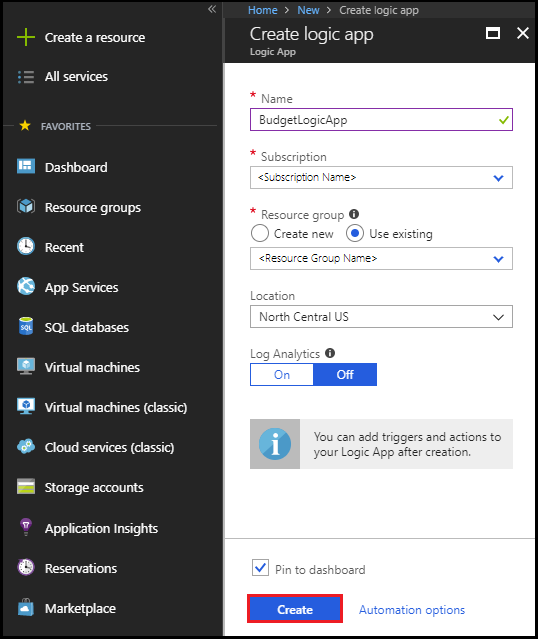
After Azure deploys your logic app, the Logic Apps Designer opens and shows an area with an introduction video and commonly used triggers.
Add a trigger
Every logic app must start with a trigger, which fires when a specific event happens or when a specific condition is met. Each time the trigger fires, the Logic Apps engine creates a logic app instance that starts and runs your workflow. Actions are all the steps that happen after the trigger.
- Under Templates of the Logic Apps Designer area, choose Blank Logic App.
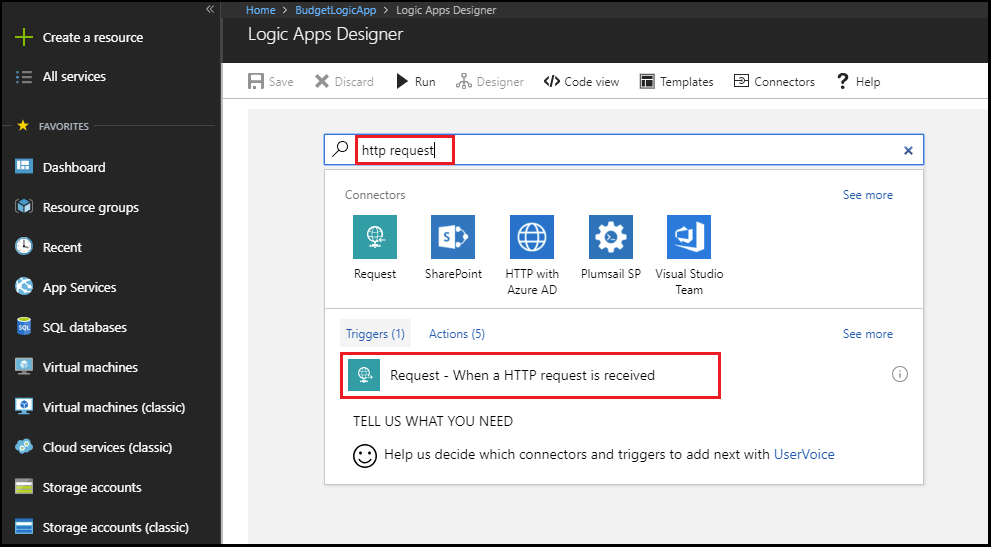
- Add a trigger by entering "http request" in the Logic Apps Designer search box to find and select the trigger named Request – When an HTTP request is received.
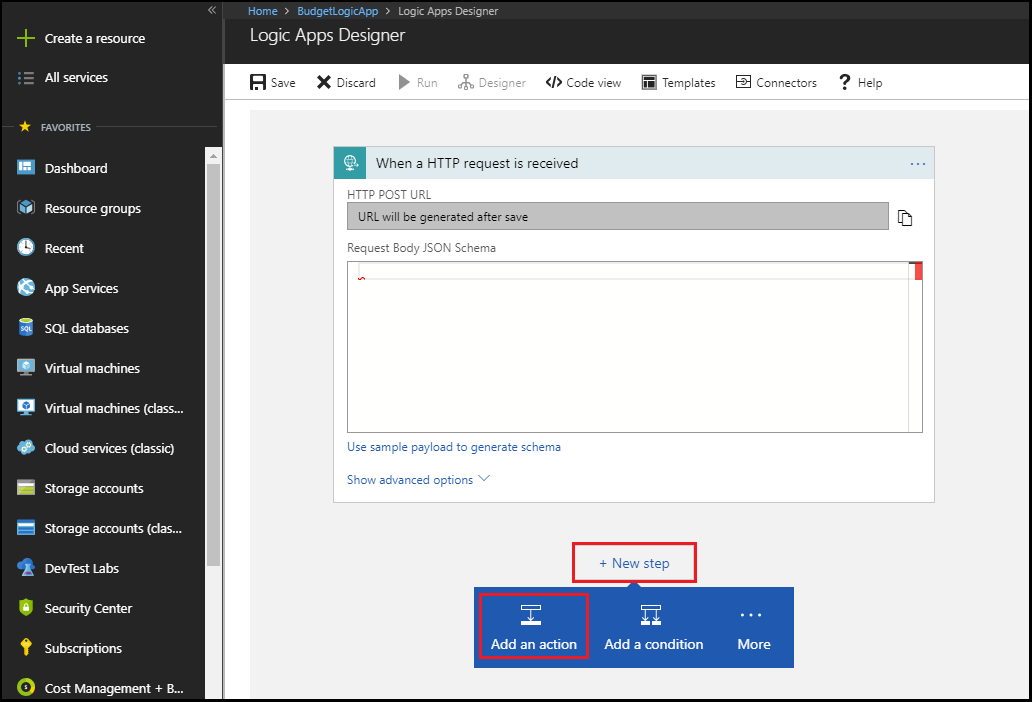
- Select New step > Add an action.
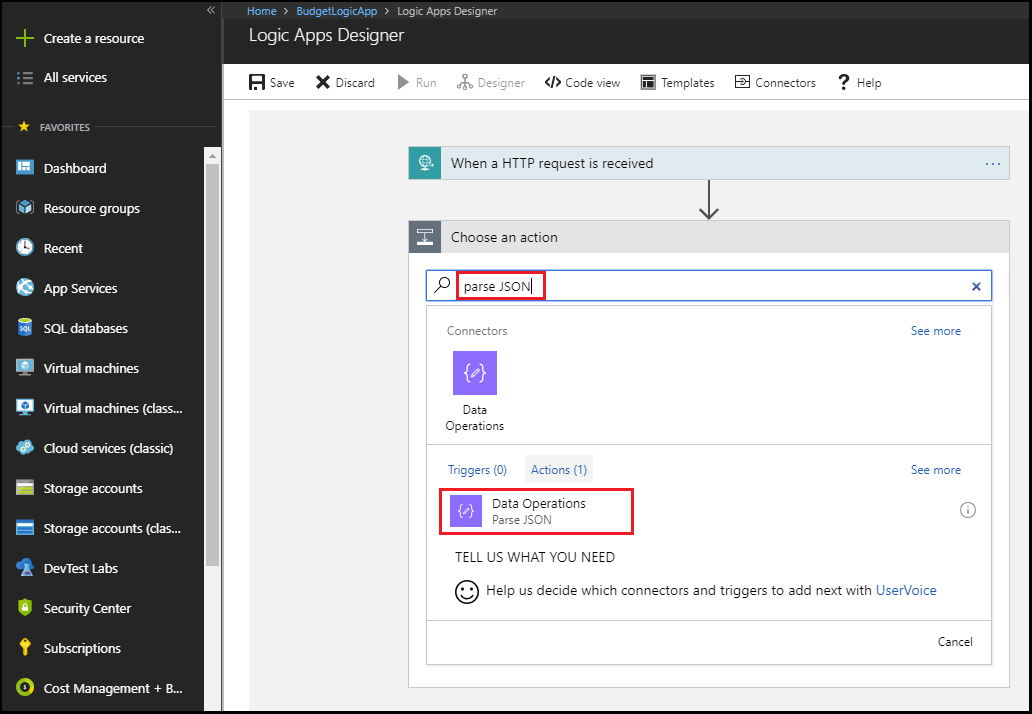
- Search for "parse JSON" in the Logic Apps Designer search box to find and select the Data Operations - Parse JSON action.
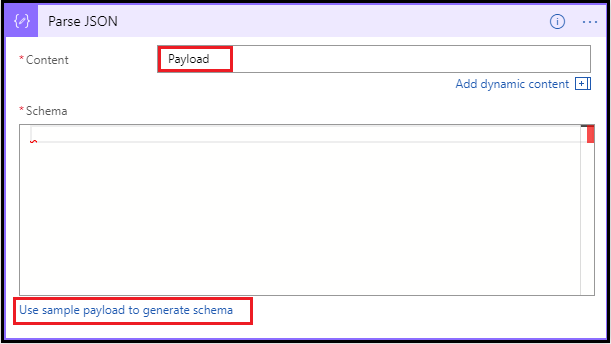
- Enter "Payload" as the Content name for the Parse JSON payload or use the "Body" tag from dynamic content.
- Select the Use sample payload to generate schema option in the Parse JSON box.
- Paste the following JSON sample payload into the textbox:
{"schemaId":"AIP Budget Notification","data":{"SubscriptionName":"CCM - Azure Enterprise - 1","SubscriptionId":"<GUID>","SpendingAmount":"100","BudgetStartDate":"6/1/2018","Budget":"50","Unit":"USD","BudgetCreator":"email@contoso.com","BudgetName":"BudgetName","BudgetType":"Cost","ResourceGroup":"","NotificationThresholdAmount":"0.8"}}The textbox appears as:
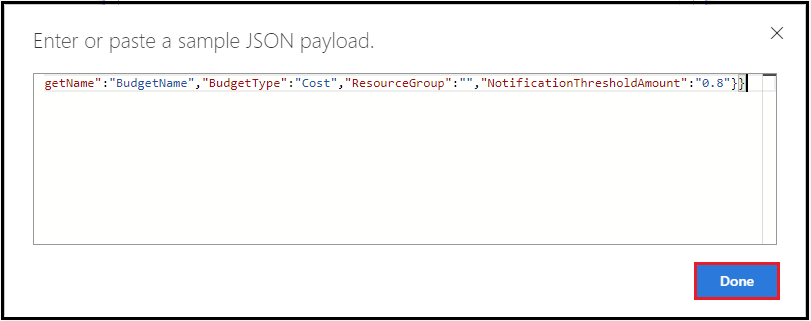
- Select Done.
Add the first conditional action
Use a conditional statement to check whether the threshold amount reached 80% or more of the budget range, but not greater than or equal to 100%. If this threshold amount is reached, send an HTTP POST using the webhook named Optional. This action shuts down the VMs in the Optional group.
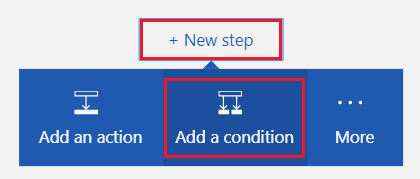
Select New step > Add a condition.
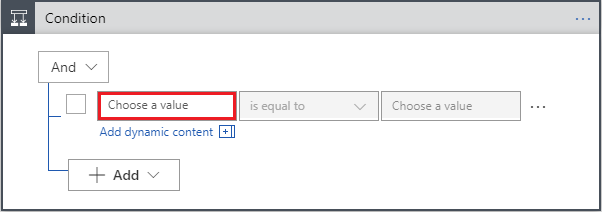
In the Condition box, select the textbox containing
Choose a valueto display a list of available values.
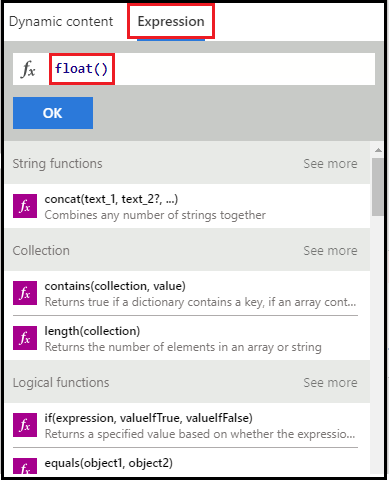
Select Expression at the top of the list and enter the following expression in the expression editor:
float()
Select Dynamic content, place the cursor inside the parenthesis (), and select NotificationThresholdAmount from the list to populate the complete expression. The expression is:
float(body('Parse_JSON')?['data']?['NotificationThresholdAmount'])Select OK to set the expression.
Select is greater than or equal to in the dropdown box of the Condition.
In the Choose a value box of the condition, enter
.8.
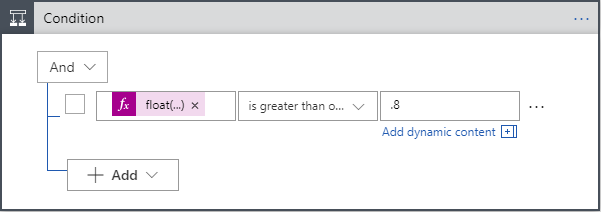
Select Add > Add row within the Condition box to add another part of the condition.
In the Condition box, select the textbox containing
Choose a value.Select Expression at the top of the list and enter the following expression in the expression editor:
float()Select Dynamic content, place the cursor inside the parenthesis (), and select NotificationThresholdAmount from the list to populate the complete expression.
Select OK to set the expression.
Select is less than in the dropdown box of the Condition.
In the Choose a value box of the condition, enter
1.
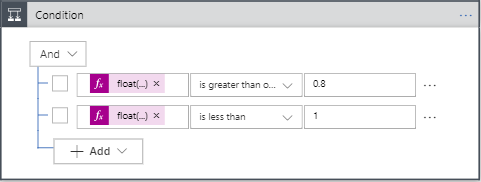
In the If true box, select Add an action. You add an HTTP POST action that shuts down optional VMs.

Enter HTTP to search for the HTTP action and select the HTTP – HTTP action.
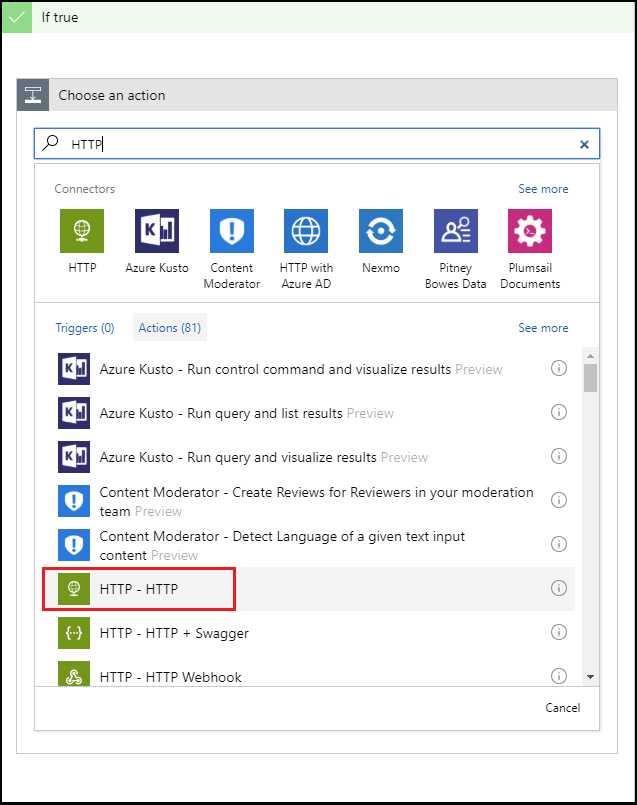
Select Post for the Method value.
Enter the URL for the webhook named Optional that you created earlier in this tutorial as the Uri value.
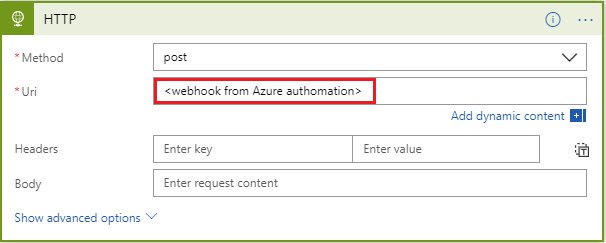
Select Add an action in the If true box. You add an email action that sends an email notifying the recipient that the optional VMs were shut down.
Search for "send email" and select a send email action based on the email service you use.
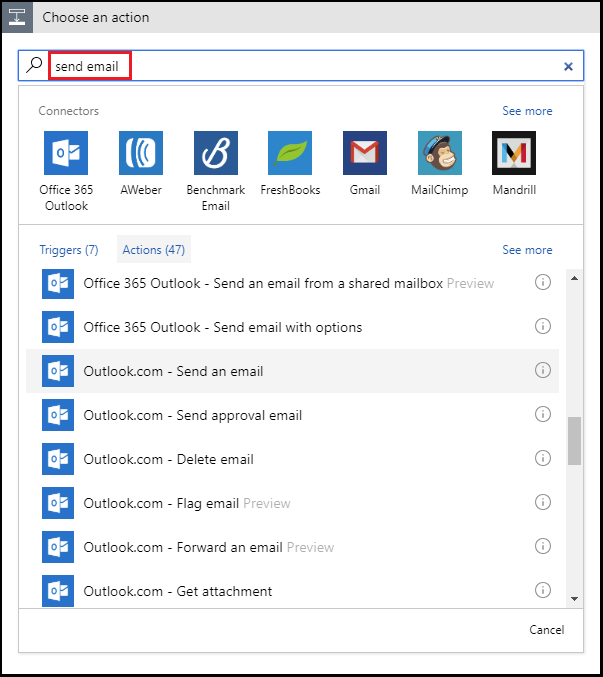
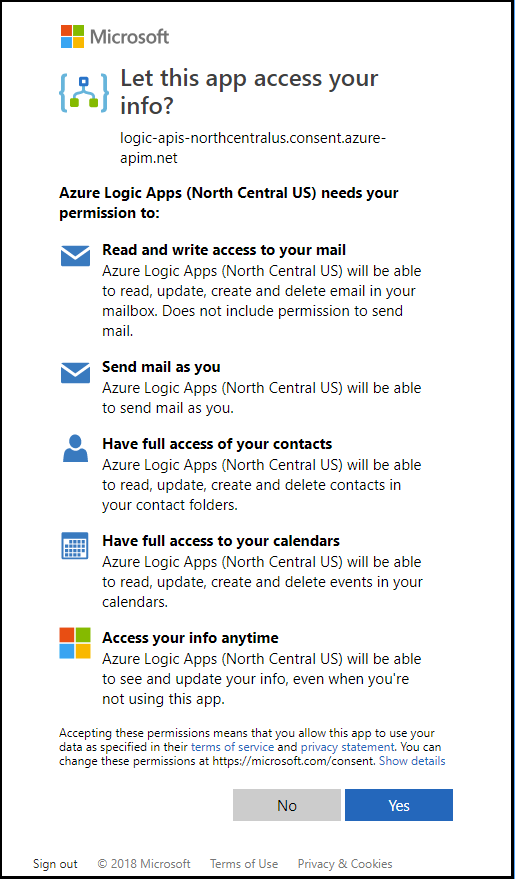
For personal Microsoft accounts, select Outlook.com. For Azure work or school accounts, select Office 365 Outlook. If you don't already have a connection, you get asked to sign in to your email account. Logic Apps creates a connection to your email account. You need to allow the Logic App to access your email information.
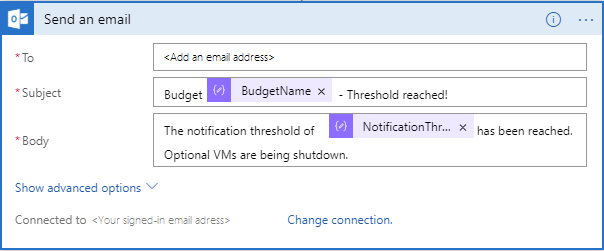
Add the To, Subject, and Body text for the email that notifies the recipient that the optional VMs were shut down. Use the BudgetName and the NotificationThresholdAmount dynamic content to populate the subject and body fields.
Add the second conditional action
Use a conditional statement to check whether the threshold amount reached or exceeded 100% of the budget value. If the threshold amount is reached, send an HTTP POST using the webhook named Complete. This action shuts down all remaining VMs.
- Select New step > Add a Condition.
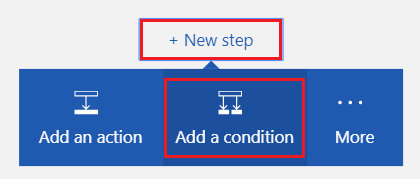
- In the Condition box, select the textbox containing
Choose a valueto display a list of available values. - Select Expression at the top of the list and enter the following expression in the expression editor:
float() - Select Dynamic content, place the cursor inside the parenthesis (), and select NotificationThresholdAmount from the list to populate the complete expression.
The expression resembles:
float(body('Parse_JSON')?['data']?['NotificationThresholdAmount']) - Select OK to set the expression.
- Select is greater than or equal to in the dropdown box of the Condition.
- In the Choose a value box for the condition, enter
1.

- In the If true box, select Add an action. You add an HTTP POST action that shuts down all the remaining VMs.

- Enter HTTP to search for the HTTP action and select the HTTP – HTTP action.
- Select Post as the Method value.
- Enter the URL for the webhook named Complete that you created earlier in this tutorial as the Uri value.
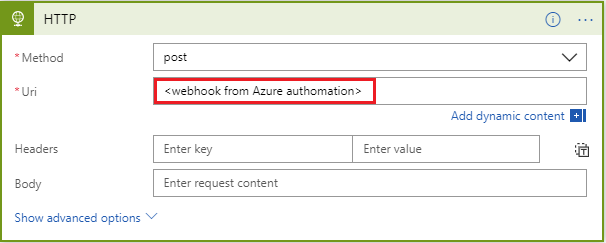
- Select Add an action in the If true box. You add an email action that sends an email notifying the recipient that the remaining VMs were shut down.
- Search for "send email" and select a send email action based on the email service you use.
- Add the To, Subject, and Body text for the email that notifies the recipient that the optional VMs were shut down. Use the BudgetName and the NotificationThresholdAmount dynamic content to populate the subject and body fields.

- Select Save at the top of the Logic App Designer area.
Logic App summary
Here's what your Logic App looks like when done. In the most basic of scenarios where you don't need any threshold-based orchestration, you could directly call the automation script from Monitor and skip the Logic App step.
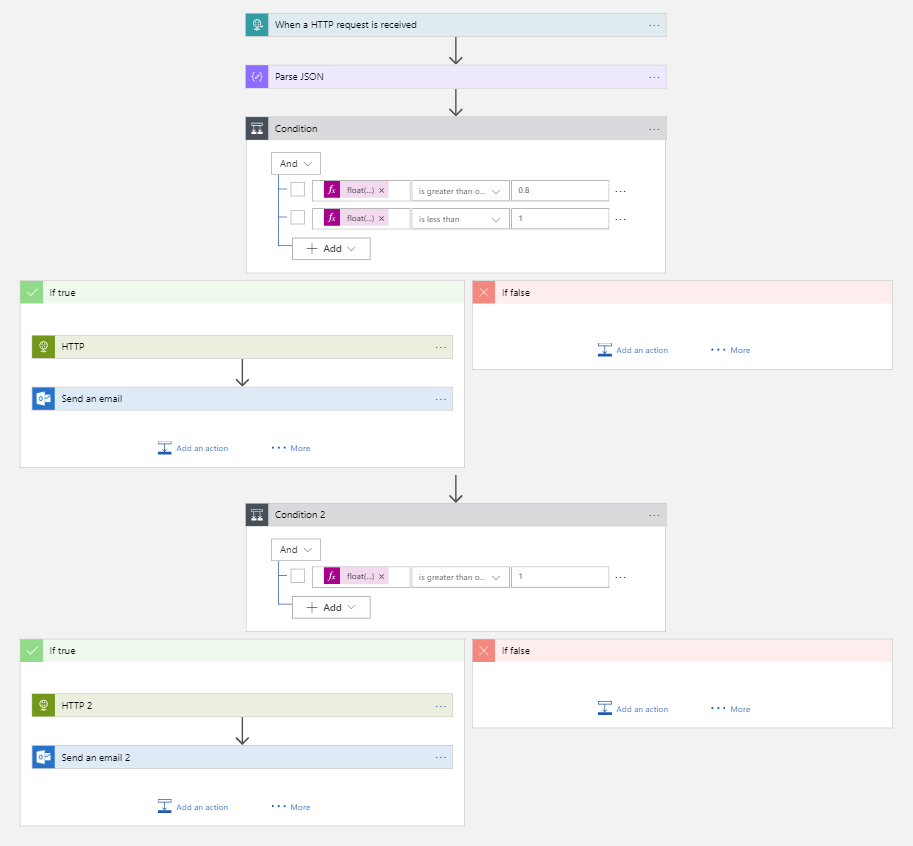
When you saved your logic app, a URL was generated that you can call. You use this URL in the next section of this tutorial.
Create an Azure Monitor Action Group
An action group is a collection of notification preferences that you define. When an alert is triggered, a specific action group can receive the alert by being notified. An Azure alert proactively raises a notification based on specific conditions and provides the opportunity to take action. An alert can use data from multiple sources, including metrics and logs.
Action groups are the only endpoint that you integrate with your budget. You can set up notifications in many channels, but for this scenario you focus on the Logic App you created earlier in this tutorial.
Create an action group in Azure Monitor
When you create the action group, you point to the Logic App that you created earlier in this tutorial.
- If you aren't already signed-in to the Azure portal, sign in and select All services > Monitor.
- Select Alerts then select Manage actions.
- Select Add an action group from the Action groups area.
- Add and verify the following items:
- Action group name
- Short name
- Subscription
- Resource group
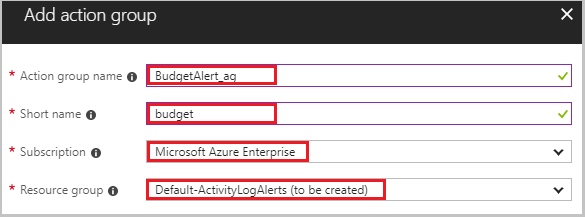
- Within the Add action group pane, add a LogicApp action. Name the action Budget-BudgetLA. In the Logic App pane, select the Subscription and the Resource group. Then, select the Logic app that you created earlier in this tutorial.
- Select OK to set the Logic App. Then, select OK in the Add action group pane to create the action group.
You completed all the supporting components that are needed to effectively orchestrate your budget. Now all you need to do is create the budget and configure it to use the action group you created.
Create the budget
You can create a budget in the Azure portal using the Budget feature in Cost Management. Or, you can create a budget using REST APIs, PowerShell cmdlets, or use the CLI. The following procedure uses the REST API. Before calling the REST API, you need an authorization token. To create an authorization token, you can use the ARMClient project. The ARMClient allows you to authenticate yourself to the Azure Resource Manager and get a token to call the APIs.
Create an authentication token
Navigate to the ARMClient project on GitHub.
Clone the repo to get a local copy.
Open the project in Visual Studio and build it.
Once the build is successful, the executable should be in the \bin\debug folder.
Run the ARMClient. Open a command prompt and navigate to the \bin\debug folder from the project root.
To sign in and authenticate, enter the following command at the command prompt:
ARMClient login prodCopy the subscription guid from the output.
To copy an authorization token to your clipboard, enter the following command at the command prompt, but sure to use the copied subscription ID from the preceding step:
ARMClient token <subscription GUID from previous step>When you complete the preceding step, you see:
Token copied to clipboard successfully.Save the token to be used for steps in the next section of this tutorial.
Create the Budget
Next, you create a budget by calling the Azure Consumption REST APIs. You need a way to interact with APIs. Some popular ways to query the API are:
- Visual Studio
- Insomnia
- Bruno
- PowerShell’s Invoke-RestMethod
- Curl
You need to import both environment and collection files into your API client. The collection contains grouped definitions of HTTP requests that call Azure Consumption REST APIs. The environment file contains variables that are used by the collection.
In your API client, create a new request.
Save the new request so that it has nothing in it.
Change the request from a
Getto aPutaction.Modify the following URL by replacing
{subscriptionId}with the Subscription ID that you used in the previous section of this tutorial. Also, modify the URL to include "SampleBudget" as the value for{budgetName}:https://management.chinacloudapi.cn/subscriptions/{subscriptionId}/providers/Microsoft.Consumption/budgets/{budgetName}?api-version=2018-03-31Select Headers in your API client.
Add a new Key named "Authorization".
Set the Value to the token that was created using the ArmClient at the end of the last section.
Select Body in your API client.
Select the raw option in your API client.
In the text area in your API client, paste the following sample budget definition. You must replace the
subscriptionID,resourcegroupname, andactiongroupnameparameters with your subscription ID, a unique name for your resource group, and the action group name you created in both the URL and the request body:{ "properties": { "category": "Cost", "amount": 100.00, "timeGrain": "Monthly", "timePeriod": { "startDate": "2018-06-01T00:00:00Z", "endDate": "2018-10-31T00:00:00Z" }, "filters": {}, "notifications": { "Actual_GreaterThan_80_Percent": { "enabled": true, "operator": "GreaterThan", "threshold": 80, "contactEmails": [], "contactRoles": [], "contactGroups": [ "/subscriptions/{subscriptionid}/resourceGroups/{resourcegroupname}/providers/microsoft.insights/actionGroups/{actiongroupname}" ] }, "Actual_EqualTo_100_Percent": { "operator": "EqualTo", "threshold": 100, "contactGroups": [ "/subscriptions/{subscriptionid}/resourceGroups/{resourcegroupname}/providers/microsoft.insights/actionGroups/{actiongroupname}" ] } } } }Send the request.
You now have all the pieces you need to call the budgets API. The budgets API reference has more details on the specific requests, including:
- budgetName - Multiple budgets are supported. Budget names must be unique.
- category - Must be either Cost or Usage. The API supports both cost and usage budgets.
- timeGrain - A monthly, quarterly, or yearly budget. The amount resets at the end of the period.
- filters - Filters allow you to narrow the budget to a specific set of resources within the selected scope. For example, a filter could be a collection of resource groups for a subscription level budget.
- notifications – Determines the notification details and thresholds. You can set up multiple thresholds and provide an email address or an action group to receive a notification.
Summary
By using this tutorial, you learned:
- How to create an Azure Automation Runbook to stop VMs.
- How to create an Azure Logic App that is triggered based on the budget threshold values and call the related runbook with the right parameters.
- How to create an Azure Monitor Action Group that was configured to trigger the Azure Logic App when the budget threshold is met.
- How to create the budget with the desired thresholds and wire it to the action group.
You now have a fully functional budget for your subscription that shuts down your VMs when you reach your configured budget thresholds.
Next steps
- For more information about Azure billing scenarios, see Billing and cost management automation scenarios.