Enable Azure Private Link back-end and front-end connections

This article summarizes the use of Azure Private Link to enable private connectivity between users and their Databricks workspaces, and also between clusters on the classic compute plane and the core services on the control plane within the Databricks workspace infrastructure.

Overview

Private Link provides private connectivity from Azure VNets and on-premises networks to Azure services without exposing the traffic to the public network. Azure Databricks supports the following Private Link connection types:

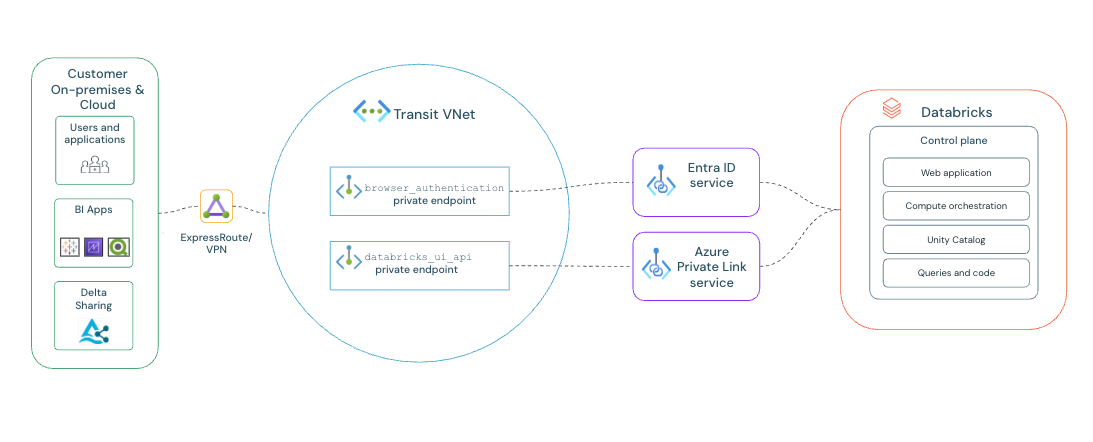
  • Front-end Private Link, also known as user to workspace: A front-end Private Link connection allows users to connect to the Azure Databricks web application, REST API, and Databricks Connect API over a VNet interface endpoint. The front-end connection is also used by JDBC/ODBC and Power BI integrations. The network traffic for a front-end Private Link connection between a transit VNet and the workspace's Azure Databricks control plane traverses the Microsoft backbone network.
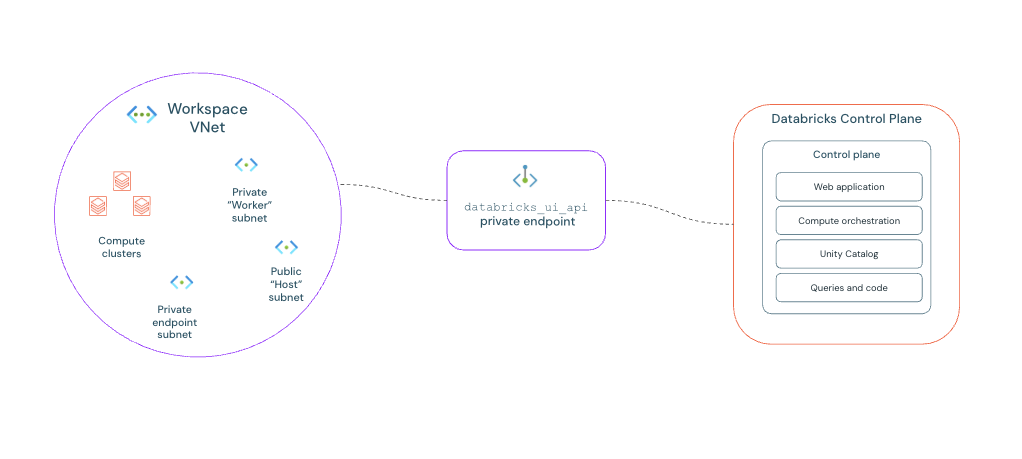
  • Back-end Private Link, also known as compute plane to control plane: Databricks Runtime clusters in a customer-managed VNet (the compute plane) connect to an Azure Databricks workspace's core services (the control plane) in the Azure Databricks cloud account. This enables private connectivity from the clusters to the secure cluster connectivity relay endpoint and REST API endpoint.
  • Browser authentication private endpoint: To support private front-end connections to the Azure Databricks web application for clients that have no public internet connectivity, you must add a browser authentication private endpoint to support single sign-on (SSO) login callbacks to the Azure Databricks web application from Microsoft Entra ID. If you allow connections from your network to the public internet, adding a browser authentication private endpoint is recommended but not required. A browser authentication private endpoint is a private connection with sub-resource type browser_authentication.

If you implement Private Link for both front-end and back-end connections, you can optionally mandate private connectivity for the workspace, which means Azure Databricks rejects any connections over the public network. If you decline to implement both front-end or back-end connection types, you cannot enforce this requirement.

Sample Unity Catalog datasets and Azure Databricks datasets are not available when back-end Private Link is configured. See Sample datasets.

Most of this article is about creating a new workspace, but you can enable or disable Private Link on an existing workspace. See Enable or disable Azure Private Link on an existing workspace.

Terminology

The following table describes important terminology.

Terminology Description
Azure Private Link An Azure technology that provides private connectivity from Azure VNets and on-premises networks to Azure services without exposing the traffic to the public network.
Azure Private Link service A service that can be the destination for a Private Link connection. Each Azure Databricks control plane instance publishes an Azure Private Link service.
Azure private endpoint An Azure private endpoint enables a private connection between a VNet and a Private Link service. For front-end and back-end connectivity, the target of an Azure private endpoint is the Azure Databricks control plane.

For general information about private endpoints, see the Azure article What is a private endpoint?.

Choose standard or simplified deployment

There are two types of Private Link deployment that Azure Databricks supports, and you must choose one:

  • Standard deployment (recommended): For improved security, Databricks recommends you use a separate private endpoint for your front-end connection from a separate transit VNet. You can implement both front-end and back-end Private Link connections or just the back-end connection. Use a separate VNet to encapsulate user access, separate from the VNet that you use for your compute resources in the classic compute plane. Create separate Private Link endpoints for back-end and front-end access. Follow the instructions in Enable Azure Private Link as a standard deployment.
  • Simplified deployment: Some organizations cannot use the standard deployment for various network policy reasons, such as disallowing more than one private endpoint or discouraging separate transit VNets. You can alternatively use the Private Link simplified deployment. No separate VNet separates user access from the VNet you use for your compute resources in the classic compute plane. Instead, a transit subnet in the compute plane VNet is used for user access. There is only a single Private Link endpoint. Typically, both front-end and back-end connectivity are configured. You can optionally configure only the back-end connection. You cannot choose to use only the front-end connections in this deployment type. Follow the instructions in Enable Azure Private Link as a simplified deployment.

Requirements

Azure subscription

Your Azure Databricks workspace must be on the Premium plan.

Azure Databricks workspace network architecture

  • Your Azure Databricks workspace must use VNet injection to add any Private Link connection (even a front-end-only connection).
  • If you implement the back-end Private Link connection, your Azure Databricks workspace must use secure cluster connectivity (SCC / No Public IP / NPIP).
  • You need a VNet that satisfies the requirements of VNet injection.
    • You must define two subnets (referred to in the UI as the public subnet and the private subnet). The VNet and subnet IP ranges that you use for Azure Databricks defines the maximum number of cluster nodes that you can use at one time.
    • To implement front-end Private Link, back-end Private Link, or both, your workspace VNet needs a third subnet that contains the Private Link endpoint and its IP address range must not overlap with the range of your other workspace subnets. This article refers to this third subnet as the private endpoint subnet. Examples and screenshots assume the subnet name private-link. This can be as small as CIDR range /27. Do not define any NSG rules for a subnet that contains private endpoints.
    • If you use the UI to create objects, you need to create the network and subnets manually before creating the Azure Databricks workspace. If you want to use a template, the template that Azure Databricks provides creates a VNet and appropriate subnets for you, including the two regular subnets plus another for private endpoints.
  • If you have a Network Security Groups policy enabled on the private endpoint, you must allow ports 443, 6666, 3306, and 8443-8451 for Inbound Security Rules in the network security group on the subnet where the private endpoint is deployed.
  • To connect between your network and the Azure portal and its services, you might need to add Azure portal URLs to your allowlist. See Allow the Azure portal URLs on your firewall or proxy server

Front-end connection network architecture

For front-end Private Link only, for users to access the workspace from your on-premises network, you must add private connectivity from that network to your Azure network. Add this connectivity before configuring Private Link. The details vary based on whether you choose the Private Link standard deployment or the simplified deployment.

  • For the standard deployment, you would create or use an existing transit VNet, sometimes called a bastion VNet or hub VNet. This VNet must be reachable from the on-premises user environment using Expressroute or a VPN gateway connection. For front-end Private Link, Databricks recommends creating a separate VNet for your connectivity to the control plane, rather than sharing the workspace VNet. Note that the transit VNet and its subnet can be in the same region, zone, and resource group as your workspace VNet and its subnets, but they do not have to match. Create a resource group for the separate transit VNet and use a different private DNS zone for that private endpoint. If you use two separate private endpoints, you cannot share the DNS zone.
  • For the simplified deployment, you create a transit subnet in your workspace VNet. In this deployment, the transit subnet does not have a separate private endpoint. The transit subnet in the workspace VNet uses a single private endpoint for both back-end and front-end connections.

Azure user permissions

As Azure user, you must have read/write permissions sufficient to:

  • Provision a new Azure Databricks workspace.
  • Create Azure Private Link endpoints in your workspace VNet and also (for front-end usage) your transit VNet.

If the user who created the private endpoint for the transit VNet does not have owner/contributor permissions for the workspace, then a separate user with owner/contributor permissions for the workspace must manually approve the private endpoint creation request.

You can enable Private Link on an existing workspace. The upgrade requires that the workspace uses VNet Injection, secure cluster connectivity, and Premium pricing tier. You can update to secure cluster connectivity and to the Premium pricing tier during the update.

You can use an ARM template or azurerm Terraform provider version 3.41.0+. You can use the Azure portal to apply a custom template and modify the parameter in the UI. However, there is no Azure Portal user interface support for this upgrade on the Azure Databricks workspace instance itself.

If something goes wrong with the upgrade and you can repeat the workspace update step but instead set the fields to disable Private Link.

Although the focus of this section is enabling Private Link on an existing workspace, you can disable it on an existing workspace by using the same workspace update call with the ARM template or a Terraform update. See to the step Step 4: Apply the workspace update for details.

Step 1: Read the requirements and documentation on this page

Before you attempt an upgrade to Private Link there are important concepts and requirements that you should read:

  1. Read this article including concepts and requirements before proceeding.
  2. Determine whether you want to use the standard deployment or the simplified deployment.
  3. On the page for standard deployment or the simplified deployment (whichever approach you use), carefully review the page including the various scenarios. Find the scenario that matches your use case. Write down which values you intend to use for publicNetworkAccess and requiredNsgRules. For the recommended configuration of both front-end and back-end Private Link with front-end connectivity locked down, use the settings publicNetworkAccess=Disabled and requiredNsgRules=NoAzureDatabricksRules

Step 2: Stop all compute resources

Before attempting this upgrade, you must stop all compute resources such as clusters, pools, or classic SQL warehouses. No workspace compute resources can be running or the upgrade attempt fails. Databricks recommends planning the timing of the upgrade for down time.

Important

Do not attempt to start any compute resources during the update. If Azure Databricks determines that compute resources were started (or are still starting), Azure Databricks terminates them after the update.

Step 3: Create subnet and private endpoints

  1. Add a subnet to your workspace VNet for your back-end private endpoints.

  2. Open the article for standard deployment or the simplified deployment (whichever approach you use).

    Follow the instructions on that page to create the private endpoints that match your type of deployment.

  3. Create all your private endpoints for back-end support before doing the workspace update.

  4. For UI access, create a private endpoint with subresource databricks_ui_api to support SSO from your transit VNet. If you have more than one transit VNet that accesses the workspace for front-end access, create multiple private endpoint with subresource databricks_ui_api.

Step 4: Apply the workspace update

Instead of creating a new workspace, you need to apply the workspace update.

You must update the publicNetworkAccess and requiredNsgRules parameters to the values that you chose in a previous step.

Use one of these methods:

Apply an updated ARM template using Azure portal

Note

If your managed resource group has a custom name, you must modify the template accordingly. Contact your Azure Databricks account team for more information.

  1. Copy the following upgrade ARM template JSON:

    {
       "$schema": "https://schema.management.azure.com/schemas/2019-04-01/deploymentTemplate.json#",
       "contentVersion": "1.0.0.0",
       "parameters": {
           "location": {
               "defaultValue": "[resourceGroup().location]",
               "type": "String",
               "metadata": {
                   "description": "Location for all resources."
               }
           },
           "workspaceName": {
               "type": "String",
               "metadata": {
                   "description": "The name of the Azure Databricks workspace to create."
               }
           },
           "apiVersion": {
               "defaultValue": "2023-02-01",
               "allowedValues": [
                "2018-04-01",
                   "2020-02-15",
                   "2022-04-01-preview",
                   "2023-02-01"
               ],
               "type": "String",
               "metadata": {
                   "description": "2018-03-15 for 'full region isolation control plane' and 2020-02-15 for 'FedRAMP certified' regions"
               }
           },
           "publicNetworkAccess": {
               "defaultValue": "Enabled",
               "allowedValues": [
                   "Enabled",
                   "Disabled"
               ],
               "type": "String",
               "metadata": {
                   "description": "Whether the workspace allows access from the public Internet"
               }
           },
           "requiredNsgRules": {
               "defaultValue": "AllRules",
               "allowedValues": [
                   "AllRules",
                   "NoAzureDatabricksRules"
               ],
               "type": "String",
               "metadata": {
                   "description": "The security rules that are applied to the security group of the Vnet"
               }
           },
           "enableNoPublicIp": {
               "defaultValue": true,
               "type": "Bool"
           },
           "pricingTier": {
               "defaultValue": "premium",
               "allowedValues": [
                   "premium",
                   "standard",
                   "trial"
               ],
               "type": "String",
               "metadata": {
                   "description": "The pricing tier of workspace."
               }
           },
           "privateSubnetName": {
               "defaultValue": "private-subnet",
               "type": "String",
               "metadata": {
                   "description": "The name of the private subnet."
               }
           },
           "publicSubnetName": {
               "defaultValue": "public-subnet",
               "type": "String",
               "metadata": {
                   "description": "The name of the public subnet."
               }
           },
           "vnetId": {
               "type": "String",
               "metadata": {
                   "description": "The virtual network Resource ID."
               }
           }
       },
       "variables": {
           "managedResourceGroupName": "[concat('databricks-rg-', parameters('workspaceName'), '-', uniqueString(parameters('workspaceName'), resourceGroup().id))]",
           "managedResourceGroupId": "[subscriptionResourceId('Microsoft.Resources/resourceGroups', variables('managedResourceGroupName'))]"
        },
        "resources": [
           {
               "type": "Microsoft.Databricks/workspaces",
               "apiVersion": "[parameters('apiVersion')]",
               "name": "[parameters('workspaceName')]",
               "location": "[parameters('location')]",
               "sku": {
                   "name": "[parameters('pricingTier')]"
               },
               "properties": {
                   "ManagedResourceGroupId": "[variables('managedResourceGroupId')]",
                   "publicNetworkAccess": "[parameters('publicNetworkAccess')]",
                   "requiredNsgRules": "[parameters('requiredNsgRules')]",
                   "parameters": {
                       "enableNoPublicIp": {
                           "value": "[parameters('enableNoPublicIp')]"
                       },
                       "customVirtualNetworkId": {
                           "value": "[parameters('vnetId')]"
                       },
                       "customPublicSubnetName": {
                           "value": "[parameters('publicSubnetName')]"
                       },
                       "customPrivateSubnetName": {
                           "value": "[parameters('privateSubnetName')]"
                       }
                   }
               }
           }
       ]
    }
    
    1. Go to the Azure portal Custom deployment page.

    2. Click Build your own template in the editor.

    3. Paste in the JSON for the template that you copied.

    4. Click Save.

    5. To enable Private Link, set publicNetworkAccess and requiredNsgRules parameters according to your use case.

      To disable Private Link, set publicNetworkAccess to true and set requiredNsgRules to AllRules.

    6. For other fields, use the same parameters that you used to create the workspace, such as subscription, region, workspace name, subnet names, resource ID of the existing VNet.

      Important

      The resource group name, workspace name, and subnet names must be identical to your existing workspace so that this command updates the existing workspace rather than creating a new workspace.

    7. Click Review + Create.

    8. If there are no validation issues, click Create.

    The network update might take over 15 minutes to complete.

Apply an update using Terraform

For workspaces created with Terraform, you can update the workspace to use Private Link.

Important

You must use terraform-provider-azurerm version 3.41.0 or later, so upgrade your Terraform provider version as needed. Earlier versions attempt to recreate the workspace if you change any of these settings.

The high-level steps are:

  1. Change the following workspace settings:

    • public_network_access_enabled: Set to true (Enabled) or false (Disabled)
    • network_security_group_rules_required: Set to AllRules or NoAzureDatabricksRules.

    The network update might take over 15 minutes to complete.

  2. Create your private endpoints.

For a detailed guide for how to enable Private Link and create the private endpoints:

The network update might take over 15 minutes to complete.

Step 5: Test user SSO authentication and back-end connectivity

Follow your main deployment page for details on how to:

  • Test user SSO authentication to your workspace.
  • Test back-end Private Link connection (required for a back-end connection)

Step 6: Validate the update

  1. Go to your Azure Databricks Service instance in the Azure portal.
  2. In the left navigation under Settings, click Networking.
  3. Confirm that the value for Allow Public Network Access matches the value that you set.
  4. Confirm that the value for Required NSG Rules matches the value that you set.

Failure recovery

If a workspace update fails, the workspace might be marked as a Failed state, which means that the workspace is unable to perform compute operations. To restore a failed workspace back to Active state, review the instructions in the status message of the update operation. Once you fix any issues, redo the update on the failed workspace. Repeat the steps until the update successfully completes. If you have questions, contact your Azure Databricks account team.