Note
Access to this page requires authorization. You can try signing in or changing directories.
Access to this page requires authorization. You can try changing directories.
Scheduling dashboard updates ensures that your dashboards display up-to-date information and improves performance for end users. Subscriptions keep stakeholders informed by sending dashboard snapshots to email, Microsoft Teams. This page explains how to set up and manage subscriptions.
Create a schedule
When you create a schedule for dashboard updates, you set a periodic cadence that pulls the freshest data and, for dashboards published with shared data permissions, refreshes the shared cache.
For each scheduled dashboard update, the following occurs:
- All SQL logic that defines datasets runs on the designated time interval.
- Results populate the query result cache and help to improve initial dashboard load time.
Benefits of shared data permissions for scheduled updates
Dashboards published with shared data permissions provide better performance and cache efficiency compared to individual data permissions:
- Shared cache: Scheduled updates populate a shared query result cache that all dashboard viewers can access, significantly improving load times for all users.
- Individual cache refresh: Even when a dashboard is published with individual data permissions, users can subscribe to schedules to trigger cache refreshes. This ensures their personal cache stays up-to-date and reduces load times when they access the dashboard.
- Reduced query load: Because results are cached and shared, the underlying SQL queries run less frequently, reducing compute costs and warehouse load.
Users who subscribe to a schedule benefit from these cache refreshes even if they don't need the email PDF snapshot. Subscribing initiates the cache refresh workflow, ensuring the dashboard loads quickly when they visit it.
To create a schedule:
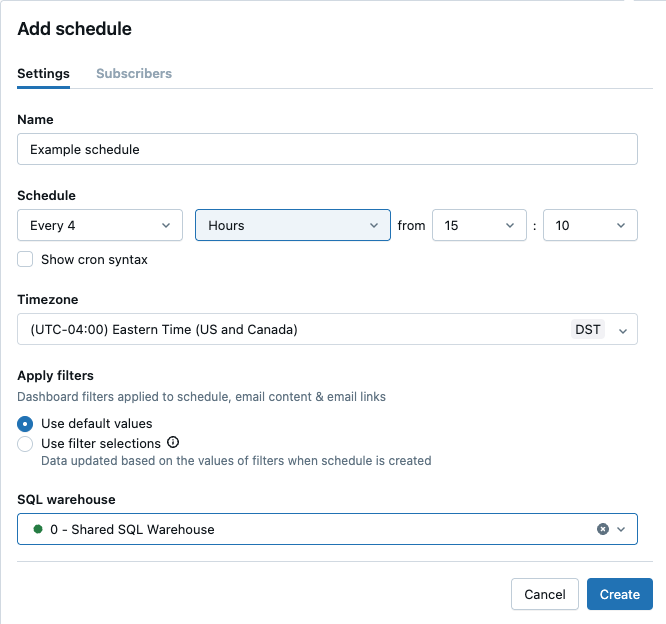
Click Schedule in the upper-right corner of the dashboard. The Add Schedule dialog appears.

Enter a name identifier for your new schedule.
Use the drop-down selectors to specify the frequency and start time, if necessary. Optionally, select the Show cron syntax checkbox to edit the schedule in Quartz Cron Syntax.
Use the Timezone drop-down menu to select the time zone.
Choose Use default values or Use filter selections to determine which filter values are applied in the dashboard during a scheduled run.
- Use default values: Applies the default values from the dashboard's filter widgets.
- Use filter selections: Applies the filter values set when the schedule is created.
Use the SQL warehouse drop-down menu to choose a different SQL warehouse for scheduled runs.
By default, the SQL warehouse used to create and run the dashboard is also used in the scheduled run. Use this setting to choose a different warehouse to run scheduled updates.
(Optional) Click Subscribers to add subscribers. Subscribers receive an email with a PDF snapshot of the dashboard after a scheduled run completes.
Click Create. The Schedules dialog appears and shows the schedule you created. If other schedules exist for this dashboard, the dialog also shows those.
If a schedule has already been created for this dashboard, the button in the upper-right corner says Subscribe. Use the previously described workflow to add a schedule.
Note
For schedules with a defined start time, the refresh cadence begins at that time each day. For example, a schedule set to run every 4 hours starting at 15:10 runs at 15:10, 19:10, 23:10, and so on, continuing until 15:09 the following day. The cadence then resets and begins again at 15:10.
Manage schedules
To edit, pause, or delete a schedule:
Click Schedule on the published dashboard. A list of schedules for the dashboard appears.
Click the kebab menu
to the right of the schedule that you want to manage.
Click Edit, Pause, or Delete.
- Edit: Opens the scheduling UI. Use the UI to adjust the schedule and then save.
- Pause or Resume: Sets whether the schedule is active or paused. Paused schedules retain their configuration and subscriber settings, but the dashboard does not update or send notifications until the schedule is resumed.
- Delete: Removes the schedule and all subscriber settings.
Manage subscriptions
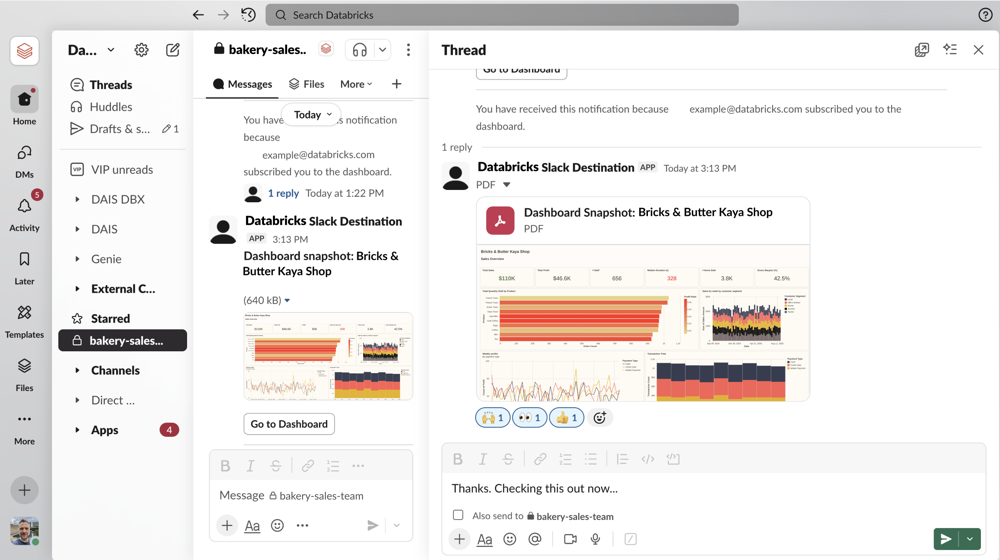
Schedule subscribers receive a snapshot of the current dashboard each time the schedule runs. Subscribers receive dashboard snapshots through email, Microsoft Teams. Email subscribers receive a PDF snapshot. Microsoft Teams channels receive a PNG image snapshot visible directly in the channel, a direct link to open the dashboard in Azure Databricks, and a PDF attachment in the message thread. For dashboards with multiple pages, the snapshot shows the first page of the dashboard.
For dashboards published with shared data permissions, subscribing to a schedule also triggers cache refreshes that improve dashboard load times. Users can subscribe even if they don't need email notifications, benefiting from faster performance when they access the dashboard.
Important
Subscription lists can contain up to 100 subscribers. A notification destination counts as one subscriber regardless of the number of messages it sends.
Subscription destinations
Dashboard subscriptions support the following destinations:
- Email: Workspace users and email notification destinations receive a PDF snapshot via email. You can configure account users, distribution lists, and external users (such as partners or clients) as email notification destinations.
- Microsoft Teams: Teams channels receive a PNG image snapshot visible directly in the channel, a direct link to open the dashboard in Azure Databricks, and a PDF attachment in the message thread. Workspace admins must configure Microsoft Teams notification destinations before you can select them as subscribers. See Configure Microsoft Teams notifications.
Note
If you cannot add email subscribers, your workspace admin might have turned off email notifications for your workspace. See AI/BI administration guide.
Workspace admins must define notification destinations before they can be selected as subscribers. See Manage notification destinations for email destinations, Configure Microsoft Teams notifications for Microsoft Teams destinations.
You can add and remove other subscribers to receive updates if you have at least CAN EDIT permissions on the dashboard. You can add and remove yourself as a subscriber to an existing schedule if you have at least CAN VIEW permissions on the dashboard.
Subscribe Microsoft Teams channel
Before you can subscribe Slack or Microsoft Teams channels, workspace admins must configure notification destinations. See Configure Microsoft Teams notifications for Microsoft Teams destinations.
To subscribe a Slack or Teams channel:
- Click Schedule in the upper-right corner of the dashboard.
- Create a new schedule or edit an existing schedule:
- To create a new schedule, enter the schedule name, frequency, and filter values, then click Create.
- To edit an existing schedule, click the kebab menu
next to the schedule and select Edit.
- In the schedule configuration, click Subscribers.
- Type to search for and select the notification destination.
- Click Save.
When the schedule runs, a notification is posted to the configured Slack or Teams channel.

If you encounter issues, see Troubleshooting for Microsoft Teams.
Subscribe other users
To subscribe other users, do the following:
- Click Subscribe in the upper-right corner of the dashboard. The Schedules dialog appears.
- Identify the schedule that you want to add subscribers to. Click the
to the right of that schedule. Then, click Edit.
If you have CAN VIEW access to a dashboard that has an assigned schedule, you can subscribe yourself to receive updates each time a scheduled run occurs.
To subscribe yourself to an existing schedule, do the following:
- Click the Subscribe button near the upper-right corner of the dashboard. The Schedules dialog shows all schedules for the dashboard.
- Click Subscribe to the right of the schedule you choose.
If you cannot add yourself as a subscriber, the following reasons might apply:
A workspace admin has turned off the Enable dashboard subscriptions option for the workspace.
This setting supersedes all others. If the workspace admin has turned this setting off, dashboard editors can still assign a schedule, but no subscribers can be assigned.
You do not have permission to access the workspace.
Account users can only be added as subscribers as a notification destination. There is no Subscribe button on the dashboard for account users.
No schedules have been defined.
For dashboards without a defined schedule, workspace users with CAN VIEW or CAN RUN access to a dashboard cannot interact with the Subscribe button.
Unsubscribe from email updates
Subscribers can choose to stop receiving notifications by unsubscribing from the schedule.
To unsubscribe using the dashboard UI, do the following:
- Click the Subscribe button near the upper-right corner of the dashboard. The Schedules dialog shows all schedules for the dashboard.
- Click Subscribed to unsubscribe. The button text changes to Subscribe.

Use the Unsubscribe link in the email footer to unsubscribe from scheduled updates.
Note
When a user who is included in a larger distribution list set up for email notifications chooses to unsubscribe using the link in the email footer, the action unsubscribes the entire distribution list. The group as a whole is removed from the subscription and will not receive future PDF snapshot updates.
Dashboard size limits for subscriptions
Dashboard subscription emails include the following base64 encoded files:
- PDF: A PDF file that includes the full dashboard.
- DesktopImage: An image file optimized for viewing on desktop computers.
For information about dashboard subscription size limits and behavior when limits are exceeded, see Dashboard subscription limits.
Data security for PDF attachments
When a dashboard PDF is generated for scheduled delivery or download, it is temporarily stored in the cloud storage configured by a workspace admin during workspace creation. This storage is managed by Azure Databricks and is not directly accessible externally. Knowing where PDFs reside and how they are deleted can help you address security and compliance requirements. See Deploy a workspace using the Azure Portal.
PDF deletion policy
Scheduled updates (email subscriptions): After the email process completes, the PDF is immediately deleted from object storage.
User-initiated downloads: When a user manually downloads a dashboard PDF from the UI, the file temporarily remains in object storage for up to 60 days. This retention period allows time for download completion, troubleshooting, or re-downloads if needed.