Note
Access to this page requires authorization. You can try signing in or changing directories.
Access to this page requires authorization. You can try changing directories.
When you configure provisioning, one of the types of attribute mappings that you can specify is the Lifecycle Workflows (LCW) extensibility workflow mapping type. This mapping type allows you to extend attribute mappings beyond the basic transformations that are supported by the expression mapping type, enabling you to fulfill scenarios where custom business logic may be required.
To configure the LCW extensibility workflow mapping type, you will need to create an LCW extensibility workflow that invokes an Azure Logic App to generate a value. The value generated by the Azure Logic App is then applied to a target attribute.
Prerequisites
You will need to create an Azure Logic App. For that, you should have:
- An Azure subscription (required for creating and using an Azure Logic App)
- At least a Logic App Contributor role
You will need to create an LCW extensibility workflow to trigger the Azure Logic App. For that, you should have:
- An Entra ID Governance license
- At least a Lifecycle Workflows Administrator role
To configure a provisioning job, including attribute mappings, you will need:
- At least an Application Administrator role. If you are configuring inbound provisioning to an on-prem Active Directory, the the Hybrid Identity Administrator role is also required
LCW extensibility workflow overview
An LCW extensibility workflow is a new type of Lifecycle Workflow that is distinct from the existing Joiner, Mover, and Leaver types.
Much like Joiner, Mover, and Leaver workflows, you will specify a task for the workflow to run. In this case, the task will be to trigger a custom extension. You can think of a custom extension as a wrapper for the Azure Logic App that houses your custom logic—when the custom extension is triggered by the extensibility workflow, the Azure Logic App will run.
Unlike Joiner, Mover, and Leaver workflows, however, extensibility workflows can run before a user is provisioned. In other words, an extensibility workflow can run independent of whether a given user account is present in the Entra ID directory.
This makes extensibility workflows useful in pre-provisioning (also referred to as pre-joiner) scenarios. For example, you can use an extensibility workflow to generate a unique alias for a newly hired employee before provisioning their account to the directory and subsequently giving them access to company resources.
Note
Currently, an LCW extensibility workflow only supports one trigger type (Provisioning attribute mapping) and one task (Run a Data-driven Custom Task Extension).
Step 0: Create an Azure Logic App
You will need to create a consumption-based Azure Logic App that outputs a single value that will be applied to a target attribute.
If you are new to Azure Logic Apps, you may read more here. Additionally, you can find instructions on how to create your first consumption-based Azure Logic App in this tutorial.
Step 1: Create a custom extension
Before creating an extensibility workflow, you need a custom extension that you can link to your extensibility workflow. As mentioned previously, you can think of the custom extension as a wrapper for the Azure Logic App where your custom logic resides. When the extensibility workflow triggers the custom extension, the Azure Logic App will run.
In the Microsoft Entra admin center
Using your browser, sign in to your Entra ID tenant via the Microsoft Entra admin center.
Navigate to Lifecycle workflows > Custom extensions > Add a custom extension.
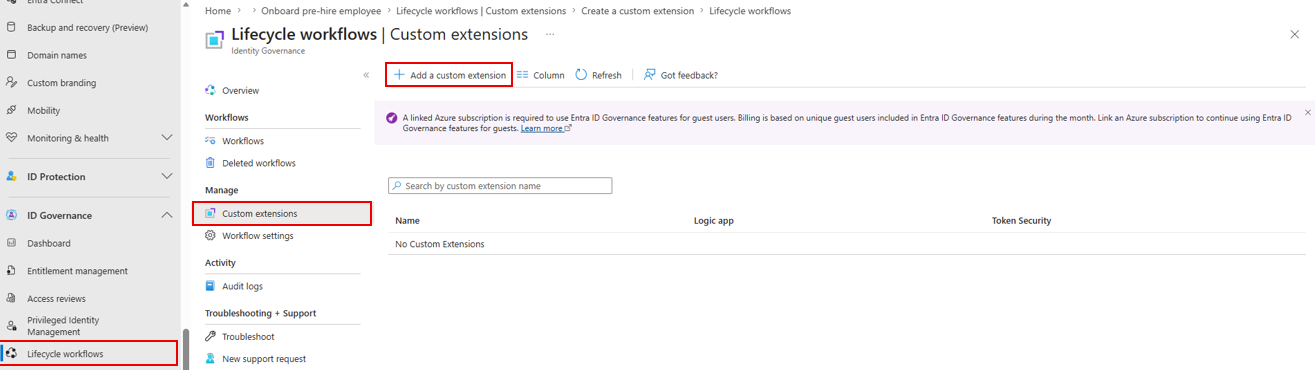
Under the Basics tab of the create wizard, add a name and description for your custom extension.
Under the Task behavior tab, select Launch wait for result (Preview).
Under the Details tab, you can link the custom extension to an Azure Logic App. Assuming you already have one created, select No for Create a logic app, then input the subscription, resource group, and Logic app details for Azure Logic App.
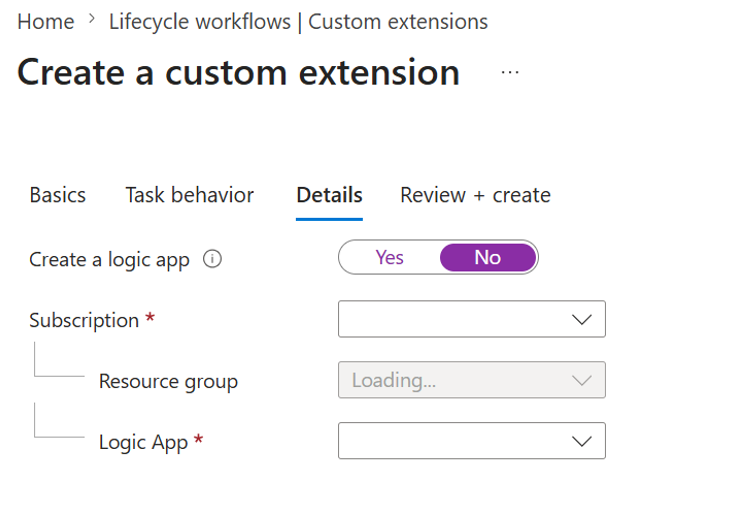
Review the details of your custom extension in the Review + create tab, and click Create to finish.
You now have a custom extension that is ready to link to an extensibility workflow as a task. Now let’s work on creating an extensibility workflow.
Step 2: Create an extensibility workflow
Once you’ve created a custom extension, you can now create an extensibility workflow whose task is to trigger the custom extension.
In the Microsoft Entra admin center
Using your browser, sign in to your Entra ID tenant via the Microsoft Entra admin center.
Navigate to Identity Governance > Lifecycle Workflows > Create workflow.
In the Choose a template tab, select the Real-time Provisioning extensibility template.
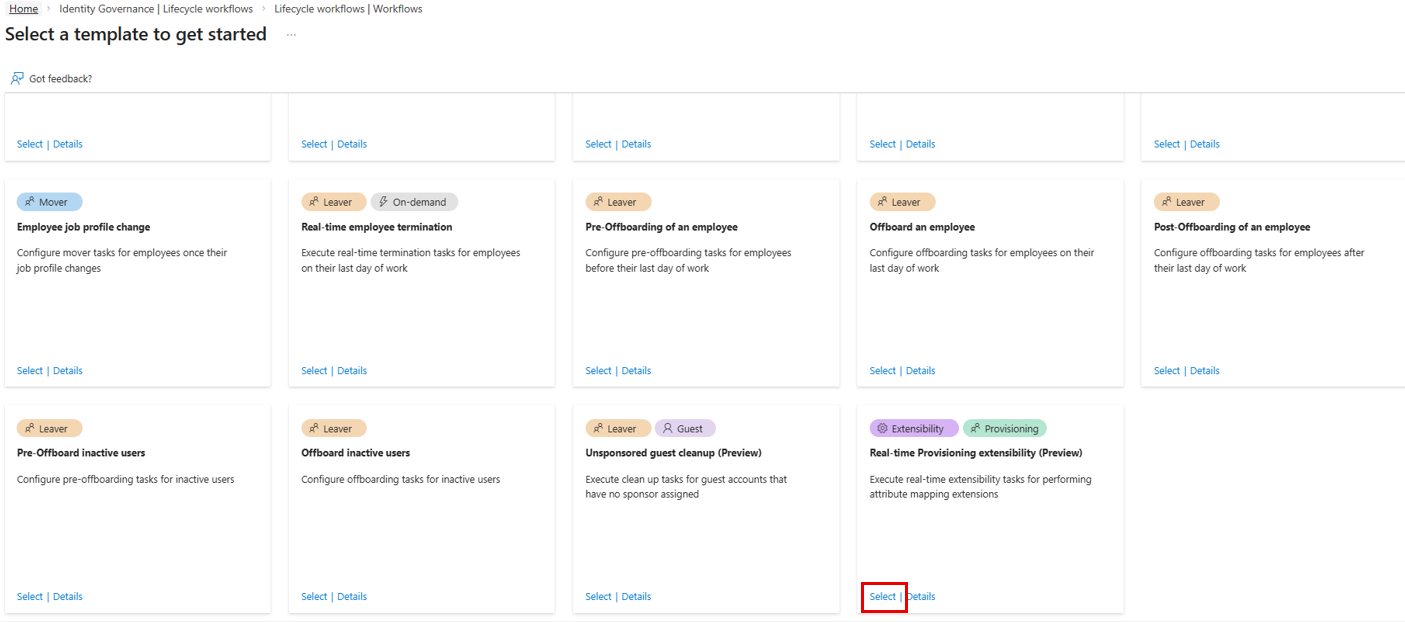
In the Basics tab, input a name and description for the workflow. The trigger type will be automatically set to Provisioning attribute mapping, which is the only trigger type that we currently support for extensibility workflows.
Now let’s configure your extensibility workflow so that it triggers a custom extension. In the Review tasks tab, click on the Run a Data-driven Custom Task Extension task, which should have been automatically added to the workflow tasks table as part of the real-time provisioning extensibility template.
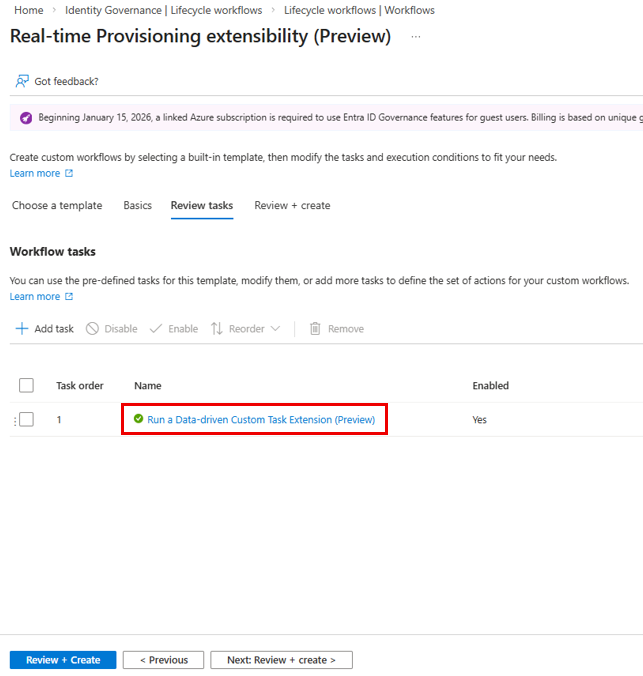
In the Run a Data-driven Custom Task Extension context pane, click on the Select custom extension field and select the custom extension you created in the previous section.
Click Save.
Review the details of your workflow in the Review + create tab, and click Create to finish.
You now have an extensibility workflow that can trigger an Azure Logic App that contains your custom logic. Now let’s work on mapping the extensibility workflow to a target attribute.
Step 3: Mapping an extensibility workflow to a target attribute
Now that you’ve created an extensibility workflow, it’s time to map it to an attribute in a provisioning job. This is so that when a provisioning job is in-progress, the extensibility workflow will generate a value for that attribute for every object in the scope of the provisioning job.
For example, if you map an extensibility workflow to the userPrincipalName target attribute and there are five users in scope of your provisioning job, the workflow will generate a value for the userPrincipalName attribute for all five users.
In the Microsoft Entra admin center
Using your browser, sign in to your Entra ID tenant via the Microsoft Entra admin center.
Navigate to Enterprise apps > All applications.
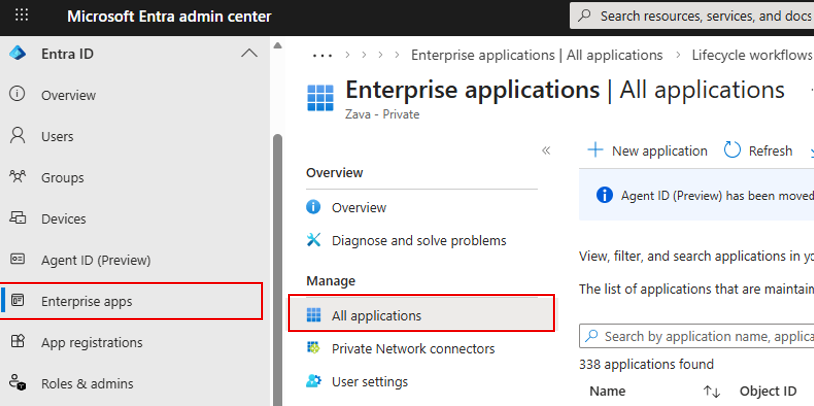
Select a specific application (e.g. an HR connector).
Within the application, navigate to Provisioning > Attribute mapping.
Within the attribute mapping list, find the target attribute that you would like to invoke custom logic for. Select the edit icon (the pencil symbol) for that attribute.
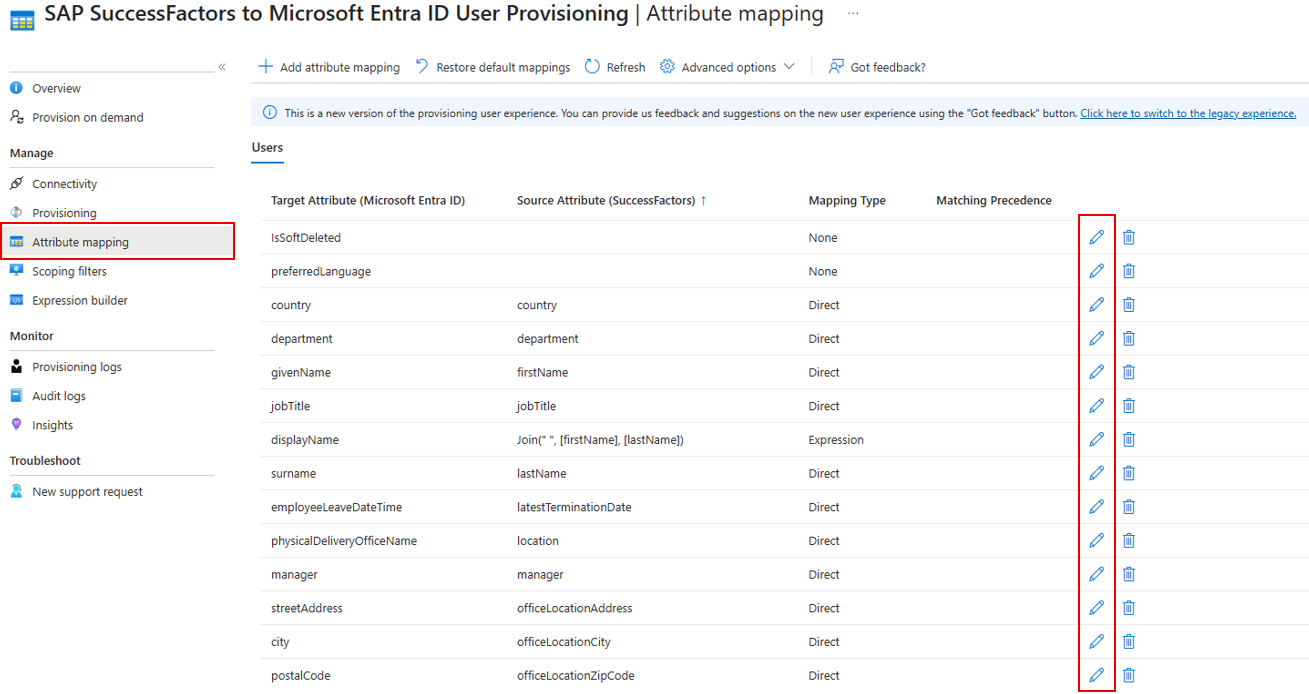
In the Edit Attribute Mapping blade, select LCW extensibility workflow in the Mapping type dropdown.
Click on the LCW extensibility workflow field to open the extensibility workflow picker.
In the Select extensibility workflow context pane, select the appropriate extensibility workflow from the list and press Select.
For the Input attributes field, specify what source system attributes you will pass into the extensibility workflow and an alias for the attribute (aliases can be especially helpful for scenarios where the source attribute names are long or non-human-readable and may need a friendly name).
Select the Edit button at the bottom of the Edit Attribute Mapping blade.
If the extensibility workflow was successfully mapped to the target attribute, the Attribute mapping page will update so that the Mapping Type column shows “LCW extensibility workflow” for that given attribute.
Once you’re done configuring the settings of your provisioning job, you can now start a provisioning job as normal. The LCW extensibility workflow wil now run for all objects in scope.
Once you’re done configuring the settings of your provisioning job, you can now start a provisioning job as normal. The LCW extensibility workflow wil now run for all objects in scope.
Limitations
Please note the following feature limitations:
- Custom call-outs are not supported for Cloud sync. LCW extensibility workflows can only be used for HR inbound, API-driven provisioning, SaaS outbound provisioning, and cross-tenant synchronization flows.
- An attribute with the LCW extensibility workflow mapping type cannot be used for matching. If an attribute's value was generated using an LCW extensibility workflow, it cannot be used as a matching attribute.
- Custom call-outs are only supported for create events. The LCW extensibility workflow mapping can only be applied during creates, not updates or deletes.
- Custom security attributes (CSAs). We do not explicitly support the use of LCW extensibility workflows for generating values for CSAs. If you decide to do so, please proceed with caution.
Related Articles
- Automate HR Provisioning/Deprovisioning to Entra ID
- Automate User Provisioning/Deprovisioning to SaaS Apps
- Customizing Attribute Mappings for User Provisioning
- Scoping Filters for User Provisioning
- Using SCIM to enable automatic provisioning of users and groups from Microsoft Entra ID to applications
- Account Provisioning Notifications