Note
Access to this page requires authorization. You can try signing in or changing directories.
Access to this page requires authorization. You can try changing directories.
You can configure an event hub so that the data that's sent to an event hub is captured in an Azure storage account or Azure Data Lake Storage Gen 1 or Gen 2. This article shows you how to write Python code to send events to an event hub and read the captured data from Azure Blob storage. For more information about this feature, see Event Hubs Capture feature overview.
This quickstart uses the Azure Python SDK to demonstrate the Capture feature. The sender.py app sends simulated environmental telemetry to event hubs in JSON format. The event hub is configured to use the Capture feature to write this data to Blob storage in batches. The capturereader.py app reads these blobs and creates an append file for each device. The app then writes the data into CSV files.
In this quickstart, you:
- Create an Azure Blob storage account and container in the Azure portal.
- Create an Event Hubs namespace by using the Azure portal.
- Create an event hub with the Capture feature enabled and connect it to your storage account.
- Send data to your event hub by using a Python script.
- Read and process files from Event Hubs Capture by using another Python script.
Prerequisites
Python 3.8 or later, with pip installed and updated.
An Azure subscription. If you don't have one, create a trial subscription before you begin.
An active Event Hubs namespace and event hub. Create an Event Hubs namespace and an event hub in the namespace. Record the name of the Event Hubs namespace, the name of the event hub, and the primary access key for the namespace. To get the access key, see Get an Event Hubs connection string. The default key name is RootManageSharedAccessKey. For this quickstart, you need only the primary key. You don't need the connection string.
An Azure storage account, a blob container in the storage account, and a connection string to the storage account. If you don't have these items, do the following steps:
- Create an Azure storage account
- Create a blob container in the storage account
- Get the connection string to the storage account
Be sure to record the connection string and container name for later use in this quickstart.
Enable Capture feature for the event hub
Enable the Capture feature for the event hub. To do so, follow the instructions in Enable Event Hubs Capture using the Azure portal. Select the storage account and the blob container you created in the preceding step. Select Avro for Output event serialization format.
Create a Python script to send events to your event hub
In this section, you create a Python script that sends 200 events (10 devices * 20 events) to an event hub. These events are a sample environmental reading that's sent in JSON format.
Open your favorite Python editor, such as Visual Studio Code.
Create a script called sender.py.
Paste the following code into sender.py.
import time
import os
import uuid
import datetime
import random
import json

from azure.eventhub import EventHubProducerClient, EventData

# This script simulates the production of events for 10 devices.
devices = []
for x in range(0, 10):
    devices.append(str(uuid.uuid4()))

# Create a producer client to produce and publish events to the event hub.
producer = EventHubProducerClient.from_connection_string(conn_str="EVENT HUBS NAMESPACE CONNECTION STRING", eventhub_name="EVENT HUB NAME")

for y in range(0,20):    # For each device, produce 20 events.
    event_data_batch = producer.create_batch() # Create a batch. You will add events to the batch later.
    for dev in devices:
        # Create a dummy reading.
    reading = {
            'id': dev,
            'timestamp': str(datetime.datetime.utcnow()),
            'uv': random.random(),
            'temperature': random.randint(70, 100),
            'humidity': random.randint(70, 100)
        }
        s = json.dumps(reading) # Convert the reading into a JSON string.
        event_data_batch.add(EventData(s)) # Add event data to the batch.
    producer.send_batch(event_data_batch) # Send the batch of events to the event hub.

# Close the producer.
producer.close()
Replace the following values in the scripts:
- Replace
EVENT HUBS NAMESPACE CONNECTION STRINGwith the connection string for your Event Hubs namespace. - Replace
EVENT HUB NAMEwith the name of your event hub.
- Replace
Run the script to send events to the event hub.
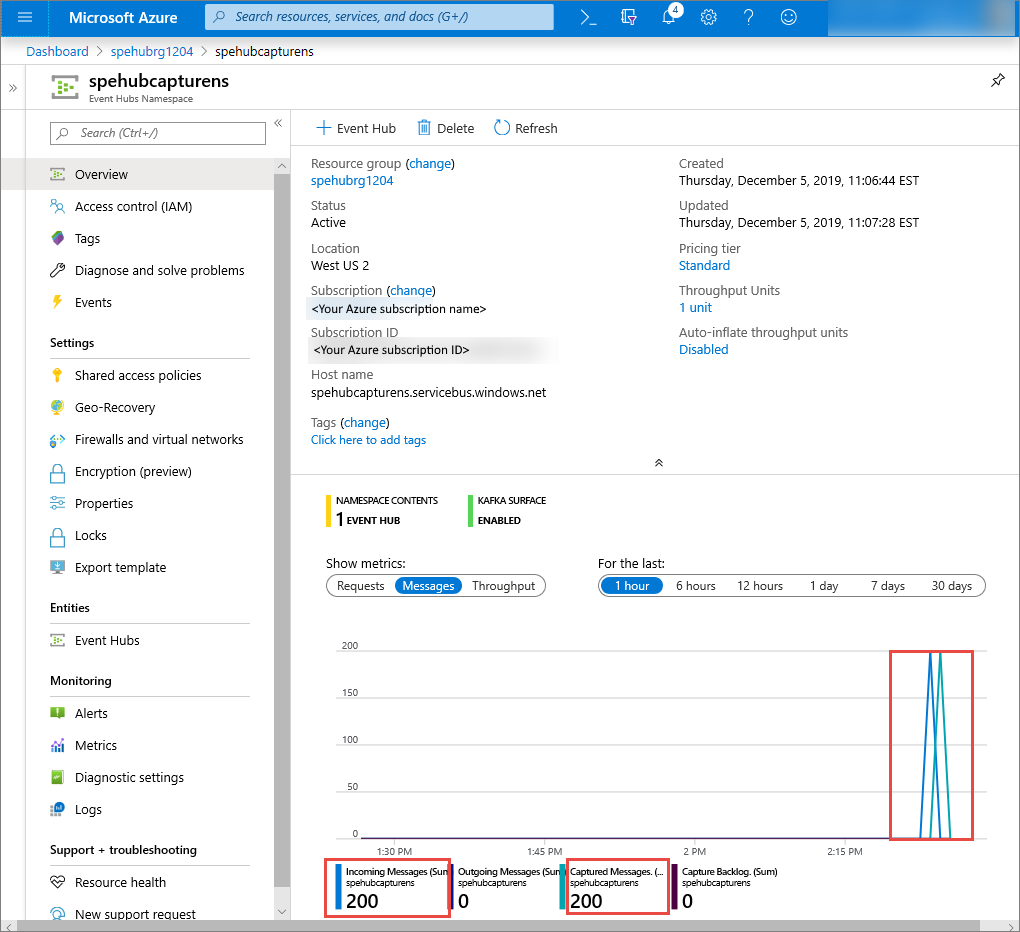
In the Azure portal, you can verify that the event hub has received the messages. Switch to Messages view in the Metrics section. Refresh the page to update the chart. It might take a few seconds for the page to display that the messages have been received.

Create a Python script to read your Capture files
In this example, the captured data is stored in Azure Blob storage. The script in this section reads the captured data files from your Azure storage account and generates CSV files for you to easily open and view. You see 10 files in the current working directory of the application. These files contain the environmental readings for the 10 devices.
In your Python editor, create a script called capturereader.py. This script reads the captured files and creates a file for each device to write the data only for that device.
Paste the following code into capturereader.py.
import os
import string
import json
import uuid
import avro.schema

from azure.storage.blob import ContainerClient, BlobClient
from avro.datafile import DataFileReader, DataFileWriter
from avro.io import DatumReader, DatumWriter

def processBlob2(filename):
    reader = DataFileReader(open(filename, 'rb'), DatumReader())
    dict = {}
    for reading in reader:
        parsed_json = json.loads(reading["Body"])
        if not 'id' in parsed_json:
            return
        if not parsed_json['id'] in dict:
            list = []
            dict[parsed_json['id']] = list
        else:
            list = dict[parsed_json['id']]
            list.append(parsed_json)
    reader.close()
    for device in dict.keys():
        filename = os.getcwd() + '\\' + str(device) + '.csv'
        deviceFile = open(filename, "a")
        for r in dict[device]:
            deviceFile.write(", ".join([str(r[x]) for x in r.keys()])+'\n')

def startProcessing():
    print('Processor started using path: ' + os.getcwd())
    # Create a blob container client.
    container = ContainerClient.from_connection_string("AZURE STORAGE CONNECTION STRING", container_name="BLOB CONTAINER NAME")
    blob_list = container.list_blobs() # List all the blobs in the container.
    for blob in blob_list:
        # Content_length == 508 is an empty file, so process only content_length > 508 (skip empty files).
        if blob.size > 508:
            print('Downloaded a non empty blob: ' + blob.name)
            # Create a blob client for the blob.
            blob_client = ContainerClient.get_blob_client(container, blob=blob.name)
            # Construct a file name based on the blob name.
            cleanName = str.replace(blob.name, '/', '_')
            cleanName = os.getcwd() + '\\' + cleanName
            with open(cleanName, "wb+") as my_file: # Open the file to write. Create it if it doesn't exist.
                my_file.write(blob_client.download_blob().readall()) # Write blob contents into the file.
            processBlob2(cleanName) # Convert the file into a CSV file.
            os.remove(cleanName) # Remove the original downloaded file.
            # Delete the blob from the container after it's read.
            container.delete_blob(blob.name)

startProcessing()
Replace
AZURE STORAGE CONNECTION STRINGwith the connection string for your Azure storage account. The name of the container you created in this quickstart is capture. If you used a different name for the container, replace capture with the name of the container in the storage account.
Run the scripts
Open a command prompt that has Python in its path, and then run these commands to install Python prerequisite packages:
pip install azure-storage-blob
pip install azure-eventhub
pip install avro-python3
Change your directory to the directory where you saved sender.py and capturereader.py, and run this command:
This command starts a new Python process to run the sender.
Wait a few minutes for the capture to run, and then enter the following command in your original command window:
This capture processor uses the local directory to download all the blobs from the storage account and container. It processes files that aren't empty, and it writes the results as CSV files into the local directory.
Next steps
Check out Python samples on GitHub.