Note
Access to this page requires authorization. You can try signing in or changing directories.
Access to this page requires authorization. You can try changing directories.
Applies to: Azure Information Protection
Relevant for: Azure Information Protection classic client for Windows. For the unified labeling client, see Learn about sensitivity labels and Restrict access to content by using encryption in sensitivity labels and Apply a sensitivity label to content automatically from the Microsoft 365 documentation.
Note
To provide a unified and streamlined customer experience, we are sunsetting the Azure Information Protection classic client and Label Management in the Azure Portal as of March 31, 2021. No further support is provided for the classic client, and maintenance versions will no longer be released.
- The classic client will be fully retired, and will stop functioning, on March 31, 2022.
- As of March 18, 2022, we are also sunsetting the AIP audit log and analytics, with a full retirement date of September 31, 2022.
The content in this article is provided to support customers with extended support only. For more information, see Removed and retired services.
When you configure conditions for a label, you can automatically assign a label to a document or email. Or, you can prompt users to select the label that you recommend.
When you configure these conditions, you can use predefined patterns, such as Credit Card Number or USA Social Security Number (SSN). Or, you can define a custom string or pattern as a condition for automatic classification. These conditions apply to the body text in documents and emails, and to headers and footers. For more information about the conditions, see step 5 in the following procedure.
For the best user experience and to ensure business continuity, we recommend that you start with user recommended classification, rather than automatic classification. This configuration lets your users accept the classification and any associated protection, or override these suggestions if they are not suitable for their document or email message.
An example prompt for when you configure a condition to apply a label as a recommended action, with a custom policy tip:
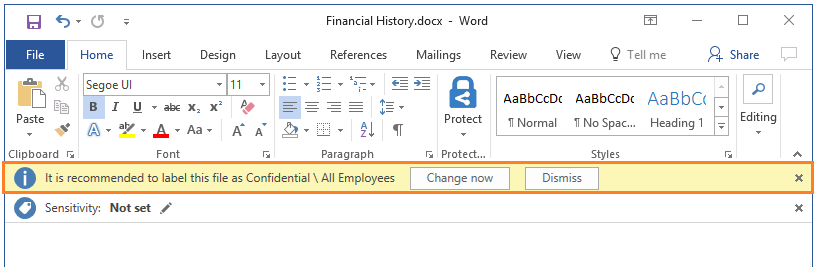
In this example, the user can click Change now to apply the recommended label, or override the recommendation by selecting Dismiss. If the user chooses to dismiss the recommendation and the condition still applies when the document is next opened, the label recommendation is displayed again.
If you configure automatic classification rather than recommended, the label is automatically applied and the user still sees a notification in Word, Excel, and PowerPoint. However, the Change now and Dismiss buttons are replaced with OK. In Outlook, there is no notification for automatic classification and the label is applied at the time the email is sent.
Important
Do not configure a label for automatic classification and a user-defined permission. The user-defined permissions option is a protection setting that lets users specify who should be granted permissions.
When a label is configured for automatic classification and user-defined permissions, the content is checked for the conditions and the user-defined permission setting is not applied. You can use recommended classification and user-defined permissions.
Automatic classification applies to Word, Excel, and PowerPoint when you save documents, and apply to Outlook when you send emails.
You cannot use automatic classification for documents and emails that were previously manually labeled, or previously automatically labeled with a higher classification.
Recommended classification applies to Word, Excel, and PowerPoint when you save documents. You cannot use recommended classification for Outlook unless you configure an advanced client setting that is currently in preview.
You cannot use recommended classification for documents that were previously labeled with a higher classification.
You can change this behavior so that the Azure Information Protection client periodically checks documents for the condition rules that you specify. For example, this would be appropriate if you're using AutoSave with Office apps that are automatically saved in Microsoft SharePoint, OneDrive for work or school, or OneDrive for home. To support this scenario, you can configure an advanced client setting that is currently in preview. The setting turns on classification to run continuously in the background.
The labels are ordered for evaluation, according to their position that you specify in the policy: The label positioned first has the lowest position (least sensitive) and the label positioned last has the highest position (most sensitive).
The most sensitive label is applied.
The last sublabel is applied.
If you haven't already done so, open a new browser window and sign in to the Azure portal. Then navigate to the Azure Information Protection pane.
For example, in the search box for resources, services, and docs: Start typing Information and select Azure Information Protection.
From the Classifications > Labels menu option: On the Azure Information Protection - Labels pane, select the label to configure.
On the Label pane, in the Configure conditions for automatically applying this label section, click Add a new condition.
On the Condition pane, select Information Types if you want to use a predefined condition, or Custom if you want to specify your own:
For Information Types: Select from the list of available conditions, and then select the minimum number of occurrences and whether the occurrence should have a unique value to be included in the occurrence count.
The information types use the Microsoft 365 data loss prevention (DLP) sensitivity information types and pattern detection. You can choose from many common sensitive information types, some of which are specific for different regions. For more information, see What the sensitive information types look for from the Microsoft 365 documentation.
The list of information types that you can select from the Azure portal is periodically updated to include any new Office DLP additions. However, the list excludes any custom sensitive information types that you have defined and uploaded as a rule package to the Office 365 Security & Compliance Center.
Important
Some of the information types require a minimum version of the client. More information
When Azure Information Protection evaluates the information types that you select, it does not use the Office DLP confidence level setting but matches according to the lowest confidence.
For Custom: Specify a name and phrase to match, which must exclude quotation marks and special characters. Then specify whether to match as a regular expression, use case sensitivity, and the minimum number of occurrences and whether the occurrence should have a unique value to be included in the occurrence count.
The regular expressions use the Office 365 regex patterns. To help you specify regular expressions for your custom conditions, see the following specific version of Perl Regular Expression Syntax from Boost. Custom regexes must be compliant with .NET documentation. In addition, the Perl 5 character escape that is used to specify Unicode (the form \x{####…}, where ####… is a series of hexadecimal digits) is not supported.
Decide whether you need to change the Minimum number of occurrences and the Count occurrence with unique value only, and then select Save.
Example of the occurrences options: You select the information type for the social security number, set the minimum number of occurrences as 2, and a document has the same social security number listed twice: If you set the Count occurrences with unique value only to On, the condition is not met. If you set this option to Off, the condition is met.
Back on the Label pane, configure the following, and then click Save:
Choose automatic or recommended classification: For Select how this label is applied: automatically or recommended to user, select Automatic or Recommended.
Specify the text for the user prompt or policy tip: Keep the default text or specify your own string.
When you click Save, your changes are automatically available to users and services. There's no longer a separate publish option.
The following sensitive information types require a minimum version of 1.48.204.0 of the Azure Information Protection client:
- Azure Service Bus Connection String
- Azure IoT Connection String
- Azure Storage Account
- Azure IAAS Database Connection String and Azure SQL Connection String
- Azure Redis Cache Connection String
- Azure SAS
- SQL Server Connection String
- Azure DocumentDB Auth Key
- Azure Publish Setting Password
- Azure Storage Account Key (Generic)
For more information about these sensitive information types, see the following blog post: Azure Information Protection helps you to be more secure by automatically discovering credentials
Additionally, beginning with 1.48.204.0 of the Azure Information Protection client, the following sensitive information types are not supported and no longer display in the Azure portal. If you have labels that use these sensitive information types, we recommend that you remove them because we cannot ensure correct detection for them and any references to them in the scanner reports should be ignored:
- EU Phone Number
- EU GPS Coordinates
Consider deploying the Azure Information Protection scanner, which can use your automatic classification rules to discover, classify, and protect files on network shares and on-premises file stores.
For more information about configuring your Azure Information Protection policy, use the links in the Configuring your organization's policy section.